• About
    • Contact
    • Press
    • Sponsor
  • DIY
    • Home & Garden
    • Jewellery & Accessories
    • Yarn Crafts
  • Sewing
    • patternless & self drafted
    • Refashions
    • Commercial Patterns
    • Sewing Tips
    • Overlockers
  • The Refashioners

Portia Lawrie

finished garments, jersey, knits, Sewing

FO x 2: (well 3 technically!) My perfect boxy tee

04/28/17

One might say that this simple boxy tee was nearly 3 years in the making! Why? Because I discovered an abandoned experiment in my stash from that time period. I picked it up…looked at it quizzically….wondered why it had been cast aside because…it looked like just the kind of tee I’d been looking for recently. So I sewed it up in half an hour and what do you know….it was exactly the shape and proportion I had been hankering after in my wardrobe. So I made 2 more!

self drafted box tee (5)

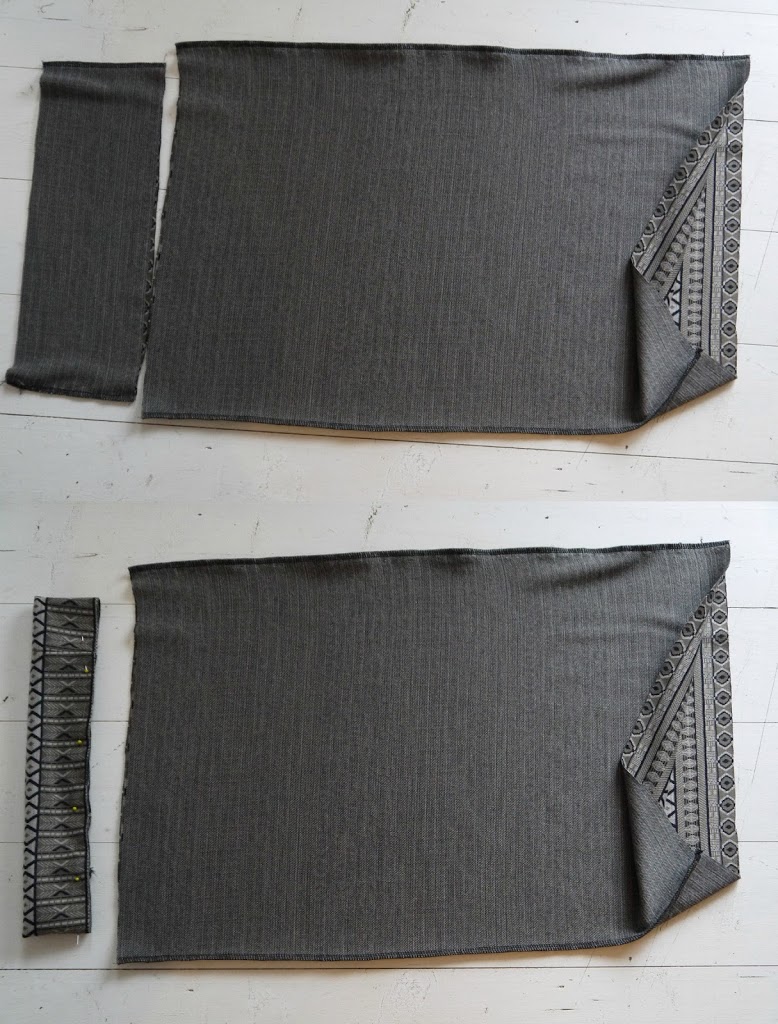
The first being this incarnation in a pique type knit from Stoff & Stil. I love the irregular sketchy arrows and the monochrome makes it a really versatile addition. The top is self drafted….but very simply so. Rectangles for body and sleeves but with a slight curve for the sleeve heads and armholes, and curves cut out for the front and back neckline. My original experimental one was literally just rectangles but I loved the proportions so much that I drafted a pattern and added in those subtle refinements….self drafted box tee (5)self drafted box tee

Then I liked that one so much that I made another! Also in a Stoff & Stil fabric. This is a slightly looser version. But all 3 (the original, which is black, and these two) are in constant rotation. It’s like I had my holy grail of tees sitting in my WIP pile for 3 years! What the heck?!! Revisit your WIPs people! Seriously….you started them for a reason!self drafted box tee self drafted box tee

So needless to say….I will be making a few more of these.

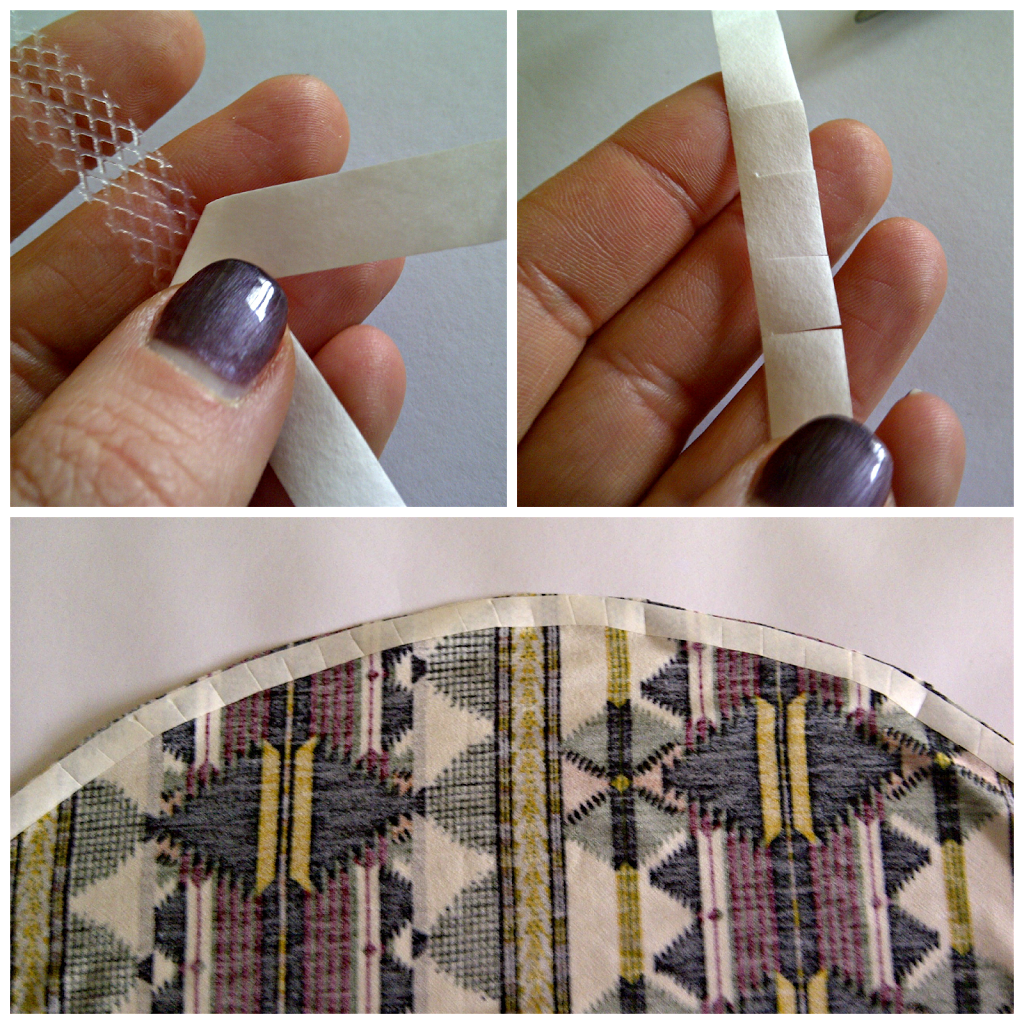
I also want to direct your attention to the neckbands on these babies. Notice they are perfectly turned in and laying flat? Well in the past this has always been a bit touch and go for me. (wavy neckbands anyone? Ack!) But I have been working on a formula for calculating the exact length of neckband you need, for any given neckline circumference….and any given fabric. (You may have read my initial ruminations here!) Because…it seemed to me that I needed to factor in the stretch percentage of the fabric I was using. A fabric with 40% stretch was not going to turn in the same way as a 60% stretch fabric cut to the same length. Well if my last few knit makes are anything to go by…I’ve nailed it! And there will be a post coming your way soon. So if you ever got frustrated at wavy or puckered neckbands….stay tuned!

DIY, Dressmaking, fabric, finished garments, free pattern download, Freebies, grainline, hemlock tee, how to, knits, minerva, overlocker, serger, Sewing, sewing patterns, Tips and Tricks, tops, Tutorials, Uncategorized

Hemlock Tee: How to Sew a Deconstructed Jersey Neckline Finish

07/24/15

Not really a secret that I love the Hemlock Tee pattern from Grainline Studio. If you follow me on Instagram you’ll have seen a few of these pop up recently that haven’t yet been blogged. One you will have seen in my previous post. This one is just a simple grey jersey…DECONSTRUCTED JERSEY NECKLINE FINISH

This would not be particularly noteworthy apart from the fact I wanted to let you know this jersey from Minerva Crafts is frikkin gorgeous! So soft. So drapey. Not too flimsy. Need more in my life!

I also wanted to share my favourite jersey neckline finish of the moment! I’m not a massive fan of conventional ribbed neck bands . I like my tees to look a little more deconstructed and I really like the raw edge of jersey fabric. The way it curls  when you stretch it! But obviously  a neckline still needs some stability. So recently I’ve been opting for this neckline finish…DECONSTRUCTED JERSEY NECKLINE FINISH

It’s applied in exactly the same way as the pattern describes, with one exception. Instead of the folded edge of the neck band edging your neckline…you flip the band the other way round before applying it,  and have the raw edge exposed instead!

Here’s a quick step by step. If you’ve never applied a jersey neckband before you may also find this useful as it covers the whole process…at least this is how I do it!DECONSTRUCTED JERSEY NECKLINE FINISH

Take your neckband pattern piece and press it with some spray starch (helps stop the edges curling too much as you work); sew together the ends to form a loop then fold in half.

DECONSTRUCTED JERSEY NECKLINE FINISH

Taking the join as your centre back marker, mark your centre front point using a pin. Do this by folding the band in half with the join smack band in the middle. Mark the CF point with a pin on the opposite side.

DECONSTRUCTED JERSEY NECKLINE FINISH

Mark the sides with of the neckband with a pin too..

Have your tee right side out…DECONSTRUCTED JERSEY NECKLINE FINISH

Pin the CF of your neckband to the CF of your neckline. I’m going for that raw edge finish on mine remember. So I’m lining up the folded edge of my neckband with the raw edge of my neckline. If you want the clean/folded edge finish to your neckline, then line up the raw edges of your neck band with the raw edge of your neckline. Savvy?

DECONSTRUCTED JERSEY NECKLINE FINISH

Pin the sides of your neck band to your shoulder seams and the CB of your neck band to the  CB of your neckline. So your neckband is now pinned at both shoulders seams, the BB, and the CF of the right side of your neckline.

DECONSTRUCTED JERSEY NECKLINE FINISH

Serge to join. I work in 1/4 sections at a time. ie from pin to pin. Hold the layers of fabric under just enough tension for the neckband to match the length of the neckline. It will be drafted ever so slightly smaller than the neckline circumference which enables it to naturally want to turn to the inside .  So pull on it juuuust enough as it runs through the serger, but be careful not to stretch it out.

DECONSTRUCTED JERSEY NECKLINE FINISH

Press! Seam allowance/serged edge downwards…

DECONSTRUCTED JERSEY NECKLINE FINISH

Top/Edge stitch around the neckline to secure the seam allowance. So you now have a finished neckline with a raw edge detail (or if you attached the band the other way, a finished neckline with a clean folded edge!). If you want it a bit narrower you can start with a narrower band in the first place OR trim it down at this stage….

DECONSTRUCTED JERSEY NECKLINE FINISH

Make a notch/snip to the depth you want…

DECONSTRUCTED JERSEY NECKLINE FINISH

And trim!

DECONSTRUCTED JERSEY NECKLINE FINISH

I went even narrower on this one and part of me wishes I’d  restrained myself a little, lol! After laundering, the edges will soften, and depending on how long you’ve left them, (ahem) curl a little too.

You might ask what the point is in lining up the folded edge of the band with the raw edge of the neckline in the first place. You could just attach the band as normal, trim, and you still end up with a raw edge. I just prefer to do it this way because I find it easier to line up a folded edge with one raw edge, than it is to align 3 raw edges; and I find the inside finish cleaner this way too. Either way would work and it’s one of those cases of personal preference.

I’ve done a variation with a twist  of this on the hemlock in my previous post. The one I’ve yet to blog about! Then there’s one more that I’ve made; (and two more that I’m about to make). Plus my first stab at Suzy Pants and 3 completed Maya variations that are also unblogged!

I literally have too many blog posts to squeeze in before the launch of The Refashioners 2015.

Oh yeah, and I ought to refashion a shirt too, gasp!!

DIY, Dressmaking, how to, jersey, knits, overlocker, overlockers, serger, Sewing, Sewing Basics, sewing machines, Tips and Tricks, Tutorials, Uncategorized

Serger Series – Part 2: Threading

06/02/15

How to thread a serger at www.portialawrie.co.uk

And so we come to it. If you have been “dreading the threading” I promise it really isn’t as intimidating as it seems at first glance. With the exception of the lower looper, which is a teeny bit fiddly, the rest is super straightforward. I know I for one had built this up in my head to be super scary; (when I was doing my garment construction course I’d always wait until the thing was already threaded and then jump on. Managed to avoid threading an overlocker for my whole time there, lol!) and when I finally took the bull by the horns, I was all “oh!! is that it?!!” This is a long photo heavy post but don’t let that put you off. The process itself takes 5 minutes. I’ve just taken alot of pictures, ha ha! You can click on each image to open seperately and zoom in for more detail 😉

PREPARATIONHow to thread a serger at www.portialawrie.co.uk

You’ll need 4 cones of thread. Thread snips and tweezers. The hook nose tweezers are the most useful and if you’re a butter fingers like me then a second pair is handy too. The trickiest part about threading is accessing some of the teeny spaces where the thread has to run; but with tweezers…its a breeze. I’m using different colours here just for illustration purposes. It’s easier for you to follow the route of each thread that way.

How to thread a serger at www.portialawrie.co.uk

Every machine will come with a threading guide. Either on board like mine, or in the manual. Have it to hand. Note the numbers at the top of the diagram. That is the order in which you thread. So, upper looper (red), lower looper (yellow), right needle (green) and finally, left needle (blue). That’s the order we’re going in. (BTW, If you have a secondhand machine that didn’t come with a manual, or you lost yours, then they are often available for free online as PDF downloads. Check out Manual Owl as a good place to start).

How to thread a serger at www.portialawrie.co.uk

Start by turning all your tension dials to zero. This sets the tension discs inside at their most open position and helps ensure that the thread passes between them when you’re threading.

How to thread a serger at www.portialawrie.co.uk

Pull up the telescopic thread bar at the back….

FIRST STAGE (applies to all 4 thread cones)How to thread a serger at www.portialawrie.co.uk

Position your thread cone on the appropriate spool holder. (We’re starting with the upper looper). Pass the thread through the corresponding loop at the top of the thread bar…

How to thread a serger at www.portialawrie.co.uk

Hold the thread horizontally. The thread from the cone in your right hand and the loose end in your left and slide it up under that hook like part. Then take the loose end and run it in the channel that leads to the tension discs at the front. This part is easy to get the wrong way round which can lead to snapped threads.  Don’t want those!  This little wire thread guide has two upper loops at the top of it and the larger hook/loop that extends down. The thread runs from the thread bar above, under the right loop and the downwards hook/loop first and then runs over the top left loop and into the tension disc channel. Click the image to enlarge and zoom in.

UPPER LOOPER (red channel)How to thread a serger at www.portialawrie.co.uk

The thread then runs along that channel and round to the front where you run it between the two metal tension discs of the tension dial and down into the next part of the channel…

How to thread a serger at www.portialawrie.co.uk

…then snugs into another thread guide underneath…

How to thread a serger at www.portialawrie.co.uk

From there join the  red dots! Each thread position is indicated with a read dot and the thread is held there by a little hook that you pass the thread behind. Once you thread the final part of the upper looper (tweezers are useful there! Also, rotate the hand wheel at the side until the upper looper rotates into the most accessible position) the thread passes under the presser foot and off to the side.

How to thread a serger at www.portialawrie.co.uk

Upper looper done! See the red thread marked “1” on my threading diagram? That’s what we’ve just done. We’re now moving on to the lower looper. Marked “2” with the threading route indicated by the yellow thread. Note to the left of the main threading diagram there are two separate diagrams of the lower looper in close up. As I said, the lower looper is slightly trickier.  To the extent that it warrants it’s own diagram, lol! But fear not. It’s fiddly rather than complex.

UPPER LOOPER (yellow channel)How to thread a serger at www.portialawrie.co.uk

The steps up until this point are identical to the red upper looper. To recap: from the thread cones, through the thread bar and rear thread guides, between the tension discs and down into the thread guide underneath…

How to thread a serger at www.portialawrie.co.uk

Follow the yellow dots (in the same way as you did the red for the upper looper), until you get to this point. AKA the slightly trickier part; Rotate the handwheel again so that the lower looper is at its most accessible position, and grab the thread with those hook nose tweezers! In this pic I have hold of the thread with my tweezers and the lower looper, the bit we want to thread, is just behind my tweezers, and just in front of the upper looper. It’s the bit that looks a little like a tiny penknife blade running horizontally behind my tweezrs and it has a little threading hole in the end of it. We need to pass the thread behind it, then over the top of it…

How to thread a serger at www.portialawrie.co.uk

…and then pull the thread towards us until it slides and then slots into a little dip/crevace right on the “elbow” of the lower looper…

How to thread a serger at www.portialawrie.co.uk

Here it is zoomed in a bit. A little blurred (sorry, it was soooo tricky to photograph one handed!) but you can just make out the little nick in the elbow of the upper looper where the thread has to sit….it passes up behind the elbow, over the top and sits in that little cut out/nick….

How to thread a serger at www.portialawrie.co.uk

From there thread the pointy end, and making sure you don’t tangle it with the thread from the upper looper (which sits directly behind it) pass the tail end under the presser foot and off to the side (2 sets of tweezers come in handy here!). Exactly as you did for the upper looper…

How to thread a serger at www.portialawrie.co.uk

Another close up for you. That’s the trickiest part done!!

NEEDLE THREADING (blue and green channels)How to thread a serger at www.portialawrie.co.uk

This part is pretty much the same as a standard sewing machine except you need to do it twice! Start with the right hand needle (green channel). Threading process is exactly the same as the loopers up until the point it passes through the tension discs. Then it goes under a small thread guide, under a slightly larger thread guide and OVER the thread guide marked with the green dot…

How to thread a serger at www.portialawrie.co.uk

Then down to the needles. Right needle is marked A. Into the little pig tail curl …

How to thread a serger at www.portialawrie.co.uk

use tweezers to thread because the cutting blade gets in the way . Especially if you’re right handed…

How to thread a serger at www.portialawrie.co.uk

Then, as with the previous two thread tails; pass under the presser foot and off to the side…

How to thread a serger at www.portialawrie.co.uk

Lastly the left needle (blue channel). Same as the right needle except it only passes under the larger thread guide then OVER the thread guided indicated by the blue dot…

How to thread a serger at www.portialawrie.co.uk

thread and pass the thread tail under the presser foot and off to the side as before.  ****YOU’RE ALL DONE AND THREADED!!*** One last thing to do though. Chain off…

How to thread a serger at www.portialawrie.co.uk

Re-engage your tension discs by setting dials to 3…

How to thread a serger at www.portialawrie.co.uk

Plug in and switch on….

How to thread a serger at www.portialawrie.co.uk

Lower the presser foot and grab hold of your thread tails…

How to thread a serger at www.portialawrie.co.uk

Pull thread tails round to the back, engage the presser foot and serge of a little chain…

How to thread a serger at www.portialawrie.co.uk

Trim any excess and leave a 3″ tail.  All done!! Hope this was useful and that it helps at least someone out there realise that threading a serger is really not as terrible as it first appears. I know this is a photo heavy post which might make this artificially seem like a lengthy process . In reality it takes me 5 minutes, if that! Please please trust me. Try it. And you’ll see 🙂

You can view the first post in this series here.

Next up is tensioning and getting a nicely balanced stitch. I’ve discovered the COOLEST trick for that. Watch this space!

DIY, Dressmaking, fabric, jersey, knits, minerva, self drafted, Sewing, Tips and Tricks, Tutorials

Asymmetric Pleated Tunic

03/12/15

DIY Asymmetric Gathered Tunic at www.portialawrie.co.uk

This mustard knit has been sat in my stash since a few months before we moved last year. I recovered it from storage last week. It is soooooo stretchy and since I didn’t have the right colour cones for my overlocker, I opted to sew this on my standard machine. One word. Aaaargh! But hey…with the aid of a walking foot and a bit of coaxing I got there. The finish isn’t perfect. But in truth this is very much a toile/prototype of an idea I wanted to try out. So in the context of that…I’m content.

Content enough to want to share, because I think in principle, this idea works.  The concept is essentially an easy way to give a shapeless garment definition through simple gathering. So I started by making a shapeless garment! Two simple rectangles sewn together across the top and sides with holes left open for the head and the arms. Not dissimilar to my pashmina refashion…but with less chalking (!) and plenty of width to play with…literally two rectangles…then neckline and armholes finished then hemmed…

DIY Asymmetric Gathered Tunic at www.portialawrie.co.uk

Then I simply pinched out pleats, gathering the excess fabric into one point. Eventually settling on four pleats set off centre just on the lower bust curve. The problem I sometimes have with overly loose tops is that, because I have a largish bust, they have a tendency to hang from the bust point, disguising any shape below the bust and well…just looking a bit “tenty”. Once I’d settled on my arrangement of pleats I simply hand stitched them in place. It provides juuuust enough shaping whilst still allowing me to indulge my love of loose tops!

I could see this being useful for refashioning oversized tops and shirts…..don’t be surprised if you see this technique pop up again basically!

DIY, how to, jersey, knits, refashion, refashioning, repurposing, Restyles, Sewing, sweatshirt, Thrifting, Tips and Tricks, Tutorials, Uncategorized, Upcycling

DIY: Sweatshirt Market Tote Bag

02/23/15

Turn a Sweatshirt into A Tote Bag
This sweatshirt was no longer as slouchy as I would like (one too many tumbles in a too hot dryer…yep!) and was languishing unloved in my wardrobe. So I thought I’d turn it into a handy little market tote, (complete with reinforced handles) ready for my next shopping trip… here’s how….

Turn a Sweatshirt into A Tote Bag

Start by pressing and laying out flat with shoulder seams lined up….

Turn a Sweatshirt into A Tote Bag

Cut off the sleeves using the seams as a guide…

Turn a Sweatshirt into A Tote Bag

Cut a big “U” shape out of the neckline…

Turn a Sweatshirt into A Tote Bag

Turn inside out, remove ribbing, sew opening closed (I curved my corners), then turn right side out again….

Turn a Sweatshirt into A Tote Bag

Now for the handles. Cut 2 x 7″ sections from the ribbing you just removed….

Turn a Sweatshirt into A Tote Bag

Fold in half lengthwise and serge (you could also zig zag or stretch stitch) all the way along the open edge. Look what it does! Cuurves into a perfect handle shape!

Turn a Sweatshirt into A Tote Bag

Feed one side of a handle through the tube…

Turn a Sweatshirt into A Tote Bag

Secure/stitch the 2 handle/strap pieces together…

Turn a Sweatshirt into A Tote Bag

Then slide the tube of ribbing over the join to hide it and distribute evenly. Repeat for both handles….

Turn a Sweatshirt into A Tote Bag

and you’re done!

The beauty of this is that it provides a little more structure and support to what would otherwise be rather stretchy handles, which has kinda what put me off the idea of T Shirt bags in the past. Plus sweatshirt fabric is sturdier to begin with. I think this bag could take a few fresh apples and bananas without breaking into a sweat (unintentional pun 😉

Do you use reuseable shoppers? Handmade or shop bought? My worst habit is actually remembering to take them with me to the shop…doh!

decor, DIY, Future projects, home, Inspiration, jersey, jewelry, knits, Knitting, planning, refashion, refashioning, repurposing, Restyles, Uncategorized, Upcycling

DIY: 21 INSPIRATIONAL IDEAS FOR USING T SHIRT YARN

02/20/15

inspirational t shirt yarn ideasOK, so it’s fair to say I’ve developed a bit of an obsession with making T Shirt yarn. The next question of course is what to use it for! I’ve been browsing the interwebs for inspiration and thought I’d share a few ideas with you, just in case, you know, I’m not the only obsessive in the room….

t shirt yarn ideas

These chunky knit cushions are right near the top of my “To do” list.  A simple knit/purl square on chunky needles with a linen backing. What could possibly go wrong, right?! The ubiquitous T Shirt necklace deserves a mention here. This clutch bag, from what I can gather is knitted from lengths of rubber. No reason it couldn’t work in T Shirt yarn instead though…

t shirt yarn ideas

The idea of a cosy blanket knitted on chunky needles appeals to me right now (instructions here); and I can see potential in this tutorial for crocheted cord being used in a jewelery piece or perhaps as handles for a bag? Now I know this rug is not made from t shirt yarn but a) its lush so I just had to share (and there are other delicious yarn art examples in this post) and b) the concept/technique could surely be applied on a smaller scale with T Shirt yarn?

t shirt yarn ideas

I love copper, grey and simplicity. So this necklace tutorial particularly floats my boat. Again there are other tutorials included in this post from Brit +Co. Love this knitted tote pattern from Daily Fix and surely T Shirt yarn lends itself perfectly to macrame hanging plant holders. Several examples in this post from Censational Girl.

t shirt yarn ideas

I mean seriously, how delicious do these knitted floor cushions look? No tute, but the idea would be simple enough to replicate? I can think of a multitude of uses for these crochet baskets (tutorial here from nimi design.com) and this macrame wall hanging has a simple charm. I’m thinking the technique could also be adapted to form a decorative element for a T Shirt refashion (party in the back anyone?)  or maybe to create a cute string grocery bag?

t shirt yarn ideas

Spoiler alert! Rugs are at the forefront of my plans. This spiral rug from A Beautiful Mess, crochet rug from WhollyKao and woven rug from Viva Le Jar, all employ different techniques to equally cool ends…none use T Shirt yarn but….you could, right?

t shirt yarn ideas

This knitted rug pattern from Purl Bee could surely be adapted for T Shirt yarn. This free pattern for a crochet basket from Ravelry calls for 12mm cotton yarn so could be doable and I like the effect of this rope trivet from Design Sponge. I can’t help but think this nautical style of knotting could be fun to try too…

t shirt yarn ideas

Another slightly more simple knitted bag. I think even I could manage this one. I love the effect of this idea from Oleander & Palm. Simple lengths of coloured yarn hung in volume to great effect; and a random woven belt design that I came across that could totally work!

So, I hope that gives you a few ideas of what to do with your squidgy balls of jersey goodness! I’ve started playing around with knitting mine and have a few ideas in the works….watch this space!

finished garments, grainline, hemlock tee, knits, overlockers, refashioning

FO: Sheer Knit Hemlock Tee Variation…

02/22/14

I recently whipped up this variation on Grainline’s Hemlock Tee. It’s made using a sheer knit fabric (hence I also had to whip up the vest top underneath!) that I bought from Minerva crafts at £4.99/m available here. I bought the ivory, which as you can see is much more white in reality. I used the exact same process on this make as I used for this pashmina refashion if you want more step by step deets….;)

Thinking I might whip up a few vest tops in different colours to layer underneath. (In fact if Minerva had this type of fabric in a range of colours  I’d probably make more of these too) I kinda hashed this vest top a bit. It hardly qualifies as self drafted as I literally laid a vest top I already had straight onto the jersey fabric, cut around it, and then whizzed it through the overlocker. Not my finest hour, lol!  Can any of you recommend a simple vest pattern??

Oh,and I had a couple of emails asking to see what my recently refashioned coat actually looked like on…and being the obedient gal that I am…

My best friend, who is extremely honest (which I love about her 😉  said that when she had seen my recent post about this coat, she thought it looked a bit “granny’ish” on the mannequin; but that actually it looked better on. I’m still not sure whether that meant that she approved overall. But I’m happy to settle for “granny chic”….

DIY, finished garments, how to, knits, overlockers, Sewing, Tutorials

DIY: Simple Tube Skirt

01/18/14

Aw, man! It’s been aaaaages! Actually a matter of a few weeks but it feels like ages. My new job has been taking up alot of my time & energy over the Christmas period and then….then my sewing machine went and died on me (she’s better now you’ll be pleased to hear!). But thankyou to all of you who have dropped me a line to check I haven’t fallen off the face of the earth!

Whilst said sewing machine was out of action I’ve had a bit of a dabble with my new overlocker (yay for Aldi!). I have to say, I’m slightly smitten! If you want a quick dressmaking fix and the ability to whip a garment up in under an hour….you can’t beat a bit of overlocking to fill the sewing void! This skirt is a case in point. Made from an Aztec ponte esque double jersey from Minerva Crafts currently in the sale at £4.99 per metre; whipped up in less than 40 mins; sooooooo comfy and sooooo easy! Look, adjustable length too! No magic to that… it’s just because it sits comfortably on the hips or the waist, depending on your preference….

Start by creating a simple tube, serged down both sides, that fits you snugly and is several inches longer than you want the finished skirt to be. Then lop a band off the top that is double the width you want your finished waistband to be, plus a bit of seam allowance…

Serge about 1 1/2″ off one side of that band so it is slightly shorter than the width of your skirt top. Then fold the band in half, wrong sides together with raw edges even…

To attach the waistband, turn the skirt part right side out, then pin the band, right sides together, to the top of the skirt, with raw edges all together. Serge all the way round…..stretching slightly to take up the slack of the skirt top, which is obviously slightly larger than the band…

Then flip the waistband up and press…ta dah! I PROMISE, this is the comfiest waistband EVER! Then simply hem the skirt to the desired length and your’re done 🙂

Please feel free to share your super quick and easy serger projects in the comments section….I’m on the lookout for more! Consider me hooked!


Dressmaking, finished garments, grainline, hemlock tee, knits, Sewing, tops

FO: Hemlock Tee (& a haircut!)

09/09/13

So, the mission for some new tops for Autumn has begun in earnest. I’ve made 4 so far in the past week. First up is this version of Grainline’s Hemlock Tee. This is a heavyweight jersey. Not quite a sweatshirt. I guess you could say somewhere between a jersey and a ponte. So it’s toasty warm 🙂 I picked this length of fabric up from a charity shop for a mere £1 so it’s a super cheap and super quick make too.

Oh, yeah, and I had all my hair lopped off too. Bit of a spur of the moment thing. I spent the night before my appointment pinning hairstyles on Pinterest. Heck I just felt like a change and blow drying that bob everyday was becoming a faff. (Especially now my mornings involve a proper school run). Still getting used to it and can’t stop fiddling with it for the moment. It’s only been 2 days. You’ll probably notice the stark contrast in colour too. I haven’t coloured my hair for a few months over the summer (just no point!). So all the colour has been sun bleached  out and this is the nearest I’ve been to my natural colour for some years (ahem, grey included! You can’t see it in these pics, but it’s there!)….

Anway, back to the Hemlock Tee. Seriously, what’s not to love about this pattern?! It’s quick, easy, FREE, and it chimes perfectly with my hankering for some slouchy, comfy tops for Autumn. In fact, if you saw my previous post you may have noticed it is almost identical to one of the inspiration pics I posted there…

I made some slight changes. I omitted the neckline band the pattern calls for and simply rolled the neckline under and narrow hemmed it. (Same with the hem and cuffs) I cut the ubiquitous high low hem, and added a patch pocket. I don’t have an overlocker so the whole thing was sewn on my standard sewing machine. As this fabric doesn’t fray there was no need for me to finish the raw edges. (I was going for quick rather than thorough 😉 Similarly, this is quite a stable knit; so neither did I have to employ any special stitches. I used a standard straight stitch on all seams and hems; and simply held the fabric under a small amount of tension (in other words I stretched it slightly) as it fed through my machine, and that seems to have done the job beautifully!

I spent so long avoiding knits.  (Probably because my first attempt to sew jersey on my machine involved a cheap low quality jersey and a hungry feed dog….)
I thought they were preserve of sergers, but apparently not! Yes a serger provides a better finish, but I think as long as you choose a relatively stable, good quality jersey, they’re not the “be all and end all” of sewing with knits by any means…


hemming, jersey, knits, Sewing Basics, Tips and Tricks

Curved hem “cheat”!

03/11/13

It’s fair to say, I like me a curved hem. It’s also fair to say, I find them a buggar to sew. But last week my college tutor delved into the college stash and pulled out this hemming aid. (I was working on my Aztec top at the time) She had no idea what it was called, or where it had come from. All she knew is that it was bloody brilliant for hemming knits. She demonstrated it on a straight hem sample. Brilliant, I thought! And duly took some home with me to finish my top. Then, as I do alot, I made it slightly more complicated for myself, by deciding I wanted a high/low curved hem (my own worst enemy I am!). And therin lay the challenge that spawned one of my favourite things…..a eureka moment!

I think this stuff is akin to Steam a Seam. Karen goes into more detail here about the overall process of using it. But this “cheat” is primarily concerned with how you get the stuff to go around a curved hem; when it is essentially a straight strip of paper. Hmmmm……

Notching that’s how! After all, don’t we use notching on fabric seam allowances to achieve all those curved elements; like collars, sleeve seams etc. Stands to reason then, that to curve that straight strip of paper backed stuff, notching would do the trick, right? Right! So I notched the entire strip before pressing it to my hem edge. As I worked along the edge I used the notches to manipulate my strip to follow the curved edge of my hem. Worked like a dream! When it came to peeling the paper backing off, it was a bit fiddlier, as essentially I was adhering the strip to itself where the notches overlapped to create the curve. But this was seriously a minor detail. The paper backing still came off fine, just in 3 or 4 pieces rather than one smooth strip. It pressed over beautifully with none of those mini folds/pleats that I often have to fight with when sewing a curved hem. I applied the same technique to my curved neckline too, which was alot easier than facing it or applying binding.  Happy days!

Gonna try this on a woven fabric to see if it’s as effective there. If it is, then I can see this stuff becoming a staple in my sewing supplies. (I really ought to stop calling it “stuff” if we’re gonna have a long term relationship….;)

Portia
Follow
Sewbox

© Copyright 2026. Portia Lawrie. All Rights Reserved. Managed by WordPress Web Dev Cornwall .