• About
    • Contact
    • Press
    • Sponsor
  • DIY
    • Home & Garden
    • Jewellery & Accessories
    • Yarn Crafts
  • Sewing
    • patternless & self drafted
    • Refashions
    • Commercial Patterns
    • Sewing Tips
    • Overlockers
  • The Refashioners

Portia Lawrie

DIY, how to, Knitting, Tutorials, Uncategorized, yarn crafts

DIY: Moss Stitch Infinity Scarf

12/14/15

My knitting “career” is littered with unfinished projects. I don’t think my attention span lends itself to long term projects. I know how to knit. But projects that involve alot of concentration, counting and keeping track are destined to fail in my hands. Period.

DIY MOSS STITCH INFINITY SCARF

So this simple infinity scarf in moss stitch was the perfect project for me. I was finally kicked into action when I saw Tamsin’s gorgeous scarf. She used the Gaptastic Cowl pattern; but this one was just done on the fly by counting and measuring. The completion of this marks my first EVER wearable knitted project! It’s as simple as knitting a super long rectangle (it’s knitted flat rather than on circulars) then joining the  two ends with a simple slip stitch. The moss stitch is super easy and provides a gorgeous texture and ANYONE that can cast on, knit and purl can make this scarf. All in it took me about 5 nights in front of the telly to complete. I really enjoy the repetition and mundanity of moss stitch. It’s like chewing gum for the brain if that makes sense. Very little concentration required and after a while it just becomes a “muscle memory” type thing. A stitch you can do without thinking, whilst binge watching a box set on Netflix 😉

The yarn is Debbie Bliss Cashmerino Aran weight yarn in plum. Super difficult to get a consistent colour representation in the images, I’m sorry! The image above is the closest to the actual colour (if a teeny bit more purpley). Really soft and easy to knit with and this make took 4 x 50g balls. Massive array of colours.DIY MOSS STITCH INFINITY SCARF

The gauge calls for 5mm needles. I wanted a slightly looser/drapier texture so opted for 6mm. These Brittany birchwood needles are so lush to knit with I have to say. I scored them in a charity shop a couple of years back for, like, £1 or something silly! (Charity shops are great places to stock up on knitting needles and crochet hooks ). These are a bit spesh though. They feel wonderful in the hands and stitches just slide along them. £1 well spent!

So…onto the deets. I’ll start by saying this is NOT a knitting pattern per se. I’ve written this so that anyone not familiar with pattern terminology can easily follow it and get the gist. And I don’t want anyone thinking I’m some kind of knitting guru because I am SO not. BUT, I did want to share this because I hear people say so often, that they can’t knit. Seriously, you can knit this. Start by casting on an odd number of stitches. The reason it’s on odd number is that it keeps it simple when knitting each row. Each row is exactly the same. Nothing to remember when you turn your work. Every row starts and ends with a knit stitch. Simple! Great video here for casting on.

DIY MOSS STITCH INFINITY SCARF

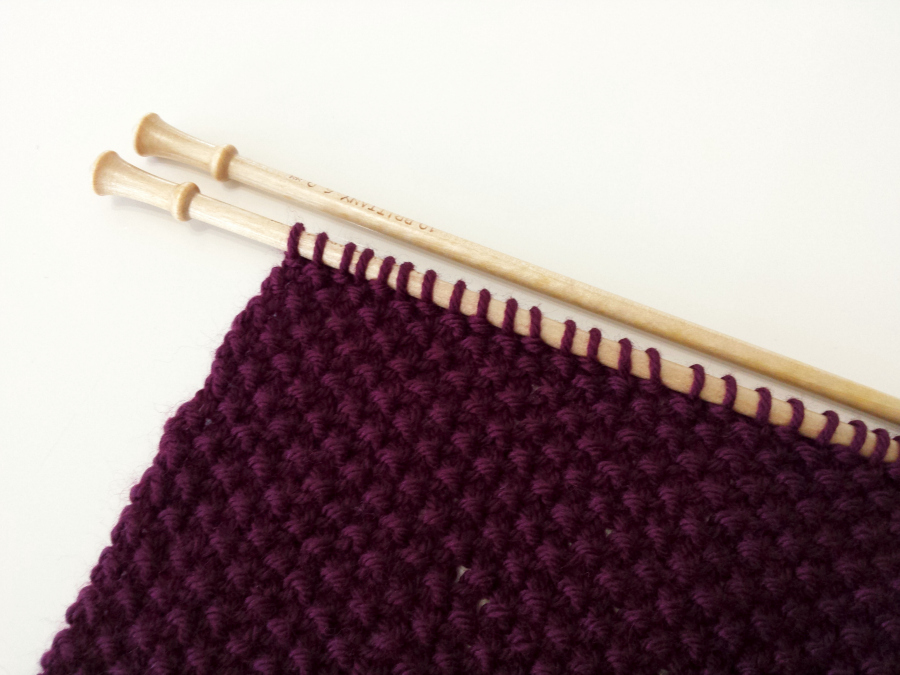
I cast on 43 stitches. This gave me a width of about 11″ for my finished scarf in this yarn; which works well for doubling over the scarf when wearing. If you want it wider, cast on a few more stitches. Narrower, cast on a few less. If you’re using a different weight of yarn, simply cast on until the row of stitches on your needles measures the desired width of your finished scarf. Just make sure it’s an odd number.

But let’s work on the basis of this scarf and this yarn for now. Seriously simple. Moss stitch is a beautiful stitch that alternates knit and purl stitches. (K1, P1, K1,P1 etc) Great video for knit here and purl here. This scarf is knit as follows:

  • Cast on 43 stitches
  • Knit the first stitch
  • Bring the yarn between the needles so it’s at the front
  • Purl the next stitch
  • Bring the yarn between the needles so it’s at the back
  • Knit the next stitch
  • Repeat that process to end of row
  • Every row identical

DIY MOSS STITCH INFINITY SCARF


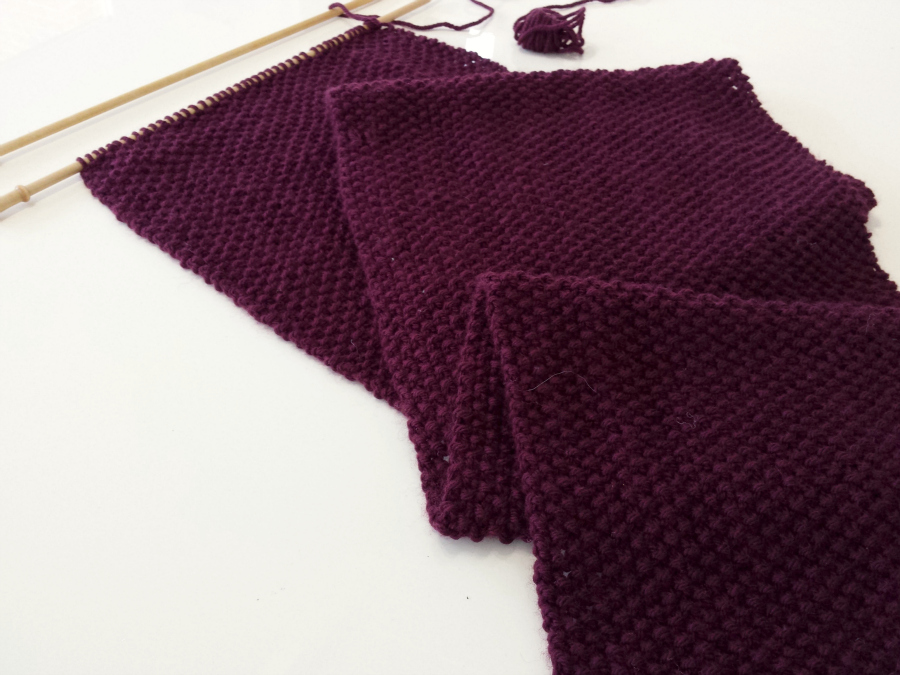
Keep going until the whole piece measures approx 50-54″ (Make sure you have a small ball of yarn left for finishing) then cast off and join the two ends together with a slip stitch. Weave in ends and you’re done!!

If you’re like me and you’ve never finished a knitting project before…this could just be it! And a great handmade gift too :

crochet, DIY, how to, Knitting, Tips and Tricks, Tutorials, Uncategorized, yarn crafts

DIY: Ombre Food Colour Dyed Yarn

04/08/15

Cotton yarn dyed with food colour at www.portialawrie.co.uk

When I was making my yarn wrapped pattern weights it occurred to me that it might be quite fun to ombre dye the cotton yarn I was using. I only need to dye a little bit so didn’t want to fork out for Rit or  Dylon fabric dyes. So I turned to the kitchen cupboards, naturally!

You will need:

Yarn.  (I used simple cotton dishcloth yarn). Food Colour. White vinegar. Glass bowls.

Cotton yarn dyed with food colour at www.portialawrie.co.uk Worth noting that the pastel effect I have achieved here is because the yarn I used is cotton which comprises of plant fibres and does not take up the colour as well as protein (animal) fibre yarns such as pure wool. The food colours I used were bright and vibrant and had I dyed wool yarn with those colours the result would have been much more vibrant. So if you want a pastel result on wool then select your food colours accordingly.

Cotton yarn dyed with food colour at www.portialawrie.co.uk

Start by adding a tbsp of white vinegar to the bowls….

Cotton yarn dyed with food colour at www.portialawrie.co.uk

Add about a cup and a half of boiled hot water. Again, worth noting. Cotton yarn will withstand hotter water than wool yarn. If you’re using wool yarn beware of having the water too hot or you risk felting the wool fibres.

Cotton yarn dyed with food colour at www.portialawrie.co.uk

Add your food colour to the vinegar/water solution  (I ended up using a whole tube to get the solution concentrated enough for the cotton yarn to take up the colour. Wool will most likely require much less)

Cotton yarn dyed with food colour at www.portialawrie.co.uk

Mix well. Not sure what happened with the violet food colour on the right. It just did not want to mix/dissolve fully in the solution, whereas the other two colours were perfect!

Cotton yarn dyed with food colour at www.portialawrie.co.uk


Wind your yarn into a hank (as per the turmeric dyed yarn post), soak it well in warm water, then while it’s wet, submerge sections of it in each of your colours and weight them down…

Cotton yarn dyed with food colour at www.portialawrie.co.uk

I’ve seen some tutes out there that suggest microwaving, steaming or heating the yarn at this stage. While I don’t doubt that this works, (the heat will fix the dye more substantially and is probably advisable if you’re dyeing yarn for a garment that will be laundered regularly) frankly, I couldn’t be bothered! I was pottering doing other things at the time, so I simply left everything submerged exactly as you see it, for approx 2 hours….

Cotton yarn dyed with food colour at www.portialawrie.co.uk

Then I rinsed the hank thoroughly and left to dry (took about a day and a half to dry fully) and this is what I ended up with! You can see that pesky violet colour didn’t really take at all, but I love the pastel turquoise in particular….

Cotton yarn dyed with food colour at www.portialawrie.co.uk

Balled up it looks like this…


I used mine for my ombre yarn wrapped pattern weights and while I had the bowls of food colour sitting there, I dipped a few plain ones in there too for a slightly different effect…

Learn how to make these yarn wrapped pattern weights at www.portialawrie.co.ukLearn how to make these yarn wrapped pattern weights at www.portialawrie.co.uk

I’m loving the creativity of dyeing my own yarn! It’s a fun and addictive process. Kool aid dyeing is next on my crafty to do list! But also looking forward to doing some sewing next week once the kiddo is back at school!


crochet, DIY, dyeing, how to, Knitting, Tutorials, yarn crafts

DIY: Turmeric Dyed Ombre Yarn

03/28/15

DIY: Ombre Turmeric Dyed Yarn at www.portialawrie.co.uk

In the past I’ve used tea & Coffee to dye clothes. I’ve been meaning to try turmeric as a dye for aaaages. Then this week when I was “playing” with some yarn for an upcoming project (which btw worked out really well and I think you’re gonna love!!) I figured I might as well use the turmeric on some yarn instead to guage the process and see if I liked it before committing it to a garment. Well, I like it alot! What’s more it’s so easy to do. If you have some plain yarn at home that is in need of a little more zing….this could be just the ticket!


DIY: Ombre Turmeric Dyed Yarn at www.portialawrie.co.uk

I used Pegasus Cotton Dishcloth Yarn (I love this stuff. Around £2 a ball and widely available on Ebay and Amazon) Ground Turmeric and White Vinegar

DIY: Ombre Turmeric Dyed Yarn at www.portialawrie.co.uk

Start by winding your yarn into a skein. I wound it between two door handles across a hallway. You can use the back of a chair, or wind it in the same way you might a power cord around your elbow and thumb. Now this bit is IMPORTANT. Whatever you do, don’t tie your skein exactly as I have.  I missed one important element and had a nightmare balling the yarn later as a result! See the multiple loops at either end of the skein? You need to tie through both of those to keep them from tangling in the dyeing process and around your loop at intervals.  Like this!

DIY: Ombre Turmeric Dyed Yarn at www.portialawrie.co.uk

In a stainless steel pan make a paste from 3 Tbsp of Turmeric and 2 Tbsp of White Vinegar….


DIY: Ombre Turmeric Dyed Yarn at www.portialawrie.co.uk

Add 3 pints of water, bring to the boil and then reduce to a simmer for 30 mins to dissolve all the turmeric powder…

DIY: Ombre Turmeric Dyed Yarn at www.portialawrie.co.uk

Thoroughly wet your skein and place into the dye liquid. I wanted an ombre effect so only placed one end of my skein in the dye liquid. Place the whole thing in if not. Gently simmer for about 10 minutes then turn off the heat and allow to sit in the cooling dye liquid for approx 30 mins. Agitate gently and periodically during this phase. Worth noting that I am dyeing 100% cotton yarn. The temperatures that cotton can withstand will be higher than wool yarn which can felt if the liquid is too hot and the yarn is agitated too much. If it were wool I would personally skip the simmering stage and minimise the agitation of the yarn whilst wet.


DIY: Ombre Turmeric Dyed Yarn at www.portialawrie.co.uk

After 30 mins remove the skein from the dye liquid rinse in clean water thoroughly until water runs clear, then hang to dry. (There’s another one I dyed using a different process. Details soon!) Mine took a couple of days to dry completely…


DIY: Ombre Turmeric Dyed Yarn at www.portialawrie.co.uk

This is what you’ll end up with. It will dry much lighter. See those currly loops at the ends that I forgot to tie?! I cannot tell you how much of a mare I had untangling those!


DIY: Ombre Turmeric Dyed Yarn at www.portialawrie.co.uk

Ball up your skein and admire the rich graduated tones of your new “zingy” yarn!


DIY: Ombre Turmeric Dyed Yarn at www.portialawrie.co.uk

Thought you’d like to see how it knits up…

DIY: Ombre Turmeric Dyed Yarn at www.portialawrie.co.uk

Seriously loving these tones!

decor, DIY, Future projects, home, Inspiration, jersey, jewelry, knits, Knitting, planning, refashion, refashioning, repurposing, Restyles, Uncategorized, Upcycling

DIY: 21 INSPIRATIONAL IDEAS FOR USING T SHIRT YARN

02/20/15

inspirational t shirt yarn ideasOK, so it’s fair to say I’ve developed a bit of an obsession with making T Shirt yarn. The next question of course is what to use it for! I’ve been browsing the interwebs for inspiration and thought I’d share a few ideas with you, just in case, you know, I’m not the only obsessive in the room….

t shirt yarn ideas

These chunky knit cushions are right near the top of my “To do” list.  A simple knit/purl square on chunky needles with a linen backing. What could possibly go wrong, right?! The ubiquitous T Shirt necklace deserves a mention here. This clutch bag, from what I can gather is knitted from lengths of rubber. No reason it couldn’t work in T Shirt yarn instead though…

t shirt yarn ideas

The idea of a cosy blanket knitted on chunky needles appeals to me right now (instructions here); and I can see potential in this tutorial for crocheted cord being used in a jewelery piece or perhaps as handles for a bag? Now I know this rug is not made from t shirt yarn but a) its lush so I just had to share (and there are other delicious yarn art examples in this post) and b) the concept/technique could surely be applied on a smaller scale with T Shirt yarn?

t shirt yarn ideas

I love copper, grey and simplicity. So this necklace tutorial particularly floats my boat. Again there are other tutorials included in this post from Brit +Co. Love this knitted tote pattern from Daily Fix and surely T Shirt yarn lends itself perfectly to macrame hanging plant holders. Several examples in this post from Censational Girl.

t shirt yarn ideas

I mean seriously, how delicious do these knitted floor cushions look? No tute, but the idea would be simple enough to replicate? I can think of a multitude of uses for these crochet baskets (tutorial here from nimi design.com) and this macrame wall hanging has a simple charm. I’m thinking the technique could also be adapted to form a decorative element for a T Shirt refashion (party in the back anyone?)  or maybe to create a cute string grocery bag?

t shirt yarn ideas

Spoiler alert! Rugs are at the forefront of my plans. This spiral rug from A Beautiful Mess, crochet rug from WhollyKao and woven rug from Viva Le Jar, all employ different techniques to equally cool ends…none use T Shirt yarn but….you could, right?

t shirt yarn ideas

This knitted rug pattern from Purl Bee could surely be adapted for T Shirt yarn. This free pattern for a crochet basket from Ravelry calls for 12mm cotton yarn so could be doable and I like the effect of this rope trivet from Design Sponge. I can’t help but think this nautical style of knotting could be fun to try too…

t shirt yarn ideas

Another slightly more simple knitted bag. I think even I could manage this one. I love the effect of this idea from Oleander & Palm. Simple lengths of coloured yarn hung in volume to great effect; and a random woven belt design that I came across that could totally work!

So, I hope that gives you a few ideas of what to do with your squidgy balls of jersey goodness! I’ve started playing around with knitting mine and have a few ideas in the works….watch this space!

crochet, DIY, Knitting, repurposing, Tutorials

DIY: Stitch Markers for Yarn lovers!

01/14/13

I’ve been delving into the joys of knit and crochet in the past few weeks. Alot of the patterns I was looking at called for stitch markers. When I looked at the offerings in my local hobbycraft and haberdashery? Well they were just a bit blaaaaah. Just as with yarn, fabric, and everything else; using something a bit nice when “making” just makes the whole process that bit more pleasurable, don’t you think? So I decided to make my own by repurposing some old jewelry and a bit of wire….

If you want to make your own it really is super simple. Here’s what you’ll need…

1. Wrap your wire around a knitting needle to get the size loop you want
2. Twist the loop one full rotation to close the loop
3. Cut both straight ends using wire cutters. The length you cut them will depend on the size of bead you’re using. Just be sure to cut them the same length.
4. You’ll end up with this
5. Use round nose pliers to bend the ends of the wire in to create a mini “hanger” shape
6. Slot the ends into the bead (you may have to trim a smidge off the ends of the wire) so that the ends of the wire meet inside the bead. Done!

Below is an alternative design. You can see that instead of the “mini hanger” shape I’ve formed a tiny loop at the base. You can then hang charms etc from it OR use jewelry headpins to create your own from old beads, as shown. The difference between this style and the one above is that in the first style the cut ends are buried inside the bead so are completely snag free. With the style below you have to take care that the cut ends of the wire do not stick out. It just takes a bit of practice 🙂

Recycling old jewelry AND prettier than those plastic things you can buy in the shops. Sorted!

Portia
Follow
Sewbox

© Copyright 2026. Portia Lawrie. All Rights Reserved. Managed by WordPress Web Dev Cornwall .