• About
    • Contact
    • Press
    • Sponsor
  • DIY
    • Home & Garden
    • Jewellery & Accessories
    • Yarn Crafts
  • Sewing
    • patternless & self drafted
    • Refashions
    • Commercial Patterns
    • Sewing Tips
    • Overlockers
  • The Refashioners

Portia Lawrie

hemming, jersey, knits, Sewing Basics, Tips and Tricks

Curved hem “cheat”!

03/11/13

It’s fair to say, I like me a curved hem. It’s also fair to say, I find them a buggar to sew. But last week my college tutor delved into the college stash and pulled out this hemming aid. (I was working on my Aztec top at the time) She had no idea what it was called, or where it had come from. All she knew is that it was bloody brilliant for hemming knits. She demonstrated it on a straight hem sample. Brilliant, I thought! And duly took some home with me to finish my top. Then, as I do alot, I made it slightly more complicated for myself, by deciding I wanted a high/low curved hem (my own worst enemy I am!). And therin lay the challenge that spawned one of my favourite things…..a eureka moment!

I think this stuff is akin to Steam a Seam. Karen goes into more detail here about the overall process of using it. But this “cheat” is primarily concerned with how you get the stuff to go around a curved hem; when it is essentially a straight strip of paper. Hmmmm……

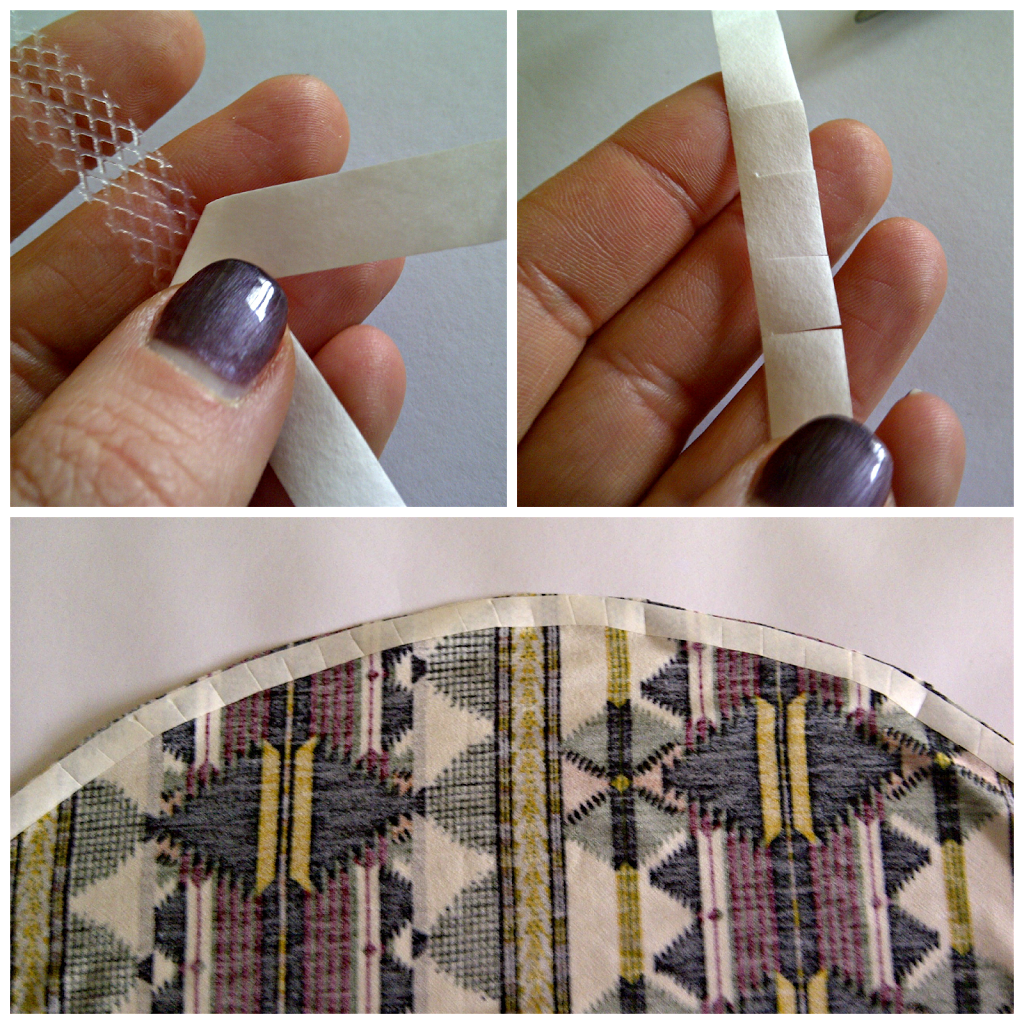
Notching that’s how! After all, don’t we use notching on fabric seam allowances to achieve all those curved elements; like collars, sleeve seams etc. Stands to reason then, that to curve that straight strip of paper backed stuff, notching would do the trick, right? Right! So I notched the entire strip before pressing it to my hem edge. As I worked along the edge I used the notches to manipulate my strip to follow the curved edge of my hem. Worked like a dream! When it came to peeling the paper backing off, it was a bit fiddlier, as essentially I was adhering the strip to itself where the notches overlapped to create the curve. But this was seriously a minor detail. The paper backing still came off fine, just in 3 or 4 pieces rather than one smooth strip. It pressed over beautifully with none of those mini folds/pleats that I often have to fight with when sewing a curved hem. I applied the same technique to my curved neckline too, which was alot easier than facing it or applying binding.  Happy days!

Gonna try this on a woven fabric to see if it’s as effective there. If it is, then I can see this stuff becoming a staple in my sewing supplies. (I really ought to stop calling it “stuff” if we’re gonna have a long term relationship….;)

DIY, hemming, machine feet, narrow hemming foot, Sewing, Sewing Basics, Tips and Tricks, Tutorials

Using a Narrow Hemming Foot

06/08/12

The last couple of weeks I have had a baptism of fire in respect of narrow hemming. My inability to say no led me to agree to shorten a friend’s sister’s wedding dress for her to wear to someone elses wedding, without looking like the bride herself. (Are you keeping up?) The latter aspect was easily remedied by making a gathered chiffon cumberbund and matching flower corsage in vibrant shades of pink. Wedding appropriate but no longer “bridal”. The biggest hurdle for me was the hemming. Three layers each almost 3metres in circumference. Silk chiffon, silk satin, and a lining fabric from hell. Slippery as anything AND I’ve ended up with some of it welded to my ironing board cover! Aaaargh!

Anyhow, EVENTUALLY, after some practice scraps (and alot of swearing), I got there……

Ths is the machine foot concerned. A narrow hemming foot. (available in a few diffrent widths) It’s comprised of a narrow shaft with a guide”curl” of metal over the top. The idea being that as you feed the fabric through the curly bit guides it over and under the shaft where it is promptly stitched in place; creating a clean narrow (or baby) hem. After a bit of practice, it really does beat turning and stitching a hem yourself and as you’d imagine is much quicker…

Starting and finishing is the trickiest part. And I can’t say I’ve mastered either perfectly, but after digesting a few online tutorials, I opted to start off by turning and pinning the first inch by hand. Then edge stitching close to the innermost fold, as if this were a standard machine foot….

With the first inch sewn, and the needle in the down position, raise the foot and gently manouvre the raw edge of the fabric over and round the shaft like so…

Then lower the foot back down. The width of the “hem” as you feed it through the foot should sit within the “open” part of the foot. (There are grooves on both sides of mine to help with this but other models may differ.) Essentially the folded edge should not be allowed to slip under the the right side of the foot; and the raw edge should not be allowed to cover the left side of the foot. I found the only way to avoid this was to work steadily and carefully.  I worked my way along the hem about 2″ at a time. Finger folding the hem and gently holding it in place (being careful not the stretch the fabric as this can result in a “curly” hem) as I fed it through….

This is how it emerges on the other side as you feed it through. (Make sure you trim raw edges before starting. Can you see the loose threads poking through on the finished section here?)

Every fabric I tried this on reacted differently. Some I had to lift slightly and feed them down into the foot. Some I had to maintain a good tension on the fabric for it to work. Some I had to feed through from the front and gently pull through from behind at the same time. Basically, practice, practice, practice on scraps first. When all said and done though, a pleasing finish…..

So, lesson 1 learnt – How to use a narrow hemming foot. Lesson 2? When will I learn to say no to time consuming alterations for other people??!! Gah! Probably never, I’m such a sap!

NB: Thanks to A Perfect Nose for pointing me in the direction of this post which has ALOT of interesting points, and discussion and links in the comment section. Especially about tackling intersecting seams, which I neglected to mention. (essentially I treated these in the same way as starting off. Disengaing the hemming foot, turning under by hand, stitching as normal, then re-inserting the fabric into the hemming foot and continuing on.)  It seems I am not alone in finding this a tricky one to use. When I say practice, practice, practice, I exagerate not! I wish I had kept the practice scraps to show you how much I bodged it before I got anywhere near a decent result!

Portia
Follow
Sewbox

© Copyright 2026. Portia Lawrie. All Rights Reserved. Managed by WordPress Web Dev Cornwall .