• About
    • Contact
    • Press
    • Sponsor
  • DIY
    • Home & Garden
    • Jewellery & Accessories
    • Yarn Crafts
  • Sewing
    • patternless & self drafted
    • Refashions
    • Commercial Patterns
    • Sewing Tips
    • Overlockers
  • The Refashioners

Portia Lawrie

DIY, dyeing, how to, refashion, refashioning, repurposing, Restyles, Thrifting, Tips and Tricks, Tutorials

diy: tea dyed floral shirt

02/27/15

Use tea to add a unique vintage twist to a white shirt at www.portialawrie.co.uk

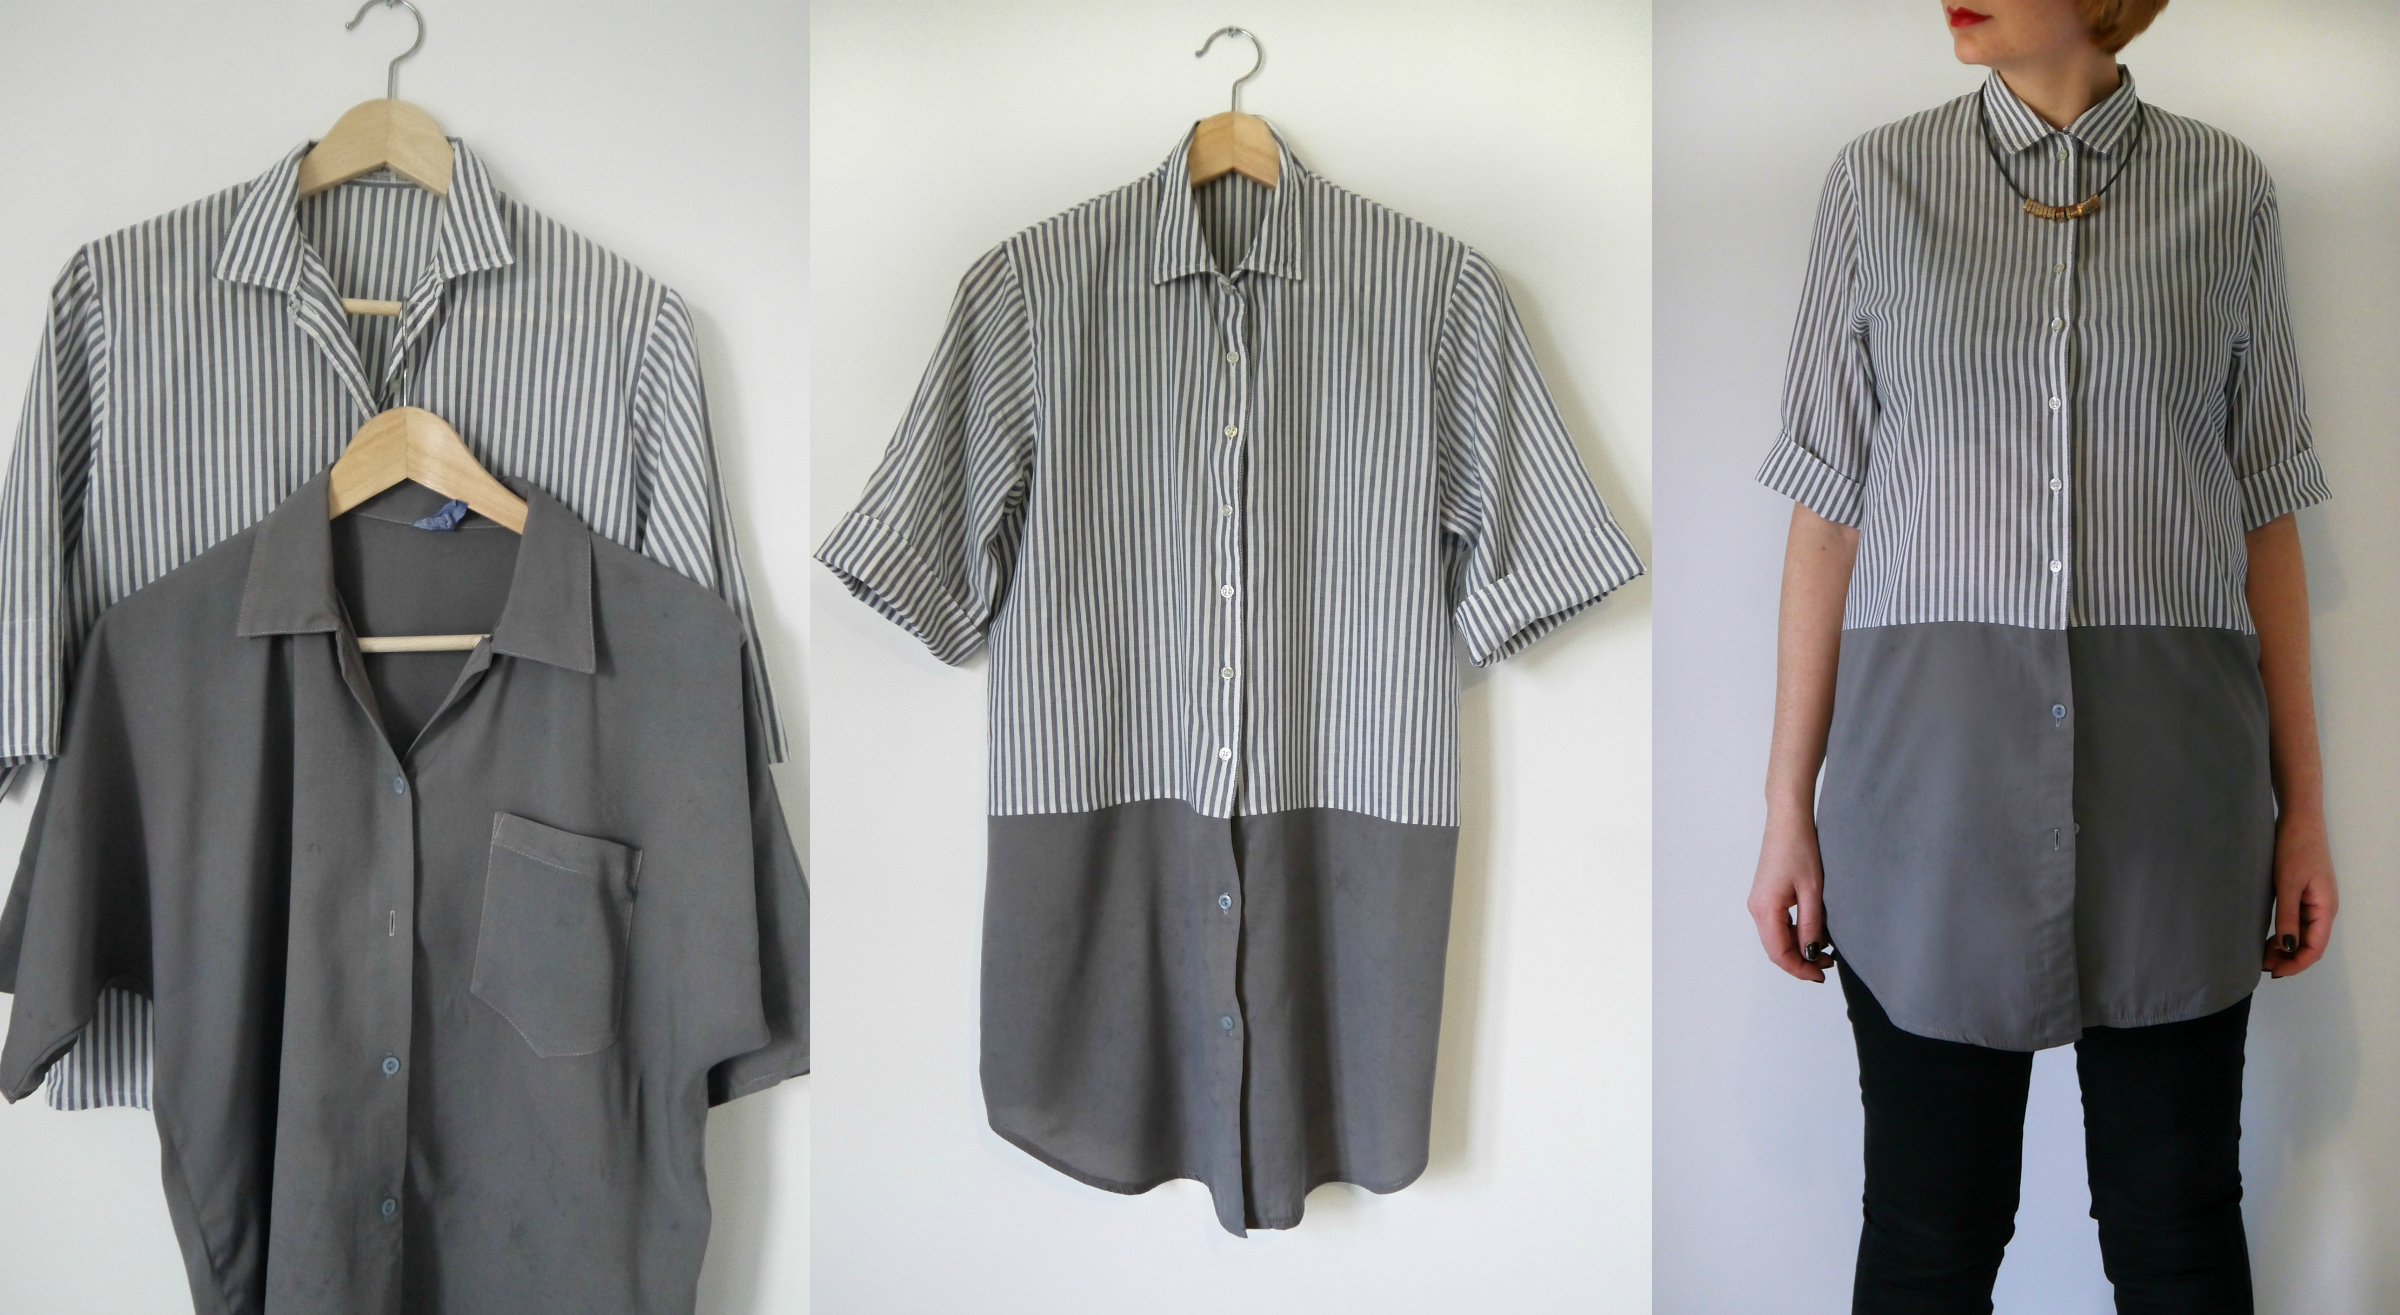
Next time you’re brewing a cuppa, why not brew a little extra and use it to give a subtle vintage twist to a “too bright” shirt. I say too bright, in my case I mean too white. White simply doesn’t suit my skin tone. Bright, is not a feature in my colour palette either. BUT I really loved this top that I thrifted earlier this week. So I bought the cheapest jumbo box of teabags I could find and set to work. Did I mention I actually hate tea? I’m a coffee girl all the way. But it does have it’s uses….


Use tea to add a unique vintage twist to a white shirt at www.portialawrie.co.uk

I used 100 cheap teabags. (Typhoo if you were wondering. On spesh at £2.50 for 200)…


Use tea to add a unique vintage twist to a white shirt at www.portialawrie.co.uk

Brewed my tea solution in about 1.5 litres of hot water for about 10 minutes….


Use tea to add a unique vintage twist to a white shirt at www.portialawrie.co.uk

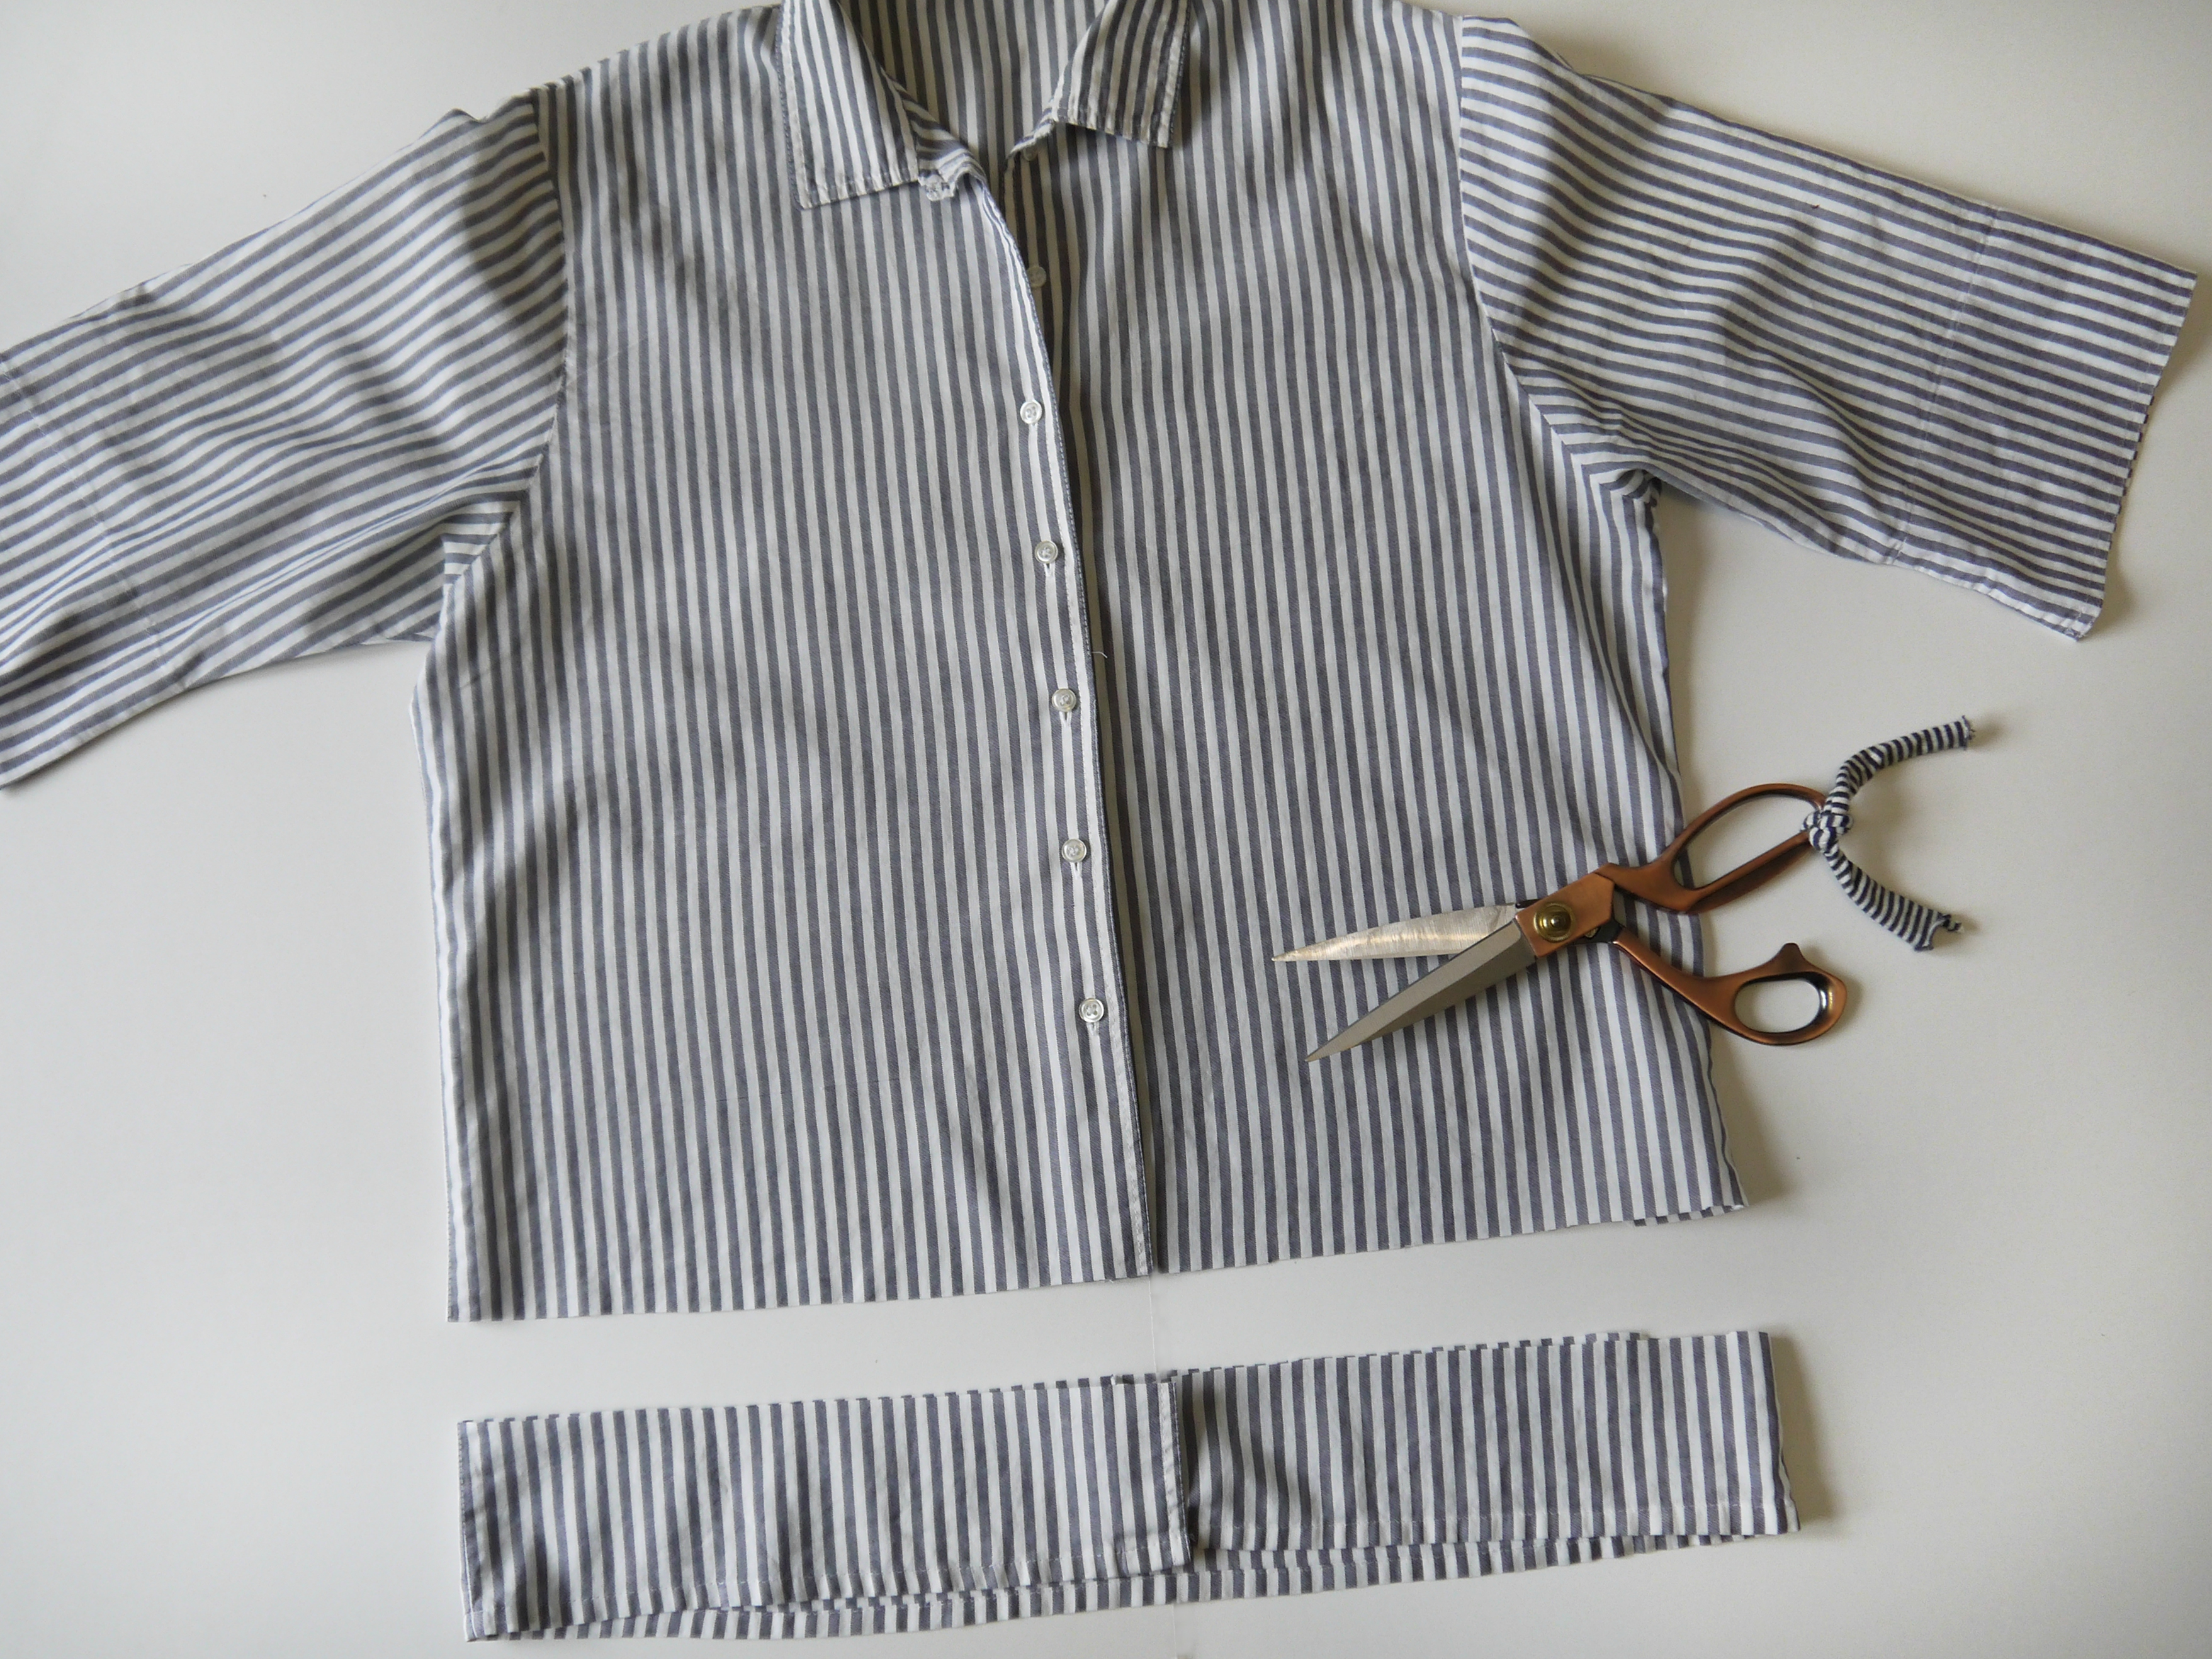
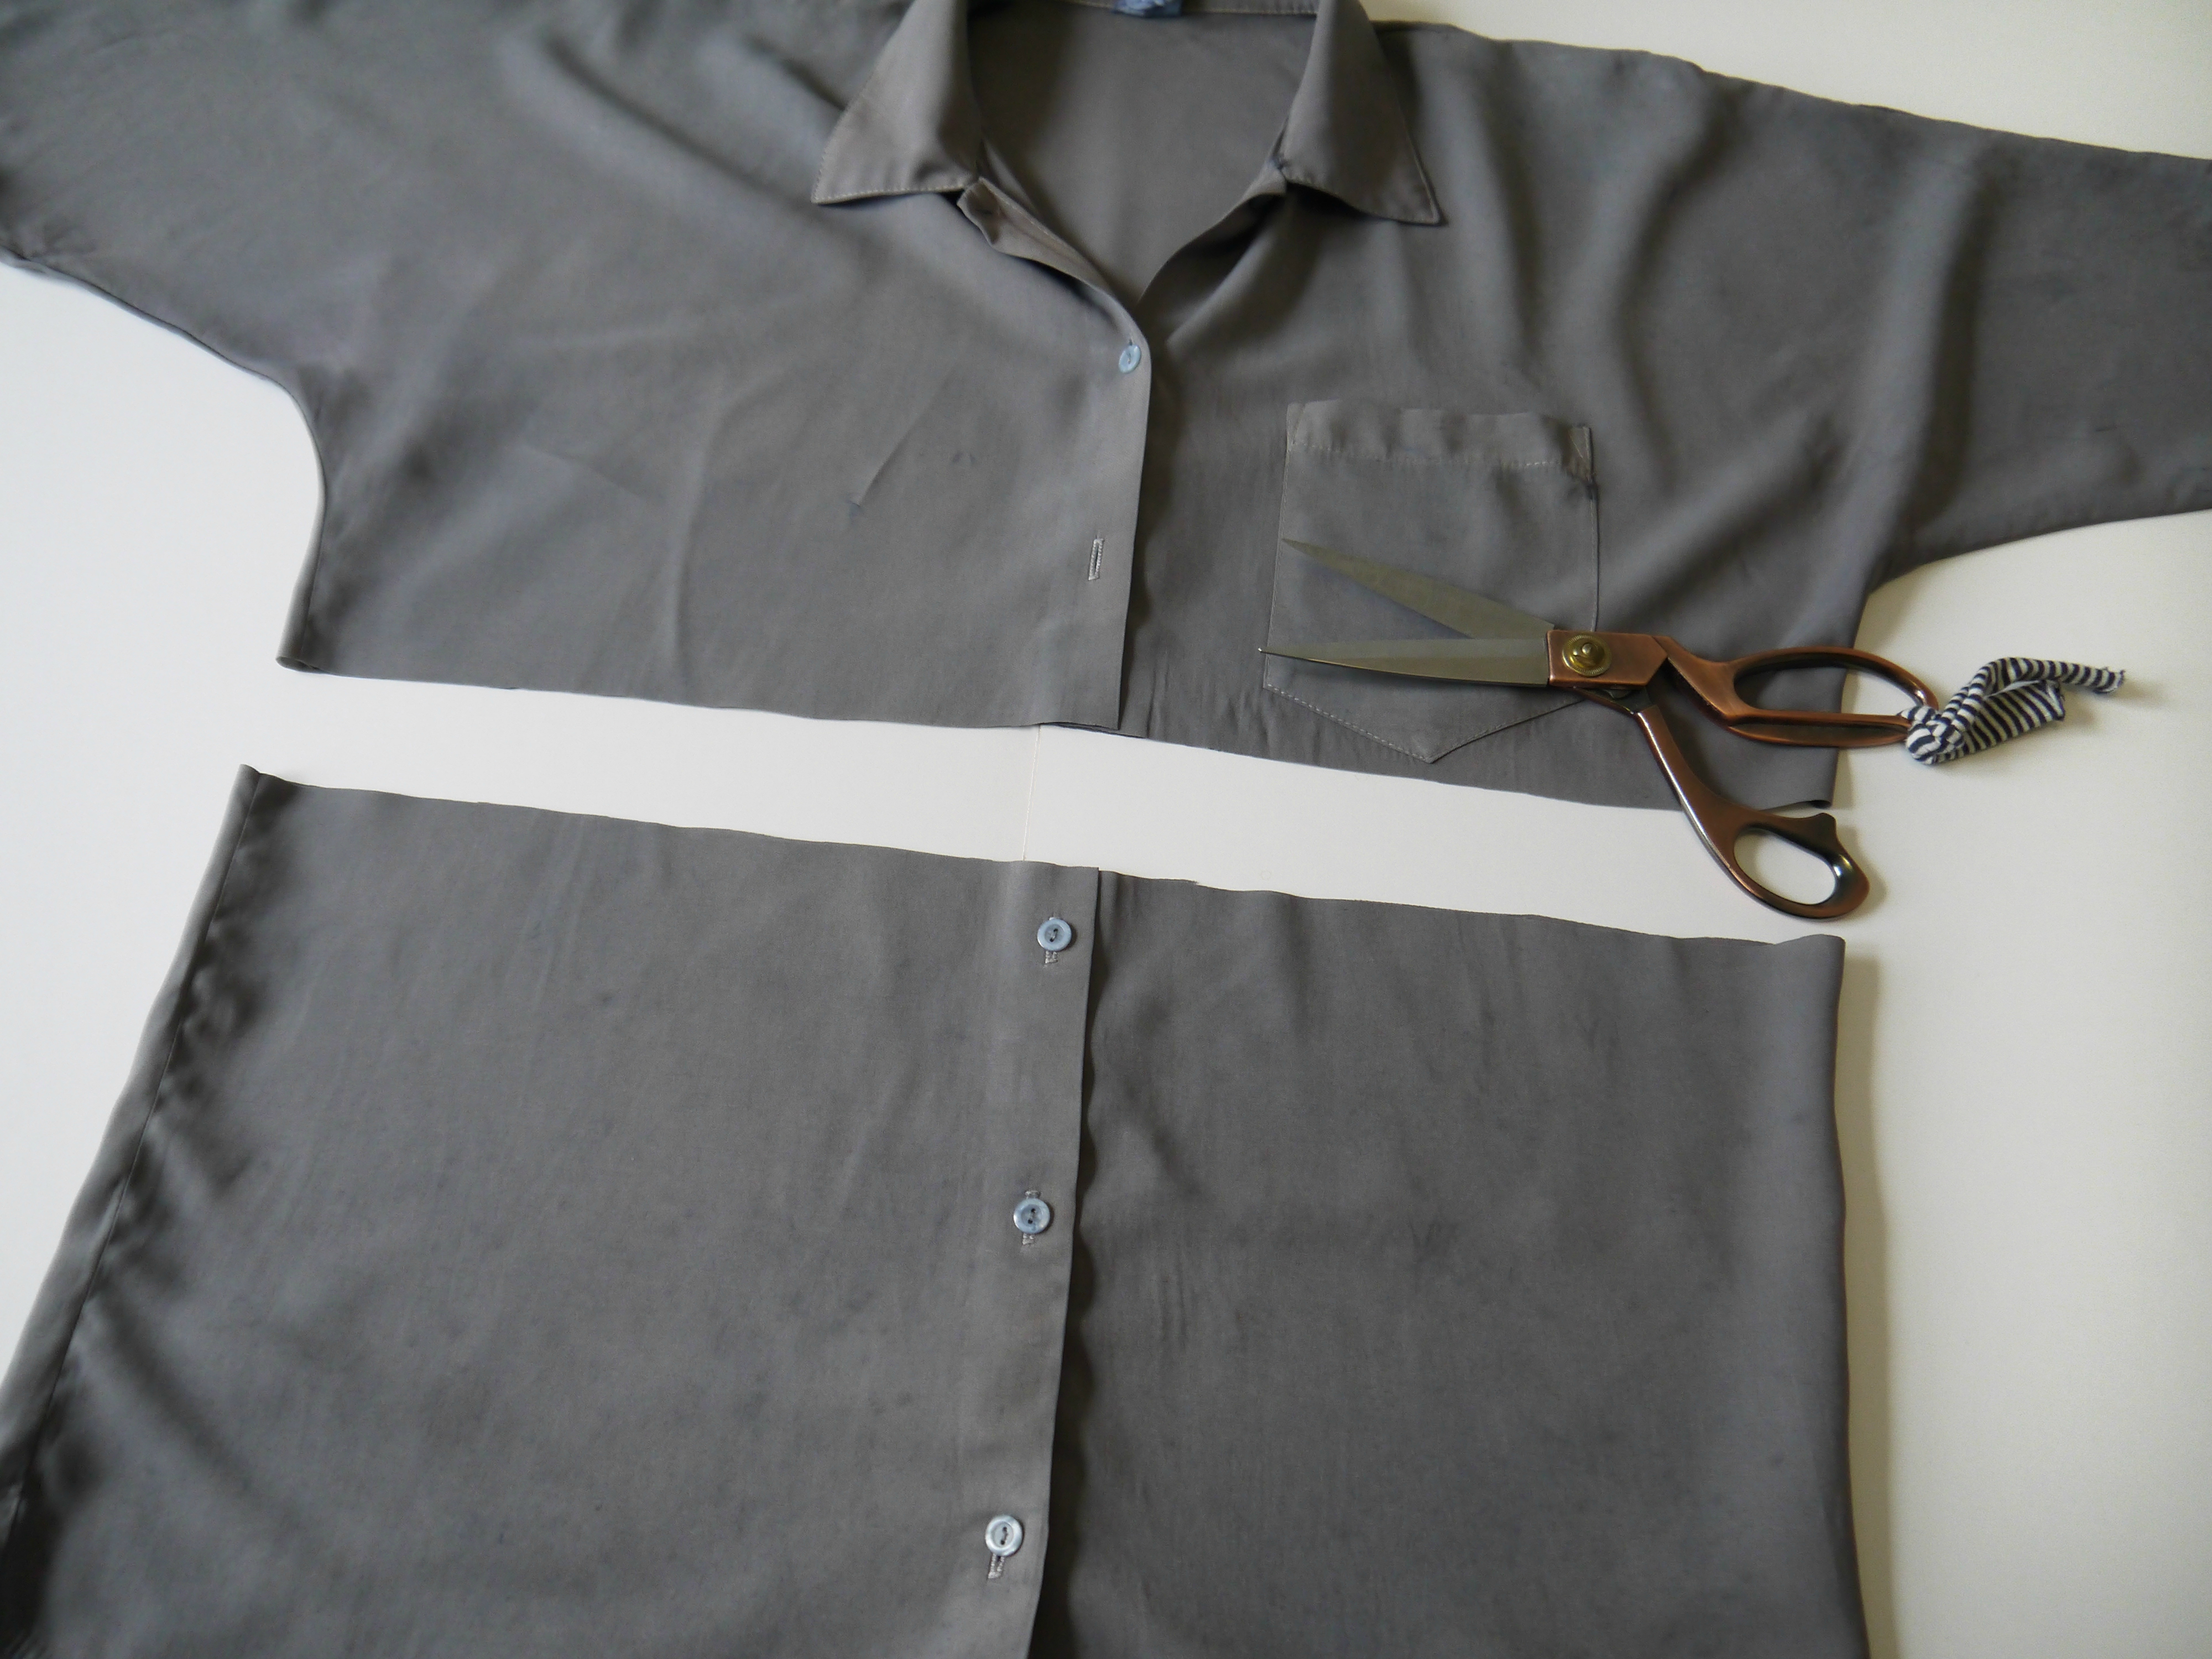
Strained the teabags (give em a good squeeze) and then topped up my pan with about another 1.5 litres of boiling water (this is a standard casserole pan if that gives you an idea of the size)…


Use tea to add a unique vintage twist to a white shirt at www.portialawrie.co.uk

Wet the garment first, then submerge in the tea….


Use tea to add a unique vintage twist to a white shirt at www.portialawrie.co.uk

Bring to an enthusiastic simmer, then turn off the heat and allow to steep in the solution for at least an hour. Preferably 2. Stir/turn frequently to ensure an even result. Then pour away the solution, rinse until water runs clear in warm, graduating to cool, water. Then chuck in the tumble dryer to help set the colour…


Use tea to add a unique vintage twist to a white shirt at www.portialawrie.co.uk

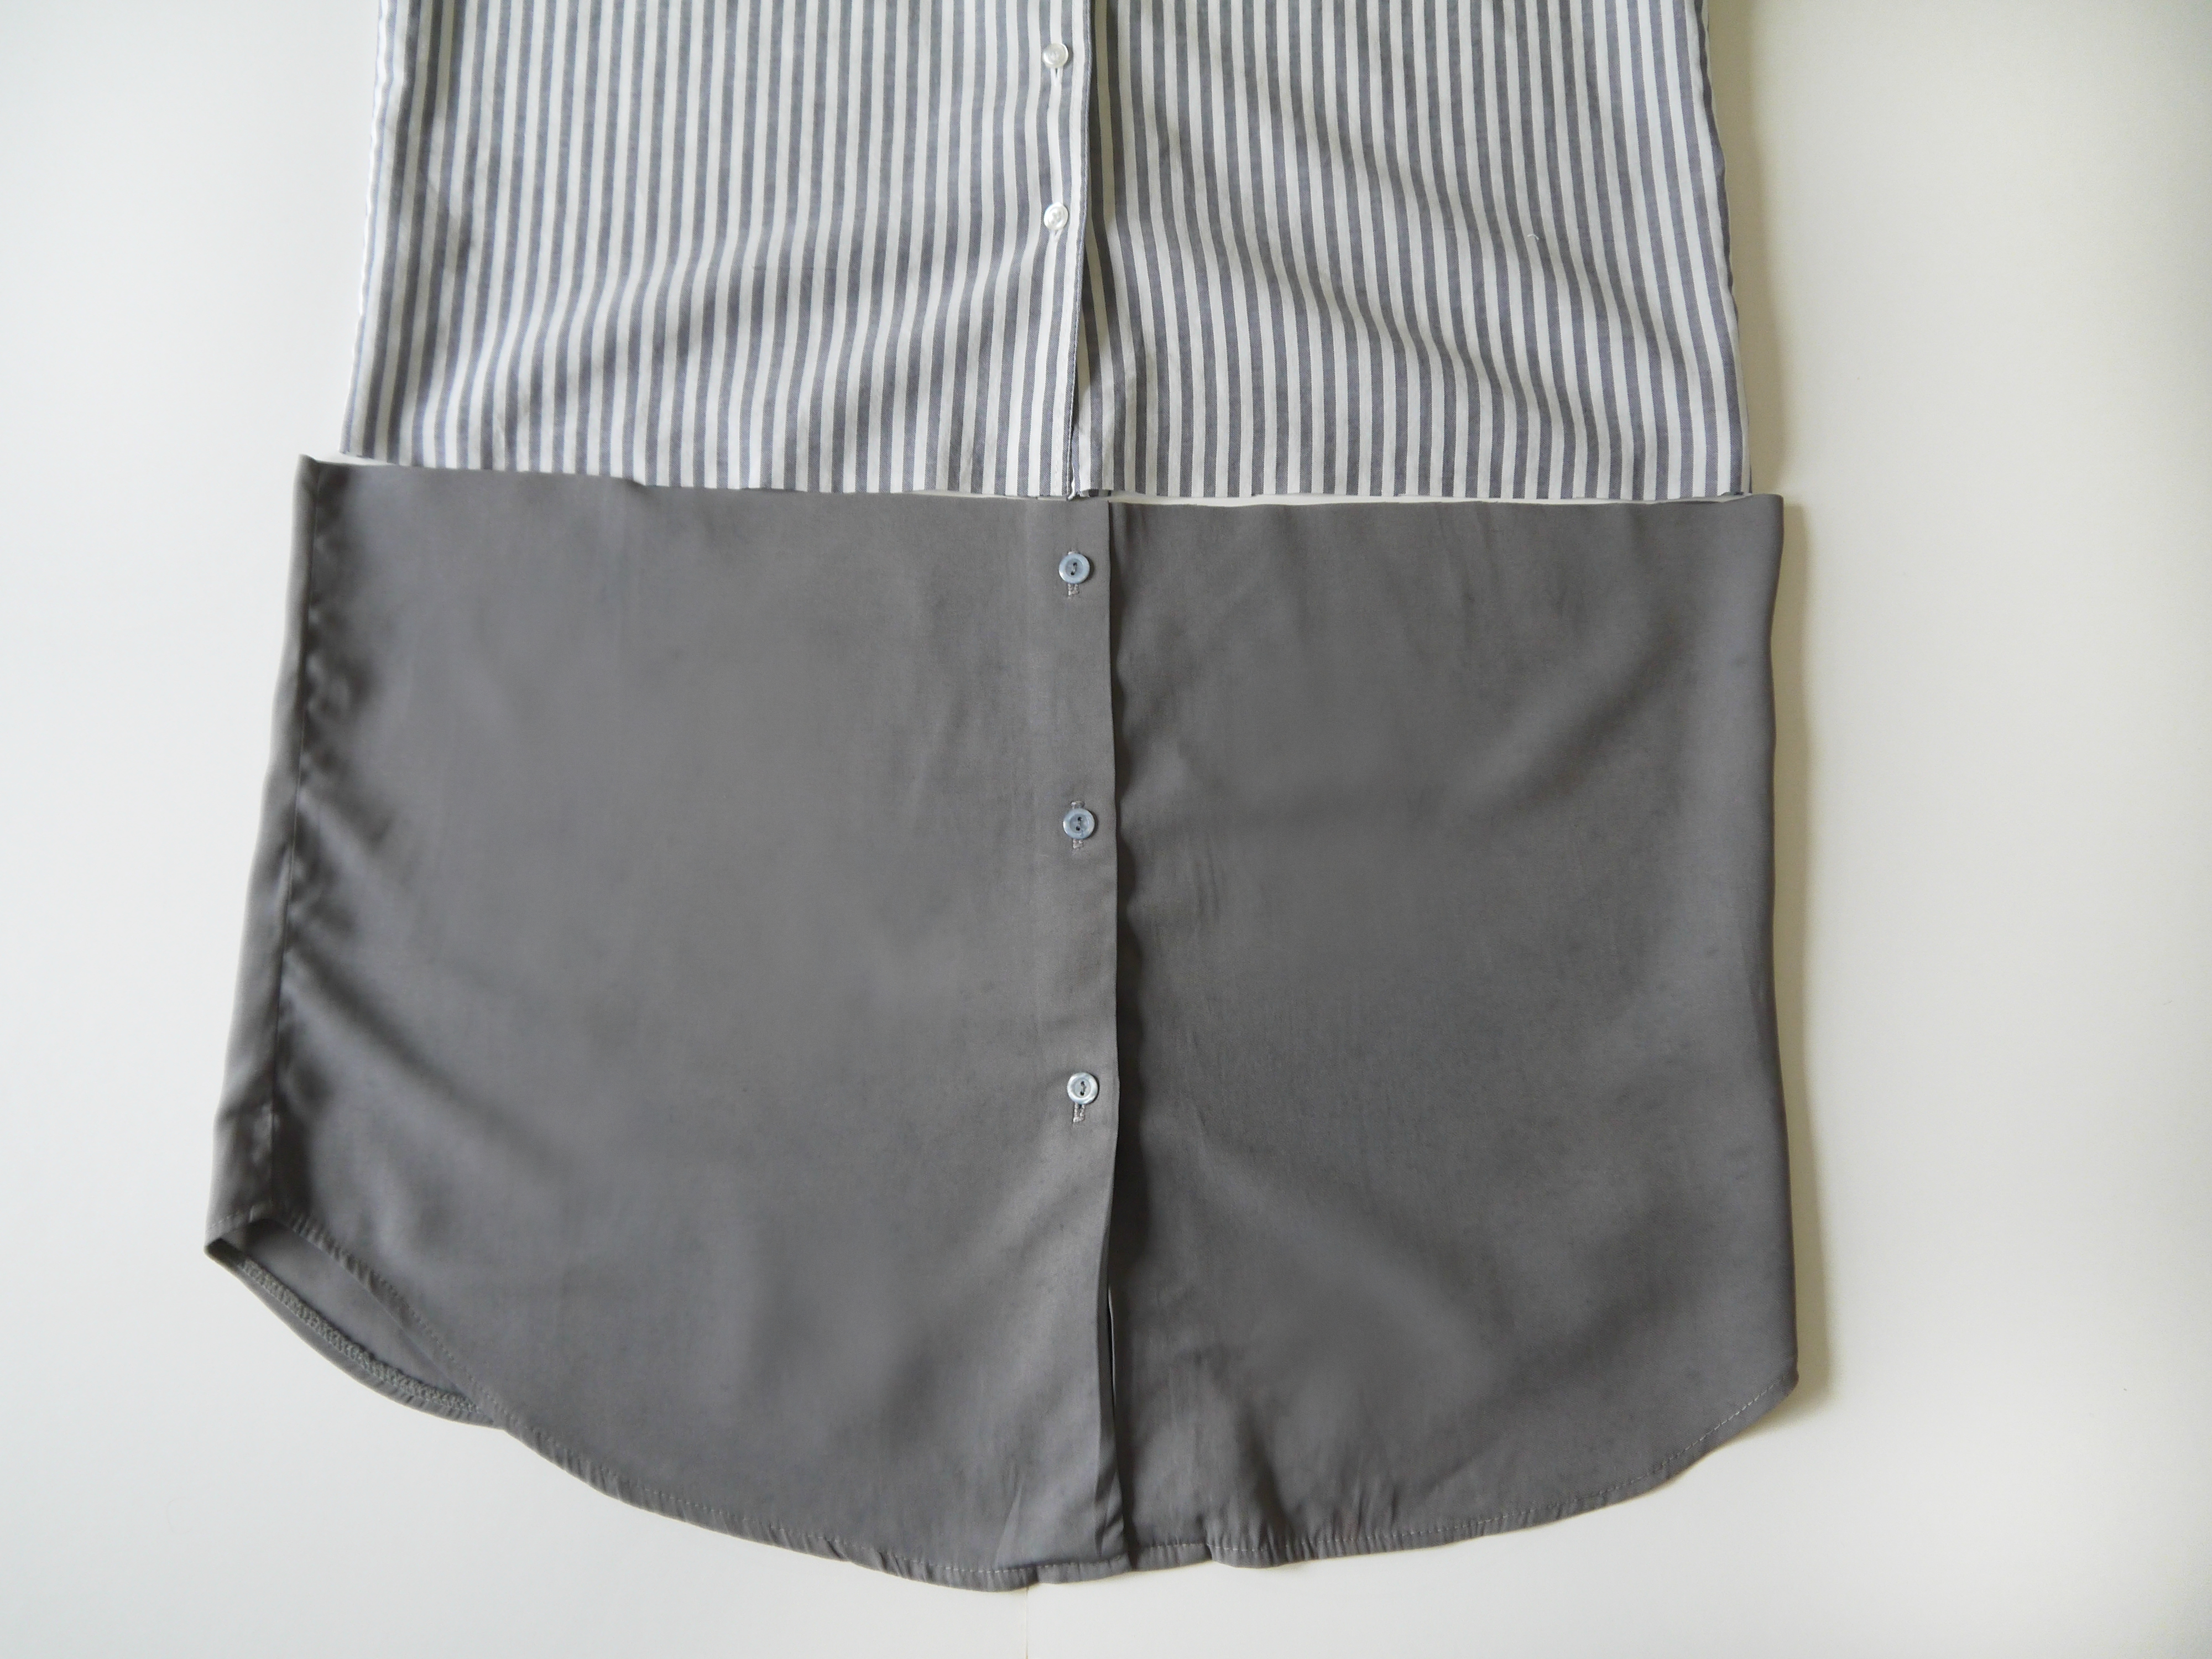
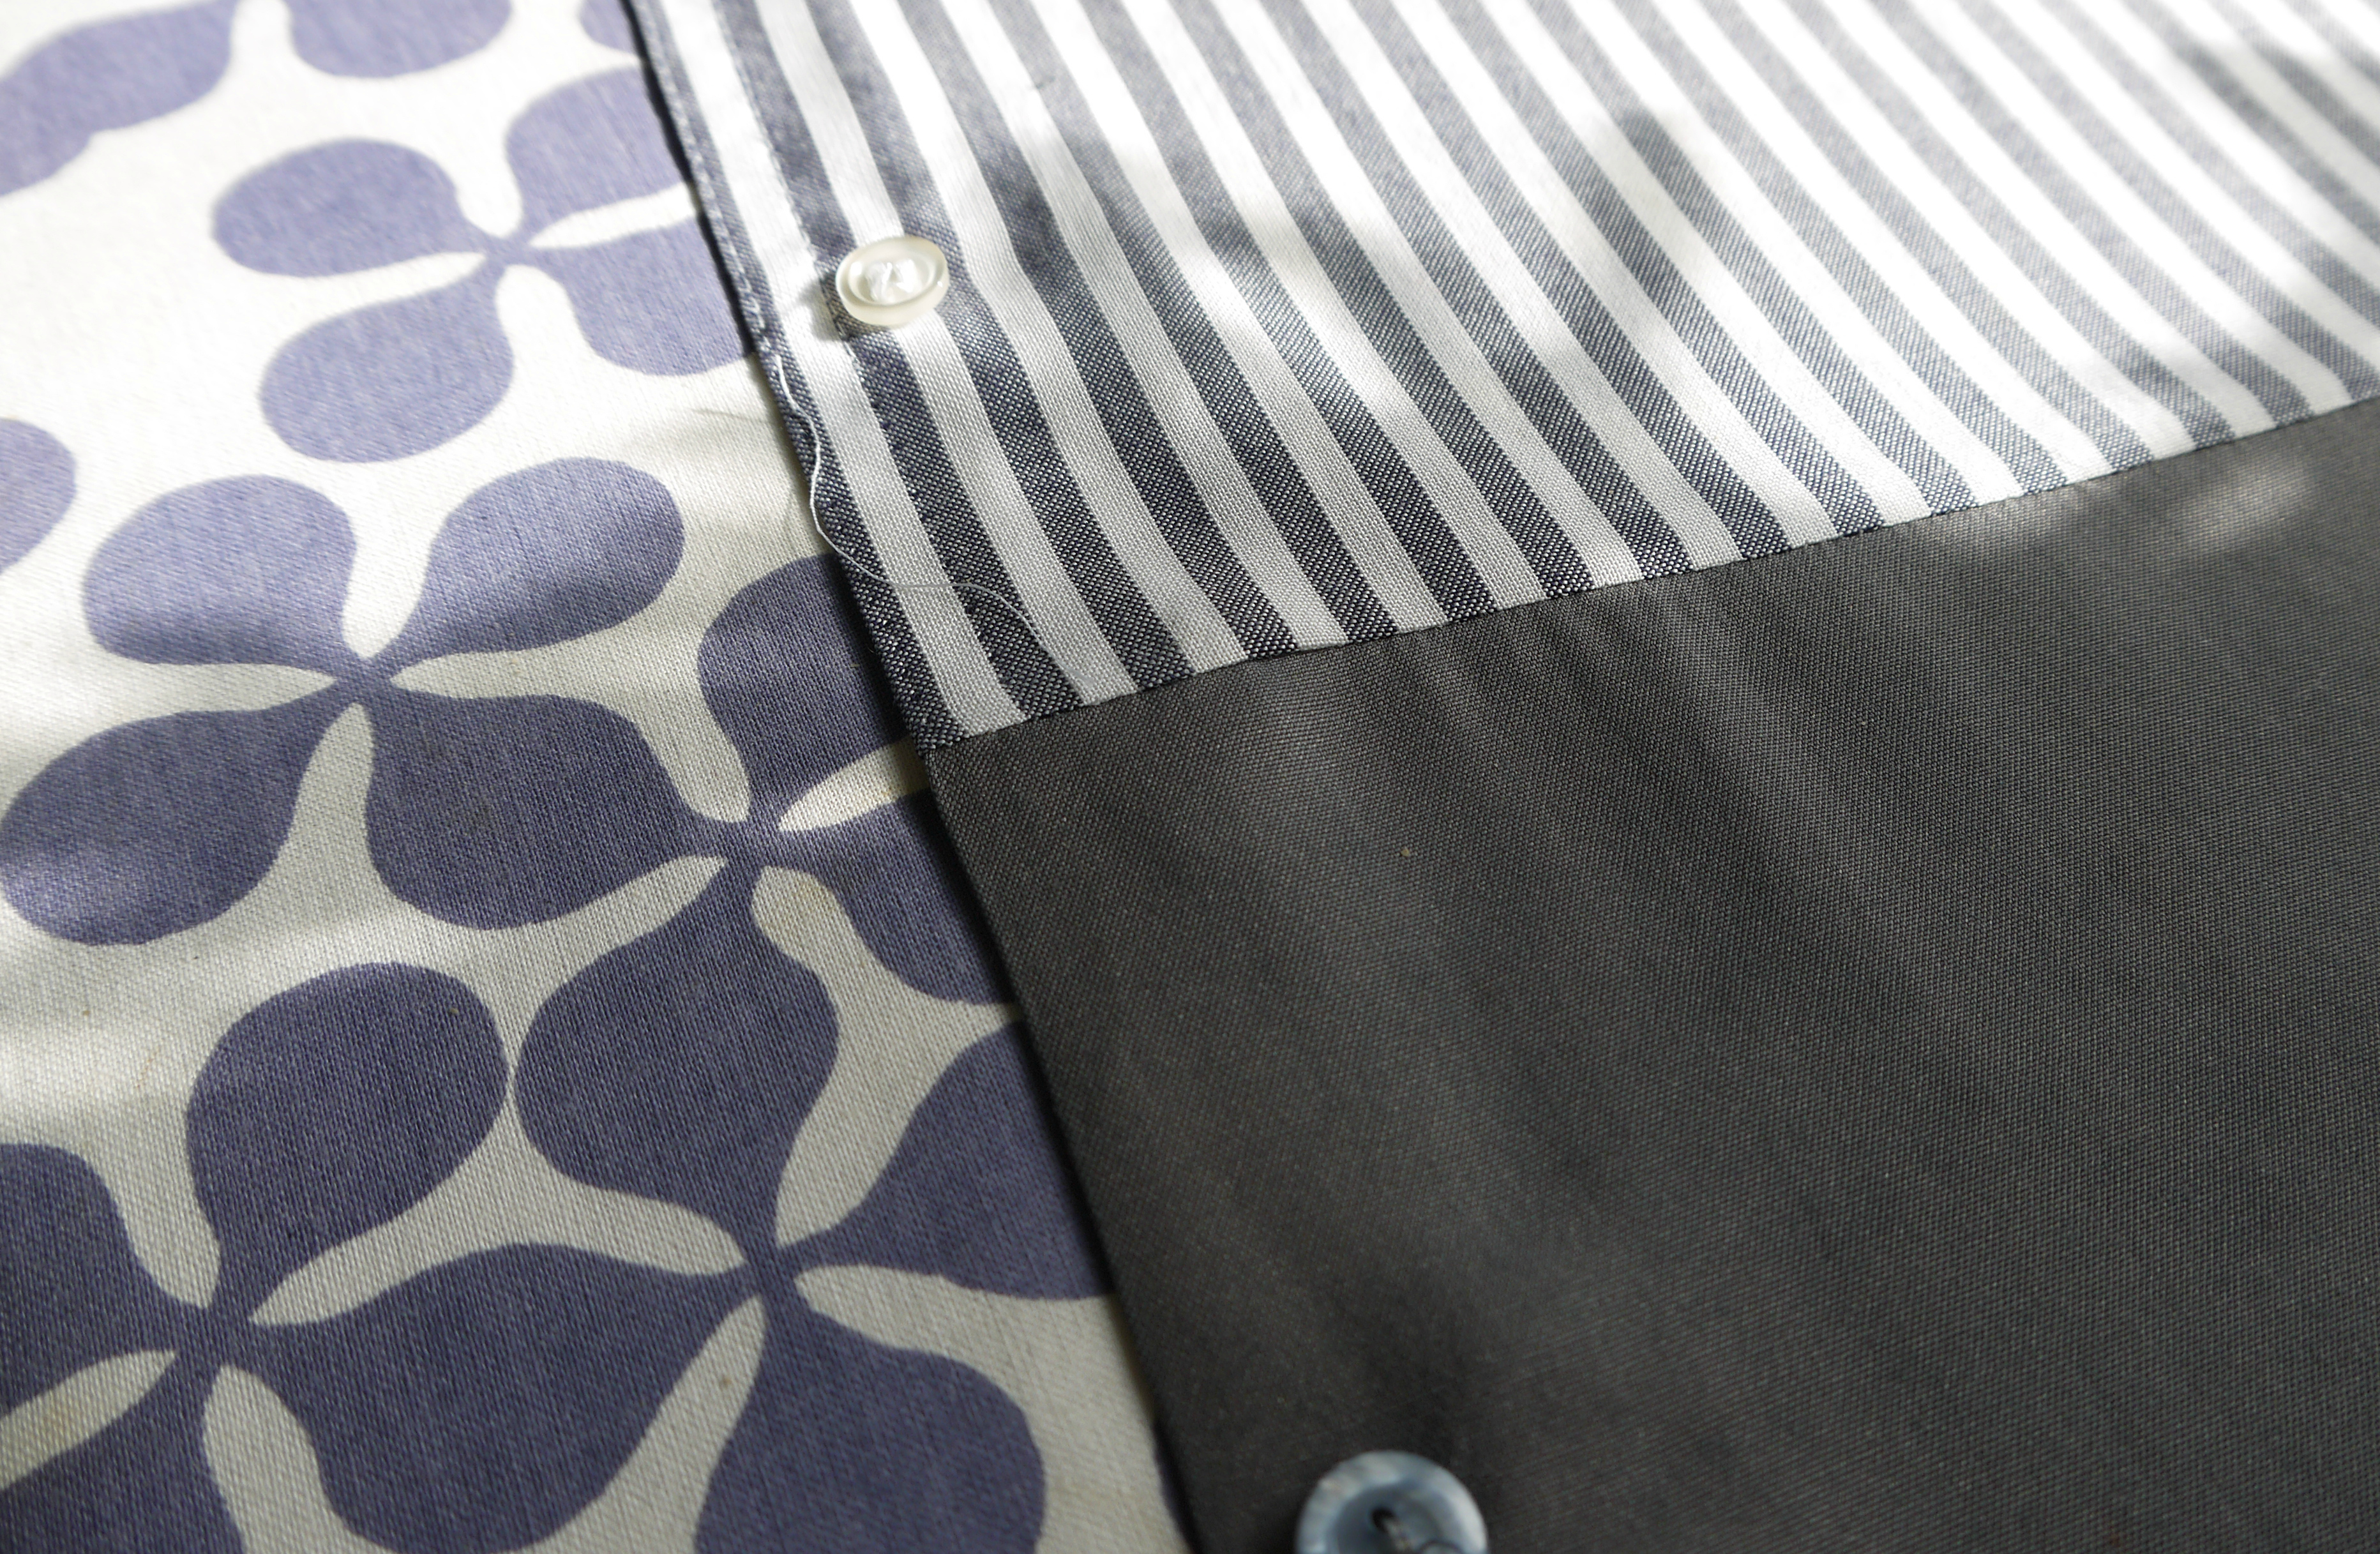
And check out the difference! It’s actually a vintagey peach colour in the flesh. and definitely more “me” and importantly, more likely to get worn.

Now, lets talk about fabric content. I actually wasn’t expecting great results with this because it’s only really supposed to work on natural fibres. (I’ve used this method to dye silk before here) This top, although it looked and felt like a lightweight cotton, is actually 100% viscose. But, hey, it worked. So far I’ve hand washed it twice with no obvious fade…next time I’ll try it on a delicate wash in the machine and see how it goes. Will keep you posted!

DIY, how to, refashioning, repurposing, Restyles, Sewing, stripes, Thrifting, Tutorials, vintage

refashion: the combo shirt

02/25/15


THE COMBO SHIRT REFASHION at www.portialawrie.co.ukI’d had both these vintage shirts hanging in my wardrobe for a few months. The spoils of a thrifting trip. The stripe one is a vintage Jaeger but was too short and had a straight hem which was not flattering on me at all. I like me a shirt tail hem….which fortuitously…the grey one had….hmmm…no brainer right?! Here’s how…


Turn 2 shirts into one at www.portialawrie.co.uk

Trim the first shirt to the point where you want the colour block effect to start, plus desired seam allowance. Don’t cut to close to a button/button hole as we’re going to need to unpick and manipulate those button bands in a bit…


Turn 2 shirts into one at www.portialawrie.co.uk

Cut the bottom half of the second shirt. Again, give yourself room to manoeuvre on the button plackets. (I ended up cutting about 1″ below that top button in the end)


Turn 2 shirts into one at www.portialawrie.co.uk

As we’re going to join the two pieces they need to be the same size, so if either the top or the bottom is bigger, like this…


Turn 2 shirts into one at www.portialawrie.co.uk

Then mark with a pin either side how much it needs to be taken in….


Turn 2 shirts into one at www.portialawrie.co.uk

Start stitching there, and taper your line of stitching gradually until you meet the original line of stitching as close to the hem as you can. Zig zag and trim, or serge the new edge…


Turn 2 shirts into one at www.portialawrie.co.uk

Now this is why we needed some wriggle room on the button plackets away from button holes and buttons. Simply joining the 2 pieces together would create too much bulk around the plackets and the join would be partially visible from side on. It just wouldn’t be a clean finish. Just cos it’s a refashion, doesn’t mean we don’t have standards! So unpick the plackets until you can lay them out flat…


Turn 2 shirts into one at www.portialawrie.co.uk

Then join the two pieces and finish the raw edge….


Turn 2 shirts into one at www.portialawrie.co.uk

Then press everything, turn the button bands back under, and re stitch the plackets where the original stitching was…


Turn 2 shirts into one at www.portialawrie.co.uk

Et voila!. Much better!  I’m kicking myself a bit because the button spacing is a bit whack. It’s only just out, but I know it’s there (and so do you now because I just did a sewist classic and pointed it out, lol!) I either need to put another button hole in…or I might settle for a concealed press stud. But the join does line up perfectly at the placket, so I’m giving myself some kudos there considering I totally eyeballed it. (Are you guys serial measurers or do you eyeball it? I tend to flit between the two. I think I have a dual personality as a sewer. Accurate and neat with some things and truly slapdash with others!) The side seams are like a mm off, so near perfect. Overall though, this one is going in the “win” pile. I like.

What do you reckon? You gonna give this one a go?

Oh, btw, the diy for the necklace in this pic can be found here…

DIY, how to, jersey, knits, refashion, refashioning, repurposing, Restyles, Sewing, sweatshirt, Thrifting, Tips and Tricks, Tutorials, Uncategorized, Upcycling

DIY: Sweatshirt Market Tote Bag

02/23/15

Turn a Sweatshirt into A Tote Bag
This sweatshirt was no longer as slouchy as I would like (one too many tumbles in a too hot dryer…yep!) and was languishing unloved in my wardrobe. So I thought I’d turn it into a handy little market tote, (complete with reinforced handles) ready for my next shopping trip… here’s how….

Turn a Sweatshirt into A Tote Bag

Start by pressing and laying out flat with shoulder seams lined up….

Turn a Sweatshirt into A Tote Bag

Cut off the sleeves using the seams as a guide…

Turn a Sweatshirt into A Tote Bag

Cut a big “U” shape out of the neckline…

Turn a Sweatshirt into A Tote Bag

Turn inside out, remove ribbing, sew opening closed (I curved my corners), then turn right side out again….

Turn a Sweatshirt into A Tote Bag

Now for the handles. Cut 2 x 7″ sections from the ribbing you just removed….

Turn a Sweatshirt into A Tote Bag

Fold in half lengthwise and serge (you could also zig zag or stretch stitch) all the way along the open edge. Look what it does! Cuurves into a perfect handle shape!

Turn a Sweatshirt into A Tote Bag

Feed one side of a handle through the tube…

Turn a Sweatshirt into A Tote Bag

Secure/stitch the 2 handle/strap pieces together…

Turn a Sweatshirt into A Tote Bag

Then slide the tube of ribbing over the join to hide it and distribute evenly. Repeat for both handles….

Turn a Sweatshirt into A Tote Bag

and you’re done!

The beauty of this is that it provides a little more structure and support to what would otherwise be rather stretchy handles, which has kinda what put me off the idea of T Shirt bags in the past. Plus sweatshirt fabric is sturdier to begin with. I think this bag could take a few fresh apples and bananas without breaking into a sweat (unintentional pun 😉

Do you use reuseable shoppers? Handmade or shop bought? My worst habit is actually remembering to take them with me to the shop…doh!

decor, DIY, Future projects, home, Inspiration, jersey, jewelry, knits, Knitting, planning, refashion, refashioning, repurposing, Restyles, Uncategorized, Upcycling

DIY: 21 INSPIRATIONAL IDEAS FOR USING T SHIRT YARN

02/20/15

inspirational t shirt yarn ideasOK, so it’s fair to say I’ve developed a bit of an obsession with making T Shirt yarn. The next question of course is what to use it for! I’ve been browsing the interwebs for inspiration and thought I’d share a few ideas with you, just in case, you know, I’m not the only obsessive in the room….

t shirt yarn ideas

These chunky knit cushions are right near the top of my “To do” list.  A simple knit/purl square on chunky needles with a linen backing. What could possibly go wrong, right?! The ubiquitous T Shirt necklace deserves a mention here. This clutch bag, from what I can gather is knitted from lengths of rubber. No reason it couldn’t work in T Shirt yarn instead though…

t shirt yarn ideas

The idea of a cosy blanket knitted on chunky needles appeals to me right now (instructions here); and I can see potential in this tutorial for crocheted cord being used in a jewelery piece or perhaps as handles for a bag? Now I know this rug is not made from t shirt yarn but a) its lush so I just had to share (and there are other delicious yarn art examples in this post) and b) the concept/technique could surely be applied on a smaller scale with T Shirt yarn?

t shirt yarn ideas

I love copper, grey and simplicity. So this necklace tutorial particularly floats my boat. Again there are other tutorials included in this post from Brit +Co. Love this knitted tote pattern from Daily Fix and surely T Shirt yarn lends itself perfectly to macrame hanging plant holders. Several examples in this post from Censational Girl.

t shirt yarn ideas

I mean seriously, how delicious do these knitted floor cushions look? No tute, but the idea would be simple enough to replicate? I can think of a multitude of uses for these crochet baskets (tutorial here from nimi design.com) and this macrame wall hanging has a simple charm. I’m thinking the technique could also be adapted to form a decorative element for a T Shirt refashion (party in the back anyone?)  or maybe to create a cute string grocery bag?

t shirt yarn ideas

Spoiler alert! Rugs are at the forefront of my plans. This spiral rug from A Beautiful Mess, crochet rug from WhollyKao and woven rug from Viva Le Jar, all employ different techniques to equally cool ends…none use T Shirt yarn but….you could, right?

t shirt yarn ideas

This knitted rug pattern from Purl Bee could surely be adapted for T Shirt yarn. This free pattern for a crochet basket from Ravelry calls for 12mm cotton yarn so could be doable and I like the effect of this rope trivet from Design Sponge. I can’t help but think this nautical style of knotting could be fun to try too…

t shirt yarn ideas

Another slightly more simple knitted bag. I think even I could manage this one. I love the effect of this idea from Oleander & Palm. Simple lengths of coloured yarn hung in volume to great effect; and a random woven belt design that I came across that could totally work!

So, I hope that gives you a few ideas of what to do with your squidgy balls of jersey goodness! I’ve started playing around with knitting mine and have a few ideas in the works….watch this space!

DIY, how to, Ponderings, refashion, refashioning, Thrifting, Tutorials

Refashion: Jersey Maxi to Slouchy Tee (aka “embrace the unexpected”)

02/02/15

Every now and then, completely bodging something up can turn into a “happy accident”. Case in point; having refashioned this jersey maxi skirt into a slouchy top I had the cracking idea of dumping it into a stockpot of dye that I had sitting on the hob from another project. Then promptly left it, got distracted and forgot about it. I didn’t stir it or rotate it periodically and consequently the dye only took in certain areas, related it seems to how the fabric was crunched up as it sat in the dye. My initial response when I realised my cock up….was a few choice words. But as this effect gradually revealed itself while it dried, I went from cursing myself, to actually kinda liking this subtle, “accidental shibori” effect….

The refashion itself was simple enough. After removing the waistband and pressing everything flat, I removed a large portion of the length and cut out this trapezoid shape. Cut out a neckline, overlocked the shoulders and side seams (leaving a 7″ opening for armholes), then turned and stitched the neckline and sleeve hems….

I used the fabric that I had left to create a folded/double thickness band that was approx 5″ smaller than the hem of the tee(and about 3″ smaller than the circumference of my thighs), and gathered the tee to fit it, overlocking to join the two pieces…

So a really simple way to convert a skirt to a top, yes. But by far the overriding thing that makes me smile about this make, is the dye job that could’ve been. And how much less interesting it would’ve been compared to what I ended up with!  Have you ever had that happen? Have something go completely awry, and end up being happier with the outcome?

Sewing aside, it happens alot in my life.  Things rarely work out exactly as I’ve planned. But more often than not, it becomes apparent down the line that it was the best thing that could have happened anyway. If “X”  hadn’t have happened then I wouldn’t have met “Y”. That kinda thing, you know? That cliche of everything happens for a reason? Well I’m a firm believer in that, and lets face it, all cliches become so, because they have been proven have an element of truth, more often than not! It’s taught me to embrace the unexpected and just go with it. (after I’ve allowed myself a bit of ranting and thrashing of hands, ha ha!) Tangent over….sorry…drifted off there!

Aaaanyway, as a fun side note, someone pointed out to me on Instagram that you can see an image in the dye pattern of this tee. I hadn’t noticed until she pointed it out, but I totally can now!. Be interesting to see if any of you can see the same thing too, or indeed something completely different!


DIY, how to, refashion, refashioning, Restyles, Tutorials

Refashion: Cropped Tee to Banded Tee

01/27/15

This is a really simple refashion that elevates a cropped boxy tee to something a little more interesting and with a bit more coverage. I don’t do “cropped”. Trust me….nobody wants to see that! This can work with a standard tee too. really anything that you want to add a bit of length or design detail to. It’s a great way to use up an otherwise redundant strip of a favourite fabric. Pick one thats a similar weight and drape to the top you’re refashioning. I’m mixing woven with jersey here….

To start…turn the tee inside out. Put it on and mark where you want your contrast fabric band to sit…

Cut straight across the tee just below this point to allow for some seam allowance…I’m a sod for not measuring or marking anything. But you can always measure 5/8″ down from your pin and chalk a line across as a guide if you’re more conscientious than I am!

Cut your contrast fabric band at your desired width. Lay it between your two tee pieces and mark where it needs to line up with the rest of the tee, with a line of pins. Sew down this line and finish/trim raw edges so you have a tube of fabric the same width as your tee.

With the tee RS out and the band WS out, place the bottom of the tee inside the contrast fabric tube, (the tee will be right sides together with the fabric tube) line up raw edges, then pin and sew all the way around. Repeat this step with the top portion of your tee, sewing it to the other raw edge…

Give it a good press and you’re done!

I used a serger for this project. You can use a standard machine and just zig zag the raw edges. Best of all….no hemming (as you’re using the original hem of the tee) and takes about 20 minutes!

Happy sewing!


DIY, how to, refashion, refashioning, Thrifting, Tips and Tricks, Tutorials

Refashion: Sweater to Kimono Cardi

01/17/15

So I mentioned in my last post (aka “that time I turned a cardigan into a sweater”) that I would most likely do the same in reverse at some point. Welllllll…..

Pretty straightforward this peops. Take a long baggy sweater and cut the panel out of the front like so. Round the back up close to the neckline ribbing, then straight down the front perpendicular to the neckline…

Pin inch wide grosgrain or cotton twill tape all along the raw edge on the right side..leave about an inch spare at either end for turning under later…

Stitch about a 1.4 inch from the edge of your ribbon all the way around. First with a straight stitch. Then with a zig zag stitch right up close to your straight stitch. The zig zag will secure the cut/raw edge of the knit and prevent it unravelling. If you zig zagged the raw/cut edge before applying the ribbon, you run the risk or stretching the fabric out, resulting in a curly edge. The ribbon stabilises the edge first. Bingo! No curly edge…

Flip the ribbon band to the inside and pin and stitch in place, (turning both loose ends of the ribbon under first!) Stitch in the ditch or just in from the seam…

The sleeves on this were pretty shot….

So they got lopped off and hemmed….

…and that was it really! The main purpose of this was to demonstrate the use of grosgrain ribbon to create, essentially,  a stabilised button band. I left this cardigan loose and open because that’s what I like. But with this technique you could just as easily convert a sweater to a fully functioning button through cardigan by adding snaps, studs, toggles or proper buttonholes. A technique to play with, no?!

finished garments, refashion, refashioning, Thrifting

Refashion: Long Tailed Shirt

01/12/15

Sometimes a few minor tweaks is all it takes to bring a charity shop find (£1.50) bang up to date. This polka dot shirt had a lovely drape. Even the fact that it was XXL was not a problem in itself as it just meant that it had that slouchy feel that I am most at home in; and I loved the fabric. Lightweight. Drapey. Perfect. After a couple of tweeks with the proportions that is…

I turned the original sleeve hem to the outside and edge stitched to a) marginally shorten the sleeve and b) create a faux cuff/turn up…

Split the side seam, left the back hem the length it was and re hemmed the front approx. 2″ shorter…

…and that quite literally…was IT! Subtle changes but eminently more wearable 🙂

Sincere apologies for the grainy images. I need to work on some lighting  at the new house. This is literally the only spot where I have a clear, plain backdrop to do garment pics. The window is along the same wall to my left and is west facing so the light is especially AWFUL at this time of year. Boo to grey winter days. After several weeks of varying degrees of illness in this household, I’m sooooo ready for spring to bloom, aren’t you?


DIY, how to, refashion, refashioning, Thrifting, Tutorials

Refashion: Oversize Cardi to Tunic Sweater

01/04/15

I’ve seen a few tutorials out there for converting sweaters into cardigans. Which I shall no doubt do at some stage. But what if you want to do it the other way round? Turns out it’s easy peasy…

I started with this thrifted cardigan. (£2). It’s a really nice fine knit but a little too boxy and shapeless as a cardi…

Flipped inside out and with right sides together I fastened the button placket all the way down so the placket ribbing was all aligned (no pins necessary!)

Next I serged all the way down with the edge of the placket, with the ribbing to the right of the blade so it got removed as I serged….

Here’s the new centre front seam all serged….

I like my sleeves elbow length. So I cut the bottom of the sleeves off, leaving a turning allowance of 2″…

…serged the new sleeve hems to prevent unravelling, turned, and hand stitched in place….

I used what was left of the sleeves to cut some oversized pockets for the front and edge stitched those in place using the stretch stitch on my standard machine…

…and that was it…

This was everything I had left…so a super minimal waste refashion. Can’t be bad 🙂

This is a great way to adapt oversized men’s cardis. I for one will be on the lookout for those on my next trip to the charity shop!


DIY, how to, leather, refashion, refashioning, rit dye, Tutorials

DIY: Dyed Leather Gloves (inc DIY leather conditioner & cleaner)

12/01/14

As I mentioned in my previous post, I had a stockpot of the Rit Dye simmering on the stove whilst I worked on another project. (Deets of that to follow soon I promise. Just waiting for some decent daylight to photograph it, as it’s soooo grey skies here right now it’s not even funny! If you follow me on instagram you’ll know what the “big project” is…just not the end result 😉 Today I thought I’d share another little experiment with Rit dye. Whilst my stockpot was simmering away I began pondering what else I could use all that lovely rich dye liquor for. I like to get value for money! (BTW, did you know you can bottle unused Rit dye liquid once it’s cooled and reuse it months later! Apparently so…result, huh?)

Anyway, I decided on a whim to randomly chuck this pair of leather gloves into the mixture…and what do you know? It worked! They didn’t crisp up when they dried and the result is relatively even…so I guess…you CAN dye leather with Rit dye!

Essentially I started with these soft leather gloves that I had thrifted and then never worn because the colour never quite fit with any of my coats. (£2 in case you were wondering ;). My dye was already mixed and simmering but as I mentioned in my previous post, was MUCH more concentrated than the instructions required. (The black and maroon powder packs you see + the whole bottle of navy liquid dye to 10pints of water gave me a concentrated dye solution that was an inky blue/purple).
1) Simply submerged my gloves in the stock pot and left for an hour with the lid on.
2) Turn them every 10 mins or so to ensure even coverage
3) Remove after an hour and rinse relentlessly in running water, graduating from hand hot to cold until it runs clear.
4) Leave to dry thoroughly (mine took a couple of days!). I wouldn’t personally be tempted to speed this process up (with a hairdryer for instance) as I’d be worried about “crisping” or shrinking the leather. I guess I thought I’d pushed my luck enough having them simmering in a dye bath for an hour, lol!

When they were finally dry I treated them to a bit of conditioning. You don’t need special products either. This works beautifully on leather of any kind. Shoes, bags, sofas…saddles!
1) Just mix equal parts of white vinegar and olive oil in a bottle.
2) Shake well and apply to leather using a cotton wool pad
3) Buff to a soft shine with a soft cloth
Et voila! Trust me when I tell you…do not bother buying expensive leather creams again. This stuff really works 🙂
4) As a final touch spray with Scotchgard or similar

So, here they are, my new, old, gloves! I like that the stitching wasn’t dyed and now contrasts with the new colour… and talking of colour…you can just about make out an aubergine tinge in these pics…not what I expected AT all. But I really love it! There are a few areas where the dye got veeeery subtly patchy (like in the creases of the leather) which lends them a slight vintage feel too…I totally knew that would happen of course… ahem…cough…;)

I’m quickly learning with dye projects, not to be too invested in achieving a specific colour. Results are not guaranteed to be what you plan! I think it’s better rather to aim for a particular area on the colour wheel and remain open to where that takes you. Sometimes it’ll be a triumph! (Sometimes not!) Even though it may be a case of more luck than judgement…shhhh…don’t tell anyone that part….just let them tell you how clever you are 😉

NB: as a little “disclaimer” and in the interests of full disclosure…I haven’t yet had a chance to wear these out. While I’m confident the exterior is colour fast due to the scotchgard, I’ve yet to test the colour fix on the inside fabric except a rub test on a towel which was fine…on sweaty hands though it’s possible it could transfer and I could end up all Smurfette…I guess I could turn them inside out and use a spray fixative of some kind…but I’ll risk it and see what happens I think…will keep you posted on that!

UPDATE: All is fine. No dye transfer on wearing for a full afternnoon!

Newer Posts
Older Posts
Portia
Follow
Sewbox

© Copyright 2026. Portia Lawrie. All Rights Reserved. Managed by WordPress Web Dev Cornwall .