• About
    • Contact
    • Press
    • Sponsor
  • DIY
    • Home & Garden
    • Jewellery & Accessories
    • Yarn Crafts
  • Sewing
    • patternless & self drafted
    • Refashions
    • Commercial Patterns
    • Sewing Tips
    • Overlockers
  • The Refashioners

Portia Lawrie

collars, refashioning, Restyles, Thrifting

Refashion: Monochrome Magic…

12/05/12

Isn’t it great when the simplest of tweaks can bring a rather boring garment bang up to date? I’ve been loving this season’s contrast collars and button bands, so thought I’d try out an idea that’s been niggling me for weeks. I bought this shirt from, yes you guessed it, a charity shop. It cost me the princely sum of £1.75. It’s a really good quality shirt but needed a little bit of “modernising”…

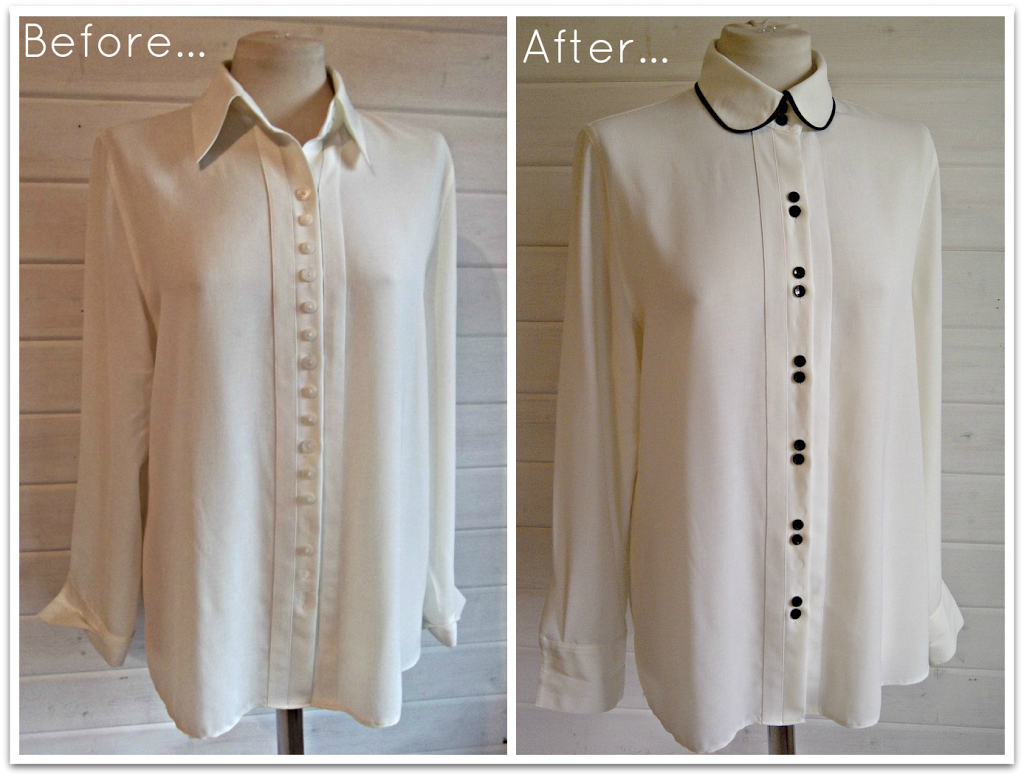
There were alot of buttons down the front of this shirt. One continuous line of them, with only a few of them being actually “functional. The rest were simply stitched onto the placket, in the gaps between the buttonholes, for decorative effect. Now I like buttons as much as the next stitcher, but this was just overkill. I removed all the buttons and used contrasting black ones instead, and went for a double button effect.

 I reshaped the collar from pointy to Peter Pan and finished with contrast black bias binding. I’ll be sharing a “How To” on the reshaping technique tomorrow, so check back for that if you fancy giving this a go 🙂 COLLAR TUTORIAL HERE
I’m not quite finished with this shirt yet. I can’t quite decide what to do with the sleeves (if anything) and I need to take it in a teensy bit.  But I was so pleased with how this stage of the transformation has turned out, that I thought I’d share it early! What say you about the sleeves? Leave well alone or change ’em up a bit? I was thinking 3/4 length but I’d have to lose the cuff as it doesn’t fit around that part of my arm. Hmmm, maybe make a new black cuff?? Decisions, decisions! Of course, what I really ought to be doing is cracking on with Christmas sewing…

Dressmaking, refashioning, Restyles, Sewing, Thrifting

Refashions: Silk Peplum Top & Skinnified Jeans

11/28/12

Just recently I’ve been returning to my refashioning roots. I picked up the outfit on the left for the grand total of £5.98 from a charity shop. A simple oversized black silk shirt, and some kinda frumpy jeans in a lovely berry purple colour. After I’d gone at them with some scissors and a sewing machine, I was left with the outfit you see on the right. I’m pleased with how striking the difference between the two outfits is. That’s really what I wanted to show. How different frumpy charity shop finds can be with a few tweaks; and I think I’ve achieved that here. Although I’m not sure how much I’ll wear the top in reality. It was an idea I wanted to try out, and I really like how it turned out. I’m just not convinced it’s “me”. Know what I mean?

 It all turned out pretty much as I had envisioned it; apart from the top having no sleeves. I had planned some slim elbow length sleeves. But the peplum section needed much more fabric than I had first thought. So I ended up using every useable scrap of fabric on that and had nothing left for the sleeves. (Actually, I think technically it’s a “ruffle” disguised as a peplum! Aren’t peplums cut as circular pieces?)

This top involved completely deconstructing the original shirt, re cutting the pieces and reconstructing it into it’s new form. Excluding finishing techniques the main points are essentially as follows:

1) I cut off the sleeves and collar close to the seams.
2) I lopped (technical term that!) off the bottom section of the shirt at waist height, and set aside for later
3) Then seperated the front and back pieces, and recut the necklines and armholes

4) Sewed the whole thing back to front to create a button back bodice section, and made it much more fitted.
5) I created a long loop of fabric using fabric from the bottom section I’d lopped off earlier, and what I could harvest from the sleeves.
6) Gathered the loop of fabric and stitched to the waistline of the new bodice
The jeans were skinnified in my usual way, and I’ve worn them lots already. I am a fan of purple, it has to be said. Always puts me in mind of that fabulous poem  You know the one I mean…about wearing purple… 😉
cuffs, DIY, refashioning, Sewing Basics, Tutorials

Adding a Simple Cuff to a Sleeve….

11/26/12

Firstly some apologies. This post was meant to go out over a week ago. But here at home we seem to have been visited by every bug going. The winter vomiting bug, flu and chest infections. All of which has meant a few weeks of broken sleep culminating in feeling like we’ve been hit by a train. I finally conceded defeat last week and got some antibiotics from the doctor. So apologies for the delay in posting this.
Secondly the quality of these photos isn’t great. The only windows in my summerhouse are north facing. So even in the summer natural light is at a premium. At this time of year? Well the graininess of these photos says it all! In addition to all that, there have been some developments on the TV front that have taken up some of my time. (More on that in another post!)
Anyhow, back to the business in hand! Simple and cute little turn up cuffs and how easy it is to do them. I used them on this refashioned top recently. It’s a technique that could be applied to an existing garment or one that you make from scratch; and is a neat little way of adding a bit of detail to a plain garment…

1. Begin by measuring the circumference of your sleeve. You can measure all the way round OR, if your sleeve is the same size front and back (as mine is), laid flat, measure seam to seam and then double the measurement. Then decide how wide you want your cuff to be.
2. Make a simple rectangular pattern piece as follows: Length =  Sleeve circumference + seam allowance on both sides. Width = Desired width of cuff x 2 + seam allowance on both edges.
3. Pin to fabric and cut out.
4. You’ll need 2 obviously!

5. Right sides together, sew the ends together to form a loop. Press seam allowances open, then trim excess seam allowance.
6. Fold in half along the length, wrong sides together and lining up the raw edges. Press.

7. With the garment inside out and lining up the seam of your cuff with the underarm seam of your sleeve; pin the raw edge of the cuff to the raw edge of your sleeve.
8. Stitch cuff to sleeve according to your seam allowance.
9. Turn cuff through to the right side of your garment and press. Understitch seam allowance to sleeve. Trim excess seam allowance away.
10. I used a zig zag stitch to understitch my seam allowance. Understitching and finishing off my raw edges in one go. Then “anchor” the cuff in place with a couple of strategic slip stitches. I place a couple of stitches on the underarm seam; and used a button to anchor the cuff in place on the top side.

If you are drafting your cuff pattern from an actual tissue pattern (as opposed to adding them to an existing garment) then simply measure the width of the front and back sleeve pieces and add these measurements together to get the length of your cuff pattern piece. No need to add seam allowance either side of the length, as this will have already been included in the measurements you took from your existing pattern. So there you have it. Simple and cute turn up cuffs. Easy peasy!

kimono tee pattern, pattern adjustments, Pattern Drafting, refashioning, Restyles, self drafted

Refashion: Dress to Cuffed Kimono Tee

11/13/12

This past couple of weeks has been manic what with one thing and another. I haven’t been getting much sewing done at all. So this week I eased back into my sewing groove with a quick and simple refashion.

This dress has been in my refashion pile for eons. Like, 2 years! It was made from a beautiful aubergine shade of purple in a drapey brushed cotton. When deciding on items to refashion, I tend to look past the garment itself to the quality and quantity of fabric that there is to work with. This dress had an ankle length gathered skirt with no darts or such like. So once I had removed the skirt from the bodice, and removed the button placket down the centre, I was left with a really good amount of fabric to work with. One large rectangle from the back of the skirt; and 2 smaller rectangles harvested from the front skirt, cut from either side of the button placket. Out came my trusty kimono tee pattern, and a few minor pattern adjustments later, voila…

After lengthening the pattern slightly and reshaping the hem; I cut the front piece in one from the larger rectangle; then the back piece in two parts from the smaller rectangles. I simply added a CB seam allowance to my pattern, so the “new” top has a centre back seam.
The hem of this top is a “high/low” affair. Scooping down at the back and up at the front. The finished tee was a little plain even for my simple tastes! So I used some leftover scraps to add some little cuffs to the sleeves, finished off with buttons harvested from the original dress. Such a simple thing to do it turns out; (and a quick how to on that to follow later this week) but I think it really finishes this tee off nicely!
Pleased as punch with this one. So comfy to wear and I do love a bit of aubergine (eggplant to those of you across the pond!) Actually I can’t stand aubergine to eat. Bleurgh! But the colour officially rocks!

BTW, my photos, until we get some decent natural light, (in the UK in the winter? Fat chance!) are gonna be fuzzy and pretty crap. Just warnin’ ya!

DIY, Me Elsewhere, refashioning, So Zo..., Tutorials

I’m Guesting over at So Zo….

10/05/12

As you may or may not know, the ever clever, stylish and talented Zoe of So Zo… has recently got married. While she and Mr So Zo are off honeymooning in NYC she has a bunch of guest posts lined up. (Sheesh, to be so organized ahead of your wedding!) Anyhow today is my turn (How chuffed was I to be asked? Very!)
So if you fancy finding out how I managed to get this size 8 vintage blouse to fit my size 12 bod, then hop on over….

You won’t be expecting this one, I promise, lol!

BTW, if you haven’t already left your thoughts on this post, then if you have the time, please do! I need as much feedback as possible!

cynthia rowley 2512, finished garments, refashioning, Thrifting

FO – Cynthia Rowley Skirt – 2512

09/24/12

I mentioned an FO last week that I had to share with you. Well here it is. My second attempt at Cynthia Rowley 2512, except this one, I finished!

You may recognise the fabric from this post. Yep. I made a skirt from curtains….and I love it. This fabric is a vintage screen print by Wemco entitled “Antibes” and was way too nice to use for home furnishings! It’s the perfect weight for a skirt like this.

Construction wise I used the waistband from View C with the skirt construction from View A. I hand picked my zip (I just can’t seem to get a decent finish with machined zips!), used black bias on the hem and waistband; and black fabric from my stash for the pockets and waistband facing. I also lengthened the skirt by about 1.5″.

I opted for pleating instead of gathering the skirt along the waistband. Again, I just can’t seem to get a pleasing effect with gathering and nine times out of ten my gathering thread breaks, which just ends up p****ng me off! I might try sewing my gathering stitches by hand with a stronger (embroidery?) weight thread and see how that goes.

The pattern didn’t call for a bias finish to the top of this waistband and to me it looks a bit obvious that it isn’t supposed to be there. But my feed dogs decided to chew up the fabric a little around the zip. Cheers for that! (I guess you never know how a fabrics gonna behave until you get to sewing with it) So I used the bias to disguise it and protect it from any more fraying. A shame, but there we go!

Overall a pleasing and straightforward pattern to work with. If anything I may cut a size smaller next time.  I’m already pondering whether to use some denim I have in my stash  for another of these OR maybe use it for a Ginger? Hmmmm…..What say ye?

Dressmaking, finished garments, kimono tee pattern, Pattern Drafting, refashioning, Restyles, Thrifting

FO x 2 – Kimono Tee with Pin Tucked Panel & Refashioned Jeans (again!)

09/13/12

Dropping a dress size and a half, (thankyou peops for all your lovely comments and yes Marie. New hair too!) means that pretty much everything I had in my wardrobe no longer fits me. So I’ve started rebuilding my wardrobe pretty much from scratch. This week I finished up a couple of versatile wardrobe basics….

Refashioned Jeans:  I picked these up at a local charity shop for £1.89! They are brand new M&S jeans in a supersoft khaki denim with a bit of stretch. Guess what…..they’re a size 10! I can’t remember the last time I fit into a size 10. In my teens I think! Granted the stretch element of the denim probably helps, but who cares! Anyhow, M&S jeans always fit me nicely in the waist, bum and hips. But the leg styles can often be a little frumpy so I just narrowed them in my usual way.

Black kimono tee: made from fabric that J’s Nanny Flo gave to me. The length means I can wear it out like this, (without fear of builders bum 😉 or tucked into a waistband without causing too much bulk underneath.  It’s self drafted using this method, and then sliced up to insert a triangular panel with pintuck detailing. (The “slicing up” part to be detailed in a post to follow shortly) The neckline, sleeves and hem are all faced with bias. Using bias as a neckline facing is a new revelation to me. I can’t believe I haven’t done it sooner! It’s sooooo easy and negates the need to draft a neckline facing.

 I first used it on my pleat front tunic as detailed in the original pattern instructions.  I can see this being a particularly useful and time saving technique for future makes. Especially for refashioning; where if I wanted to recut a neckline, I would otherwise have to draft a facing by tracing the curve from the fabric. Something that has always stumped me in the past. Daft really when I think about it. I’ve used bias to bind a neckline before. So I don’t know why it never occurred to me to go one step further to steam it into shape and turn it in as a facing instead! a bit of “doh” forehead slapping moment! I’m probably late to the party for that one. You clever lot all knew about it already I’ll bet!

DIY, finished garments, Pattern Drafting, refashioning, vintage

FO x 2 – Pleat Front Tunic and Refashioned Jeans

09/09/12

Yes peops! FINALLY the sewing famine has ended. Elliott started back at school on Monday and I was back in my sewing room like a rat up a drainpipe as soon as I’d dropped him off. So today I have 2 finished projects to share with you. A pair of jeans that I thrifted for £2 and refashioned from full length bootcut to cropped skinnies (see here for how); AND this pleat front tunic that has been rattling around in my head as an idea for weeks…..

I used this vintage pattern as a starting point and then set to work adapting it to fit my design. I fitted the bodice much more closely (seriously the ease on this pattern was ridiculous!), added bust darts and then sliced the pattern up a bit so I could insert the pleated panel……I opted for a more simple, ungathered skirt portion. I’ve dropped from a size 14/16 to a size 12 (Yay! Yes, you may congratulate me 😉 in the past few weeks, and I didn’t want a heavily gathered skirt adding volume to my newly trimmed down frame!! I think the simplicity of the lines works really well………

I’m putting together some diagrams of the drafting process for later in the week. It’s super easy and I will definately be using the technique again to add some detail and interest to plainer fabrics and garment styles..

There’s a bit of a funny story attached to this make. I wore this outfit on Tuesday to a meeting I had in London to do with the…shhhh…..TV thing…..;)
I had been in a rush to make this tunic the day before and in my haste had neglected to finish the armhole seams securely enough. (I don’t have an overlocker so opted for a simple zig zag seam finish). Well….act in haste repent at leisure! Turns out this fabric (a lightweight wool blogged here) is a b****rd for fraying. Half an hour before my meeting I realised that it had frayed right through my flimsy seam finish and there was a messy and rather obvious hole in one of the underarm seams! I spent the whole meeting with my right arm glued to my side and trying to only move it from the elbow down so as not to expose my slapdashery!

So I shall have to put my thinking cap on as to how to try and rescue this make. I rather like it and it would be a shame to see it consigned to the scrapheap after just one outing!!

Dressmaking, Me Made May 12, Pattern Drafting, refashioning

MMM ’12 – Weeks 3 – 4

06/03/12

To be honest, the last week and a half of Me Made May saw me running around like a blue arsed fly with no inclination whatsoever to take any photographs. So I struck on the idea of using the previous couple of week’s photos as my own personal gallery of outfit options. Each day I would flick through, pick an outfit I’d already photographed and wear that for the day. Thereby dispensing with the necessity to take further photos! Ha! Take that you pesky self photography demon!! Of course, I have had my hair cut and coloured since the start of May so it looks as if my hair has miraculously grown back overnight, but you get the gist!

Monday: Navy refashioned top and blue refashioned trousers
Tuesday: Self drafted Geometric top  Trousers – Thrifted
Wednesday: Thrifted stripe top  and Cropped Jeans

Monday tuesday wednesday

Thursday: Denim Shirt – Thrifted (99p) and refashioned Trousers
Friday: Self Drafted Coral Top and  Cropped Jeans
Saturday:  Grey Polka top – Self drafted thrifted Flared Jeans

thursday friday saturday

Monday: (Freshly dyed hair!) Thrifted Cashmere Sweater and Blue Trousers
Tuesday: Self drafted Coral Top and  Bleached Jeans (not blogged)
Wednesday: (no photo) Plaid Shirt and Cropped Tan Jeans
Thursday: (no photo) Geometric Self Drafted Top and thrifted Navy Trousers
Friday: No photo and can’t remember!!
Saturday: Newly thrifted Polka Dot Blouse (£1.50) and refashioned Trousers (and the obligatory summer bob cut)

Monday tuesday saturday

Sunday: (Hot day! Yay!!!) Newly thrifted Silk Jersey Top (£1.50) and refashioned Cropped Jeans
Monday: Refashioned Top and Refashioned Trousers
Tuesday: Can’t remember!
Wednesday: Thrifted Top and refashioned Cropped Jeans
Thursday: This outfit

sunday monday saturday

So that was that! I managed to wear MM garments every day and at least half of those were entirely MM. Yay!! I did it! What I’ve noticed is that I rely heavily on cropped narrow leg trousers. Thoe tan cropped jeans being used in HEAVY rotation. I need a couple more pairs in different colours. I have a purple pair lined up for refashioning and a white pair that I intend to refashion and dye a dove grey colour, or maybe lavender if I’m feeling brave!! I’d forgotten how much I like that navy refashioned top. So I’m on the lookout for more skirts to refashion into tops and hopefully replicate  it in a few more colours/patterns. It really is so easy to throw on and feel instantly fab in. My geometric and grey polka tops are good wardrobe staples too. Both made from the same SUPER simple self drafted pattern. So a couple more of those wouldn’t go amiss. Of course, my button back top still needs some tweaking and once I’ve done that, hopefully I’ll be able to add a raft of those to my Me Made arsenal too. Overall, this challenge was my easiest to date (apart from the photography part!!). A sure sign that MM items are gradually taking over my wardrobe!

How about you? Has MMM 12 left you with a long list of projects? Has it helped you realise how far you’ve come? Hope so!

Me Made May 12, Pattern Drafting, refashioning, Sewing

MMM ’12 – Week 2!

05/14/12

So another week down! I must admit, the last couple of Me Made challenges I’ve participated in were a struggle. Being relatively new to sewing I had only a handful of “wearable” MM items to choose from which made putting together outfitsVERY tricky; and often resulted in somewhat bizarre combinations that certainly didn’t reflect my personal style very much. This time around, it’s proving easier. Namely because I have a growing number of MM items to play with AND, more and more of them are reflective of my personal style. I’ve never really had a “personal style aesthetic” before. It really was a bit incoherent, mismatched and I had alot of “stuff” that just didn’t go with other “stuff” or just didn’t suit me! But the ability to sew and adapt my own clothes seems to have opened the door for me to experiment with different shapes/styles and I can definately see a few patterns emerging in how I dress….

Monday (no photo): Grey top– Self drafted (fabric £4/m),  Flared Jeans – thrifted (£4)
Tuesday: Grey Polka top – Self drafted (fabric £4/m),  Trousers – Thrifted (£2) and refashioned
Wednesday: Thrifted top and cardi, Trousers – Thrifted (£1.50) and refashioned (not blogged)
Thursday: Striped Tee- Thrifted (99p) and refashioned (not blogged), Thrifted (£1.50) and refashioned (not blogged)

Tuesday wednesday thursday

Friday: Navy Top – Thrifted (99p) and refashioned, Trousers – Thrifted (£3)
Saturday: White Blouse – Thrifted (99p)   Cropped Jeans – Thrifted (£3) and refashioned.
Sunday:  Grey Polka top – Self drafted (fabric £4/m), Flared Jeans – thrifted (£4)

friday saturday sunday

Friday’s trousers have been banished from my wardrobe. Saturday, the shape is good but the combo is a bit “mumsy” in hindsight. Sunday is a failsafe of mine. I wear this combo alot and really like it. I’d love to hunt down some more of that polka fabric, (as I fudged the construction of this top a little) but I couldn’t see it on my last trip to Goldhawk Road. The navy trousers (Weds/Thurs) I cropped and narrowed ages ago but never wore them because I’d put on a little weight. Well somehow I must’ve lost some because they now fit, yay! I liked the sailor style button details on the hips but the original length and leg width wasn’t quite right. Both legs really are the same length I promise. When I stand like that in a photo, one knee bent, it make the perspective a little odd! The navy top (Fri) has sat in my repair pile for AGES. (I wore it to “the” blogger meetup in Goldhawk Road last year) It took MMM to give me the kick up the arse I needed to sort it out. I was in a rush to finish it and I, well erm, I didn’t finish it. That is to say, I didn’t finish the raw edges inside before I wore, and then washed it (several times!). I received a few compliments on the “ingenuity” of this top that day. Little did Zoe, Karen et al know the guilty secret that was on the inside! No matter, because it has all been sorted now! Amazing what a zig zag stitch can do in 5 minutes 😉
Oh, and we had some sun too!

Newer Posts
Older Posts
Portia
Follow
Sewbox

© Copyright 2026. Portia Lawrie. All Rights Reserved. Managed by WordPress Web Dev Cornwall .