• About
    • Contact
    • Press
    • Sponsor
  • DIY
    • Home & Garden
    • Jewellery & Accessories
    • Yarn Crafts
  • Sewing
    • patternless & self drafted
    • Refashions
    • Commercial Patterns
    • Sewing Tips
    • Overlockers
  • The Refashioners

Portia Lawrie

DIY, how to, pattern adjustments, Pattern Drafting, Sewing, Tutorials, Uncategorized

The Copycat Crepe Top – (Part 3) – Grading the sewing pattern down (or up!) a size

02/28/16

Ok, so following on from Part 1 & Part 2 of The Copycat Crepe top my final step was to take the pattern that I had copied from the original RTW garment and size it down. This is a first for me. I had never graded a pattern before. But thanks to this great tutorial from Melly Sews (There was also one from Burda that I now can’t find, aaaargh!) I was able to figure it out. I thoroughly recommend hopping over to that tute as well, if this is something you are planning to try!

So here is where I was at….MAKING A SEWING PATTERN FROM AN EXISTING GARMENT

MAKING A SEWING PATTERN FROM AN EXISTING GARMENT
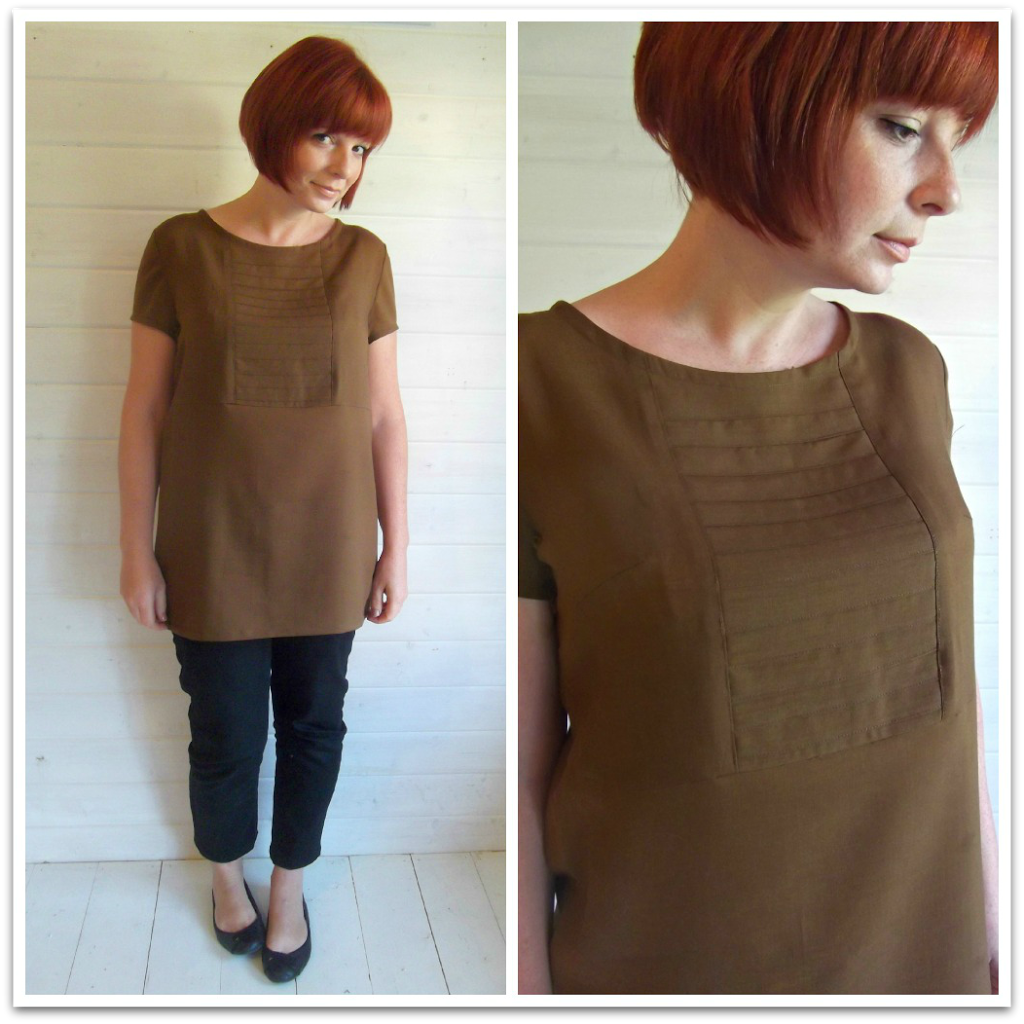
I had made my pattern and tested it with a toile; and in every way in terms of how it hung/fit on me it was pretty much identical to the original top. So I was feeling pretty chuffed with myself! (First time I had made a pattern from a rtw garment too!). Including the fact that it was too big. Probably by about 1-2 sizes was my best guess. The label had been removed so I don’t know the original size.  Based on how the top fit me I reasoned that the difference between the bust size of the top and my own bust size, was about 3″.  That is therefore, how much I wanted to reduce the pattern by across both the front and back pattern pieces. (Known as the “total grade”).

All the advice out there btw, asserts that 1-2 sizes (around 2″) is about the maximum you want to grade a pattern up or down by, in one pass. The reason being that the pattern begins to get increasingly distorted the more you grade by. If you want to grade a pattern by substantially more than that, then it’s best to do it in stages. Grade by 2″ make a totally new pattern, then grade that one by 2″. Obviously I haven’t done that. I’ve graded by 3″. Because I’m naughty like that.

This method involves slashing the pattern pieces along various lines, and overlapping them. Thus making the pieces incrementally smaller. (The exact same process applies for making it bigger, except you spread instead of overlap) The total grade amount (3″ in my case) is split up evenly between the front and back pattern pieces, and then again between multiple lines on those pattern pieces. So each individual overlap is relatively small, but added together they all add up to 3″. (The sleeve is addressed separately after grading the main pattern pieces).

Right, so seeing as this requires me to slice up my pattern pieces, the last thing I wanted to do was mess up the pattern I had so painstakingly created. So my first step was to trace off copies of all the pattern pieces….(then if I fluffed this I was still ok!)GRADING A SEWING PATTERN DOWN - OR UP - A SIZE

Next I drew in my “slash” lines. The process is the same for the front and back pattern pieces here. It’s a simple dartless top so nothing to complicate things thank goodness. You can see 3 vertical lines here. (Yep, they’re double lines but I’ll get to that in a moment. For now lets just call it 3 places on the pattern where I’ve drawn vertical lines, lol!). And one horizontal line. All of the vertical lines are parallel with the CB/CF lines . The horizontal line is perpendicular (90 degrees) to the CB/CF line….GRADING A SEWING PATTERN DOWN - OR UP - A SIZE

Line 1: straight down from the neckline. Line 2: Straight down from the shoulder. Line 3: straight down from the armhole.  Reasonably, when you consider a multi size pattern, then the neckline, shoulder and armhole will differ proportionately between sizes in those areas. So it makes sense to put the adjustment/slash lines in those positions. The horizontal line is roughly at the waist. A pattern will not change in length between sizes, as much as it does in width. So the adjustment here is small, and it seems from everything I’ve read, a standard 3/8″ between sizes. **(see note further down. I did end up putting a second horizontal slash line across the armscye. It may even be preferable to add a third horizontal slash at the shoulder and spread your 3/8″ between them)

OK. So a little math before we go any further. My total grade (the total amount I want to reduce the garment by) is 3″. I’m going to switch to cm here as it gets a little tricky to show the math in inches! So 3″  converts to roughly 7.6cm

I want to split that between two areas. The front & back of the garment. 7.6cm divided by 2 = 3.8cm. So I want to remove 3.8cm from the back of the garment, and 3.8cm from the front.

My pattern pieces represent half the back of the garment and half the front of the garment. So I need to split that measurement in half again. 3.8cm divided by 2 = 1.9cm.  So I want to remove 1.9cm from the back pattern piece, and 1.9cm from the front pattern piece. For the sake of simplicity, what’s 1mm between friends (at least on a loose fitting garment like this)? I’m going to call that 2cm. Just because that’s easier to work with without me losing the will to live!

So now I want to take that 2cm and divide it between my 3 vertical lines.  But hold your horses! It seems that it’s not quite as straightforward as dividing it by 3.  It’s never THAT simple, lol! But…it does make sense. From what I gather from the reading I have done, the change between sizes doesn’t happen equally in those 3 areas. (The vertical line’s I’ve drawn will directly affect the neckline, shoulder and armhole width). The greatest proportion of the change between sizes happens nearest the side seams and that vertical line at the armhole. With a slightly smaller change to the neckline and shoulder….GRADING A SEWING PATTERN DOWN - OR UP - A SIZE

So, with that in mind I took 1cm from the slash line at the armhole. Then 0.5cm each from the slash lines at the shoulder and neckline…GRADING A SEWING PATTERN DOWN - OR UP - A SIZE

My lines here are double. The first line on the left is the one I plan to cut. The second line is drawn to show where I want to butt the cut edge up to when I overlap; the distance between those two lines is the amount I want to grade by in that section.

In the picture below I’ve marked my cutting lines with an x…and marked the distance between the two lines. Essentially I’ll be removing the sections between those two lines…GRADING A SEWING PATTERN DOWN - OR UP - A SIZE

The double dashed lines above are balance marks. They should be perpendicular to my slash lines and drawn with a ruler. I was being a bit slapdash there, sorry! The purpose of them is to provide alignment marks once the piece is slashed. What we don’t want to do is accidentally shift the pattern pieces up or down when we overlap/realign them as this will distort the pattern. Horizontal balance marks serve as a guide to line everything up again…

As does the horizontal slash line at the waist line…GRADING A SEWING PATTERN DOWN - OR UP - A SIZE

So with all of that in place I took a deep breath and sliced up my pattern along my 3 vertical cutting lines…GRADING A SEWING PATTERN DOWN - OR UP - A SIZE

Then overlapped the cut edge up to the second line that I had drawn and stuck in place. You can clearly see why hastily drawn angled balance marks don’t entirely work, lol! The must be straight and at 90 degrees to your vertical line to be effective. Luckily that horizontal line at the waistline served as a very effective balance mark and by aligning that, I made sure the pieces didn’t shift up or down as I overlapped them…GRADING A SEWING PATTERN DOWN - OR UP - A SIZE

On both the front and back pieces….I overlapped all 3 vertical slashes by the amount that I’d marked. (0.5cm  + 0.5cm  + 1cm  = 2cm.)  The horizontal line at the waist is overlapped by 3/8″. Again, from all my reading it seems that this is a standard in pattern grading. For each size you go down (or up) the length is reduced (or increased) by a standard 3/8″. **(I did go back and put a second horizontal slash line extending from the CB/CF line through the armscye and overlapped that by a further 1/8″.  I should probably have done this from the outset plus another horizontal line at the shoulder for good measure. Both those additional horizontal lines  serve to reduce the height of the armscye which seems to me a sensible thing to do as this is something that does change between sizes. As it is mine worked out fine. But…just sayin….).GRADING A SEWING PATTERN DOWN - OR UP - A SIZE

Overlapping will leave areas like the shoulder…GRADING A SEWING PATTERN DOWN - OR UP - A SIZE

The armscye…GRADING A SEWING PATTERN DOWN - OR UP - A SIZE

And the hem… GRADING A SEWING PATTERN DOWN - OR UP - A SIZE

…with areas that need smoothing out.

I tend to make a little “extension” in the area I want to redraw by sandwiching the paper pattern between two layers of masking tape…GRADING A SEWING PATTERN DOWN - OR UP - A SIZE

….and drawing my new line onto the masking tape. If you look carefully you can see the pattern through the masking tape in these pics…GRADING A SEWING PATTERN DOWN - OR UP - A SIZE

Then simply cut away the excces along the new line…GRADING A SEWING PATTERN DOWN - OR UP - A SIZE

Same on the neckline and shoulder and hem…GRADING A SEWING PATTERN DOWN - OR UP - A SIZE

GRADING A SEWING PATTERN DOWN - OR UP - A SIZE

When it comes to grading the sleeve pattern, it’s all about establishing the total amount that you have removed from both the front and back armholes, and removing the same amount from the sleeve pattern…GRADING A SEWING PATTERN DOWN - OR UP - A SIZE

Mine was 1cm from the vertical slash at the armhole on both the front and back pattern pieces. So 2cm in total. Then I took a further 1/8″ across a horizontal slash on both the front and back pattern pieces. So another 2/8″ there. Of course it’s just like me to mix up my metric and imperial as if things aren’t confusing enough, lol!!GRADING A SEWING PATTERN DOWN - OR UP - A SIZE

After a bit of conversion and rounding I calculated I wanted to remove a total of 1″ from the sleeve pattern piece so it matched what I had done to the armholes when I graded them.

The sleeve pattern I slashed with 3 vertical and 1 horizontal line. I spread that 1″ total grade as follows: 3/8″ at the left and right vertical lines. Then 1/8″ each at the centre vertical and 1/8″ at the horizontal line. (You can also see I drew my balance marks properly this time, lol!) Then smoothed out my lines as above….and I was done…GRADING A SEWING PATTERN DOWN - OR UP - A SIZE

I don’t think I did everything technically perfectly here. Namely the number of horizontal slash lines I started with. But hey…it all worked out…and it WORKED! So as my first attempt at grading…I’m pretty chuffed. And it’s nowhere near as difficult or scary as I thought. Being able to grade up or down a size opens up a whole host of options….THE COPYCAT CREPE TOP

…I’m intrigued to learn more!

Don’t forget the Copycat Crepe  Top giveaway with The Splendid Stitch here! Closes tomorrow!!!

DIY, how to, Pattern Drafting, Sewing, Tips and Tricks, Tutorials, Uncategorized

The Copycat Crepe Top – (Part 2) – Making a pattern from an existing garment

02/23/16

Following on from Friday’s post (don’t forget to enter the giveaway on that one btw!) today I’m going to show you what I did to create a sewing pattern from this here rtw top…MAKING A SEWING PATTERN FROM AN EXISTING GARMENT

The method I used involves completely deconstructing the original top. If this is something you absolutely don’t want to do then you could try the “rub off” technique. Not a method I’ve tried yet. But the rub off technique has the benefit of leaving your original garment intact. This method though, enables you to seperate the original pattern pieces and have everything lay flat. Thus enabling easier/more accurate tracing and measuring.  In this instance the top I started with cost me £2 from a charity shop (So I’m not gonna be out of pocket financially here) It was 1-2 sizes too big (label had been removed so not entirely sure but I couldn’t have worn it the way it was). I didn’t like the colour on me (judging by the feel of the fabric there was a high level of synthetic content so dyeing  wasn’t really an option) and there was a stain right in the front. So all in I was happy to slice this one up and make a pattern from it from which I could make multiples of the same design.

The process of deconstructing a garment is such a useful one in terms of learning about construction order and construction techniques. Since rtw garment manufacture will often use more time efficient methods than home sewing patterns, it’s a great opportunity to have a delve and learn a few things that you may be able to apply to future makes. I seam ripped this top in a couple of hours one evening while I was watching Netflix. As I went I noted the order in which I deconstructed the top. (Essentially working backwards from the original construction). When I finished, I simply reversed my deconstruction list to give me my construction order for remaking the top! Make sense? The way the inside seams lay on top of eachother will tell you the order in which they were sewn. It was during this process that I noticed that the underarm and side seams had been sewn after the sleeves had been inserted flat. Prompting me to try this on my first toile and leading to much happy clapping and squealing in shedquarters when I finally achieved the perfect sleeve head! Even if this top hadn’t worked out, that would have been enough of a pay off from this process, for me!MAKING A SEWING PATTERN FROM AN EXISTING GARMENT

Deconstructing left me with these 4 pieces. (Front, back and 2 sleeves). I removed/seam ripped all  of the stitching, taking care not to disrupt any of the raw edges or stretch the fabric around the curves as this would disrupt the shape of the pieces and I want to trace them as closely as possible to what they would have been originally. I also marked the back and front of one of the sleeves. Once they’re laid flat it’s easy to lose track of which side is which and this is of course, an important piece of info in achieving smooth sleeve insertion on the final top! You’ll also notice the folds along the edges where the original seam line was.  Again…important info to have going forward as the amount of seam allowance the top is to be sewn with will impact on the final fit…MAKING A SEWING PATTERN FROM AN EXISTING GARMENT

Before tracing, press all the pieces flat. (You’ll only need to press one of the sleeves obvs). Being careful not to stretch the fabric as you press. The key thing here is we’re pressing (lift, press, lift, press)….not ironing (moving the iron across the fabric in one continuous motion whilst applying pressure)…MAKING A SEWING PATTERN FROM AN EXISTING GARMENT

The next step is to split the front and back of the top in half to give the familiar 1/4 pattern piece.  (Below is my front piece). To do this I folded the piece in half lengthwise and  meticulously lined up the neckline, shoulder, armscye and side seams right on top of eachother; and pinned in place…MAKING A SEWING PATTERN FROM AN EXISTING GARMENT


MAKING A SEWING PATTERN FROM AN EXISTING GARMENT

This essentially gives me a long straight edge that will become my CF seam. I pressed a sharp crease along that edge then opened it all out again….MAKING A SEWING PATTERN FROM AN EXISTING GARMENT

It gave me a super clear and straight cutting line so that I could accurately split the piece in half…MAKING A SEWING PATTERN FROM AN EXISTING GARMENT


MAKING A SEWING PATTERN FROM AN EXISTING GARMENT

Retain one of those to use as a template. Discard the other. Repeat for the back piece. (nb: my back piece was a little tricky as it had a zip installed so I pinned it as I did the front and pressed the CB as far as I could. But ommitted this “cutting up the center” step and skipped straight to tracing around the folded pattern piece).

Weight each piece down, smooth and flat, on top of tracing/pattern/wrapping/brown paper. (I’m working on my sleeve piece here) I didn’t use pins as they can disrupt the line around the edge of the fabric. Carefully trace around the perimeter of the pattern piece…MAKING A SEWING PATTERN FROM AN EXISTING GARMENT

I used a dotted line snugged right up against the edge of the fabric, taking care to draw in any corner points as accurately as possible…MAKING A SEWING PATTERN FROM AN EXISTING GARMENT

I was left with a dotted line, which I then carefully smoothed out using a French curve or ruler…MAKING A SEWING PATTERN FROM AN EXISTING GARMENT

Checking things like seam junctions and corners were square and adjusting my pencil lines as needed…MAKING A SEWING PATTERN FROM AN EXISTING GARMENT

Cut out. Add in those all important front/back sleeve head notches and centre notch….MAKING A SEWING PATTERN FROM AN EXISTING GARMENT

The next measurement I needed was the amount of seam and hem allowances the top had been constructed with. Measuring from the edge with a seam gauge I established those measurements (they’ll vary across the pattern)…MAKING A SEWING PATTERN FROM AN EXISTING GARMENT

And marked them on my pattern piece along with the grainline and pattern details.  NB: The seam allowance on a deconstructed garment will be small as the “trim excess seam allowance” step has already been carried out during the manufacturing process. So further down the line you may want to increase the seam allowance on your pattern.MAKING A SEWING PATTERN FROM AN EXISTING GARMENT

Repeat for the front and back pattern pieces…MAKING A SEWING PATTERN FROM AN EXISTING GARMENT

Once all the pattern pieces are cut out line up any seams that will meet, Shoulder seams, side seams, sleeve seams etc) overlapping seam allowances, and smooth out the edges…you can see that neckline curve below isn’t sitting flush and smooth…MAKING A SEWING PATTERN FROM AN EXISTING GARMENT


MAKING A SEWING PATTERN FROM AN EXISTING GARMENT

Again, any seams that will be sewn together, line up the pattern pieces and snip little notches to give you alignment marks for the construction stage…MAKING A SEWING PATTERN FROM AN EXISTING GARMENT

And that’s it. I marked all my pattern details onto each pattern piece including the words “First Draft” so if I ever needed to work back to a certain point  I’d know which pattern was which. Then I toiled it…and, well it worked! To the point that the size and the way it hung when worn was  identical to the way the original top fit me. So a win then!MAKING A SEWING PATTERN FROM AN EXISTING GARMENT


As I mentioned, the original top was too big and consequently, so was my copy top! So later this week I’ll share the process I followed to grade it down which incidentally, is the same process for sizing a pattern up, bar one detail. I’ll be back later in the week with that post.

But in the meantime, hop over to part one if you haven’t seen it already, for the finished top, and a chance to enter a fab giveaway from The Splendid Stitch

DIY, how to, pattern adjustments, Pattern Drafting, Sewing, Tips and Tricks, Tutorials, Uncategorized

Top Tip: How to raise a “too wide” Raglan Neckline

01/28/16

… Read The Post

Dressmaking, Pattern Drafting, Sewing, Tips and Tricks

top tip: budget friendly pattern weights

03/06/15

Pattern weights are awesome. Fact. They’re quicker than pinning and they don’t tear your tissue patterns or leave pin holes in delicate fabrics. (They’re especially useful for tracing patterns).  My jaw nearly hit the floor when I saw what Dritz were charging for 4 pattern weights on Amazon recently. £30+ !!! Seriously Dritz! WTF!?

These are my pattern weights…

Pattern Weights

I’ve used them for several years and they cost me a big fat £0. They are lead curtain weights, also known as penny weights (they’re actually the size of a 2p piece so I presume the reference relates to the OLD penny). They cost me nothing because I harvested them from the hems of some old curtains that I was using for another project. That said, they’re pretty inexpensive to buy. (Seriously Dritz?! £30 for pattern weights??)

Pattern Weights

I wanted some larger pattern weights so I’ve also ordered some giant washers from Amazon. (Couldn’t get ’em locally sadly). Also super cheap.  I guess the moral is, most particularly if you’re new to sewing, don’t be fooled by all the tools and gadgets that manufacturers dangle in front of you to tempt you to part with your cash. They’re almost always a cheaper alternative! MUCH cheaper (Dritz, I’m looking at you. Yes you! ).

More or less anything with a smooth flat base will do as a pattern weight.  (I’m secretly considering these gorgeous slate pieces) Experienced sewers…what do you use as pattern weights?

DIY, finished garments, how to, kimono tee pattern, Pattern Drafting, self drafted, Tutorials

Draft a simple Kimono Tee: An old project revisited….

05/19/14

“Draft your own Simple Top” was one of my first proper tutorials and still one of my most visited and repinned posts. (That and the bias tape trick!) I guess because a simple basic will always have appeal and a place in our wardrobes. I posted it waaaaay back in October 2011, and whilst that tutorial will still yield a cute and wearable top….I’ve learnt a bit more since then and there are a couple of refinements to the drafting and construction process that I wanted to revisit in an updated tutorial. Mainly to eliminate the drag lines I would often get around the neckline….but also some of the design tweaks  that I tend to apply during construction as opposed to during drafting…in a way….kind of self drafted then refashioned!


Start with a rectangle and calculate the length of the sides as follows:
A = Bust or Hip Measurement (whichever is the larger) + 2-3″ (ease) divide by  4 and + 3″
B = Required length of top + desired hemming allowance
Mark which is your side seam and which is your centre back/front line….


This is what we’re going to end up with….


For the neckline:
C = Mark a point between 2-3″down the CB/CF seam from the top (depending on how low you want your neckline to scoop this could be more but wouldn’t advise it being any less as 2” is just about at the base of your throat)
D = Mark a point along the top edge where you want your neck opening to finish. I used my bra strap as a guide as I don’t like to flash them! This point marks the end of your neck opening and the beginning of your shoulder line.
Draw in your neckline curve either freehand or using a French Curve. Where the neckline curve hits the CB/CF seam needs to be at a 90 degree angle so as to avoid “peaking” when you come to cut out the pattern piece on the fold. 


Now Slope the shoulder (below left):
E = Mark a point 2”down the side seam (The one opposite the centre front/back line) and join to point D. This slopes the shoulder seam to follow the natural slope of your shoulder line and this is the part that avoids pull lines around the neckline….

Draw in the Sleeves (above right):

F = Mark a point approx 8″ down the side seam from what will be the top of your pattern. (This will be your armhole. I made mine 8″. Yours may be slightly more or less depending on how big you want  your armhole opening to be).
G = Square down 3″ from F and and then 3” across (in from the side seam).
Join these two points up creating a curve for the underarm…this will become your actual stitching line/side seam…


Finish the Side Seam:
Join G to your hemline (straight down or slightly angled to create an A line. I prefer the veeeeeery slight A Line to give me a bit more ease at the hips) and you have your basic pattern piece!


Add a seam allowance to the underarm/ side seam AND the shoulder seam…then cut out your pattern piece and mark relevant details like the grainline, fold, size etc. 


Then cut 2 on the fold out of your fashion fabric and with RS together sew together the shoulder seams and then the side seams.
You now have a basic kimono tee! (Or tunic/dress depending on how long you drafted it). Try it on for size. At this point you can choose to take it in or let it out a bit. Or tweak the design elements. For instance, I scooped my front neckline down a little, shortened the sleeves, added a patch pocket and cut a shirt tail hem. You could shorten it, cut a high low hem, add cuffs to the sleeves, cut a scoop back, ruche the sleeves, add a faux button placket, peter pan collar….what ever your imagination allows. At this stage you essentially have a blank canvas on which to create. And once you have that basic pattern piece, you can just keep churning out a basic shape, that you can turn into a different top each and every time by changing up design details….what about making this in a semi sheer bold print cotton lawn, and slicing it right up the centre to make a kimono cover up for cool summer evenings…..or drafting it ankle length to and making in a drapey jersey to make a maxi dress?


I guess that’s why I keep coming back to this shape time and time again. It’s easy, it’s quick, its comfy, and it’s as versatile as your imagination allows it to be !
 
Once you’ve tweaked to your hearts content, finish seam allowances, hems and neckline.  I finished the neckline with self fabric bias tape,(see posts here and here) and just hemmed the bottom and sleeves with a narrow hem. Simple as that. Go on! Give it a go! 


kimono tee pattern, pattern adjustments, Pattern Drafting, refashioning, Restyles, self drafted

Refashion: Dress to Cuffed Kimono Tee

11/13/12

This past couple of weeks has been manic what with one thing and another. I haven’t been getting much sewing done at all. So this week I eased back into my sewing groove with a quick and simple refashion.

This dress has been in my refashion pile for eons. Like, 2 years! It was made from a beautiful aubergine shade of purple in a drapey brushed cotton. When deciding on items to refashion, I tend to look past the garment itself to the quality and quantity of fabric that there is to work with. This dress had an ankle length gathered skirt with no darts or such like. So once I had removed the skirt from the bodice, and removed the button placket down the centre, I was left with a really good amount of fabric to work with. One large rectangle from the back of the skirt; and 2 smaller rectangles harvested from the front skirt, cut from either side of the button placket. Out came my trusty kimono tee pattern, and a few minor pattern adjustments later, voila…

After lengthening the pattern slightly and reshaping the hem; I cut the front piece in one from the larger rectangle; then the back piece in two parts from the smaller rectangles. I simply added a CB seam allowance to my pattern, so the “new” top has a centre back seam.
The hem of this top is a “high/low” affair. Scooping down at the back and up at the front. The finished tee was a little plain even for my simple tastes! So I used some leftover scraps to add some little cuffs to the sleeves, finished off with buttons harvested from the original dress. Such a simple thing to do it turns out; (and a quick how to on that to follow later this week) but I think it really finishes this tee off nicely!
Pleased as punch with this one. So comfy to wear and I do love a bit of aubergine (eggplant to those of you across the pond!) Actually I can’t stand aubergine to eat. Bleurgh! But the colour officially rocks!

BTW, my photos, until we get some decent natural light, (in the UK in the winter? Fat chance!) are gonna be fuzzy and pretty crap. Just warnin’ ya!

finished garments, kimono tee pattern, Pattern Drafting, self drafted

FO – The Plum Pudding Tunic

10/01/12

Friends, we are skint at the moment! I have no shame in saying this. It is a simple statement of financial fact at the moment, not a reflection on our “value” as individuals! It is, without doubt, a situation that countless families are facing right now. J has yet to secure another job almost 3 months after being made redundant, and while we’re scraping by financially at the moment, there really isn’t room in our budget for me to go fabric shopping right now. Not being one to let a small detail like cash get in the way, I’ve been stash bustin’ instead….
I had this smallish piece of brushed cotton fabric in my stash. A little over a metre long and 45″ wide. I loved the snuggly texture and the plum shades seemed to me, to be perfect for Autumn and Winter. Just one question…what to make with it? The piece was too small to allow room for the placement of multiple pattern pieces. So I opted keep it simple and reached for my trusty self drafted “kimono” sleeve top; with a few variations….

I really squeeeezed this out of the yardage. I managed to cut the 2 main pattern pieces side by side across the width; as opposed to on the fold. I literally had a mm to spare, but I managed it by shortening the sleeves and keeping any ease to a minimum, until everything fit in across the width. I extended my original pattern to more of a tunic length and flared it slightly from the waist to accommodate hips/bum etc.

Construction is obviously really simple. The main change I made here, is that I flipped the facing to the outside to create a little interest around the neckline. I bound the outer edge of the facing before applying it to the neckline in reverse; so that it flipped through to the outside instead; a bit like you would a collar I guess. I then topstitched the facing down through the bias bound edge; so it’s a fixed detail rather than a collar flapping around.

The sleeve hems are bias bound to tie in with the neckline detail; and if you were to look really closely at the sleeve hems, you would see those teeny tiny holes you get along the selvedge. That’s how close a cut this one was peops! Barely enough fabric left from this to make a pincushion!

DIY, Dressmaking, Pattern Drafting, Tips and Tricks, Tutorials

Adding a Decorative Panel to a Front Bodice…

09/14/12

With two of my most recent makes I have been experimenting with inserting decorative panels….

As promised, here’s a breakdown of how simple it is to alter a front bodice pattern piece to add this detail:

1: Draw in where you want the panel to be, being careful to avoid any darts. It will be half the width of your finished panel
2: Cut along this line so you now have two new pattern pieces
3: Trace the new pieces and add your seam allowance

You will need to cut 2 of pattern piece A, and then (once you have finished pleating/pintucking your fabric panel) cut 1 of pattern piece B, on the fold (placing what was the original centre front onto the fold)

For my pleat front tunic I pleated a panel of fabric, pressing and pinning the pleats in place one at a time. I then topstitched each pleat down and once my pleated panel was long enough to accomodate my new pattern piece, I cut the pattern piece from my pleated panel of fabric. I left a small section at the top and bottom unpleated so as to avoid bulk at the neckline and waist seams….then join it to the other two bodice pieces and continue on with your make as normal!

I used the same method for my black kimono tee except of course, the panel I drew in was triangular, and I used pintucks instead of pleats. The triangle also doesn’t reach to the bottom of my original pattern piece on this make. So my pattern piece A in this instance, was cut on the fold; and when opened out had a deep V missing out of the centre ready for the triangular panel to be inserted.

And there you have it. A simple way to add some detail to a plain bodice front. The method will work for pretty much any shaped panel. Scooped, square, oblong, rounded etc; and you could use it to insert a panel of contrasting fabric, lace, a button placket, ruched/gathered panel, pleated panel, embroidered, pleated,whatever. Whatever your imagination desires!

Dressmaking, finished garments, kimono tee pattern, Pattern Drafting, refashioning, Restyles, Thrifting

FO x 2 – Kimono Tee with Pin Tucked Panel & Refashioned Jeans (again!)

09/13/12

Dropping a dress size and a half, (thankyou peops for all your lovely comments and yes Marie. New hair too!) means that pretty much everything I had in my wardrobe no longer fits me. So I’ve started rebuilding my wardrobe pretty much from scratch. This week I finished up a couple of versatile wardrobe basics….

Refashioned Jeans:  I picked these up at a local charity shop for £1.89! They are brand new M&S jeans in a supersoft khaki denim with a bit of stretch. Guess what…..they’re a size 10! I can’t remember the last time I fit into a size 10. In my teens I think! Granted the stretch element of the denim probably helps, but who cares! Anyhow, M&S jeans always fit me nicely in the waist, bum and hips. But the leg styles can often be a little frumpy so I just narrowed them in my usual way.

Black kimono tee: made from fabric that J’s Nanny Flo gave to me. The length means I can wear it out like this, (without fear of builders bum 😉 or tucked into a waistband without causing too much bulk underneath.  It’s self drafted using this method, and then sliced up to insert a triangular panel with pintuck detailing. (The “slicing up” part to be detailed in a post to follow shortly) The neckline, sleeves and hem are all faced with bias. Using bias as a neckline facing is a new revelation to me. I can’t believe I haven’t done it sooner! It’s sooooo easy and negates the need to draft a neckline facing.

 I first used it on my pleat front tunic as detailed in the original pattern instructions.  I can see this being a particularly useful and time saving technique for future makes. Especially for refashioning; where if I wanted to recut a neckline, I would otherwise have to draft a facing by tracing the curve from the fabric. Something that has always stumped me in the past. Daft really when I think about it. I’ve used bias to bind a neckline before. So I don’t know why it never occurred to me to go one step further to steam it into shape and turn it in as a facing instead! a bit of “doh” forehead slapping moment! I’m probably late to the party for that one. You clever lot all knew about it already I’ll bet!

DIY, finished garments, Pattern Drafting, refashioning, vintage

FO x 2 – Pleat Front Tunic and Refashioned Jeans

09/09/12

Yes peops! FINALLY the sewing famine has ended. Elliott started back at school on Monday and I was back in my sewing room like a rat up a drainpipe as soon as I’d dropped him off. So today I have 2 finished projects to share with you. A pair of jeans that I thrifted for £2 and refashioned from full length bootcut to cropped skinnies (see here for how); AND this pleat front tunic that has been rattling around in my head as an idea for weeks…..

I used this vintage pattern as a starting point and then set to work adapting it to fit my design. I fitted the bodice much more closely (seriously the ease on this pattern was ridiculous!), added bust darts and then sliced the pattern up a bit so I could insert the pleated panel……I opted for a more simple, ungathered skirt portion. I’ve dropped from a size 14/16 to a size 12 (Yay! Yes, you may congratulate me 😉 in the past few weeks, and I didn’t want a heavily gathered skirt adding volume to my newly trimmed down frame!! I think the simplicity of the lines works really well………

I’m putting together some diagrams of the drafting process for later in the week. It’s super easy and I will definately be using the technique again to add some detail and interest to plainer fabrics and garment styles..

There’s a bit of a funny story attached to this make. I wore this outfit on Tuesday to a meeting I had in London to do with the…shhhh…..TV thing…..;)
I had been in a rush to make this tunic the day before and in my haste had neglected to finish the armhole seams securely enough. (I don’t have an overlocker so opted for a simple zig zag seam finish). Well….act in haste repent at leisure! Turns out this fabric (a lightweight wool blogged here) is a b****rd for fraying. Half an hour before my meeting I realised that it had frayed right through my flimsy seam finish and there was a messy and rather obvious hole in one of the underarm seams! I spent the whole meeting with my right arm glued to my side and trying to only move it from the elbow down so as not to expose my slapdashery!

So I shall have to put my thinking cap on as to how to try and rescue this make. I rather like it and it would be a shame to see it consigned to the scrapheap after just one outing!!

Older Posts
Portia
Follow
Sewbox

© Copyright 2026. Portia Lawrie. All Rights Reserved. Managed by WordPress Web Dev Cornwall .