• About
    • Contact
    • Press
    • Sponsor
  • DIY
    • Home & Garden
    • Jewellery & Accessories
    • Yarn Crafts
  • Sewing
    • patternless & self drafted
    • Refashions
    • Commercial Patterns
    • Sewing Tips
    • Overlockers
  • The Refashioners

Portia Lawrie

finished garments, Sewing

FO: Maya Pattern Hack into a Boxy Cuffed Tee

05/11/15

At the moment I’m busy with preparations for The Refashioners 2015 (expect an announcement of this years stunningly good line up shortly!) and the imminent arrival of my new summerhouse which will become Makery Shedquarters 😉 (hence the slight radio silence around here last week!) So just a quickie post today to share my most recent make….
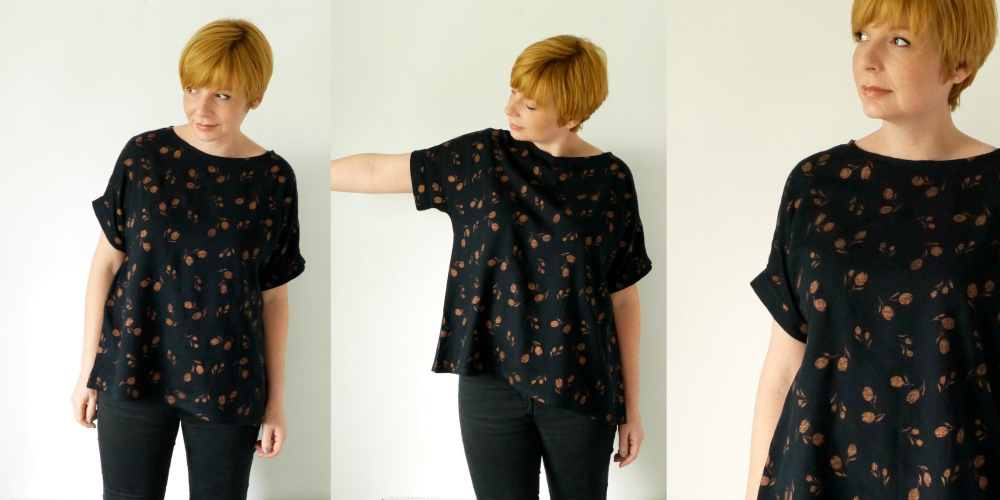
Maya pattern hack into a boxy cuffed tee

Made from a gauzy lightweight cotton with a copper floral print. I picked this fabric up at a local craft jumble, in aid of Essex Air Ambulance, for a mere £2 for 2.5m. So that was a bit of a score then! Style wise I revisited the lovely Maya pattern by Marilla Walker. But this time I made some modifications. I omitted the pocket and instead of the curved hem opted for a straight hem to achieve a more boxy look. I extended the kimono sleeve by about 2″ and added cuffs.

Cuffs are so simple to add to a sleeve and make a lovely extra design element to an otherwise plain top. Simply cut a band that is double the width you want your finished cuff to be plus seam allowance; and the same length as the circumference of your sleeve, plus seam allowance. Join the ends, RS together; then turn right side out; fold in half. To attach to your sleeve hem turn the top inside out and slide the sleeve inside the cuff; align raw edges; and sew/serge all the way around. Press seam allowances upwards towards the cuff and understitch. Turn cuff through to right side and press! Mine are topstitched down but you could also hand tack at strategic points to keep in place or add a little button and tab detail for another cute design element 🙂

Dressmaking, finished garments, marilla walker, pdf patterns, Sewing, sewing patterns, tops

FO: Maya Top by Marilla Walker

04/21/15

Marilla Walker Maya Top at www.portialawrie.co.uk

This top has been sat unfinished for about 3 months. Seriously. I am a serial UFO’er.  All it needed was the neckline facing and the sleeves hemming. I love the fabric and the style is right up my strata so why oh why have I taken this long to finish it? Simple answer is, there is no answer. Apart from I need to give myself a slap! I LOVE this top.  The curved hem, the boat neck the kimono sleeve. I mean if ever a pattern was made for me this is it…


The fabric is an ebay purchase at £4.95 a metre. (You may recognise it from my banded tee) It has a veeeeery subtle metallic element to the lighter part of the weave. Nothing flashy. Like you could hardly notice if I hadn’t told you and you were standing right next to me. That kinda subtle. The overall effect is like a luxe tie dye if that makes any sense whatsoever?? I have no idea what the fabric content is and sadly the seller has run out, but hey ho, I like!

Marilla Walker Maya Top at www.portialawrie.co.uk

It’s not complex. But it is versatile. The pattern comes in two lengths (a dress and a top) with button through and hem variations and I’m already planning some customisations as this is the perfect basic to have a play with.


In terms of sizing it’s pretty spot on. What I would add is there is not a great deal of play with the size of the armhole. It’s snug. So if you’re cutting a smaller size than you normally would for some reason, blend it back up to your usual size at the sleeves.

PicMonkey Collage

You can introduce yourself to Marilla here (she’s lovely. Say Hi) if you haven’t discovered her yet, be sure to check out her blog!

boiled wool, dragonfly fabrics, finished garments, freemantle coat, marilla walker

FO: Freemantle Coat by Marilla Walker

01/31/15

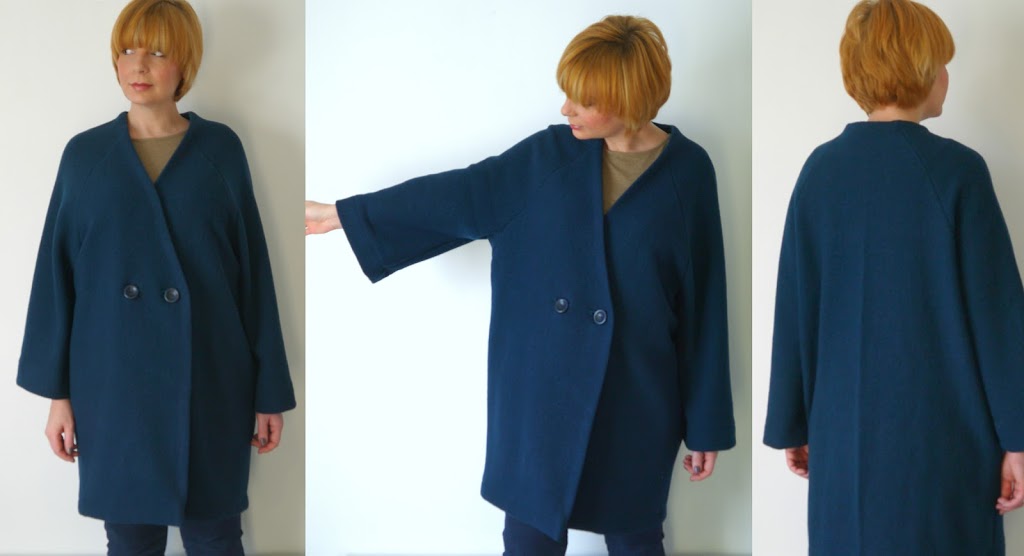
Look peops! I made a coat!

I’d been devouring little sneak peeks of this pattern on instagram and marvelling at the striking resemblance it had to some of the coat styles I’d been pinning on Pinterest. So when Marilla put out a call asking for pattern testers…well….I was straight in there like a rat up a drainpipe!

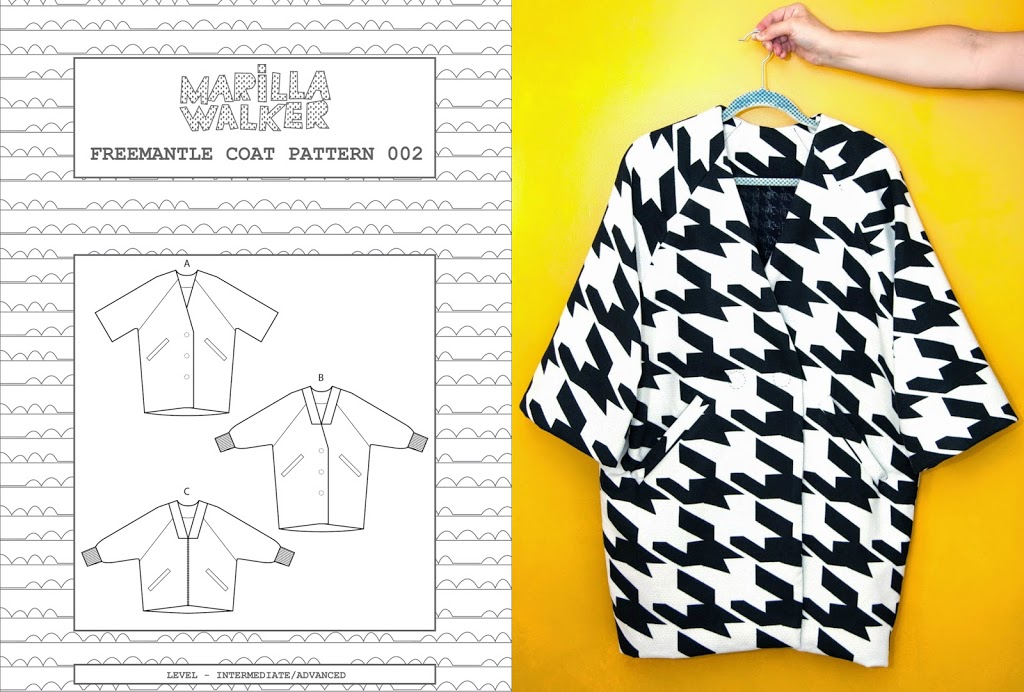
Enter the Freemantle Coat by Marilla Walker!  The cocoon shape is wide across the body and torso and tapers to a narrower shape at the hem, which on the view I opted for, stops just above the knee. There are three views to choose from, two sleeve options, and button/giant popper or zip closure options too as well as welt pockets (which I ommitted on my sample due to time constraints)  So in my book, this pattern is great value for money.  Here it is…Just check out the giant houndstooth version Marilla made!

Particularly cool is the construction of the sleeve with its integral gusset extension.  A bit of a head scratcher on first inspection, but actually really simple, clever , and strangely satisfying! Just folow the instructions step by step, and have faith, all becomes clear! Talking of construction….SUPER straightforward. The style is so simple, with such clean lines and subtle details that it’s a breeze to sew. No troublesome fitting issues due to the ease built into the design. In short, this was a cinch to sew. The only possible stumbling block I can see for a beginner would be the welt pockets. In terms of the the quality of the drafting I was also super impressed. Everything lined up perfectly including the intersecting seams of the underarm gusset (I love that word).

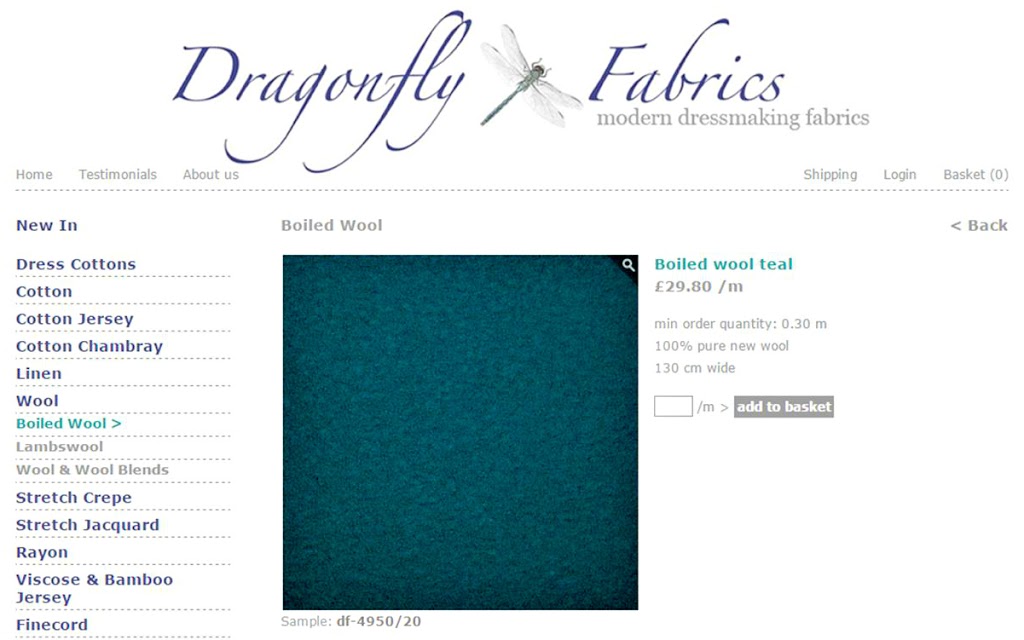
What made things even simpler for me was the fabric I chose. This beautiful boiled wool from Dragonfly Fabrics. I didn’t need to underline or finish seams which cut down my construction time considerably. I just adore this fabric, A dream to cut, sew and wear, I had a hard time choosing which colour to go for when browsing the range, but I’m so glad I opted for this teal. I’ve had so many compliments.

There are literally no negatives for me with this make. And I am totally going to be making more. I fancy trying this out in sweatshirt material for instance. The only thing I may change next time is the button placement which I may move marginally closer to the the edge of the opening, as on mine it doesn’t quite hold it flat. Although I also fancy having a play with the proportions and mixing the sleeve options from view B (omitting the ribbing) with view A. Maybe playing with an asymmetric opening or adding a shawl collar.

In any case, this pattern has me excited as it’s ripe for some creative play, and I can definitely see another Freemantle in my future!


finished garments, refashion, refashioning, Thrifting

Refashion: Long Tailed Shirt

01/12/15

Sometimes a few minor tweaks is all it takes to bring a charity shop find (£1.50) bang up to date. This polka dot shirt had a lovely drape. Even the fact that it was XXL was not a problem in itself as it just meant that it had that slouchy feel that I am most at home in; and I loved the fabric. Lightweight. Drapey. Perfect. After a couple of tweeks with the proportions that is…

I turned the original sleeve hem to the outside and edge stitched to a) marginally shorten the sleeve and b) create a faux cuff/turn up…

Split the side seam, left the back hem the length it was and re hemmed the front approx. 2″ shorter…

…and that quite literally…was IT! Subtle changes but eminently more wearable 🙂

Sincere apologies for the grainy images. I need to work on some lighting  at the new house. This is literally the only spot where I have a clear, plain backdrop to do garment pics. The window is along the same wall to my left and is west facing so the light is especially AWFUL at this time of year. Boo to grey winter days. After several weeks of varying degrees of illness in this household, I’m sooooo ready for spring to bloom, aren’t you?


DIY, finished garments, how to, refashion, refashioning, Thrifting, trousers, Tutorials

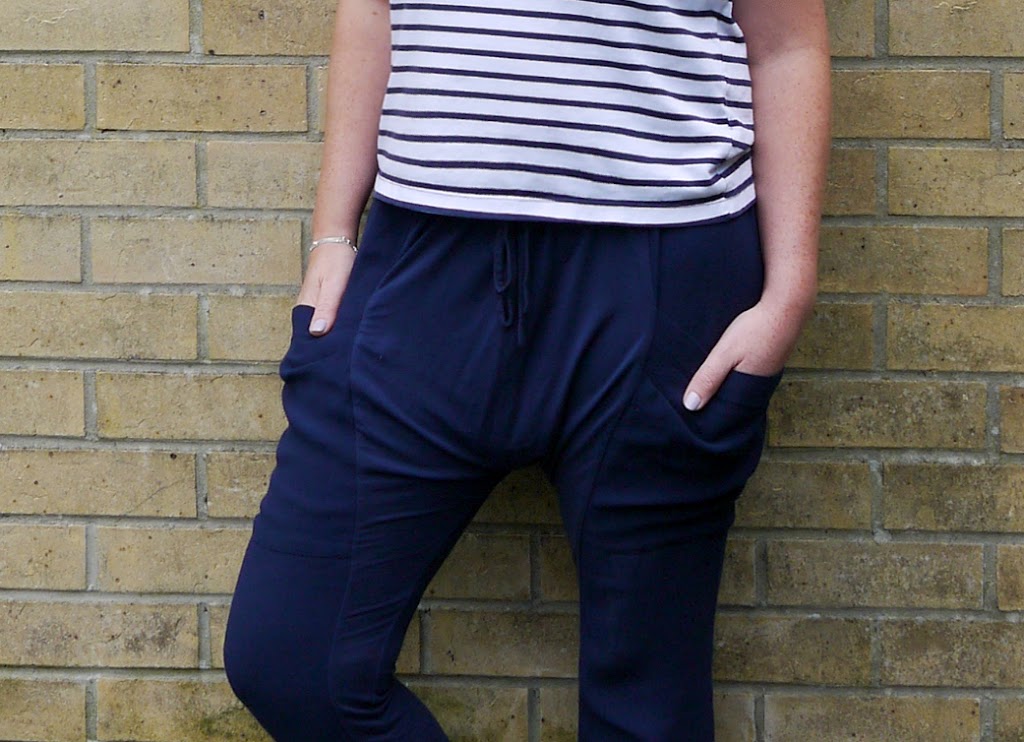
Refashion: M&S Maxi to Slouchy Harem Pants

09/08/14

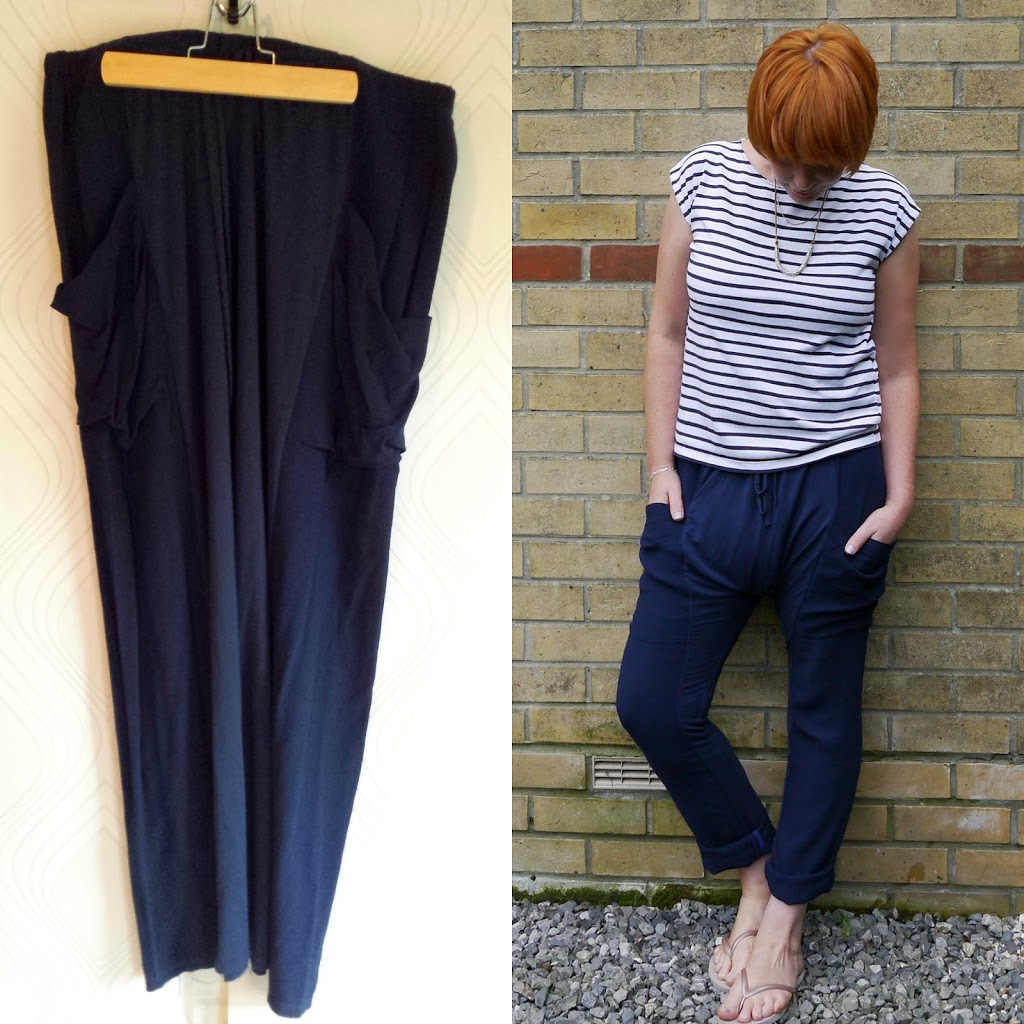
Before our house move (and the temporary loss of sewing facilities) a couple of weeks ago I had time to squeeze in a few projects. One was this refashion of a thrifted maxi into some so so comfy (read “worn to death whilst chilling at home”) slouchy harem pants. Difficult to tell from the picture but the skirt comprised of central jersey panels with the side panels made from a kind of textured crepe with utility style slouchy pockets….

You can kinda see the panelling and seaming in this photo

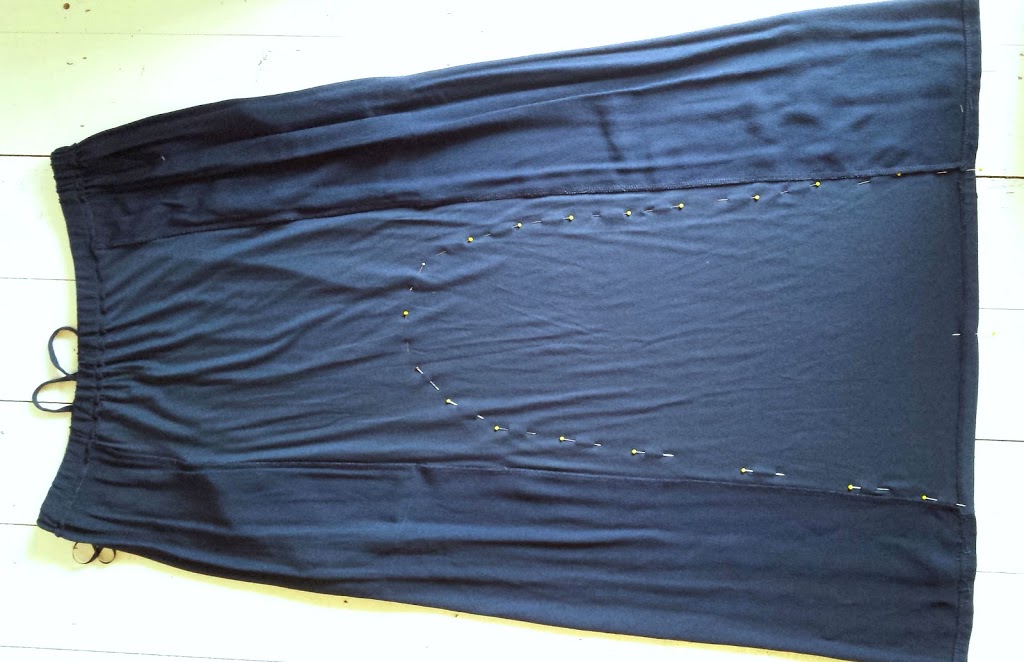
This could not have been simpler really! I marked out new inseams and a curved “dropped crotch” seam with pins…I completely eyeballed this…

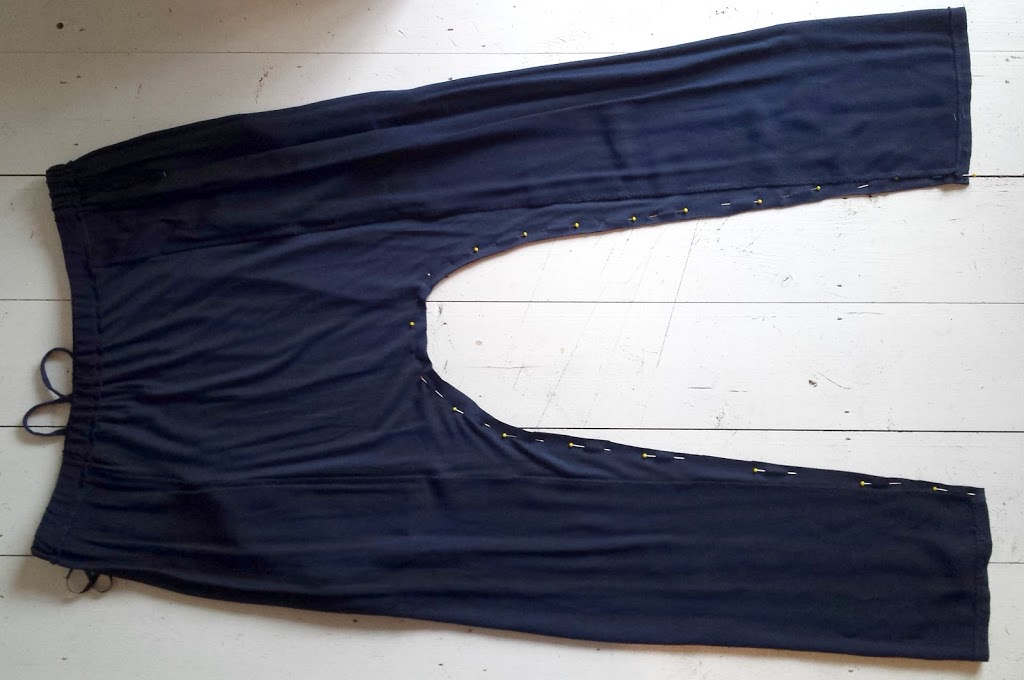
Then I cut out the excess leaving a little allowance for serging…

…and…er…serged basically. That was it.

These are sooooo comfy for lounging around in at home, and were lovely to wear dressed up a bit more on an evening out during our trip to Malta, back in August. So much so that I used these as a base to draft a similar pair from scratch. Deets on that coming soon!


DIY, finished garments, how to, kimono tee pattern, Pattern Drafting, self drafted, Tutorials

Draft a simple Kimono Tee: An old project revisited….

05/19/14

“Draft your own Simple Top” was one of my first proper tutorials and still one of my most visited and repinned posts. (That and the bias tape trick!) I guess because a simple basic will always have appeal and a place in our wardrobes. I posted it waaaaay back in October 2011, and whilst that tutorial will still yield a cute and wearable top….I’ve learnt a bit more since then and there are a couple of refinements to the drafting and construction process that I wanted to revisit in an updated tutorial. Mainly to eliminate the drag lines I would often get around the neckline….but also some of the design tweaks  that I tend to apply during construction as opposed to during drafting…in a way….kind of self drafted then refashioned!


Start with a rectangle and calculate the length of the sides as follows:
A = Bust or Hip Measurement (whichever is the larger) + 2-3″ (ease) divide by  4 and + 3″
B = Required length of top + desired hemming allowance
Mark which is your side seam and which is your centre back/front line….


This is what we’re going to end up with….


For the neckline:
C = Mark a point between 2-3″down the CB/CF seam from the top (depending on how low you want your neckline to scoop this could be more but wouldn’t advise it being any less as 2” is just about at the base of your throat)
D = Mark a point along the top edge where you want your neck opening to finish. I used my bra strap as a guide as I don’t like to flash them! This point marks the end of your neck opening and the beginning of your shoulder line.
Draw in your neckline curve either freehand or using a French Curve. Where the neckline curve hits the CB/CF seam needs to be at a 90 degree angle so as to avoid “peaking” when you come to cut out the pattern piece on the fold. 


Now Slope the shoulder (below left):
E = Mark a point 2”down the side seam (The one opposite the centre front/back line) and join to point D. This slopes the shoulder seam to follow the natural slope of your shoulder line and this is the part that avoids pull lines around the neckline….

Draw in the Sleeves (above right):

F = Mark a point approx 8″ down the side seam from what will be the top of your pattern. (This will be your armhole. I made mine 8″. Yours may be slightly more or less depending on how big you want  your armhole opening to be).
G = Square down 3″ from F and and then 3” across (in from the side seam).
Join these two points up creating a curve for the underarm…this will become your actual stitching line/side seam…


Finish the Side Seam:
Join G to your hemline (straight down or slightly angled to create an A line. I prefer the veeeeeery slight A Line to give me a bit more ease at the hips) and you have your basic pattern piece!


Add a seam allowance to the underarm/ side seam AND the shoulder seam…then cut out your pattern piece and mark relevant details like the grainline, fold, size etc. 


Then cut 2 on the fold out of your fashion fabric and with RS together sew together the shoulder seams and then the side seams.
You now have a basic kimono tee! (Or tunic/dress depending on how long you drafted it). Try it on for size. At this point you can choose to take it in or let it out a bit. Or tweak the design elements. For instance, I scooped my front neckline down a little, shortened the sleeves, added a patch pocket and cut a shirt tail hem. You could shorten it, cut a high low hem, add cuffs to the sleeves, cut a scoop back, ruche the sleeves, add a faux button placket, peter pan collar….what ever your imagination allows. At this stage you essentially have a blank canvas on which to create. And once you have that basic pattern piece, you can just keep churning out a basic shape, that you can turn into a different top each and every time by changing up design details….what about making this in a semi sheer bold print cotton lawn, and slicing it right up the centre to make a kimono cover up for cool summer evenings…..or drafting it ankle length to and making in a drapey jersey to make a maxi dress?


I guess that’s why I keep coming back to this shape time and time again. It’s easy, it’s quick, its comfy, and it’s as versatile as your imagination allows it to be !
 
Once you’ve tweaked to your hearts content, finish seam allowances, hems and neckline.  I finished the neckline with self fabric bias tape,(see posts here and here) and just hemmed the bottom and sleeves with a narrow hem. Simple as that. Go on! Give it a go! 


finished garments, grainline, hemlock tee, knits, overlockers, refashioning

FO: Sheer Knit Hemlock Tee Variation…

02/22/14

I recently whipped up this variation on Grainline’s Hemlock Tee. It’s made using a sheer knit fabric (hence I also had to whip up the vest top underneath!) that I bought from Minerva crafts at £4.99/m available here. I bought the ivory, which as you can see is much more white in reality. I used the exact same process on this make as I used for this pashmina refashion if you want more step by step deets….;)

Thinking I might whip up a few vest tops in different colours to layer underneath. (In fact if Minerva had this type of fabric in a range of colours  I’d probably make more of these too) I kinda hashed this vest top a bit. It hardly qualifies as self drafted as I literally laid a vest top I already had straight onto the jersey fabric, cut around it, and then whizzed it through the overlocker. Not my finest hour, lol!  Can any of you recommend a simple vest pattern??

Oh,and I had a couple of emails asking to see what my recently refashioned coat actually looked like on…and being the obedient gal that I am…

My best friend, who is extremely honest (which I love about her 😉  said that when she had seen my recent post about this coat, she thought it looked a bit “granny’ish” on the mannequin; but that actually it looked better on. I’m still not sure whether that meant that she approved overall. But I’m happy to settle for “granny chic”….

DIY, finished garments, how to, knits, overlockers, Sewing, Tutorials

DIY: Simple Tube Skirt

01/18/14

Aw, man! It’s been aaaaages! Actually a matter of a few weeks but it feels like ages. My new job has been taking up alot of my time & energy over the Christmas period and then….then my sewing machine went and died on me (she’s better now you’ll be pleased to hear!). But thankyou to all of you who have dropped me a line to check I haven’t fallen off the face of the earth!

Whilst said sewing machine was out of action I’ve had a bit of a dabble with my new overlocker (yay for Aldi!). I have to say, I’m slightly smitten! If you want a quick dressmaking fix and the ability to whip a garment up in under an hour….you can’t beat a bit of overlocking to fill the sewing void! This skirt is a case in point. Made from an Aztec ponte esque double jersey from Minerva Crafts currently in the sale at £4.99 per metre; whipped up in less than 40 mins; sooooooo comfy and sooooo easy! Look, adjustable length too! No magic to that… it’s just because it sits comfortably on the hips or the waist, depending on your preference….

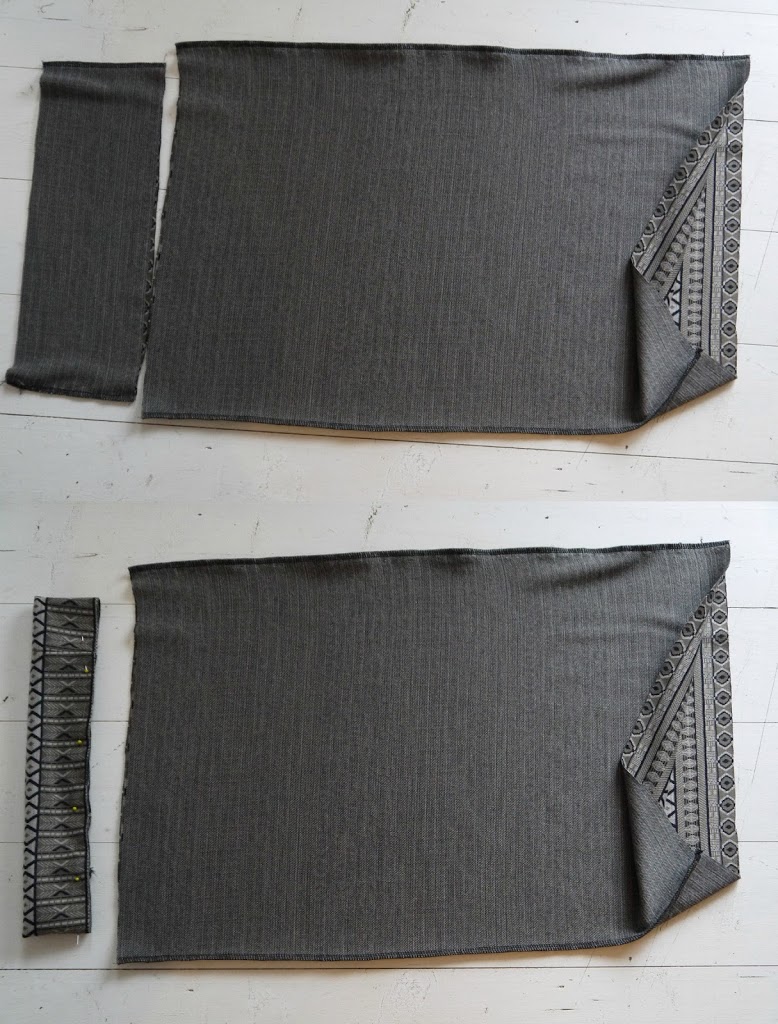
Start by creating a simple tube, serged down both sides, that fits you snugly and is several inches longer than you want the finished skirt to be. Then lop a band off the top that is double the width you want your finished waistband to be, plus a bit of seam allowance…

Serge about 1 1/2″ off one side of that band so it is slightly shorter than the width of your skirt top. Then fold the band in half, wrong sides together with raw edges even…

To attach the waistband, turn the skirt part right side out, then pin the band, right sides together, to the top of the skirt, with raw edges all together. Serge all the way round…..stretching slightly to take up the slack of the skirt top, which is obviously slightly larger than the band…

Then flip the waistband up and press…ta dah! I PROMISE, this is the comfiest waistband EVER! Then simply hem the skirt to the desired length and your’re done 🙂

Please feel free to share your super quick and easy serger projects in the comments section….I’m on the lookout for more! Consider me hooked!


finished garments, hemlock tee, jersey, minerva

FO: My Hemlock Dress

09/27/13

So I had a step by step all photographed for this make. Unfortunately someone, who shall rename nameless, managed to delete all the photos from our SD card. So when I came to write up this post….erm….no photos! Aaaargh! But, I’m sure you’ll get the gist. Let me explain….

This is yet another incarnation of the fabulously versatile and free Hemlock Tee pattern. The fabric is a lovely medium weight jersey with a fine fleecy underside from Minerva Crafts. It’s from their clearance section & priced at £5.99/m. In fact they have a whole heap of jersey on clearance at the moment from as little as £1.99/m. You may have also noticed from my sidebar ads that they are one of my new sponsors….which means if you use the code PORTIA10 at checkout, you’ll get a further 10% off. So if you wanted to recreate a jersey Hemlock dress of your own….hop over there if you fancy a bargain 😉 With a free pattern and discounted fabric, what’s not to love! I would recommend medium to heavy weight jersey for this make. Perhaps even a ponte?

On the subject of how this little number was created, clearly I made a few adjustments:

  • I used the back pattern piece to cut both the front and back pieces of this dress. It makes for a higher, slash neck effect at the front.
  • I lengthened my main pattern piece by several inches.
  • I shortened the sleeve pattern piece so the sleeves are elbow length (I always pull ’em up anyway so why not!)
  • I also shaped the dress so it followed the curve of my body. Not snugly, but it made for a subtly more flattering silhouette in this dress version.

Because of the way the Hemlock Tee is constructed, it is perfect for “pinning to shape”.  The shoulder seams are sewn first. Then the sleeves are attached whilst the fabric is flat (rather than inserted into an armhole). THEN, the sleeves and side seams are sewn in one continuous line. So at THIS stage, rather than stitching as per the instructions, I pinned it to fit me the way I wanted (yes I am a contortionist at weekends) then removed the dress (yes I did stab myself with pins in the process) and used the pins as a guide to draw in my new, more shapely, side seams. Does that make sense?! You could of course pin it so it was much more body con than I have done. Jersey’s great like that!

Man I’m so bummed I don’t have the step by step photos. I was all set to show you the difference between the original seam and the new curvier one AND how I managed to draw in the new seam lines symmetrically on both sides. Also how I achieve a finish similar to an overlocker on my standard machine! But alas, there is no use crying over spilt milk! I shall just have to make another, and next time, guard the SD card with my life!!

BTW, I don’t normally wear dresses. But I can officially confirm HOW comfy this is. I can definitely see a few more of these on the horizon. Quite liberating not having to match seperates! I feel as if I’ve been missing a trick all this time….


finished garments, refashioning, Restyles, Thrifting

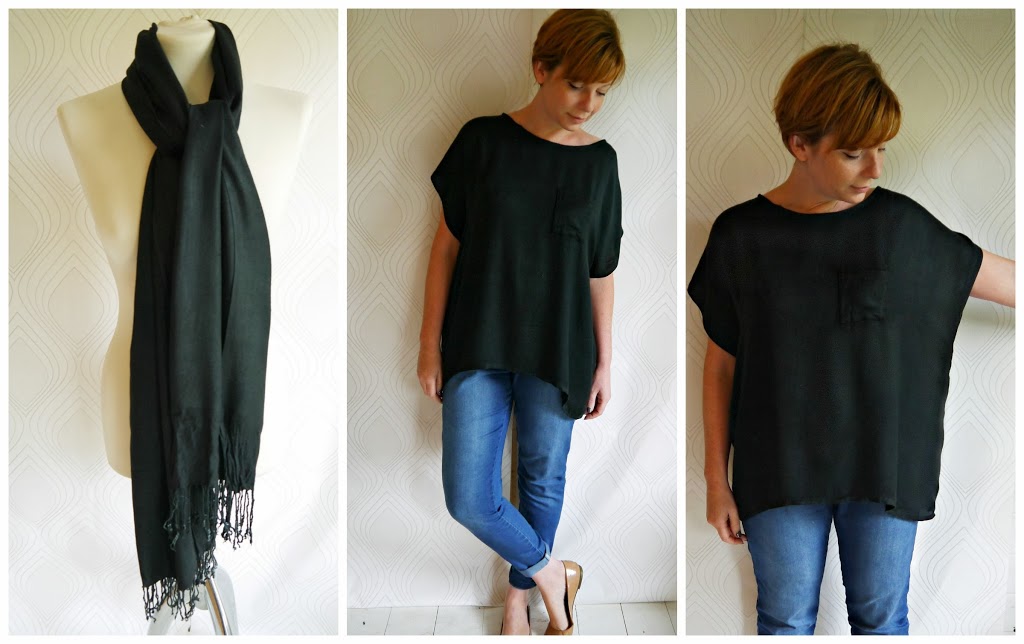
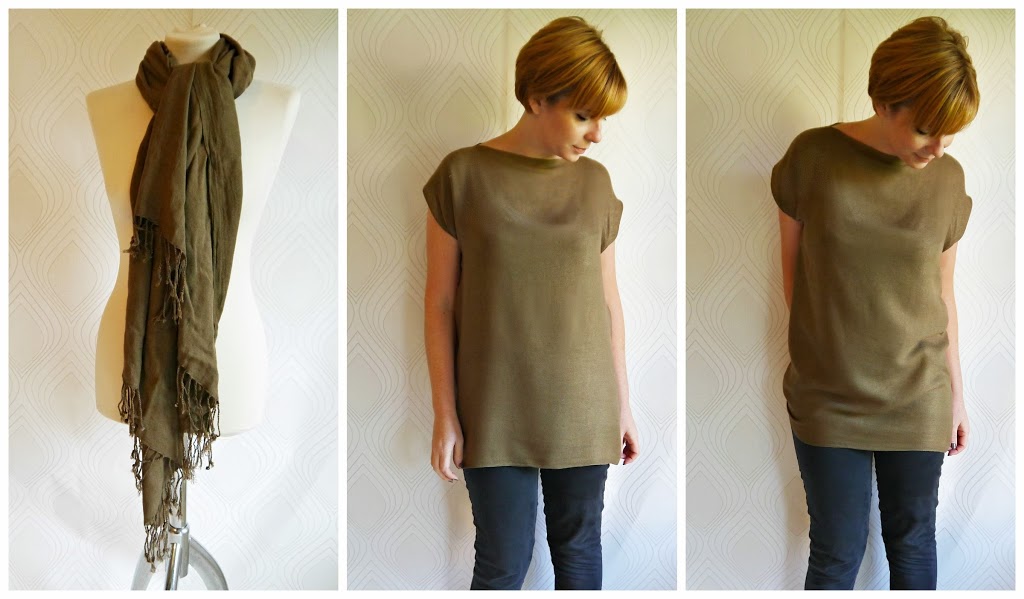
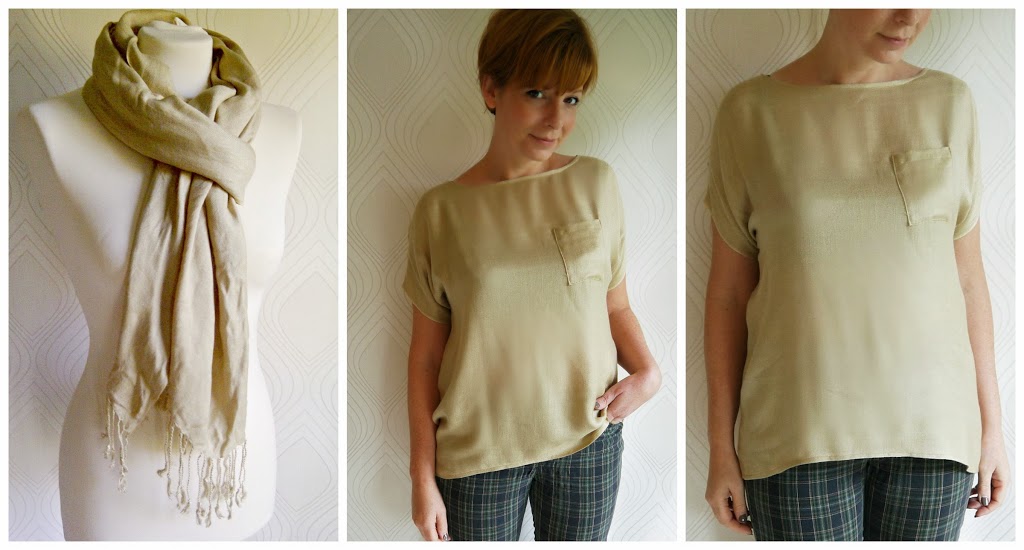
Refashioned: Pashminas 3 Ways

09/12/13

In my previous post I mentioned I had completed 4 garments in pursuit of some slouchy tops for Autumn. Inspired by the images in this post. Well, 3 of them are refashioned from simple pashminas!

All 3 involved slightly different approaches to cutting, shaping and finishing. I’ll be sharing details of each one in separate posts next week….which should give you time to grab some pashminas either from your local charity shop (if you don’t already have some lurking that is!). These 3 cost me between 50p – £1 each. Bargainous huh?!

Newer Posts
Older Posts
Portia
Follow
Sewbox

© Copyright 2026. Portia Lawrie. All Rights Reserved. Managed by WordPress Web Dev Cornwall .