• About
    • Contact
    • Press
    • Sponsor
  • DIY
    • Home & Garden
    • Jewellery & Accessories
    • Yarn Crafts
  • Sewing
    • patternless & self drafted
    • Refashions
    • Commercial Patterns
    • Sewing Tips
    • Overlockers
  • The Refashioners

Portia Lawrie

Uncategorized

Having a DeStashing Pattern Sale

04/06/15

Just a quick heads up! Am having a major destash in time for the arrival of my new summerhouse at the end of the month (aka my new sewing room!!! Sliiiiightly excited!). Starting with the stash of sewing patterns I love but know I will never use!

Pattern Sale

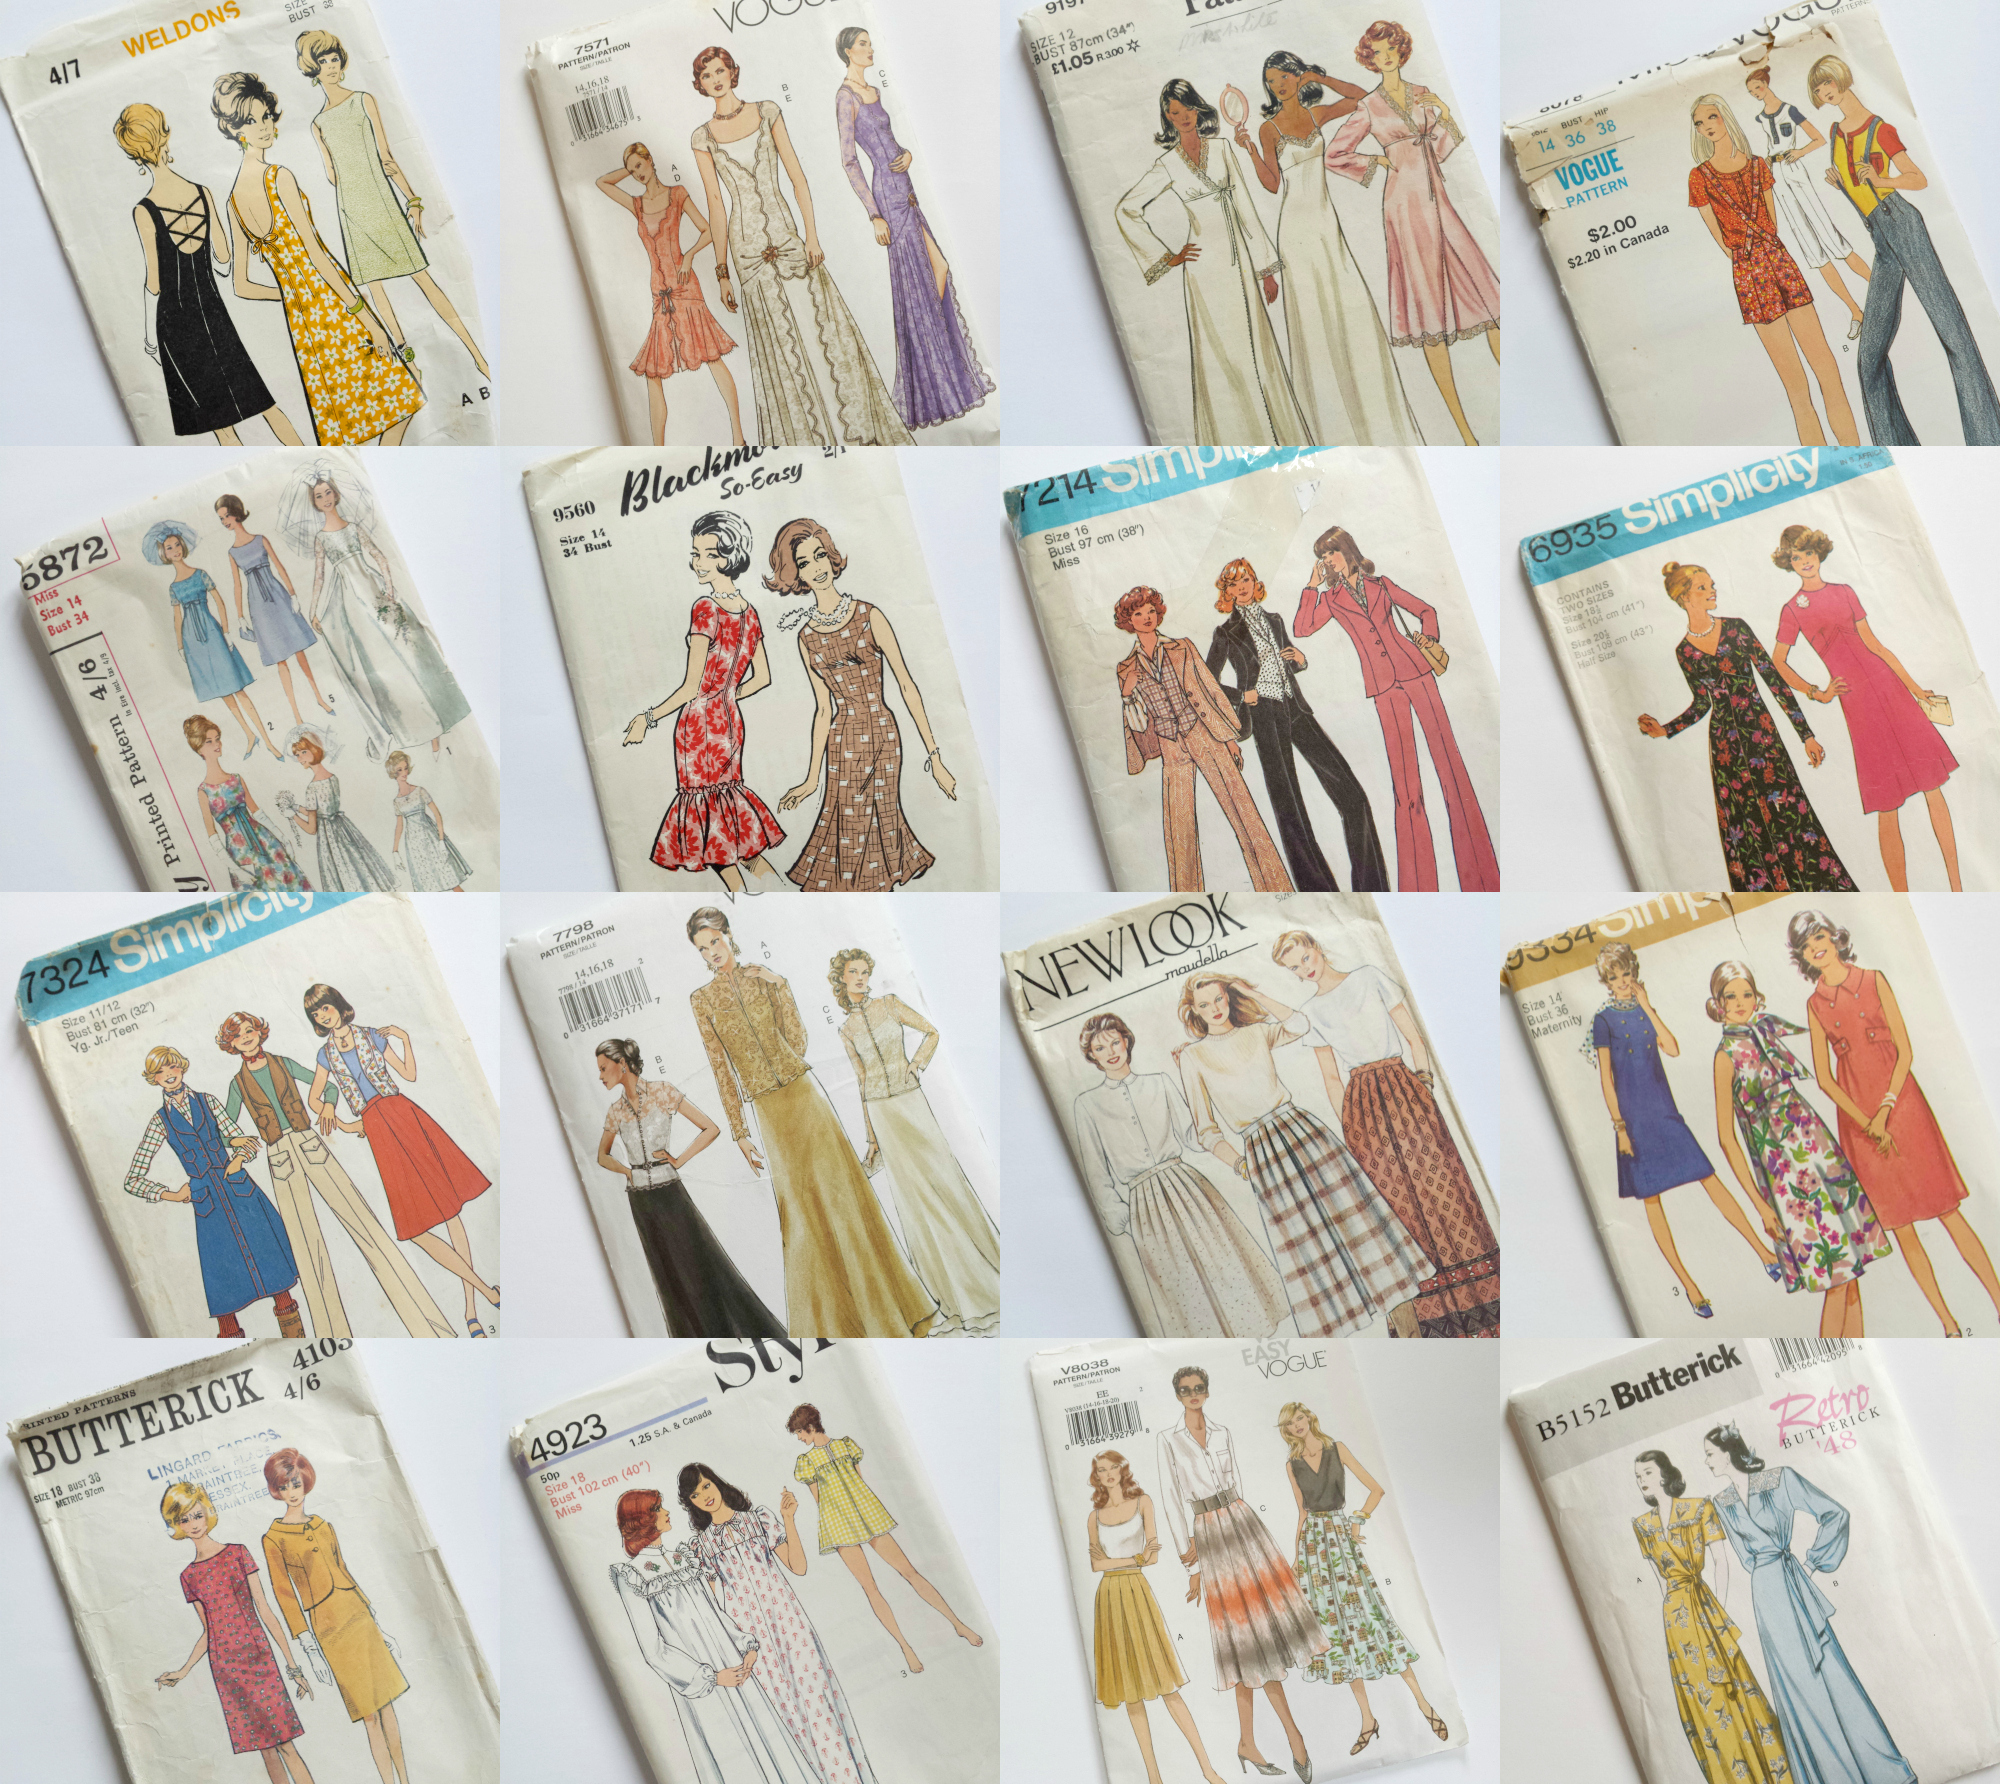
So I’m having a little flash sale over on my Instagram account. These vintage lovelies along with some modern patterns will be uploaded over the next few days. Bargains to be had peops. You can find me on Instagram here!

Hope you’re all having a wonderful Easter! I’m off to some more spring cleaning and destashing!!

DIY, how to, Sewing, Tutorials, Uncategorized, yarn crafts

DIY: Yarn Wrapped Pattern Weights

04/02/15

Learn how to make these yarn wrapped pattern weights at www.portialawrie.co.uk


A little while ago we were talking about budget friendly pattern weights and I mentioned that I had ordered some giant washers and had plans to prettify them a little. Actually I had a couple of ideas and am waiting on a delivery of some more washers to try out the other(s) but in the meantime here’s one way of prettying them up! I’ve seen these done with ribbon on pinterest which can work equally well, but here’s my little twist on the idea with some seasonally appropriate pastel ombre touches….

Learn how to make these yarn wrapped pattern weights at www.portialawrie.co.uk

They remind me slightly of pastel macarons when stacked like this

Learn how to make these yarn wrapped pattern weights at www.portialawrie.co.uk

They’re a decent size too!


Learn how to make these yarn wrapped pattern weights at www.portialawrie.co.uk

If you fancy making your own you’ll need some yarn. (I used simple cotton dischcloth yarn).  Large metal washers (I used these). A yarn needle. Scissors.


Learn how to make these yarn wrapped pattern weights at www.portialawrie.co.uk

The washers singly are not quiiiiite heavy enough so we’re doubling them up. Start by  cutting a length of yarn approx 4m long and tying a slipknot through the central hole of both washers.


Learn how to make these yarn wrapped pattern weights at www.portialawrie.co.uk

Tighten the slipknot then twist the knot and tail around to the back…

Learn how to make these yarn wrapped pattern weights at www.portialawrie.co.uk

Thread the long end through a yarn needle and start wrapping. The first few wraps are a little cumbersome as you’ve got so much yarn to play with, but it gets easier as you go. The wrapping part is not quite as straightforward as wrapping one strand next to another all the way round.  You have to do it in sections like this, then work your way around about 3 more times, filling in the gaps each time.  So the first round looks something like this.


Learn how to make these yarn wrapped pattern weights at www.portialawrie.co.uk

This is it flipped over to the reverse. Use the first round to “bury” the tail of the slipknot and snip off the end once it’s secure…


Learn how to make these yarn wrapped pattern weights at www.portialawrie.co.uk

Then it’s just a question of working your way round filling in the gaps that the last round left. 3, possibly 4 times with this yarn. More if it’s thinner, less if it’s thicker. The yarn from the current round will slot in between the yarn strands from the previous round. On the final round, when the wrapping has become more compact, use your nail to move the wraps up close against eachother (behind my finger in the pic) and make space (in front of my finger in the pic) for the final round of wrapping.  See those teeny gaps where you can see the metal through the yarn? The final strands of yarn will snug in those inbetween places.


Learn how to make these yarn wrapped pattern weights at www.portialawrie.co.uk

When you’re done feed the tail under the uppermost yarn strands around the hole in the centre to bury it and snip off the excess…


Learn how to make these yarn wrapped pattern weights at www.portialawrie.co.uk

Done! (Each one takes about 15 mins).


Learn how to make these yarn wrapped pattern weights at www.portialawrie.co.uk

I rather like the simplicity of them as they are and they are VERY tactile!


Learn how to make these yarn wrapped pattern weights at www.portialawrie.co.uk

These ones have been dipped in food colouring to give the pastel ombre effect…


Learn how to make these yarn wrapped pattern weights at www.portialawrie.co.uk

These ones I dyed the yarn first with food colouring to create an ombre effect (mini tute on that to follow), and then wrapped my washers…


Learn how to make these yarn wrapped pattern weights at www.portialawrie.co.uk


Learn how to make these yarn wrapped pattern weights at www.portialawrie.co.uk


They’re definitely much prettier than your standard metal washer now! Wouldn’t they make great tablecloth weights for outdoor dining in the summer too?? Just add a loop!

Uncategorized

COLOUR BLOCK SHIRT INSPIRATION

03/04/15

Lately I’ve been using (and crushing on) colour blocking quite a lot. You could say I’m slightly obsessed. My recent colour blocked shirt refashion garnered quite a bit of interest so I thought I’d share some colour blocking eye candy with you today….

COLOUR BLOCK SHIRT INSPIRATION

All image sources via pinterest here

What do you think? Would you try any of these? I can see DIY options here and am already starting to plot….!

DIY, how to, jersey, knits, refashion, refashioning, repurposing, Restyles, Sewing, sweatshirt, Thrifting, Tips and Tricks, Tutorials, Uncategorized, Upcycling

DIY: Sweatshirt Market Tote Bag

02/23/15

Turn a Sweatshirt into A Tote Bag
This sweatshirt was no longer as slouchy as I would like (one too many tumbles in a too hot dryer…yep!) and was languishing unloved in my wardrobe. So I thought I’d turn it into a handy little market tote, (complete with reinforced handles) ready for my next shopping trip… here’s how….

Turn a Sweatshirt into A Tote Bag

Start by pressing and laying out flat with shoulder seams lined up….

Turn a Sweatshirt into A Tote Bag

Cut off the sleeves using the seams as a guide…

Turn a Sweatshirt into A Tote Bag

Cut a big “U” shape out of the neckline…

Turn a Sweatshirt into A Tote Bag

Turn inside out, remove ribbing, sew opening closed (I curved my corners), then turn right side out again….

Turn a Sweatshirt into A Tote Bag

Now for the handles. Cut 2 x 7″ sections from the ribbing you just removed….

Turn a Sweatshirt into A Tote Bag

Fold in half lengthwise and serge (you could also zig zag or stretch stitch) all the way along the open edge. Look what it does! Cuurves into a perfect handle shape!

Turn a Sweatshirt into A Tote Bag

Feed one side of a handle through the tube…

Turn a Sweatshirt into A Tote Bag

Secure/stitch the 2 handle/strap pieces together…

Turn a Sweatshirt into A Tote Bag

Then slide the tube of ribbing over the join to hide it and distribute evenly. Repeat for both handles….

Turn a Sweatshirt into A Tote Bag

and you’re done!

The beauty of this is that it provides a little more structure and support to what would otherwise be rather stretchy handles, which has kinda what put me off the idea of T Shirt bags in the past. Plus sweatshirt fabric is sturdier to begin with. I think this bag could take a few fresh apples and bananas without breaking into a sweat (unintentional pun 😉

Do you use reuseable shoppers? Handmade or shop bought? My worst habit is actually remembering to take them with me to the shop…doh!

decor, DIY, Future projects, home, Inspiration, jersey, jewelry, knits, Knitting, planning, refashion, refashioning, repurposing, Restyles, Uncategorized, Upcycling

DIY: 21 INSPIRATIONAL IDEAS FOR USING T SHIRT YARN

02/20/15

inspirational t shirt yarn ideasOK, so it’s fair to say I’ve developed a bit of an obsession with making T Shirt yarn. The next question of course is what to use it for! I’ve been browsing the interwebs for inspiration and thought I’d share a few ideas with you, just in case, you know, I’m not the only obsessive in the room….

t shirt yarn ideas

These chunky knit cushions are right near the top of my “To do” list.  A simple knit/purl square on chunky needles with a linen backing. What could possibly go wrong, right?! The ubiquitous T Shirt necklace deserves a mention here. This clutch bag, from what I can gather is knitted from lengths of rubber. No reason it couldn’t work in T Shirt yarn instead though…

t shirt yarn ideas

The idea of a cosy blanket knitted on chunky needles appeals to me right now (instructions here); and I can see potential in this tutorial for crocheted cord being used in a jewelery piece or perhaps as handles for a bag? Now I know this rug is not made from t shirt yarn but a) its lush so I just had to share (and there are other delicious yarn art examples in this post) and b) the concept/technique could surely be applied on a smaller scale with T Shirt yarn?

t shirt yarn ideas

I love copper, grey and simplicity. So this necklace tutorial particularly floats my boat. Again there are other tutorials included in this post from Brit +Co. Love this knitted tote pattern from Daily Fix and surely T Shirt yarn lends itself perfectly to macrame hanging plant holders. Several examples in this post from Censational Girl.

t shirt yarn ideas

I mean seriously, how delicious do these knitted floor cushions look? No tute, but the idea would be simple enough to replicate? I can think of a multitude of uses for these crochet baskets (tutorial here from nimi design.com) and this macrame wall hanging has a simple charm. I’m thinking the technique could also be adapted to form a decorative element for a T Shirt refashion (party in the back anyone?)  or maybe to create a cute string grocery bag?

t shirt yarn ideas

Spoiler alert! Rugs are at the forefront of my plans. This spiral rug from A Beautiful Mess, crochet rug from WhollyKao and woven rug from Viva Le Jar, all employ different techniques to equally cool ends…none use T Shirt yarn but….you could, right?

t shirt yarn ideas

This knitted rug pattern from Purl Bee could surely be adapted for T Shirt yarn. This free pattern for a crochet basket from Ravelry calls for 12mm cotton yarn so could be doable and I like the effect of this rope trivet from Design Sponge. I can’t help but think this nautical style of knotting could be fun to try too…

t shirt yarn ideas

Another slightly more simple knitted bag. I think even I could manage this one. I love the effect of this idea from Oleander & Palm. Simple lengths of coloured yarn hung in volume to great effect; and a random woven belt design that I came across that could totally work!

So, I hope that gives you a few ideas of what to do with your squidgy balls of jersey goodness! I’ve started playing around with knitting mine and have a few ideas in the works….watch this space!

Uncategorized

DIY: Recycle Old T Shirts into Yarn

02/18/15

T Shirt Yarn - header image

Last night, I became aware that I’d got through the day having made nothing. I’m leaning quite heavily on creative pursuits at the moment to keep me calm and sane. (Do you find therapy in DIY?) So last night I was feeling a bit twitchy and decided to try making some T Shirt Yarn. Little did I know how addictive it would be!

Now there are more than a few tutorials on this out there. I could have just linked to any one of those but a) that would be a boring post for you! and b) there were a couple of  things that I discovered that I wanted to add into the mix, that I think helped me achieve a better result than my first attempt.


Supplies:

Old T Shirts (light to medium weight jersey is better)

Masking tape

Scissors

T SHIRT YARN - SUPPLIES


Firstly lets talk about side seams. Some T’s have ’em. Some don’t…. This one doesn’t and will make smoother/better yarn because of it…

T SHIRT YARN - NO SIDE SEAM


This one does so the yarn I make from it will have little slices of side seam in it every 12-20″, depending on the width of the Tee. We can reduce that bulk a little but it will be there nonetheless. The moral is, if this sort of thing is likely to bug you, pick a tee where the body has no side seams and is one continuous tube of fabric

T SHIRT YARN - WITH SIDE SEAM

Other things to avoid are too thick jersey (like sweatshirt  or ponte thick) and anything with print/transfer or embroidery below the chest area as this prevents the jersey from curling effectively.  So now you’ve got the right kind of Tee this is how you do it…

Step 1: Cut the hem band neatly off the tee. Keep as straight and even a cut as possible…

T SHIRT YARN - STEP 1


Step 2: Cut straight across the tee under the arms. Again keep it straight and at right angles to the side seams.

T SHIRT YARN - STEP 2


Step 3: Remove any care labels in the side seams as close to the stitching as possible without cutting the stitching itself

T SHIRT YARN - STEP 3A


Step 4: Now this may prove controversial, but the full bulk of an overlocked seam in my first ball of nice jersey yarn, bugged me. So this time, I trimmed some of it off. Just the bulky edge, about a mm a way from the double row of straight stitch. Note the double row of stitching as I think this could be key. Not all overlocked seams are formed in the same way. If your overlocked seam looks in any way loose or you see only one row of straight stitch, personally I wouldn’t trim it down. It worked great on this tee and the pink one…but the yellow one (they’re all pictured at the bottom of this post) had a slightly different overlock and unravelled and pulled apart in places so I ended up with several lengths instead of one continuous one…so use your best judgment and if in doubt, cut a strip off the bottom & test first…

T SHIRT YARN - STEP 4


Step 5: Now fold the tee body almost in half  (side seam to side seam) but leaving about 1-2″ extra of the bottom layer poking out along the top…

T SHIRT YARN - STEP 5


Step 6: Cut strips at least  1″ wide (or marginally wider) up from the folded edge. I used masking tape as a cutting guide to keep my widths even (more uses for masking tape here!). Cut straight up, through all layers, at right angles to the folded edge, and cut through the first overlocked edge but NOT the second. Stop 1-2″ before and leave that part uncut…

T SHIRT YARN - STEP 6


You’ll end up with one overlocked edge and a bunch of jersey loops hanging from it

T SHIRT YARN - STEP 8


Step 7: Slide the uncut edge over an ironing board.  Start with a tapered, diagonal cut from the outer edge to the first slit. Then from the base of the next slit cut diagonally across to the next top slit. ( Not straight across to the one opposite). You can see the first 2 cuts I made, and the next 3 are marked with dotted lines. Do this all the way along…diagonally from the bottom slit across to the top slit….

T SHIRT YARN - STEP 9


…and you’ll end up with a continuous strip like this…

T SHIRT YARN - STEP 10


Step 8: Working in approx 18″ lengths, stretch it out and it will roll in on itself to form a skinny tube like this. I found that holding the little bits of side seam, one in my left and one in my right hand, and stretching out just one section at a time, avoided putting undue pressure on the seams.

T SHIRT YARN - STEP 11


Step 9: Roll it up!

T SHIRT YARN - STEP 12


I nipped to the local charity shop this morning and bought each of these t shirts for 50p each so a super thrifty and eco friendly project. (I’ve kept the leftovers for another project) If you’ve got some lurking in your wardrobe even better! ( BTW, Elliott wanted me to tell you that he helped me style this picture 🙂 He also helped me style another where he artistically arranged leftover strips of each colour in the background. For those of you that don’t know, Elliot is my 6 year old son. He’s actually sat looking over my shoulder as I type this, making sure I type this, and let you know that! Give it a month and he’ll be writing my blog posts for me)

T SHIRT YARN - FINISHED

Now I just need to decide on a project. Have you made or used T Shirt yarn? Please feel free to leave any ideas in the comments below!


DIY, endless leather, gift ideas, how to, Tutorials, Uncategorized

DIY: Leather Tassle Key Fob/Bag Charm

02/16/15

diy leather tassle header

Today is a teeny bit momentous. My first post from my new home. I finally completed my migration from Blogger to this here self hosted WordPress site. What do you think of the new pad? I’m still tweaking. (Please let me know if you see anything amiss!)  Lord knows it is not as straightforward as I’d hoped BUT it is doable and so far the pros are far outweighing the cons. (If there’s an appetite for it I thought I might do a post to explain the process and share the resources I found useful. What d’ya think?) With the last couple of weeks being a blur of html, file transfers, 301 redirects and  a few headaches, I’ve been itching to get back to some DIY therapy. So today I thought I’d kick off with a quick and satisfying DIY. This leather key fob/bag charm…

You’ll Need:

Approx 12m of leather lace. (Mine is from Endless Leather)

1.2″ Diameter Split Ring with Lobster Clasp (I got this one and removed the bits I didn’t need)

Side cutters (or Scissors)

Leather Needle (or one with a wide enough eye to fit your leather through)

LEATHER TASSLE - MATERIALS

Set a 30″ length of leather aside. Then establish how long you want each strip of leather to be by cutting a strip and testing it out in your keyring. Once you’re happy, measure the length…

LEATHER TASSLE - STEP 1

Find a book (or similar) who’s circumference is roughly double the length that you want and wrap the remainder of the leather repeatedly and snugly around it…

LEATHER TASSLE - STEP 2

Cut the loops at either end and you’ll have a whole batch of leather pieces approximately the length you want them…

LEATHER TASSLE - STEP 3

Gather them all together (I used approx 40 x 12″ lengths)…

LEATHER TASSLE - STEP 4

…and thread through the split ring…

LEATHER TASSLE - STEP 5

…with the split ring in the middle or your strips of leather, fold them in half. Enclosing the split ring in the fold. Grab the 30″ length you set aside and tie a slip knot. Leave a short tail end that is the same length as your folded tassle.

LEATHER TASSLE - STEP 6

Slip the loop of your slip knot over the top of your tassle and slide it snugly closed like so, with the short tail pointing downwards towards the end of the tassle.

LEATHER TASSLE - STEP 7

Then take the long tail and wrap it tightly around the neck of your tassle covering the slip knot as you go. When you have all but run out of tail, thread the end into a needle and pass it through/behind the wrapped part. Pull tightly to secure.

LEATHER TASSLE - STEP 8

Bunch the end of your tassle together and trim the ends to even them out..

LEATHER TASSLE - STEP 9

Aaaaand you’re done!

LEATHER TASSLE 1


LEATHER TASSLE 2


LEATHER TASSLE 3

Your leather tassle is ready for some keys…or simply to add a pop of colour to a leather bag …

LEATHER TASSLE 4


Have a great day! And don’t forget to let me know of any little gremlins you find in the new site! I would sooooo appreciate your eagle eyes on this! If you’re interested in finding out about the Blogger to WordPress migration, perhaps you’re considering the move yourself but you’re not sure, then let me know, and I’ll put a summary post together so you can see what it involves!

Uncategorized

Welcome!!!

02/14/15

<a href=”http://www.bloglovin.com/blog/13660805/?claim=e4vdj3wmgua”>Follow my blog with Bloglovin</a>

Well hello!! You found it ok then! Welcome to my new pad. Make yourself at home, I’ll pop the kettle on and be back in a jiffy!

Please note: I am still building links to my archive gallery pages (in the drop down menus at the top of the page). In the meantime please feel free to have a root around the archives using the archive menu or search function in the sidebar. Some images in older posts that have been migrated from my old Blogger site have suffered a deterioration in quality/resolution. (More recent ones appear to be fine. So yay for that!) I’m working to fix those too.  If you come across anything that’s not linking or displaying  how it should, please do let me know as I may not have noticed it yet! I appreciate your patience!

Uncategorized

Top Draftalong – Style 1 (slight deviation) – Step by Step

05/05/12

I finished up my toile for my first attempt at drafting this style…

I set out to draft a simple enough kimono sleeve, but got distracted from my goal (a definite personality trait!) by these instructions for drafting a “slash” style sleeve treatment in the book that originally inspired this draftalong in the first place. So I thought I’d try it out. (Hence the “slight deviation” in the title of this post)I am in the process of drafting a second toile in line with the original plan but thought I might as well share this in the meantime…

I followed the diagram above to draft the top part of the bodice. Tracing my blocks onto paper in the position shown. Then drawing in the new neckline and armhole as per the diagram. (The dotted lines are the new shape lines). There were a few variations to my draft since the block I was starting with is a variation of the free Sorbetto pattern, rather than the one from the book. For instance, I had to raise the neckline at the CF and CB before I could draw in the “bateau” neckline shape, whereas the toile pattern in the book has a high neckline to begin with.

I then drafted a new hemline shape on the front….

…and then the back of my new pattern…

The key thing here is to line up the side seams and ensure that the curve flows smoothly where the seamlines will eventually meet. It’s also important to ensure that at least the first few mm or so of the new hem line is at right angles to the CF and CB. This will make for a smooth curve that flows seamlessly from front to back and will avoid a pointy look at the CF and CB…

Once I added on 5/8 seam allowance…

My pattern was finished and ready to try out…

This is the result. The fabric is super drapey and slippery (and creases and frays, ugh!) which posed a few problems with the construction. Namely with creating the self bias binding (even with my masking tape trick! Argh!) and on the curves of the hem. Overall though, It’s a comfy top to wear and a good opportunity to try out the hem shape. Personally, I don’t LOVE the sleeve treatment here. But then I don’t hate it either. I guess I’m OK with it but not super chuffed. Which makes me a bit more keen than before to try out the original “vision” of a kimono style sleeve.
However, there were a few anomalies that surfaced during construction that make me think that this is not a great method. If you look at the diagram you’ll see that it instructs you to trace the shoulder points so that they are a distance apart. (2cm to be precise). However, because this is essentially adding length at the shoulder seam, the position of the bust darts was too low as a result. You also end up dropping the armhole down a few cm. (You can see in the diagram the new armhole is lower front and back). Combined with the extra length at the shoulders this makes for a very baggy and gaping armhole and bust darts that are floating around under the bust! It was easily remedied by taking the whole thing up by an inch at the shoulders.

 But that’s not really the point. If the draft is good then you shouldn’t have to make adjustments like this once the toile is made up, right? So to be honest, I shall be all but abandoning the instructions in this book for future drafts and relying on my wits and my trusty Winifred Aldrich book. Anything else I can research online! Overall though, a good experience. Focussing on the positives, the hem treatement is exactly as I wanted it, the neckline is a good shape, and now I’m looking forward to drafting the sleeves as originally planned and not getting distracted from my plan!
I’ll rethink my fabric choice too. This is a little toooo drapey. Look at the drag lines eminating from the neckline! Great on a grecian style look, but not on this style of top. I’m aiming for simple, smooth and uncluttered lines. This is a big area that I need to learn more about. Picking the right fabric for the right project. I have a sturdier cotton in mind for the next attempt. Fingers crossed!

Hoping you’re having a lovely weekend, despite the ruddy rain
(if you’re in blighty :)!

Uncategorized

And the winner is….

04/29/12

Thanks to everyone who left their tips and tricks in the comments secton of the giveaway post. Many words of wisdom indeed! Some of which I shall be trying out for myself, and if you’ve got 5 minutes they’re worth a trawl. Actually, if you can’t find 5 minutes in the day they’re definately worth a trawl!
Now, back to the business at hand. The winner of their very own copy of Simply Superwoman is…..

Alessa of Farbenfreude ! Yay, well done Alessa. Email me with your details and I’ll get the book out to you ASAP 🙂
Sorry to those that missed out. If however you do decide you want your own copy of Simply Wonderwoman it can be purchased here. (This is not a sponsored link and I get no payment for you clicking on or buying from this link. Just wanted to let ya know!!)
Happy Sunday to one and all!

Newer Posts
Older Posts
Portia
Follow
Sewbox

© Copyright 2026. Portia Lawrie. All Rights Reserved. Managed by WordPress Web Dev Cornwall .