• About
    • Contact
    • Press
    • Sponsor
  • DIY
    • Home & Garden
    • Jewellery & Accessories
    • Yarn Crafts
  • Sewing
    • patternless & self drafted
    • Refashions
    • Commercial Patterns
    • Sewing Tips
    • Overlockers
  • The Refashioners

Portia Lawrie

Dressmaking, finished garments, Fitting, Giveaways, Sewing, simplicity 1918, trousers

Simplicity 1918 – Amazing Fit Trousers? (+ a GIVEAWAY!)

07/07/13

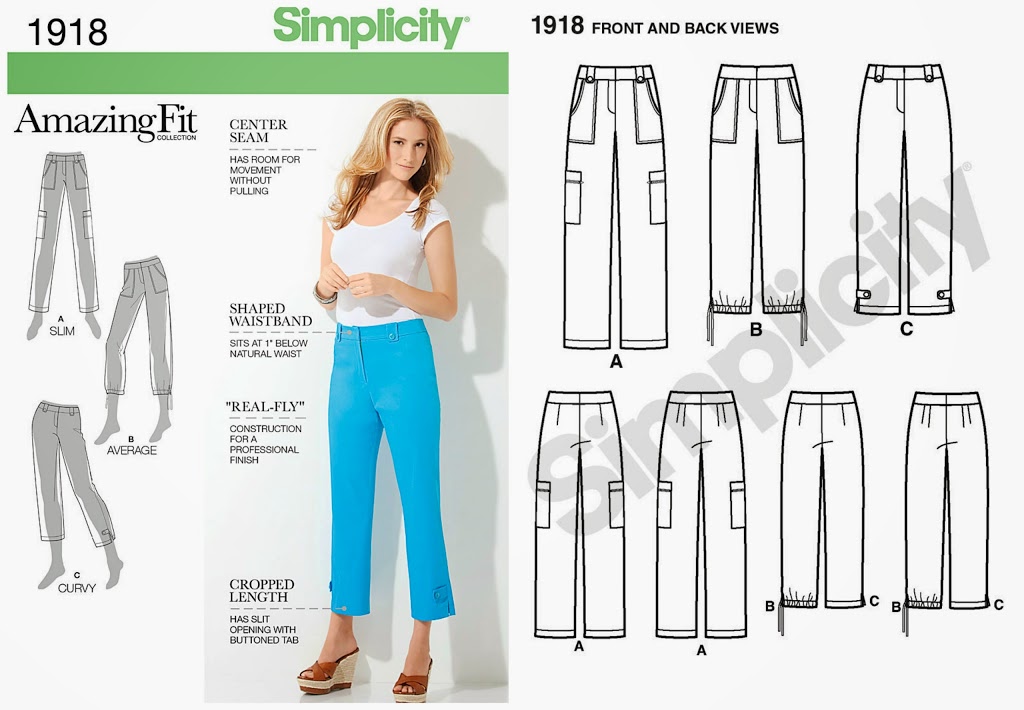
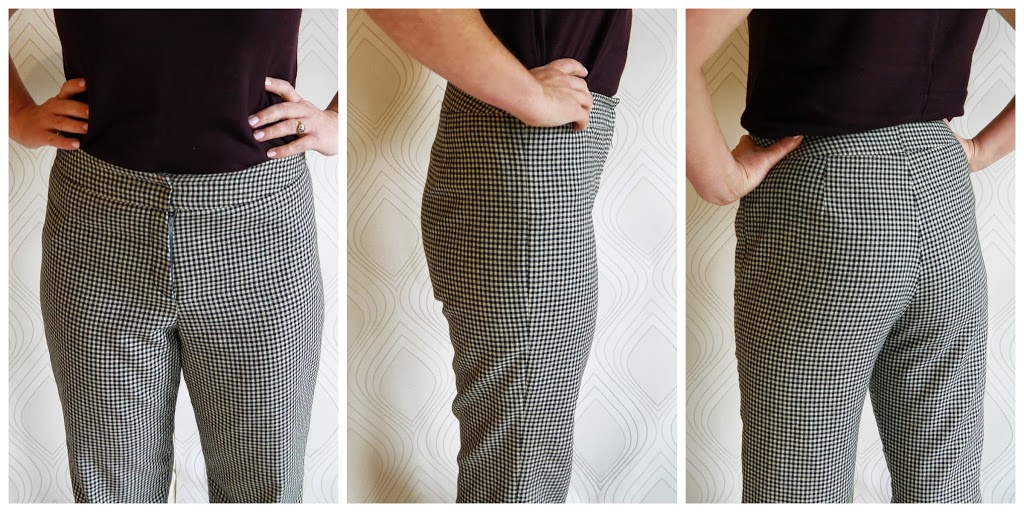
Sooooo…this post marks a bit of a dressmaking milestone for me. πŸ™‚ My first ever pair of trousers. Simplicity 1918 – from their Amazing Fit range. (View C minus the tabs πŸ˜‰ What say you peops? Are Simplicity right? Are these indeed an amazing fit? I must admit….I’m seriously impressed. This was actually meant to be a 1st toile. I never anticipated ending up with a pair of trousers I could actually wear with the first attempt. I pictured re-pinning, tracing, redrawing crotch curves. I was ready for a battle. But no. I cut the pattern (not quite according to the instructions, more on that in a bit). I sewed them up according to the instructions. I put them on; and apart from a teeny adjustment at the waist and hip (more on that in a bit); this is how they fit pretty much straight out of the packet….they’re made from a lightweight pure wool check bought for £1.60 at the craft jumble I mentioned previously…

Having read numerous horror stories about crotch length and rise and drag lines; I’d kind of built up trouser sewing in my head as a bit of a mountain that I wasn’t sure I wanted to climb. I mean any area of sewing that requires a plethora of books and classes aimed solely at achieving a good fit, has got to be head bangingly frustrating right? Well, that was the view I held at any rate.

When Simplicity asked me if I’d like to pick out a pattern to test out, I saw it as a great opportunity to slay the trouser beast. Especially when my eyes alighted on the words “Amazing Fit” and “Trousers” on the same pattern envelope. I thought it HAD to improve my chances of success. The schtick here, is that this range of patterns comes not only in a the usual range of sizes, but also in 3 separate figure types. Slim, average and curvy. Welcome acknowledgement at last from one of the big 4; that we do actually come in different shapes and sizes….amen to that!

So…how good is the fit? Here they are from various angles. I’m no expert of course. But to my mind, there are no areas that are pulling, there are no areas that are bagging. Nothing is twisting, side seams are perpendicular to the floor and the fabric lays smooth across the front and backside; and I can move about, sit down and stand up with no strain on any seam and what’s more, they are VERY comfy. Is it me? Or is this a bit of a result for a first pass??!

A word or two on Sizing:
The only time that I deviated from the instructions was when it came to selecting which size to cut. According to my measurements, I should’ve cut a 16. Wasn’t convinced by that AT all. (Commercial patterns always seem to equate to excessive ease in my experience) Especially taking into account that the pattern cites 4 – 4 1/2″ of wearing ease included. I am a 40″ hip. Cutting a 16, according to the pattern envelope, would’ve given me a finished garment measurement of 44″ at the hip. A size 14″ however, would give me a finished garment measurement of 42″ at the hip. Better πŸ™‚ That’s my hip measurement + 2″ of wearing ease. Plus, there’s a generous seam allowance (a full 1″) built into this pattern at the waist/hip seams and centre back seam to allow for adjustments. No worries then! So that’s what I went for. I cut a 14 “average” because my crotch length dictates that I am of average shape πŸ˜‰ Once I’d  basted them together, the only adjustment I needed to make was to let the waist out by about 2-3mm each side, and shave the hip curve off because basically, I’m pretty much straight up and down and don’t need my trousers to curve out much at all at the hip. That’s it.

Next time:
The only changes I would make on future makes (and there will be some for sure) would be to narrow the bottom leg slightly (a teeny bit flappy) and sew a better fly front. This was also my first time ever sewing a fly front. It turned out ok but you can still see my zip a bit; which is not the idea methinks! But thanks to your suggestions on fly tutes; (Thankyou so much!) I’m confident I’ll do better next time!

Overall though, I’m totally impressed with this pattern; and it has me wondering if other patterns in this range are worth my attention. After all; how many times does a pattern fit you pretty much perfect, straight out of the packet?? For me, never, until this one!

Giveaway Conditions:
Sooooo, the lovely folks at Simplicity sent me 2 copies of this pattern. So that means I have one left to give away to one of you! The giveaway pattern is the very same pattern Simplicity 1918 in a size 14-22.

The giveaway is open Worldwide and all you have to do to enter is leave a comment below; tell me if you’ve ever found a pattern that fit you straight out of the packet, and what it is please?! If you’ve never been that lucky, then just tell me an interesting sewing or fitting tip or failing that; just something interesting! You don’t have to follow this blog or like my facebook page or any of that malarkey! Just don’t put “yes please” or anything like that cos well, that’s just boring πŸ˜‰


Giveaway ends on Wednesday 17th July at midnight GMT and results will be announced on Thursday 18th July. Good Luck!

**NOW CLOSED**

Dressmaking, finished garments, kimono tee pattern, Sewing, Sorbetto

FO: Electric Blue Sorbetto Variation

05/20/13

This is me dressing for the weather I want rather than the weather we have! In fact, as I type this, I’m staring at a grey drizzly morning and wrapped up in a chunky cardi with a warming cup of coffee! (I drink an unhealthy amount of coffee every day!) It’s a variation of the Sorbetto pattern using the same fabric as my Electric Blue Kimono Tee….

Essentially I lengthened the front & back pieces to create a high low scooped hem. It’s a hem treatment I’m growing rather fond of; although this is the most exaggerated incarnation of it so far! (You’ll notice a few examples in this recent inspiration post) The neckline and armholes are finished with self fabric bias using my nifty cheat method…

One problem with this top….despite pre washing the fabric, the kimono tee I made from it has shrunk to unwearable proportions after just 2 washes. So if I want to keep this top wearable, it’s handwash only. Which is a pain in the backside! Ah well! Come on summer! Where the heck are you?!

colette patterns, Dressmaking, Laurel, sewing patterns

Excited About… Colette Patterns’ Laurel!

04/19/13

This plopped onto my doormat the other day….

Whilst I adore from afar, all of Colette Patterns‘ creations….sadly they don’t really fit my aesthetic usually. But THIS? This is RIGHT up my strata! A simple shift with endless tweaking possibilities? Yes please Sarai you clever, CLEVER lady…!

(Yep, I splashed out and treated myself to the printed version. Yes, it is deliciously packaged isn’t it?!)

Dressmaking, refashioning, Restyles, Sewing, Thrifting

Refashions: Silk Peplum Top & Skinnified Jeans

11/28/12

Just recently I’ve been returning to my refashioning roots. I picked up the outfit on the left for the grand total of £5.98 from a charity shop. A simple oversized black silk shirt, and some kinda frumpy jeans in a lovely berry purple colour. After I’d gone at them with some scissors and a sewing machine, I was left with the outfit you see on the right. I’m pleased with how striking the difference between the two outfits is. That’s really what I wanted to show. How different frumpy charity shop finds can be with a few tweaks; and I think I’ve achieved that here. Although I’m not sure how much I’ll wear the top in reality. It was an idea I wanted to try out, and I really like how it turned out. I’m just not convinced it’s “me”. Know what I mean?

 It all turned out pretty much as I had envisioned it; apart from the top having no sleeves. I had planned some slim elbow length sleeves. But the peplum section needed much more fabric than I had first thought. So I ended up using every useable scrap of fabric on that and had nothing left for the sleeves. (Actually, I think technically it’s a “ruffle” disguised as a peplum! Aren’t peplums cut as circular pieces?)

This top involved completely deconstructing the original shirt, re cutting the pieces and reconstructing it into it’s new form. Excluding finishing techniques the main points are essentially as follows:

1) I cut off the sleeves and collar close to the seams.
2) I lopped (technical term that!) off the bottom section of the shirt at waist height, and set aside for later
3) Then seperated the front and back pieces, and recut the necklines and armholes

4) Sewed the whole thing back to front to create a button back bodice section, and made it much more fitted.
5) I created a long loop of fabric using fabric from the bottom section I’d lopped off earlier, and what I could harvest from the sleeves.
6) Gathered the loop of fabric and stitched to the waistline of the new bodice
The jeans were skinnified in my usual way, and I’ve worn them lots already. I am a fan of purple, it has to be said. Always puts me in mind of that fabulous poem  You know the one I mean…about wearing purple… πŸ˜‰
DIY, Dressmaking, Pattern Drafting, Tips and Tricks, Tutorials

Adding a Decorative Panel to a Front Bodice…

09/14/12

With two of my most recent makes I have been experimenting with inserting decorative panels….

As promised, here’s a breakdown of how simple it is to alter a front bodice pattern piece to add this detail:

1: Draw in where you want the panel to be, being careful to avoid any darts. It will be half the width of your finished panel
2: Cut along this line so you now have two new pattern pieces
3: Trace the new pieces and add your seam allowance

You will need to cut 2 of pattern piece A, and then (once you have finished pleating/pintucking your fabric panel) cut 1 of pattern piece B, on the fold (placing what was the original centre front onto the fold)

For my pleat front tunic I pleated a panel of fabric, pressing and pinning the pleats in place one at a time. I then topstitched each pleat down and once my pleated panel was long enough to accomodate my new pattern piece, I cut the pattern piece from my pleated panel of fabric. I left a small section at the top and bottom unpleated so as to avoid bulk at the neckline and waist seams….then join it to the other two bodice pieces and continue on with your make as normal!

I used the same method for my black kimono tee except of course, the panel I drew in was triangular, and I used pintucks instead of pleats. The triangle also doesn’t reach to the bottom of my original pattern piece on this make. So my pattern piece A in this instance, was cut on the fold; and when opened out had a deep V missing out of the centre ready for the triangular panel to be inserted.

And there you have it. A simple way to add some detail to a plain bodice front. The method will work for pretty much any shaped panel. Scooped, square, oblong, rounded etc; and you could use it to insert a panel of contrasting fabric, lace, a button placket, ruched/gathered panel, pleated panel, embroidered, pleated,whatever. Whatever your imagination desires!

Dressmaking, finished garments, kimono tee pattern, Pattern Drafting, refashioning, Restyles, Thrifting

FO x 2 – Kimono Tee with Pin Tucked Panel & Refashioned Jeans (again!)

09/13/12

Dropping a dress size and a half, (thankyou peops for all your lovely comments and yes Marie. New hair too!) means that pretty much everything I had in my wardrobe no longer fits me. So I’ve started rebuilding my wardrobe pretty much from scratch. This week I finished up a couple of versatile wardrobe basics….

Refashioned Jeans:  I picked these up at a local charity shop for £1.89! They are brand new M&S jeans in a supersoft khaki denim with a bit of stretch. Guess what…..they’re a size 10! I can’t remember the last time I fit into a size 10. In my teens I think! Granted the stretch element of the denim probably helps, but who cares! Anyhow, M&S jeans always fit me nicely in the waist, bum and hips. But the leg styles can often be a little frumpy so I just narrowed them in my usual way.

Black kimono tee: made from fabric that J’s Nanny Flo gave to me. The length means I can wear it out like this, (without fear of builders bum πŸ˜‰ or tucked into a waistband without causing too much bulk underneath.  It’s self drafted using this method, and then sliced up to insert a triangular panel with pintuck detailing. (The “slicing up” part to be detailed in a post to follow shortly) The neckline, sleeves and hem are all faced with bias. Using bias as a neckline facing is a new revelation to me. I can’t believe I haven’t done it sooner! It’s sooooo easy and negates the need to draft a neckline facing.

 I first used it on my pleat front tunic as detailed in the original pattern instructions.  I can see this being a particularly useful and time saving technique for future makes. Especially for refashioning; where if I wanted to recut a neckline, I would otherwise have to draft a facing by tracing the curve from the fabric. Something that has always stumped me in the past. Daft really when I think about it. I’ve used bias to bind a neckline before. So I don’t know why it never occurred to me to go one step further to steam it into shape and turn it in as a facing instead! a bit of “doh” forehead slapping moment! I’m probably late to the party for that one. You clever lot all knew about it already I’ll bet!

Dressmaking, Me Made May 12, Pattern Drafting, refashioning

MMM ’12 – Weeks 3 – 4

06/03/12

To be honest, the last week and a half of Me Made May saw me running around like a blue arsed fly with no inclination whatsoever to take any photographs. So I struck on the idea of using the previous couple of week’s photos as my own personal gallery of outfit options. Each day I would flick through, pick an outfit I’d already photographed and wear that for the day. Thereby dispensing with the necessity to take further photos! Ha! Take that you pesky self photography demon!! Of course, I have had my hair cut and coloured since the start of May so it looks as if my hair has miraculously grown back overnight, but you get the gist!

Monday: Navy refashioned top and blue refashioned trousers
Tuesday: Self drafted Geometric top  Trousers – Thrifted
Wednesday: Thrifted stripe top  and Cropped Jeans

Monday tuesday wednesday

Thursday: Denim Shirt – Thrifted (99p) and refashioned Trousers
Friday: Self Drafted Coral Top and  Cropped Jeans
Saturday:  Grey Polka top – Self drafted thrifted Flared Jeans

thursday friday saturday

Monday: (Freshly dyed hair!) Thrifted Cashmere Sweater and Blue Trousers
Tuesday: Self drafted Coral Top and  Bleached Jeans (not blogged)
Wednesday: (no photo) Plaid Shirt and Cropped Tan Jeans
Thursday: (no photo) Geometric Self Drafted Top and thrifted Navy Trousers
Friday: No photo and can’t remember!!
Saturday: Newly thrifted Polka Dot Blouse (£1.50) and refashioned Trousers (and the obligatory summer bob cut)

Monday tuesday saturday

Sunday: (Hot day! Yay!!!) Newly thrifted Silk Jersey Top (£1.50) and refashioned Cropped Jeans
Monday: Refashioned Top and Refashioned Trousers
Tuesday: Can’t remember!
Wednesday: Thrifted Top and refashioned Cropped Jeans
Thursday: This outfit

sunday monday saturday

So that was that! I managed to wear MM garments every day and at least half of those were entirely MM. Yay!! I did it! What I’ve noticed is that I rely heavily on cropped narrow leg trousers. Thoe tan cropped jeans being used in HEAVY rotation. I need a couple more pairs in different colours. I have a purple pair lined up for refashioning and a white pair that I intend to refashion and dye a dove grey colour, or maybe lavender if I’m feeling brave!! I’d forgotten how much I like that navy refashioned top. So I’m on the lookout for more skirts to refashion into tops and hopefully replicate  it in a few more colours/patterns. It really is so easy to throw on and feel instantly fab in. My geometric and grey polka tops are good wardrobe staples too. Both made from the same SUPER simple self drafted pattern. So a couple more of those wouldn’t go amiss. Of course, my button back top still needs some tweaking and once I’ve done that, hopefully I’ll be able to add a raft of those to my Me Made arsenal too. Overall, this challenge was my easiest to date (apart from the photography part!!). A sure sign that MM items are gradually taking over my wardrobe!

How about you? Has MMM 12 left you with a long list of projects? Has it helped you realise how far you’ve come? Hope so!

Dressmaking, Giveaways, Pattern Drafting

Drafting sneaky peek…

04/24/12

I’m finally getting my house in order, and this weekend was able to squeeze in some drafting for the Top Draftalong. I started by making a list of the adjustments I needed to make to the basic block, took a deep breath, and dived in…

The drafting I’ve done so far is for this style, without the button back at this stage as I wanted to test my drafting with a (hopefully) wearable toile, before diving into drafting button plackets and facings….

I was weirdly nervous when I cut into my fabric. You kind of assume a commercial pattern is gonna work out because “they” know what they’re doing. But this is the first test of my drafting from a block so I had a familiar twinge of self doubt (despite the simple design and the fact that everything looks perfectly alright!). But, feel the fear and do it anyway, right?! Hopefully should have my toile all finished up before the weekend πŸ™‚

Oh and while I remember, don’t forget, you have until Friday (Midnight GMT) to enter the giveaway πŸ™‚

Newer Posts
Portia
Follow
Sewbox

© Copyright 2026. Portia Lawrie. All Rights Reserved. Managed by WordPress Web Dev Cornwall .