• About
    • Contact
    • Press
    • Sponsor
  • DIY
    • Home & Garden
    • Jewellery & Accessories
    • Yarn Crafts
  • Sewing
    • patternless & self drafted
    • Refashions
    • Commercial Patterns
    • Sewing Tips
    • Overlockers
  • The Refashioners

Portia Lawrie

DIY, how to, jewelry, repurposing, Tutorials, Uncategorized

DIY: Pendant from Brass Tube Offcuts

11/16/15

DIY PENDANT FROM BRASS TUBING OFFCUTS

If you thought my rubber and brass tube necklace was simple, this pendant is even more so!

DIY PENDANT FROM BRASS TUBING OFFCUTS

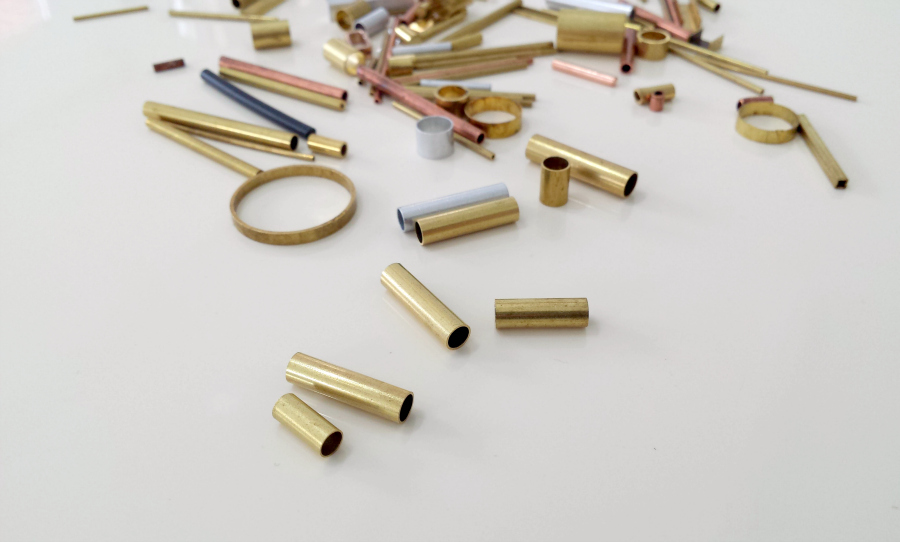
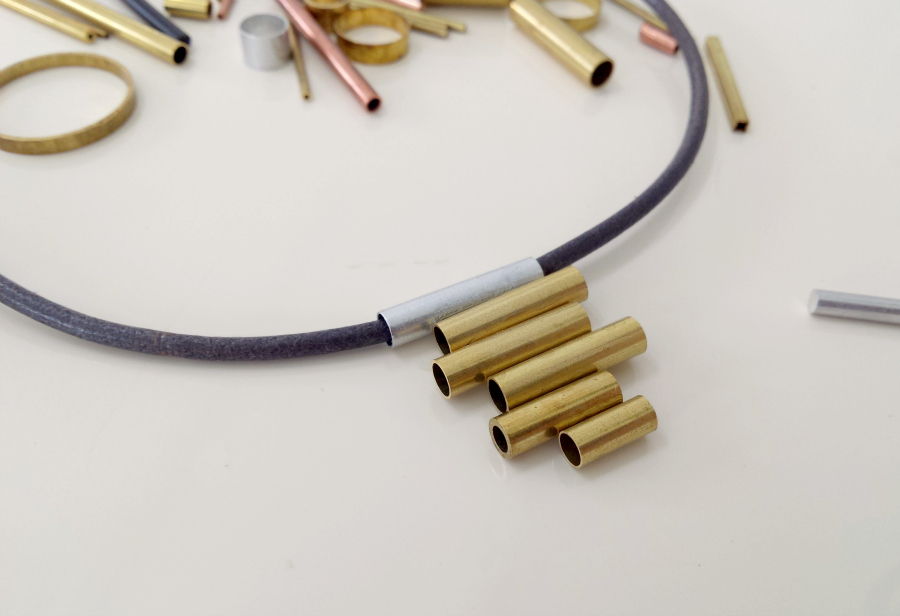
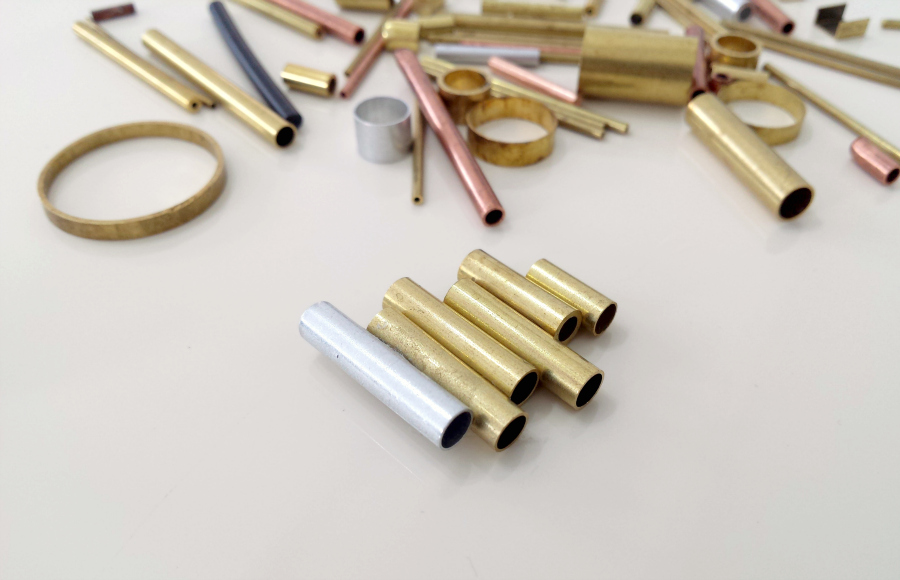
The pieces come from the same batch of tubing offcuts in the previous post. This time  6 pieces of metal tube the same diameter and graduating lengths (approx 1″ and smaller)…

DIY PENDANT FROM BRASS TUBING OFFCUTS

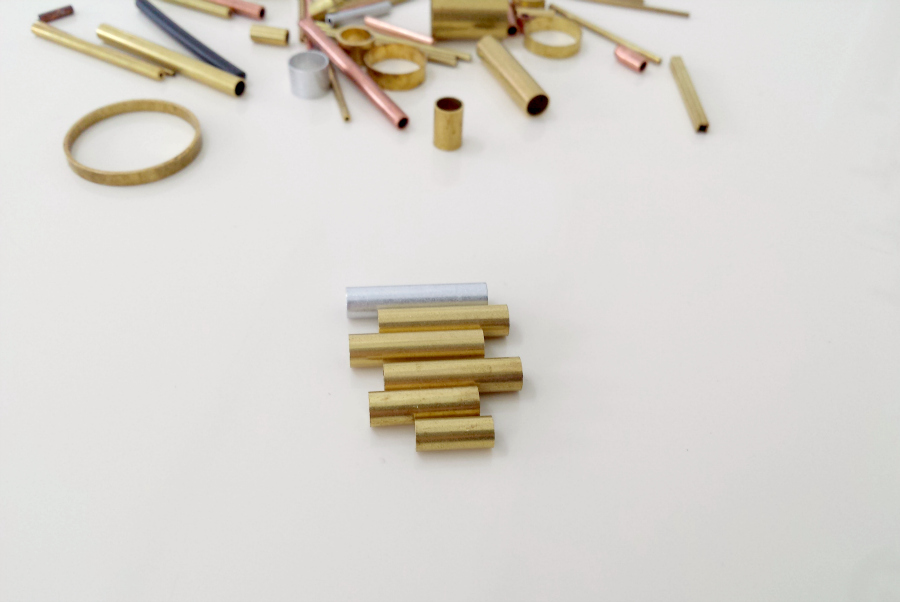
I played around with arranging them and settled on this staggered configuration…

DIY PENDANT FROM BRASS TUBING OFFCUTS

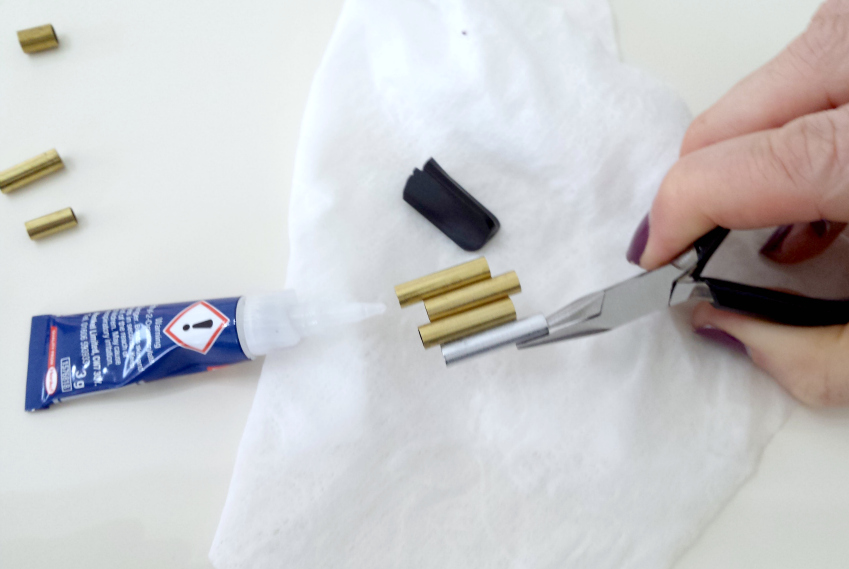
Then grasping one of the tubes with a set of small pliers…I simply super glued each tube in turn along the length, holding in place for about 30 seconds before moving onto the next….(be sure to use a glue suitable for metal)

DIY PENDANT FROM BRASS TUBING OFFCUTS

Leave to dry…

DIY PENDANT FROM BRASS TUBING OFFCUTS

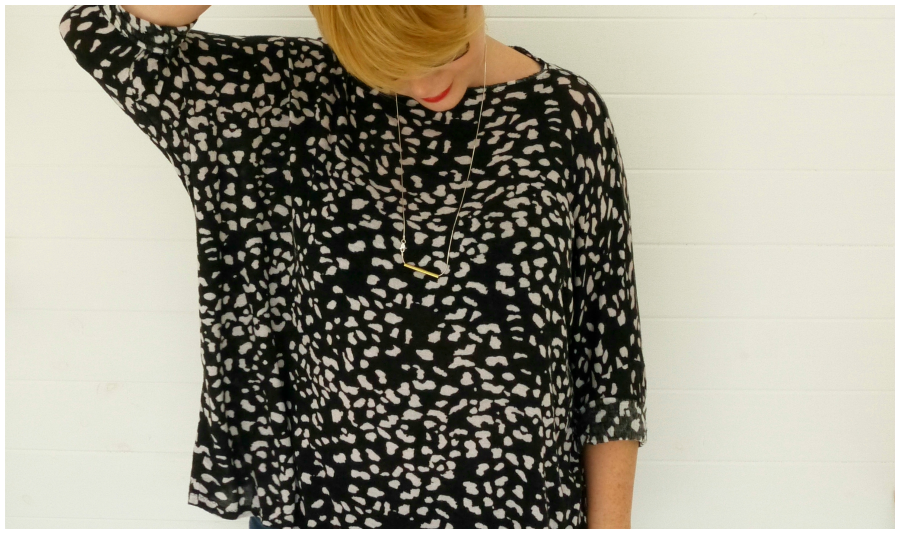
Thread onto a piece of leather, rubber, or your favourite chain!

Doesn’t get easier than that, right?!

Uncategorized

October Sponsor Showcase – Discounts, Special Offers + News!

10/29/15


Wendy Ward – New Patterns and a new book!

I am fast realising that I have perhaps found a bit of a kindred spirit in Wendy. Not that I would liken my skills to hers in a million years; but more that I really relate to her laid back style and easy manner. If I lived Closer to Wendy’s Brighton workshop I would snap her up as a sewing teacher in a heartbeat! Wendy’s success continues with the announcement that she has just signed the deal for her second book (due out next year) and the recent launch of 2 new patterns and the expansion of some of her existing patterns into kits!. The Wisewood cowl neck dress and top; and the Kelham ultimate A Line skirt. Both are print patterns and available now…WENDY WARD


Swedish Tracing Paper

This week I started my first adventure with SWedish Tracing Paper. A long overdue bit of pattern hackery that’s been on my mind for months. You can trace your pattern pieces on this stuff then sew it up like a toile, and make any adjustments directly onto it; negating the need for muslin/toile fabric and cutting out the need to transfer your adjustments from fabric to pattern then back again. Will keep you posted on my progress!SWEDISH TRACING PAPER


Girl Charlee UK – 10% off with code MAKERY

It’s stripes a go go at Girl Charlee right now! They’ve expanded their range of stripes massively in ALL the colours. (Over 50 different colourways!!!) So if you love your stripes, check it out and take advantage of the discount code above. They’ve also taken a keen interest in YOUR feedback as to what you would like them to stock in addition to their already extensive range. I’m reliably informed there’s some amazing stuff to come!girl charlee


Fabric Godmother – Sale now on & Open Day 7th November

These are just some of the fabrics I hope to be working with in the next few weeks. Am waiting on swatches of the marl and shatta jerseys (Far Left and Far Right). The Venice Modal Silk Jersey I have already got my mitts on and is new in. Oh.My.Word. Soft doesn’t even begin to describe it! Look out for some posts coming up using the plum and slate colourways 😉 There’s currently a sale on and Josie is opening up her premises to the public on 7th November for her Open Day so you can get to fondle the fabrics in person (I am HOPING to make it too). Head to the website for deets…FABRIC GODMOTHER


Dragonfly Fabrics – 15% off until Nov 29th with code DRESSMAKING

If you want boiled wool then I haven’t seen a better range of it anywhere than at Dragonfly fabrics. And I can attest to how delicious it is because I made this last year!! They’ve also just got in an awesome range of ponte roma jersey in the most delicious autumns tones. This cable knit jacquard one is particularly fun. Would make a great knit pencil skirt surely?! I’m also crushing on this Melton wool. I’m formulating ideas for a winter kimono coat and this could well be perfect! Delicious range of silk crepes on 20% off  too! Crushing on this one in particular!dragonfly fabrics


The Splendid Stitch – 10% off with code PORTIA10 + 20% off “Recommend a Friend”

So I have been chatting a bit with Amy at The Splendid Stitch this week about an upcoming project and asking for some fabric recommendations. There’s something about independent business that makes them go that extra mile you know? (This applies to everyone in this post). Blue Viscose Challis, Atelier Brunette challis in Facet and this Atelier Brunette Batiste . Can’t decide. Need to feel them. One of the difficulties of buying online. Swatches are on their way to me now. But not only that, Amy has set up a Pinterest board where she will post pictures relating to customer queries. Seeing the fabrics draped on a form etc gives a better idea of things like drape and pattern repeats and I think is an excellent idea! To help you even further, I like the way The Splendid Stitch have laid out their fabric categories. Not only can you shop by the usual fabric type/colour pattern etc…but also by “project type”. In other words…what that fabric will be suitable for. Simple but clever. The extra mile you know. The first fabric is a lining that’s just come in that I’m bookmarking for that coat project!the splendid stitch


Remnant Kings – 10% Off with code MAKERY10

Talking of coat projects…what say you about this tweed from Remnant Kings? And if you like the idea of the scuba pencil skirt I made, there’s an expanded range of colours and finishes available too….remnant kings


Sewbox – The one stop Liberty Shop + 10% discount on Hot Patterns to 10 Nov with Code HOT10

If you’re a Liberty fan then Sewbox have got you covered yet again! Their Liberty Rossmore Cords are marked down including this rather unusual  abstract design as is this John Kaldor polka dot crepe de chine and this Liberty poplin, although not in the sale is still fantastically priced.  Click here to shop the entire sale… Lots of new Liberty Cords in stock – all at discounted prices – from £14.95/M. Sewbox is on Stand E24 at the Stitching, Sewing and Hobbycrafts Show 5-8 Nov at NEC and  will have a ‘huge’ range of Liberty prints  – jerseys, cords, Tana Lawn, Lantana wool mix etc all at discounted prices.  New Cashmerette Appleton Dress in Stock* UK Sizes 16-32.  This classic wrap dress is designed to play up your curves with a crossover front, a built-in waist tie, and a deep V-neck. Designed by and for curvy women. Boom!SEWBOX


Sew Crafty – 20 % Off with code PORTIA20

Some cute new arrivals at Sew Crafty! Including these two cottons from Windham fabrics. How quirky are they???! Also happy to see this curved ruler being stocked. I LOVE mine.  Had it for several years now and it’s super useful for pattern drafting or alterations especially if you’re crap at drawing smooth curves freehand…like me! Can thoroughly recommend that bit of kit!SEW CRAFTY ONLINE


White Tree Fabrics – 20% Off + Free P&P with code MAKERY

And how about this for genius? This evening dress kit (Includes the fabric and the pattern) for £30!! Whaaaat? They are also stocking a new line of U Handbag kits. So that’s a whole outfit sorted for the party season then!

WHITE TREE FABRICS


I want to say thank you again to all of these wonderful people who have been supporting me and this blog this month. Take advantage of all the discount codes in this post and support them too if you can. Independant businesses like this are part of what makes this sewing community of ours so awesome!

DIY, how to, Sewing, Tutorials, Uncategorized

FO: Scuba Pencil Skirt + tutorial

10/20/15

This may actually be one of the most versatile garments I’ve sewn! I don’t normally style a make in lot’s of different ways for a blog post, but since skirts are an alien concept to me I needed to try out a few ideas and see what worked best for me. It turns out quite alot works with a black pencil skirt which shouldn’t surprise me as it’s often touted as THE supreme wardrope staple. It’s just that as a lifelong tomboy I tend to stick resolutely to trousers. I may have been swayed with this make…SCUBA PENCIL SKIRT OUTFITS

So…if I’m such a trousers devotee…you might ask what prompted me to sew a pencil skirt? Well….I’ll explain! I fell prey to the confusion that exists over the difference between neoprene and scuba. Know the difference? I didn’t! I saw the word scuba and thought I had ordered neoprene. Which is a foam core sandwiched between two layers of dense knit. (Yes, the stuff that wetsuits are made from hence the “Scuba” confusion) I planned to make a giant tote/shopper. Then my scuba arrived… (Remnant Kings at £9.99 a metre. This is the heavyweight scuba that they have currently sold out of but they have the medium weight and some new crepe scuba in stock which would also work for a lighter version of this. Get 10% off when you use the code MAKERY10 )SCUBA PENCIL SKIRT TUTORIAL

Scuba it turns out is a very dense knit. Sturdy but with some drape and firm stretch and a very slight sponginess. Definately apparel weight though. So I had to rethink my plans; and “The Scuba Skirt” was born!

It’s a simple make and requires no pattern. You just need your hip measurement…SCUBA PENCIL SKIRT TUTORIAL

And your desired length. With the fabric folded in half selvedge to selvedge, mark your length on the fold…SCUBA PENCIL SKIRT TUTORIAL

Then square across from this point by half your hip measurement (no SA needed as this is stretch and I’m serging…but add a little SA if you’re using your standard machine). Then square up to create a rectangle…SCUBA PENCIL SKIRT TUTORIAL

Cut along your lines and up the fold so you have 2 separate rectangles. Then sew along the sides to create a tube and try on…

SCUBA PENCIL SKIRT TUTORIAL

Pin to fit whilst you are wearing it. Tapering at the waist and hem to create that classic pencil skirt curve at the side seams….remove the skirt and even out the line of pins so it’s a smooth curve that  blends into the seam at the hip…SCUBA PENCIL SKIRT TUTORIAL

To mark the curve identically on both sides remove the pins from one side. Fold the skirt in half lengthwise, lining up the side seams; then using the remaining line of pins, pin through all layers at once…being careful not to change the position of the pins and retain the shape of the curve…SCUBA PENCIL SKIRT TUTORIAL

Mark the position of the pins with chalk on one side…SCUBA PENCIL SKIRT TUTORIAL

Then flip over and do the same on the back…

SCUBA PENCIL SKIRT TUTORIAL

When you remove those pins and open out the skirt you’ll have the outline of your curve marked identically on both sides…SCUBA PENCIL SKIRT TUTORIAL

Join those marks then use the line as a guide to sew your new curved side seams. Make sure the line is lined up with your needles and then serge or sew…SCUBA PENCIL SKIRT TUTORIAL

Create a simple folded over waistband. A strip of fabric, sewn together to fit your waist snugly (Make sure you can get it over your hips too) then folded over…SCUBA PENCIL SKIRT TUTORIAL


With the skirt RS out line up the waistband seam with the CB of your skirt and the sides of your waistband with the side seams of your skirt. The waistband will be marginally smaller…SCUBA PENCIL SKIRT TUTORIAL

Slide the waistband onto the skirt with raw edges aligned. Pin in place. Serge/Sew together. You’ll need to stretch slightly as you sew to take up the slight bit of slack between the waistband and the skirt itself….then hem…and you’re done! Easy right?!SCUBA PENCIL SKIRT TUTORIAL

Except a word of advice. Warning. Call it what you will. While I LOVE this fabric and my finished skirt. My serger did not and threw an absolute paddy when it came to the waistband. I have the Singer 14SH754. Yep the Lidl spesh that I got a few years back. (and I know a few of you have bought one recently). While I don’t deny that this fabric is sturdy…and dense…I’d liken it to sweatshirt fabric in terms of thickness and stretch. And it’s my honest belief, that when my manual gives instructions for sewing “heavyweight” fabrics…it should have been able to cope with this. It could not. I won’t go into the details of the injuries my machine sustained. Far too gruesome, lol! It’s with the servicing company as we speak . This is not the first thicker fabric that my Singer failed to cope with. And I’ve come to conclude that this machine is not actually powerful enough for thicker fabrics. So…my advice would be this if you intend to work with this fabric…SCUBA PENCIL SKIRT TUTORIAL

My serger managed 2 layers of this. But it didn’t like it. It grumbled at me while I was sewing and I should have listened. When attaching the waistband you’re looking at 3 layers of this stuff (+ seams!). If your serger in any way complains at 2 layers of this…do not even attempt to attach the waistband using a serger. In the end I used DENIM needles and a zig zag stitch on my standard machine (a Janome) for this stage. The fabric is completely non fray so the unfinished edge is not problematic. And trust me….you don’t need the heartache of a broken serger when you have projects to finish (and deadlines to meet, aaaargh!). In hindsight I wish I’d done the whole thing on my standard machine. She did me proud my Janome. If you go down the standard machine route, then definitely try the denim needles and look at increasing your stitch width and length to account for the the thicker fabric. Swatch it all first and you’ll be good.SCUBA PENCIL SKIRT TUTORIAL

Despite the trauma of “sergergate” I sincerely do love this skirt which is quite a revelation to me. The scuba is perfect for smoothing over lumps, bumps and VPL. The waistband is CRAZY comfy and it really is a very comfy and versatile piece.  I tried out a few different looks…flat or heeled boots with a variety of tops…SCUBA PENCIL SKIRT OUTFITS

The first stripe top is the one I based my spotty box top on and is refashioned from a thrifted jersey nightdress. The camel and black stripe top is a cropped variation of a hemlock tee that I never blogged. Then grey hemlock blogged here. Then the camel top is refashioned from a skirt (due to be blogged) and the black top in the last pic is a black crepe test version of the 2 Hour Top. A free pattern from Sew Different. (I love it!) I think they all work as outfits. I think you can probably guess which 2 I am most likely to wear considering my tomboy tendencies. But at least now I know I have a dressier more ladylike option. To be fair, there is something about this skirt that makes me feel feminine (without being girly) which is a slightly odd and alien state for me. A totally new silhouette. And what is it with pencil skirts that makes you feel like you want to sashay like Jerry Hall when you walk?!

Sewing Room Organisation, sewing space, shedquarters, Uncategorized

Shedquarters: Part 2 – Making it Mine

10/19/15

SHEDQUARTERS - MAKING IT MINE (13)

While I spent alot of time in wellies during the build part of Shedquarters, once it was built, it was a “no shoes” zone right from the outset. While wellies and earphones characterised the outdoor phase; bare feet, coffee and my bluetooth speaker were and still are my staples inside! I cannot do anything without caffeine and music on in the background; and BOY was there alot to do to get this space ready for sewing!

Let’s start by taking a look around the inside and all that wood than needed painting! It was super important to me that Shedquarters had as much natural light coming in as possible. And this informed our choice of building and it’s position. What it also meant was four long windows, and  two french doors….plus frames. Those are gonna need undercoating and glossing inside and out…SHEDQUARTERS - MAKING IT MINE (3)

We went for a pitched roof as opposed to a flat one for the sense of height and space on the inside (those beams also offer storage options further down the road that I am pondering!). So the ceiling and beams are also gonna need painting…SHEDQUARTERS - MAKING IT MINE (1)

As are all four of those walls…SHEDQUARTERS - MAKING IT MINE (2)

SHEDQUARTERS - MAKING IT MINE (5)SHEDQUARTERS - MAKING IT MINE (4)

And the floor and skirtings. That’s a heck of alot of wood to paint! It also needed thoroughly brushing down and hoovering inside as it was covered in sawdust which needed removing before painting could begin.

But before that there’s the outside to seal and protect. So first priority is to get the exterior weatherproof. We opted for this Cuprinol Garden Shades treatment in Urban Slate…SHEDQUARTERS - MAKING IT MINE (6)

I LOVE this colour and as a product I really rate this too. It’s a great consistency, goes on easily and covers in one coat if you don’t skimp on loading your brush.

My method was to put it on relatively thick and push it into the grooves between the wood first, then fill in the flat areas in between with what’s left on the brush.  It all seems pretty straightforward right? Which it was on the areas of blank wall. Those took me no time to cover. But if you look at this picture you can also get a sense of all the little nooks and crannies that you have to navigate with your paintbrush. Particularly where the logs intersect at the corners…but also around the window/door frames and up and under the roof overhang and facia board…SHEDQUARTERS - MAKING IT MINE (7)

You can just about see the rain starting to come down in this picture too! Typical British weather!

It took me about 3 days to paint the exterior and prime the doors and windows. You can see in this image we also opted to remove the Georgian style batons from the windows. Three reasons. Mainly because it gives the whole thing a slightly more sleek and contemporary look. But also because it was one less element to paint (and a fiddly one at that) and it also made the frames much easier and quicker to paint…SHEDQUARTERS - MAKING IT MINE (8)

With all of that done I was ready to start on the inside. You can probably tell from these pics that the weather was still dull, grey and damp. So I was happy to get inside…

But no sooner had I put  a single coat on a couple of the interior walls, than the sparky turned up to hook Shedquarters up to the mains! Exciting!! You can see in this pic the cabling he’s put up on the back wall to one of two double sockets in Shedquarters. It’s grey. Dark grey. Apparently he couldn’t get white. Man did that cabling take a lot of painting to obscure it!! If you plan on doing this….get white cabling. It’ll save you at least SOME paint!SHEDQUARTERS - MAKING IT MINE (10)

The cabling runs under the patio from the house (we had to lift some slabs, dig in a channel and lay some conduit for the armoured cabling in preparation for the electrician’s arrival). It enters Shedquarters in the bottom left hand corner of this pic and runs up the interior wall then along the ceiling to the various sockets/light switches etc. We had 2 double sockets, an exterior socket (for the lawnmower!) plus interior and exterior lights.

The interior lighting is a strip of moveable halogen spotlights from B&Q. I’ve since (Like yesterday) replaced these with daylight/white light LED spotlights. They are energy saving (5w emits the equivalent of a 50w halogen) and I’m hoping the whiter light will help with photography during the greyer days of winter. Will keep you posted on that one!SHEDQUARTERS - MAKING IT MINE 11A

These 2 pics will also give you a sense of the paint coverage straight onto the untreated wood. One coat of satin emulsion essentially gives the wood a whitewash. I was eager to have as solid a white an interior as possible to bounce the light around for photographic purposes. So ultimately I had to coat every inch of the interior at least 3 times (more in some instances) to achieve the solid white I was looking for. The wood literally drinks paint. I was having some health issues at this time too which meant my energy levels were at rock bottom. So I was only managing to paint for 2-3 hours a day. So this stage took me about 2 weeks to complete…SHEDQUARTERS - MAKING IT MINE (12)

You can see the cabling running across the top of the window from the fuse box; and the wood at various stages of coverage from unpainted to 3 coats in places. The building was actually still “settling” at this stage too. So I would paint one day. Then by the time I came in the next day there would be horizontal cracks in the fresh paint where the wood had shifted slightly over night. I became a tad obsessive with achieving as clean a finish as I could so would keep layering the paint up to cover up these cracks. I would often step out of Shedquarters and have momentary “white blindness” I had spent so long scrutinising the walls for spots that needed touching up. But I was determined to invest the time and effort at this stage as I knew I would ultimately be happier with my space down the line…SHEDQUARTERS - MAKING IT MINE (11)

While all of that paint on the walls and ceilings obviously brightened up the interior, it seemed to be the painting of the floor that had the biggest impact and effectively turned the whole thing into one big lightbox!! When the sun was out I would venture to say that it was almost too bright inside! I put sunglasses on at one point, ha ha! But I knew from experience (and my previous summerhouse) that this effect would soften over time. For 2 reasons. The addition of furniture, shelves etc would break up the expanse of white and give the eye other things to rest on. But also, I knew it would not remain a true white. Sap from the trees remains in the wood looooong after it is cut. And over time I knew that the remnants of this would seep through the layers of paint and soften and dull the white. Which indeed it has. Less than 6 months down the line it is nowhere near as eye achingly bright …in fact in some places I’ve had sap dripping out of the beams through all those layers of paint. The knots in the wood in particular will show through again over time…SHEDQUARTERS - MAKING IT MINE (9)

Here’s another little tip for speeding up painting window frames. For years I masked and painstakingly cut in with a brush when painting window frames. Making it one of my most hated decorating tasks. But the OH showed me that you can paint right onto the glass, let it dry and then simply scrape the paint off the glass. This is sooooo much quicker than masking, allows you to get the paint right up into the recess and achieve a better seal between the glass and the wood, AND achieve a much better finish. I’m a convert!SHEDQUARTERS - MAKING IT MINE (16)

In terms of painting the inside, I found the best method for me was a combination of paintpads and a large brush. I would use the paintpad heavily loaded to cover the flat areas; and the brush to push the paint into the grooves between the wood and other nooks and crannies. The paintpad needed to be changed fairly frequently as the surface of the wood was rough in places (over the knots etc) and would get soggy and shred over time. (and forget rollers. Trust me!) So I definitely wouldn’t use your best ones. Just some cheaper ones. Use them to get the paint up on the walls in the first place, then use a decent large brush to spread it around evenly and push into the recesses. That’s what worked the best for me anyway!SHEDQUARTERS - MAKING IT MINE (15)

One of the benefits of spending so long painting inside was that I got a really good sense of the light and even without it finished I could tell that this was going to be a beautiful and calming space in which to work. It has a real feeling of zen calm which I think the photo below really captures for me.  I need as much Zen as I can get, as I am prone to flipping out when things go wrong, lol!SHEDQUARTERS - MAKING IT MINE (14)

With all of the painting done it was time to start kitting it out and moving in. The weather was changing at this stage. Summer was coming, the sun was out. And I was happily sat on the floor of Shedquarters, singing to my music, putting together flatpack furniture and looking out onto the garden as it was beginning to burst into life. I remember very clearly being sat on the floor, taking the picture below, and thinking to myself…”how frikkin lucky am I?!”SHEDQUARTERS - MAKING IT MINE (17)

My machine table is comprised of 2 x 3 drawer Malm units and of all things, an Ikea wardrobe door! They didn’t have the length of worktop I wanted in the width, finish and price bracket that I wanted. This wardrobe door was perfect! I unded up putting additional supporting “L” brackets underneath in the centre and fixing the top to the drawer units and now it’s as sturdy as anything 🙂 One of the beauties of custom building a space is you can put your sockets exactly where you need them. You can see mine are pretty much central to the knee space of my desk. The worktop also sits slightly away from the wall to allow machine cables to run down the back as opposed to over the front of the desk. It’s a small thing but…well….you sew…you know what I mean 😉SHEDQUARTERS - MAKING IT MINE (18)

My cutting table!!! Ah the holy grail of sewists! Somewhere to cut without breaking your back! So….the carcass comprises of 2 second hand bookcases I bought locally for £5 then painted with paint we already had in the shed. The chair is a second hand Ikea one that I picked up for £10. The top is a high gloss tabletop that we picked up on sale at Ikea reduced from £79 to £30. So basically this whole set up cost me around £50! I’m aware that I have mentioned Ikea alot, lol! But much as I would have like to say everything was repurposed/recycled/DIY’d….at this stage I needed to be very specific about what I needed my space to do and well….Ikea have it nailed when it comes to functionality, interchangeability and versatility. I bought what I could second hand (even then alot of it was second hand Ikea) but there were some things I just wasn’t prepared to compromise on and I couldn’t keep waiting indefintely for what I needed to pop up locally and second hand. So eventually….an afternoon trip to Ikea gave me everything I needed to finish up the inside…SHEDQUARTERS - MAKING IT MINE (19)


This gives you an idea of the desks in relation to eachother…I can wheel between the two when I’m on my sewing chair!SHEDQUARTERS - MAKING IT MINE (20)

Talking of my sewing chair…this came out of my old summerhouse and had been in the shed for over a year. (Yes, yes…more secondhand Ikea, lol!) It really needed a makeover to be deserving of it’s place in Shedquarters…SHEDQUARTERS - MAKING IT MINE (21)

And so began my obsession with black spray paint…

SHEDQUARTERS - MAKING IT MINE (22)

This stuff to be precise. LOVE it. Best spray paint EVER!SHEDQUARTERS - MAKING IT MINE (26)

My vintage weights got a spruce up…

SHEDQUARTERS - MAKING IT MINE (27)

As did my ironing board that had also been sat in the shed for over a year (nope. Didn’t need it inside. I don’t do ironing. Life’s too short. Outside of pressing during the making process I rarely iron anything. If the creases don’t drop out when It’s hung damp…well…)SHEDQUARTERS - MAKING IT MINE (23)

I dismantled the whole thing (watching me put it back together would be like a comedy sketch of head scratching and staring blankly at the pieces until I realised I could just look at the photo above on my phone! Doh!) and sprayed all the metal parts black to match my new interior scheme…SHEDQUARTERS - MAKING IT MINE (25)

I treated the board and my sleeve board to new covers using some vintage Conran cotton I rediscovered when I collected my stash from storage!SHEDQUARTERS - MAKING IT MINE (28)

And here is everything set up! Oh what a happy day!!SHEDQUARTERS - MAKING IT MINE (29)


HACCI KIMONO DIY (9)

Shedquarters is still evolving. As I work out what I need from it and how the space flows I will make little tweaks like putting up a hook here or a shelf there. So I keep things in the place where I am most likely to reach for them. And there may well be a future post where I share those kinds of things and my reasoning behind them. That roll of tracing paper attached to the wall above the cutting table is a case in point. But for now, that’s where Shedquarters is at. It’s a light, bright sewing sanctuary. It was alot of work, and saving, and scrimping (and stress on occasion) but it has been so worth it and I feel a little leap of joy every time I step inside.

I hope it inspires someone to allow themselves some priority. Yes I have  family and household expenses. And this on the surface would seem alot of time, money and energy to spend on what is essentially a hobby and something that is just for me. Is it selfish? Maybe. But why is selfish always deemed to be such a negative anyway? We give so much of ourselves to others, day in day out, (often without much obvious appreciation!) that it’s easy to forget that we too need things that replenish and feed us. We are no good to anyone if we do not look after our own  needs too. (At least I’m not) Sewing, and a physical and head space of my own is my replenishment.  I learnt a long time ago that is something I need to stay sane. (Know thyself, right?) And I also learnt a long time ago that if I address my own needs, I’m a calmer, saner, better person in general. An analogy that has always stuck with me is that our energy and souls are like cups of wine. We drink from our cups to sustain ourselves; and we allow others to drink from our cups also, every time we give of ourselves to others. Or if their cups are a little empty, we pour a little of our wine into theirs.  If all we ever do is give of ourselves, eventually that wine will run out, and an empty wine glass is no good to anyone 😉 At some point we need to open a new bottle of wine and refill our glasses.

So Shedquarters is really not for me at all….but don’t anyone else dare set foot in it unless they’ve been invited….and then they better make sure they take their shoes off….and bring wine  😉SHEDQUARTERS - MAKING IT MINE (13)


Uncategorized

What’s been occurring…

10/07/15

It’s been a funny couple of weeks. A mix of brilliant stuff and annoying obstacles! Best of all was announcing the winner of The Refashioners 2015 and the overwhelming consensus seems to be that Mirjam was indeed a worthy winner! In terms of what I’ve been up to I’ve been pretty productive! (Most of this will show up in more detailed blog posts going forward) I skinnified a pair of berry coloured jeans that have been bugging me for months. I’ve toiled my first pair of Ultimate Trousers. I’ve been cutting into cashmere sweaters for a project/experiment (sharp intake of breath. I KNOW!) I made up my boxy top in a woven to see if it would work. It does 😉 I posted the “boxy top” tutorial in this gorgeous hacci knit by Girl Charlee last week. (2 days left to enter their fabric giveaway people!). I had my first sewing experience with crepe and I think I’m in love! I used the free 2 hour top pattern from Sew Different and LOVED it. (about to cut my second in a magenta peachskin!!) I refashioned a bias cut crepe jersey skirt into what I have christened “the wonky top”. It really shouldn’t have worked on paper….but it sooooo does!!PicMonkey Collage

I treated myself to some new plants 🙂 A beautiful Echiveria succulent for the house and a trailing pothos for Shedquarters. Talking of Shedquarters (you can just see my new plant in that pic) I am growing more and more in love with my space every day 🙂 I’m working on the next post to show you how we took it from this into a breezy, bright and functional sewing space. Stay tuned for that later this week! I’ve been having some serious overlocker woes. Like for the past 3 weeks! (5 projects queued and stopped midway!) There was a day that I have now christened “overlocker armageddon” where it just seemed to throw a huge tantrum and implode. Broken needles and needle plate and it turns out (I got it back yesterday from the servicing company) the upper looper needed replacing, both knives were worn and out of alignment, the cam belt was slipping and the needles weren’t clearing the upper looper properly. What!! Anyway, it’s back and I’m off to test out my “Steve Austin” machine when I’ve finished typing this post! Hopefully to finish sewing the black scuba fabric that seemed to be the last straw for it those few weeks ago! Wish me luck on that?! Saturday was a wonderful day. Fabric shopping and lunch with fellow sewists at a meet up in Walthamstow. Doesn’t get much better than that 😉 I’m particularly taken with this polka dot and teal viscose (have it in maroon too!) that has a kind of satin swiss dot texture to it. £2 a metre from the legendary “man outside Sainsbury’s”!!

So that’s a very edited version of what I’ve been up to. How ’bout you? Watcha been doing? Spill!

the refashioners, Uncategorized

The Refashioners 2015: and the winner is…..

10/02/15

I seriously cannot overstate just HOW difficult it has been to arrive at this decision! There has been so much creativity and ingenuity that I wish I had a multitude of prize packages to give away! There is a caveat to this. Which you’ll come to further down. But for now…without further ado…meet this years winner of The Refashioners 2015 “Get Shirty” Community Challenge….

Mirjam Liechti

When I first saw these trousers my jaw literally dropped. When you have lots of fabric to work with there’s a degree of flexibility in what you can do. Margin for error too. But to eek a pair of trousers out of a shirt; with all the fitting nuances we all know are involved? Well that requires gutsy vision, precision and a whole different kind of creativity…THE REFASHIONERS 2015 - YOUR MAKES (6)

The way in which Mirjam has retained the original essence of this shirt and her use of practically every last piece in details like the ankle cuffs (the original shirt cuffs) and the matching braces and button tabs is super clever. But it’s subtle too. What’s more, I get the sense that this really is a reflection of her style and personal aesthetic; which surely is one of the best kinds of motivation for refashioning and sewing our own clothes!

This was Mirjam’s first make for The Refashioners. Again, clever but subtle reuse of the cuffs at the waistband. And here’s the kicker…Mirjam is a beginner sewer! Having taken up sewing little more than a year ago Mirjam says she has discovered her passion. So much so that she has given up a career as a qualified teacher (!) to work part time in sales so she can attend the Swiss College of Textiles where she started a month ago and will be training for the next two years. All of which ramps up just how impressive this is and for me, is indicative of someone who has a natural talent for creative sewing that should surely be encouraged. She has pretty much promised me that she is going to start a blog in the not too distant future (I for one shall be following that with interest! One to watch I’d say. You know when you get the sense you could be witnessing the start of something awesome?  That’s what my gut tells me about this lady!) But in the meantime…you can keep up with Mirjam here 🙂the refashioners 2015 - your makes

And now for that caveat!

Lisa Poblenz

Lisa blogs over at Pattern & Branch and for a long time I literally could not decide between these two. This make by Lisa is SERIOUSLY awesome, involved a lot of work on her part and is deserving of some recognition. You should go check out the process. Seriously!

I promoted this community challenge as having one prize package and one winner. And I felt I should honour that. But had I had two prize packages to award, this would have been it. So with Mirjam’s permission I peeled off a little something from that immense prize package for Lisa; and she will be receiving the trio of Megan Nielsen patterns. Seriously. Awesome. Skills.The Refashioners 2015 - your makes (3)


So that’s that. All of these awesome prizes (bar the caveat above) will be winging their way to Mirjam very shortly…..

The Refashioners 2015 Awesome Prize Package


And that rounds up this years series of The Refashioners. It’s been so amazing. The blogger challenge was phenomenal and just when I thought it couldn’t get any better, in comes the community challenge and blows us all away again! The community challenge will now become a permanent element of The Refashioners series, and yes, I’m already putting together the bones of next year’s series! ( we’re gonna need more prize packages). I think it’s fair to say that men’s wardrobes/closets are a little less safe today than they were a few weeks ago…sorry chaps! (Not!) Please please please keep refashioning and looking at the fabric that you have at your fingertips before consigning it to landfill or abandonment 😉 Until next year people, this is The Refashioners 2015….signing off.

refashion_6copy 900


Uncategorized

The Refashioners “Get Shirty” Closes tonight!

09/27/15

Aaargh! We have a matter of hours (midnight GMT tonight) before The Refashioners 2015 closes for entries to the community challenge and that awesome prize package; and I am SERIOUSLY struggling to keep up with you guys as awesome shirt refashions are coming in thick and fast today from all corners of the globe! How AWESOME!!

Crazy clever wrap configuration from Aneta!002

Way to feminise a shirt Juliette!The Refashioners 2015 - your makes (16)

Love this refashion based on Megan Nielsen’s Darling ranges (blouse version)…(Jenny…I want!!)001

Great reworking of the collar here!The Refashioners 2015 - your makes (12)

Angela making ingenious use of sleeves and plackets for a baby/toddler set!The Refashioners 2015 - your makes (9)

Thumblenina has been at it again! This time, not only  a dress but also another playsuit for her Sis!The Refashioners 2015 - your makes (17)

Love Deepti’s batik shirt refash. Simple but it so works!003

Squeezing 2 gorgeous separates from one shirt??? That takes some skill Edina!The Refashioners 2015 - your makes (5)

Love Carissa’s addition of lace to this make 🙂The Refashioners 2015 - your makes (4)

Natalie made this gorgeous vintage style halter. Epic right?The Refashioners 2015 - your makes (6)

Sue’s quilted (reversible!) jacket from shirts is an epic undertaking!! Wow!The Refashioners 2015 - your makes (7)

Great little apron and I’m also seeing a cropped halter tie top variation in there!!

The Refashioners 2015 - your makes (8)

Marianna keeps it simple and classy with this princess seamed creation where the sleeve/shoulder detail is the subtle star of the show…

The Refashioners 2015 - your makes (15)

There are still MORE amazing refashions to share….but you only have a few hours left to submit yours!! Hurry hurry hurry!!

discounts, Giveaways, sponsor, Uncategorized

September Sponsor Showcase: Giveaways & Discounts!!

09/25/15

It probably hasn’t escaped your attention that my little sidebar has started to play host to some advertising.  I realise that this can be a controversial issue for some readers, and one worth addressing. Let me promise you now, it’s only going to be a positive thing for this blog (sponsorship enables me to concentrate on this blog instead of working for someone else = more posts and more inspiration!) and for you (it means I can bag you some discounts and giveaways!!)

I spent about half a day this week drooling over all these websites and picking a few faves from each one…and let me tell you it was hard! But…without further ado…a big shout out and MASSIVE thanks to all of my September sponsors for supporting me/Makery this month AND for you guys here are some of my faves AND the lowdown on some exclusive discounts and giveaways!

The Splendid Stitch – 10% off with code: PORTIA10

The texture on this Sybille Ivory Crepe has me drooling and I can’t help but think it would be an awesome Lexi top! This geometric cotton batiste from Atelier Brunette would make an awesome Archer or Quinn shirt; and I can’t quite shake my love of grey so this Murray Grey Wool tweed has me thinking about another Freemantle. Worth noting that fabrics are sold by the quarter metre at The Splendid Stitch so bear this in mind when entering your quantities.THE SPLENDID STITCH


Fabric Godmother –  Win Gutterman Thread!

I love so much in Josie’s store! Aaargh! I’ve developed a bit of a thing for Cupro recently. (I have some I picked up from “The Man Outside Sainsburys” at a Walthamstow meet up that I am about to cut into….eeep! Cupro isn’t that widely available so this gorgeous Koop Cupro in taupe (with tiny polka dots!) is a real find. Cupro, if you haven’t come across it is kind of like a peachskin/heavy silk but made from cotton linter (so it’s a natural cellulose fibre) and is seriously gorgeous on the skin. This bamba monochrome viscose has the most gorgeous stylised bamboo design! I’m also loving plum tones right now so I’m thinking this Lillies Acqua viscose jersey and this Isabella wool and viscose jersey by John Kaldor would make an awesome combo! If you’re up for a bit of refashioning Josie has also very generously donated 10 spools of Gutterman thread AND a lace collar kit to the prize package for The Refashioners…but hurry! Deadline is 27th Sept!FABRIC GODMOTHER


Swedish Tracing Paper – Giveaway AND 10% off with code: MAKERY

Beloved of so many sewists it seems (although I have yet to try it myself in the interests of full disclosure)Swedish Tracing Paper is the traceble, stitchable, pretty much untearable paper used for tracing patterns and making toiles. I hear that once you use this stuff you won’t want to use bog standard tracing paper again. Well, Claire is offering you the chance to win a free roll of this wonder paper. Simply hop over and sign up to her newsletter packed with articles, tips and offers every fortnight. Then leave a comment here to let me know. Giveaway is open until midnight GMT on 9th October. Winner will be selected at random and notified by the email address given at the time of signing up for the newsletter.SWEDISH TRACING PAPER


Remnant Kings  – 10% off with code: MAKERY10

A household name in Scotland Remnant Kings are rightfully starting to gain traction elsewhere. A VAST array of fabrics and haberdashery for all manner of projects. I have a couple of projects coming up using some of their fabrics so look out for those soon. In the meantime check this out! This rose print leatherette (Yes you read that right! Leatherette. With roses on it.) had me all whaaaaaat!!! You know when something is SO unusual it has you racking your brains thinking what you might make?? A huge floral tote? Pencil skirt? What would you make with that??  On a slightly more conventional note, I’m also pondering a Freemantle in this Missoni Tweed with a burgundy lining (told you I was loving plum tones, lol!). They have a HUGE selection of linings in all the colours 🙂REMNANT KINGS


Wendy Ward – Win a signed copy of A Beginners Guide to Dressmaking!

While Wendy is well known for her book, classes and patterns, did you know that she has also launched a range of accessories including sewing themed jewellery (!) and this awesome MIY collaboration with scissor gods Ernest Wright & Son! I mean seriously! I keep looking at those shears and it makes my stomach hurt how much I want them. (Shedquarters is all white inside so it’s a must right?). Anyway, they’ve gone onto my Christmas/Birthday list so fingers crossed 🙂 You can also win a signed copy of Wendy’s book as part of The Refashioners Prize Package. Hurry hurry hurry!WENDY WARD


Girl Charlee – Giveaway – Win 2m of the fabric of your choice

The new(ish) jersey and knit specialist on the UK block but loooong established across the pond! You may have seen my previous post regarding this spotty Hacci knit. As well as a drafting tutorial for the top itself there’s deets on a giveaway where you can win 2m of the fabric of your choice! Get to it! I have another tutorial coming up using this mauve stripe Hacci knit too. So stay tuned for that. And just in case you were wondering where the triangle ponte knit that has been popping up all over the interwebs came from…it was these guys! (But they just sold out of that….aargh!)GIRL CHARLEE


White Tree Fabrics – Liberty Deal PLUS 20% off + Free P&P with Code: MAKERY

Art Gallery fabrics are stirring up a storm at the moment I know. But for the most part, lovely as they are, for a colour phobe like me (all the greys, lol) I hadn’t seen one that I thought I could incorporate into my wardrobe. Then I saw this Cultivate Jersey and was sold! The smudgy stripe is such a cool take on a classic breton stripe. Awesome.  I’m much the same with Liberty. I can appreciate them for their quality etc. But traditional florals have never really been my thing. But they do seem to be expanding their offering to include some more edgy and abstract designs. Like this Ilona and Strike Tana Lawn. Cool right??! That Strike tana lawn and it’s stylised match book motif has a distinct 50’s formica look to it don’t you think?? As well as the discount code above (applicable across the whole site) hey’re also offering a special deal on Liberty Tana Lawns at £15m (RRP £22.50) so head here to check that out 🙂WHITE TREE FABRICS


Sew Crafty – Prizes and 20% off with code “PORTIA10”

While I’m not usually a lover of bright colours (actually that’s not strictly true, I like them…I ‘m just not good at wearing them!) this multiflower cotton lawn is pretty delicious and I could see a drop hem tunic in this teamed with some black skinnies. Hmmmm. Dare I? What do you think?? This measuring tape ribbon is so cool! It would be perfect for garment hanging loops or to stabilise a neckline as a cheeky little hidden nod to a garment’s handmade credentials right? Sew Crafty have also contributed to The Refashioners Prize package where you can win an awesome toolkit and one of their newly launched sewing journals!!SEW CRAFTY


Elephant in My Handbag – 10% off your first order with code: MAKERY

I’ve been contemplating some pleat front courduroy trousers (I’ve been toiling and playing with a hack on the Suzy pattern – deets shortly) and this shade “anthracite” plays to my love of grey. As does this scandi Christmas jersey. Seriously….who want’s a white christmas when you can have a grey christmas, lol! Christmas decorating will no longer be agonising for us neutral lovers! Stephanie has a great range of scandi  christmas stuff in greys and taupe! I know! Althoooooogh….this herringbone organic cotton canvas is catching my eye for some catch all lined baskets I need for the bedroom…not totally colour averse then!EIMH - SEPT FAVES


Sewbox – Liberty Prize Giveaway + Offer plus Kwik Sew Pattern Offer

If Liberty is your thing then Susan from Sewbox could be your fairy godmother! Not only has she contributed 2m of Liberty fabric to The Refashioners prize package; there’s also plenty of it included in their sale;  and all Kwik Sew patterns are half price until 24th Oct! While I’ve already admitted that traditional florals aren’t quite my thing, I can’t deny the quality and inherent beauty of a Liberty fabric. They do have some beautiful autumnul colourways which I can totally appreciate. This particular Rossmore cord is just gorgeous! I’m not sure of the weight of a Rossmore cord, but wouldn’t this look cool as some Ultimate Trousers with a plain black or burgundy top?!!SEWBOX


So that’s it. These are all the wonderful people who have been supporting this blog behind the scenes this month! If you like what you see, then please do go and support them too. As someone who has worked in many and independent small business, I know how important your support is to them. 🙂

DIY, how to, Sewing, Tips and Tricks, Tutorials, Uncategorized

Boxy Hacci Knit Top: Tutorial & Giveaway!!!

09/24/15

HACCI KNIT SPOTTY BOX TOP - DRAFTING TUTORIAL

The lovely folks at Girl Charlee got in touch a while ago and asked me if I’d be interested in having a play with some of their gorgeous knits.  Absoflippinlutely I would! One of the fabrics they sent me (they are a generous bunch, but more on that later!) was this delicious Hacci knit. (If anyone knows the correct pronunciation let me know. “Hachi or Hacki” ?? What say you??)

It’s times like this that I wish you guys could reach into the screen and pick this fabric up. Soft and drapey is an understatement. SOOOO soft….SOOO drapey….

HACCI KNIT SPOTTY BOX TOP - DRAFTING TUTORIAL

So as you may have gathered from the title this is a very boxy top.  Made up in a different fabric (ie heavier and less drapey) it would look much more voluminous. But the great thing about this one is it drapes to the body and doesn’t look like there’s huge amounts of fabric adding bulk to your frame. Only when I raise my arms is it obvious just how wide this top is….(and I don’t tend to walk around in a permanent “yay!” position. So we’re good!)HACCI KNIT SPOTTY BOX TOP - DRAFTING TUTORIAL

Approx 56″ around to give you an idea. (I’m a 38″ bust so that’s a full 18″ of ease). It’s so simple to draft your own pattern for this. It’s literally a couple of squares for the body and a trapezium shape for the sleeves. Here’s what I did…

The basis for this top was the RTW jersey top you can see in the background below…HACCI KNIT SPOTTY BOX TOP - DRAFTING TUTORIAL

I took some measurements of the body, neckline and sleeves. Things like the neckline width, sleeve length and circumference at either end. Body length and width. Shoulder slope, how far the armhole extended out from the main body etc.

Then I took those measurements and went about drafting a simple template pattern. I established from the RTW top that the body (front and back) was essentially 2 squares measuring 28″ x  28″ ….identical bar the neckline depth, so I only really needed to draft one pattern piece for the body and cut 2 of those from my fabric.HACCI KNIT SPOTTY BOX TOP - DRAFTING TUTORIAL

Before we proceed it’s worth noting…this is “maverick” drafting. It’s not technically perfect as I haven’t added seam allowances the “right” way or anything of that nature; and purists out there…I apologise, lol! I am not a qualified pattern cutter. I work things out as I go and what I share here tends to be what works for me first as opposed to “technically perfect”.  But it does yield a wearable top because the size and boxy nature are very forgiving of such things! And it’s a top I love and is in use as soon as it comes out of the laundry. So if that’s the measure of a successful outcome, then this totally works for me. If you get easily “offended” by technically “incorrect” stuff…click away now! If you want a really quick easy bit of drafting that yields a comfortable drapey top….read on!

Patterns are drafted in quarters as we know. So I started with a rectangle that was 14″ wide and 28″ long…

Neckline

  • Measure down 1.5″ to 2.5″ (or your preferred neckline depth) from the top left hand corner of your rectangle. Mark a point.
  • Measure across 3.5″ to 5″ (or your preferred neckline width divided by 2) from the top left hand corner of your rectangle. Mark a point.
  • Join with a curve ensuring a 90 degree angle where the curve meets the centre front and shoulder point.

HACCI KNIT SPOTTY BOX TOP - DRAFTING TUTORIAL

You have your neckline!

Armhole

This style has and extended/drop shoulder line and a curved under arm seam.

  • From the top right hand corner of your rectangle, extend a dotted line out by 3″
  • Square down from there another dotted line of 3″”
  • Join that to your neckline curve to get your shoulder line
  • Square down approx 7″ (your preferred armhole depth) from the end of your shoulder line to get your armhole opening
  • Join that to your side seam with a smooth gradual curve at least 3″ down the side seam

HACCI KNIT SPOTTY BOX TOP - DRAFTING TUTORIAL

You have your armhole and shoulder!

The sleeve

It’s a matter of preference here it terms of length and “snugness” around the arm. But essentially it’s a trapezium! The measurements shown are what I used for this top. You might prefer a longer or more/less fitted sleeve. Jut change the measurements to suit:

  • Draw a vertical line the length you want for your sleeve; incorporating a bit extra for hemming etc
  • Your sleeve head measurement must match that of the armhole. Draw a horizontal line of that width, across the base of ( and centred on) your vertical line.
  • Your cuff measurement will vary depending on the length of your sleeve. The longer the sleeve the narrower the cuff. Draw a horizontal line of that width, across the top of ( and centred on) your vertical line.
  • Join either side with a diagonal line

HACCI KNIT SPOTTY BOX TOP - DRAFTING TUTORIAL

You have your sleeve!

Cutting

  • Body – Cut 2 on the fold
  • Sleeve – Cut 2

HACCI KNIT SPOTTY BOX TOP - DRAFTING TUTORIAL

Construction

  • Sew the shoulder seams RS together
  • Sleeves are put in flat. Attach the sleeves RS together then flip and press out (see below)
  • Fold in half RS together and sew the sleeve, under arm and side seams in one go
  • Finish hem, sleeves (I just turned once and hemmed) and neckline  (here’s what I did) as you wish.

HACCI KNIT SPOTTY BOX TOP - DRAFTING TUTORIAL

The Fabric

Now I LOVE this fabric. But it’s the very things I love about this fabric that make it a little tricky to work with. For instance, it is soooo drapey (actually “springy” and “boingy” would be suitable terms too I think!) that when you hang it off an ironing board to press the hem it drapes/stretches out (all the way to the floor in my case!) Which doesn’t make for even hemming. I resolved this by popping a stool underneath to “support” the fabric. Steam a seam to stabilise the hem for turning and sewing. I spray starched my pattern pieces around the edges after cutting to minimise curling. When it comes to cutting, the fabric stretches out as the scissor blades pass underneath it then “springs” back as soon as it is cut. I found cutting a couple of mm away from my pattern paper compensated adequately for this.  Apart from that, work relatively quickly, use the right needles and tension settings and you’re good. But SWATCH first and handle gently 🙂HACCI KNIT SPOTTY BOX TOP - DRAFTING TUTORIAL

It’s perfect for a loose fitting top like this…HACCI KNIT SPOTTY BOX TOP - DRAFTING TUTORIAL

HACCI KNIT SPOTTY BOX TOP - DRAFTING TUTORIAL

HACCI KNIT SPOTTY BOX TOP - DRAFTING TUTORIAL

Giveaway time!!

Now I mentioned that the folks at Girl Charlee are a generous lot! They are offering you the chance to win 2m of the fabric of your choice from their selection. To be in with a chance of winning, follow them on Instagram and Facebook. Then leave a comment here stating what fabric you would choose and any suggestions for what knits you would love to see them stocking in the future. Simples. Giveaway closes at midnight GMT on 9th October and the winner will be selected at random.

Good luck!!

Uncategorized

Get Shirty: Shades of Autumn (and a bit of summer!)

09/23/15

The deadline is looming people! You have until midnight GMT on the 27th of September to submit your shirt refashions for a chance to win that AMAZING prize package. (Yep that’s 4 days left!) In the meantime….if you’re after some last minute inspiration….

This refashion by CSews went through several evolutions before she wound up with this final incarnation using several elements from the Stylish Remakes book. If you hop over to her blog she’s reviewed and is running a giveaway for a copy of the book too! You’re welcome 😉THE REFASHIONERS 2015 - YOUR MAKES (7)

Kate has sure embraced The Refashioners. This is her 3rd shirt refashion for the series!12

From a rain soaked pavement to a sun drenched beach! Love Sarah’s shirt turned romper!THE REFASHIONERS 2015 - YOUR MAKES (3)

The inimitable CarmentcitaB! Winner of the French version of GBSB I have recently discovered! You can see why when you look at this matching dress and bralet combo made from 2 Liberty print shirts she cannily found on sale at Costco!THE REFASHIONERS 2015 - YOUR MAKES (4)

Love these recycled (shirt) bags by  @janavalach….available to purchase too!THE REFASHIONERS 2015 - YOUR MAKES (4)THE REFASHIONERS 2015 - YOUR MAKES (2)

Gemma landed this awesome plaid shirt and had some fun styling up her refashion by the looks of it! Gemma you like a fun lady to be around 😉

THE REFASHIONERS 2015 - YOUR MAKES (5)

Katie made great use of the Aster pattern for this make. Love the shade of this linen shirt and really MUST check that pattern out…it really does look like a perfect template for shirt refashions!THE REFASHIONERS 2015 - YOUR MAKES (3)

I was blown away by the ingenuity of these trousers and braces!! How clever right? Great plaid again too!THE REFASHIONERS 2015 - YOUR MAKES (6)

So impressed by this little combo too…THE REFASHIONERS 2015 - YOUR MAKES (1)


I am running to keep up with you guys and am seriously chuffed with how much everyone has got on board and embraced this year’s challenge! There’ll likely be another round up of your makes before The Refashioners is done as there are still so many to share. In the meantime, keep getting shirty! 4 days left to get your entries in!

Newer Posts
Older Posts
Portia
Follow
Sewbox

© Copyright 2026. Portia Lawrie. All Rights Reserved. Managed by WordPress Web Dev Cornwall .