• About
    • Contact
    • Press
    • Sponsor
  • DIY
    • Home & Garden
    • Jewellery & Accessories
    • Yarn Crafts
  • Sewing
    • patternless & self drafted
    • Refashions
    • Commercial Patterns
    • Sewing Tips
    • Overlockers
  • The Refashioners

Portia Lawrie

DIY, how to, refashioning, Restyles, the refashioners, Thrifting, Tutorials

The Refashioners 2015 – Wendy (again!)

08/25/15

WENDY WARD - THE REFASHIONERS 2015

While I love denim, I used to think that “double denim” was a bit of a fashion sin. Now I’m a convert. What’s not to love about a unique denim shirt dress? I took 3 men’s Levis denim shirts in different denim washes, all size L and turned them into two very different shirt dresses.WENDY WARD - THE REFASHIONERS 2015

Yes, 3 denim shirts, 2 shirt dresses, there was one shirt casualty that was simply plundered for “spare parts”, but I think it was worth it. Here’s what I did.

What do I need?

2 large men’s denim shirts will make 1 shirt dress, 3 shirts will make 2 dresses(ideally all the same size, style and brand so that you know they’ll be the same dimensions) WENDY WARD - THE REFASHIONERS 2015

How to do it?

Remove the collars – using an unpicker, remove the stitching around the top of the collar stand until the collar can be removed. Don’t unpick any further than you need to. WENDY WARD - THE REFASHIONERS 2015WENDY WARD - THE REFASHIONERS 2015WENDY WARD - THE REFASHIONERS 2015

If you like a grandad style shirt collar you could leave your shirt like this and just restitch around the top edge of the stand – tack the edges together first to make the machining easier to do and more accurate. WENDY WARD - THE REFASHIONERS 2015WENDY WARD - THE REFASHIONERS 2015

Swap the collars around between the shirts. If any of the collars are worn or marked, turn them over so that the side that was on the top is now on the underside of the collar. This is what’s known as “turning a collar” and very thrifty 1940’s housewife business!

To reattach the collar, fold it in half to mark the centre.  Do the same to the open top edge of the collar stand. WENDY WARD - THE REFASHIONERS 2015WENDY WARD - THE REFASHIONERS 2015

Slot the collar inside the open edges of the stand matching the pins marking the centre back neck .WENDY WARD - THE REFASHIONERS 2015

Pin, tack and topstitch the collar in place trying to stitch along the original seamline as close as possible .WENDY WARD - THE REFASHIONERS 2015

Collars swapped! WENDY WARD - THE REFASHIONERS 2015

Now for the brutal stuff….I cut the bottom off shirt 1 as low as I could to keep as much length in the top of the shirt. Simply chalk a straight horizontal line across the shirt and cut it off! Try and go in the middle of two press studs or buttons.

I cut the bottom off shirt 2 as high as I could (just below the pockets) to keep as much length on the bottom as possible. Make sure this line also runs in the middle of two press studs or buttons.

I removed the patch pockets from shirt 3 so that I could remove as much length as possible from the bottom of the shirt. I cut the shirt across where I’d removed the pockets which gives that nice “shadow” of the pocket remaining where the denim has faded around it. WENDY WARD - THE REFASHIONERS 2015

To reassemble the long sleeved shirt dress (made from the top of shirt 1 and the bottom of shirt 2), pin the 2 cut edges together matching up the side seams. WENDY WARD - THE REFASHIONERS 2015

Make sure that the press studs or buttons down the centre front of the shirt will still fasten once the 2 parts of the shirt are joined. Machine, neaten the edges together and press the seam down towards the hem. It might need topstitching in place to keep it flat.

To reassemble the short sleeved shirt dress (made from the top of shirt 2 and the bottom of shirt 3), pin the 2 cut edges together matching up the side seams.WENDY WARD - THE REFASHIONERS 2015

Check that the press studs or buttons will still fasten once this seam is sewn. Machine, neaten the edges together and press the seam down towards the hem. It might need topstitching in place to keep it flat. WENDY WARD - THE REFASHIONERS 2015

Decide what length you want the sleeves and cut the sleeves straight off at right angles to the top sleeve, leaving enough for a hem (approx. 3cm).  Chalk a line 3cm above the cut edge of the shortened sleeve on the inside of the shirt. Press the hem up so that the cut edge is level with this line, then turn again along the chalk line and press. Pin in place and machine. WENDY WARD - THE REFASHIONERS 2015

And there you have it – 2 totally wearable new shirt dresses from 3 baggy denim shirts destined for the “decorating clothes” pile!

Refashioning “pick n mix” or denim “mash up”!  Whatever you call it, a GREAT way to mix things up and make plain shirts more interesting! As  a child of the 80’s double denim holds a little fear for me too, lol 😉  But I think I may have been swayed here Wendy …. Thank you so much for this and your previous post. Inspiration aplenty!

You can find Wendy here and here. And don’t forget amazing prizes to be won as part of The Refashioners 2015 Community Challenge*. Including a signed copy of Wendy’s Book! So get involved for a chance to win!!! Grab a shirt and get refashioning! You have until Sunday 27th Sept to enter! Stay tuned for more inspiration throughout the WHOLE of August! After this week it’ll be over to you. So start sharing your shirt refashions for a chance to win!

*To clarify, the bloggers that have taken part in this year’s blogger challenge (ie the daily posts on this blog throughout August) are not entered to win that prize package. That is JUST for you! I wanted to clarify as a few comments made me think I haven’t made that clear. All of the posts throughout August have been for purely for your delight and inspiration. So go forth and refashion for a chance to win that awesome prize!

DIY, how to, refashioning, Restyles, Sewing, the refashioners, the refashioners 2015, Thrifting, Tutorials

The Refashioners 2015 – Dixie

08/24/15

DIXIE DIY - THE REFASHIONERS 2015

Hello all you Refashioners out there! I admit, I’m not usually much of a Refashioner. I get easily overwhelmed in giant thrift stores but I love this challenge and I’ve been participating since the beginning so how could I say no? Plus, I love getting surprise stuff in the mail, so exciting!DIXIE DIY - THE REFASHIONERS 2015

This go around I chose to exchange shirts with the lovely Heather Lou of Closet Case Files. She kindly sent me three shirts to work with so I was able to do two refashions.

First I made a loose-fit, sleeveless, peplum top out of a black and white shirt. The key to this top is getting the most fabric you can for the peplum and using a big enough shirt that can still be put on over your head as the buttons won’t be very useful in the end.DIXIE DIY - THE REFASHIONERS 2015

I started by taking off the sleeves. I used the front and back pieces from the Grainline Archer pattern to trim the sides off the shirt (the Archer has no darts which makes it a good base for a dart-less men’s shirt). Since the original shirt was only a men’s medium I didn’t have to cut the shirt much smaller to fit me.DIXIE DIY - THE REFASHIONERS 2015

Next I took some body measurements and lopped off the bottom third of the shirt.DIXIE DIY - THE REFASHIONERS 2015

With the leftover fabric from the shirt hem and the two sleeves I cut rectangular chunks out of the fabric, all the same length but varying widths.DIXIE DIY - THE REFASHIONERS 2015

I then stitched them all together, hemmed the bottom, and gathered the top.DIXIE DIY - THE REFASHIONERS 2015

This flannel check fabric hid the seamlines well and it was easy to match the print.I sewed the peplum to the bottom of the shirt.

DIXIE DIY - THE REFASHIONERS 2015

Lastly, I adjusted the shoulder line as the shirt originally reached past my shoulders, and I bound the armhole with self bias tape.DIXIE DIY - THE REFASHIONERS 2015

The only problem was that this shirt was a little big on me but not big enough that I could re-draw an entirely new armhole. I had to work with the existing armhole which meant the opening is pretty low. Oh, well, I’ll just wear a tank top under it instead.DIXIE DIY - THE REFASHIONERS 2015

*******

My second refashion used a 2XL men’s striped shirt and I turned it into shorts. This works best with a fabric that’s fairly thick (so you don’t end up with VPL) and a shirt that has the longest button placket you can find.DIXIE DIY - THE REFASHIONERS 2015

I wanted to try out the Katy and Laney Tap Shorts pattern but with a twist. I chose view A which allowed me to play with the angle of the stripes. This pattern originally uses a side zip opening but I decided to repurpose the shirt’s button placket and utilize that instead.

First I cut apart the whole shirt, including slicing off both sides of the button placket. This shirt was big enough to fit all my pieces easily.

I assembled the pattern like normal except I didn’t sew up the side seams or add the waistband yet.

From there I folded my seam allowances on the side seams to the right side and pressed. I went ahead and hemmed each leg at this point, too.

Now comes the placket – I split each placket in half, evenly distributing the buttons (three for each side of the shorts). I trimmed each section to make all the pieces the same length.

I folded up the very bottom of the placket pieces 1/4″ and stitched down.DIXIE DIY - THE REFASHIONERS 2015

I layered the plackets over the leg pieces with the center line of the placket sitting right on the folded edge of the leg pieces (buttons on the back side, button holes on the front).

Next, I sewed the plackets up the sides of the shorts following the two rows of original topstitching on the placket. This stitches down the seam allowances from the leg pieces.DIXIE DIY - THE REFASHIONERS 2015

As you can see in the photo above, the placket pieces were too short compared to the side seams. Rather than shorten the legs to compensate, I lowered the waistline and chopped off an extra inch from the top of the shorts.DIXIE DIY - THE REFASHIONERS 2015

That adjustment meant I needed to re-draft my waistband piece to be larger, as well as add another 5/8″ on the side seams to allow for the overlap of the button placket. I attached the waistband pieces, made a horizontal buttonhole on each side and added buttons I had cut off from the cuffs.DIXIE DIY - THE REFASHIONERS 2015

And finally, I know from experience that if you don’t at least partially sew the button plackets together you’ll get major gaping so I buttoned my shorts up to the second button from the bottom and stitched the plackets together on either side, again following the original topstitching.

I can still easily get in and out of the shorts by only opening the top two buttons.DIXIE DIY - THE REFASHIONERS 2015

Well, that’s it! Thanks for reading and I hope you’re inspired to do your own refashions. – Dixie

It’s fair to say the word “genius” can be over used. Not in the case of those shorts Dixie! A seriously ingenious placement of those button plackets!! Wow!! Wouldn’t a denim shirt be a great base garment for this?! Love the stripe play too. And Dixie makes a good point about the bonus of working with a shirt with a strong check like the first one. You basically have a fantastic cutting and measuring guide built into the fabric!

You can find Dixie here and here. And don’t forget amazing prizes to be won as part of The Refashioners 2015 Community Challenge. Including a copy of Dixie’s Bonnell Dress pattern! So get involved for a chance to win!!! Grab a shirt and get refashioning! You have until Sunday 27th Sept to enter! Stay tuned for more inspiration throughout the WHOLE of August!

DIY, how to, refashioning, Restyles, Sewing, the refashioners, the refashioners 2015, Thrifting, Tutorials

The Refashioners 2015 – Sally

08/23/15

CHARITY SHOP CHIC - THE REFASHIONERS 2015

The raw materials for my refashion were chosen and sent to me by Elisalex from By Hand London. As you can see, naughty Elisalex (never one to play by the rules) selected not one but two shirts in similar sizes and colour schemes.CHARITY SHOP CHIC - THE REFASHIONERS 2015

One shirt was stripy taupe and white.CHARITY SHOP CHIC - THE REFASHIONERS 2015

The other was also taupe and white, but a subtle dotted pattern. The fabric was thinner and had an element of stretch to it.CHARITY SHOP CHIC - THE REFASHIONERS 2015

I don’t know how she found two shirts in the exact same colours, but she’s right, they were destined to be together.

My ideas for combining contrasting fabrics in shirts were limited to bowling shirts and cowboy/country and western shirts. Since I already have a bowling shirt in my wardrobe, I went for a cowboy shirt.

To combine pieces of one shirt with pieces of another, some fairly drastic shirt surgery was required. I started by amputating the sleeves from both shirts.

I cut the yoke from the donor (stripy shirt), leaving a pointy edge.  I just cut this by eye, but I did fold the shirt over to try and make it the same on the left and right.CHARITY SHOP CHIC - THE REFASHIONERS 2015

Then I pinned the donated yoke to the recipient shirt and cut roughly around it.CHARITY SHOP CHIC - THE REFASHIONERS 2015

I prepared the yoke for transplant by folding up 5mm and pressing. Then I grafted it onto the recipient with white topstitching.CHARITY SHOP CHIC - THE REFASHIONERS 2015

CHARITY SHOP CHIC - THE REFASHIONERS 2015I also took the opportunity to do some minor cosmetic work; taking in the sides under the arms and using bias tape to finish the armholes.CHARITY SHOP CHIC - THE REFASHIONERS 2015

I made flat felled seams at the sides, in keeping with the original shirt.

For decoration, I added some basic hand embroidery (chain stitch only) in a contrasting shade of pink.

CHARITY SHOP CHIC - THE REFASHIONERS 2015 (9)CHARITY SHOP CHIC - THE REFASHIONERS 2015

I also cut off the buttons and added pink ones, which I think really helps distance it from its origins.CHARITY SHOP CHIC - THE REFASHIONERS 2015 (10)

Overall I like the look of it but now seeing these pictures, it’s crying out for some pink piping to emphasise the yoke shape – I may add that at some point.CHARITY SHOP CHIC - THE REFASHIONERS 2015

All in all, a successful transplant!

Thanks Portia for inviting me to be a part of the series again, I had a blast!

Thank you Sally!! And congratulations on your nuptuals!! (Psss…Sally only went and got married 2 days ago peops!!) Love the way these 2 prints complement eachother. Combining shirts is a great way to give yourself more fabric to work with and add visual interest. This has me thinking….you could probably take two shirts…do this for both….and still end up with 2 shirts with the colour/print blocking in the opposite configuration!  Hmmmmm…….

You can find Sally here and here. And don’t forget amazing prizes to be won as part of The Refashioners 2015 Community Challenge. Including a copy of Sally’s Bellini shirt pattern! So get involved for a chance to win!!! Grab a shirt and get refashioning! You have until Sunday 27th Sept to enter! Stay tuned for more inspiration throughout the WHOLE of August!

DIY, how to, refashioning, Restyles, Sewing, the refashioners, the refashioners 2015, Thrifting, Tutorials

The Refashioners 2015 – Heather Lou

08/21/15

CLOSET CASE FILES - HEATHER LOU - THE REFASHIONERS 2015

Up until about 5 years ago, most of the sewing I did as an adult involved tweaking and reworking clothing I found at thrift stores. I was particularly found of turning muumuus into summer dresses and still wear a few of them to this day, even if the quality of the sewing embarrasses me now.

I used to be a thrift store bandit; I even ran a business selling vintage on Ebay for a year or two. Buying secondhand was the best way for a fashion-loving lady on a 20-something budget to play with clothing and develop a sense of personal style.  When I started sewing in earnest again, from actual patterns using actual fabric, the siren call of thrift stores faded to less than a whisper. Once I realized I could simply make vintage dresses from scratch, rather than praying all the way to the dirty changing room that the gem I had stumbled on actually fit, my bi-weekly visits to the thrift shops of Montreal ended rather unceremoniously.

While I don’t miss the universal thrift store eau de parfum (do they all use the same delousing spray?), the terrifying florescent lighting or the grimy hands after a few hours at the racks, I do miss that little tingle you get when you spot something possibly precious in between hangers of stretched out turtlenecks and pilly acrylic sweaters, and the satisfaction that comes from taking something someone else rejected and turning it into something beautiful. When Portia asked me to join the Refashioners team this year, I was excited to relive that moment with Dixie DIY, my shirt trade partner.

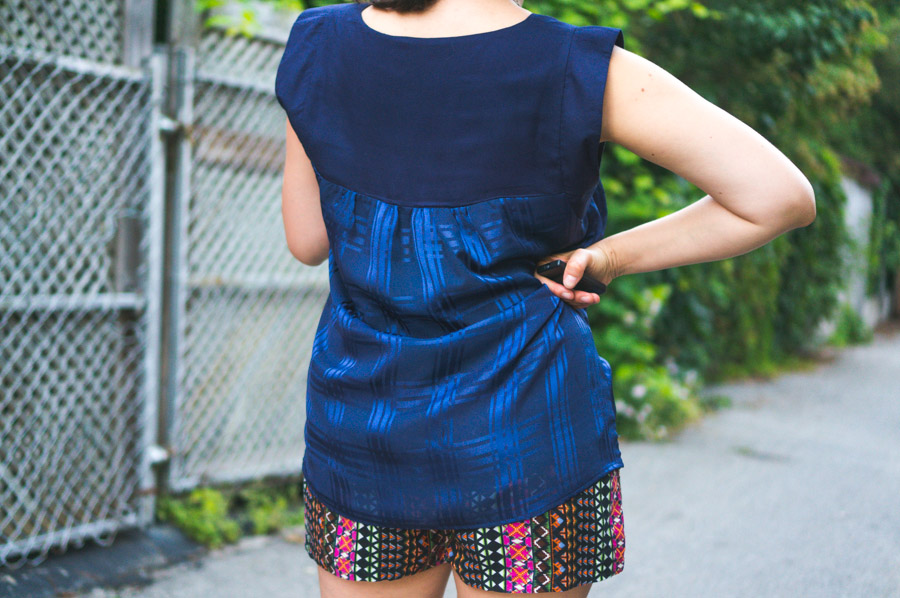
For a few weeks, I sketched ideas for ways I could rework men’s oxford shirts in preparation. But when Dixie’s package arrived, I didn’t get what I was expecting. Rather than big cotton shirts, I received a big…. poly chiffon shirt! Oh Dixie, you little devil.

Oxford plan out the window, I stared at the shirt. And stared at it some more. It hung in my studio for weeks, mocking me. Taunting me. What the hell was I going to do with this sheer iridescent plaid? The fabric was pretty, but I have avoided poly chiffon ever since I made a caftan out of the stuff a few years ago and wore it in Cuba, which was basically like wrapping myself in a sweaty sheer prison harder to escape than Alcatraz.

I realized that in order to come up with a plan of attack, I needed to break it down into usable pieces and take it from there. Half way into deconstructing the shirt, I remembered I had to take a before picture. I pinned it together as best as I could. This is what I was working with:

CLOSET CASE FILES - HEATHER LOU - THE REFASHIONERS 2015

The shirt was double layered, with a sheer navy poly lining.  And boy did it fray. It was essentially decomposing while I was cutting. I tried draping it on my dress form and came up with a few ideas, but all of them involved me wearing poly chiffon close to my skin, an untenable idea after the aforementioned Alcatraz caftan. Luckily, I had recently purchased and printed out the Tessutti Alice pattern (http://www.tessuti-shop.com/products/alice-dress-top-pattern) and realized it would be the perfect choice. I could use some rayon challis in my stash for the yoke, thus avoid having polyester around my sweatiest bits, thus making an actual functional garment I would actually wear, thus saving the refashioning day.

So that’s just what I did.CLOSET CASE FILES - HEATHER LOU - THE REFASHIONERS 2015

The gathered portion of the Alice top is basically one long rectangle, so I removed the bust darts from the shirt front and did what I could. Unfortunately the front and back pieces were around 3” shorter than the pattern demanded, but I forged ahead, anticipating a little leeway due to the ease of the garment. I used the existing shirt hem and layered the navy poly lining underneath, basting and gathering at the top as if it was one.CLOSET CASE FILES - HEATHER LOU - THE REFASHIONERS 2015

Construction was a total snap. While the hem juust squeaks past my hips, I am fairly happy with the final result.  I love the armhole bands and shoulder shape of this pattern; the silhouette is old fashioned and modern at the same time.CLOSET CASE FILES - HEATHER LOU - THE REFASHIONERS 2015CLOSET CASE FILES - HEATHER LOU - THE REFASHIONERS 2015

While I don’t think the transformation is that dramatic, I’m quite pleased to have recycled this poly chiffon beast into something I’ll actually wear. The addition of rayon challis makes it possible on warm days but I suspect this top is something I’ll be more likely to pull out in the fall with a pair of jeans and ankle boots. CLOSET CASE FILES - HEATHER LOU - THE REFASHIONERS 2015

Thank you for the challenge Portia! It was a bit of a head scratcher but I think I pulled through. And Dixie, your bolt of revenge iridescent poly chiffon is in the mail and on route to you. I expect your assignment on my desk within a month’s time.

Ha ha! I love the idea of a revenge bolt of fabric winging it’s way to Dixie! What a way to turn something from frump to fab though! Effortlessly cool as ever Heather Lou! A classic and simple shape that I can really see styled up with jeans 70’s styleee. Big chunky cardi , and leather boots like she says. If you’re not using a pattern then lopping off the top portion of a shirt and adding your own yoke is a quick and simple fix to a shirt. But the Alice Pattern that Heather used, well it could almost be made with a shirt refashion in mind! The sleeve and yoke pieces could quite easily be squeezed out of the sleeves of the original shirt and you can choose to flip the original body of the shirt round to create a button back detail! Hmmmm….may have to look into this one myself!

You can find Heather Lou here and shop her pattern range here. She has also very generously  added your choice of Closet Case Pattern to the prize package!!  Take a look at ALL the amazing prizes to be won as part of The Refashioners 2015 Community Challenge. So get involved for a chance to win!!! Grab a shirt and get refashioning! You have until Sunday 27th Sept to enter! Stay tuned for more inspiration throughout the WHOLE of August!

DIY, how to, refashioning, Restyles, Sewing, the refashioners, the refashioners 2015, Thrifting, Tutorials

The Refashioners 2015 – Ingrid

08/20/15

THE REFASHIONERS 2015 - WE THE SEWING - INGRID

I won’t bore you with any more ranting of how brilliant this initiative is. I did enough of that here. But it is amazing. Just sayin.

When originally invited by Portia to take part in refashioning a men’s shirt I planned to make a button down skirt. However, the shirt I got in the post was in no way big enough to cover my backside, so, I went with a top instead.THE REFASHIONERS 2015 - WE THE SEWING - INGRID

Here is the shirt Portia sent me for the challenge. It’s actually a really nice Jack & Jones shirt – a Danish brand too which was a luurvly touch J (I am Swedish but live in Denmark at the moment).  THE REFASHIONERS 2015 - WE THE SEWING - INGRIDTHE REFASHIONERS 2015 - WE THE SEWING - INGRID

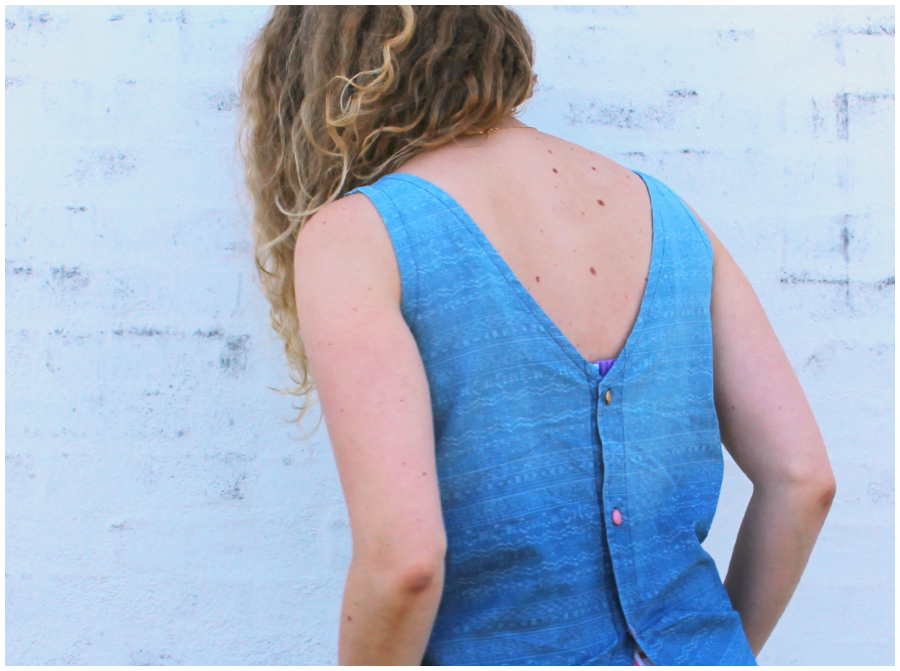
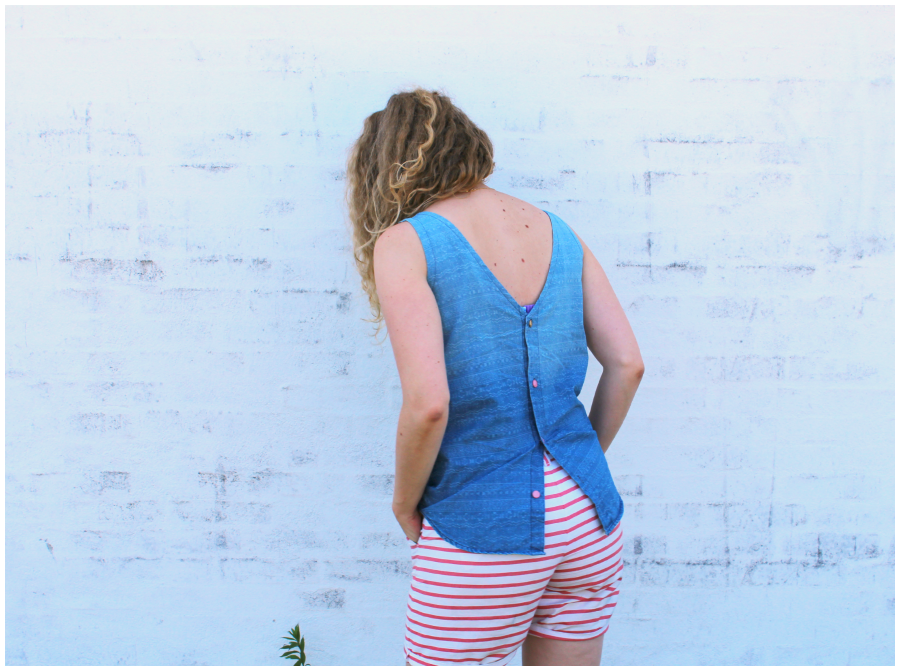
I have a feeling that my refashion might be one of the simpler ones this year. But I don’t mind! I REALLY needed a basic top, and this one has become a staple in my wardrobe already. So it’s been total success from my perspective. I decided to add the wow factor to the back of the top, by turning it back to front, adding a deep V neck whilst keeping the existing button band.THE REFASHIONERS 2015 - WE THE SEWING - INGRID

I also decided to make a few zipper pouches – but more on that below!

So how did I go about it? First of all I need to say that I only remembered to take photo’s of the refash process after finishing the neckline. But I think you’ll be able to see what I did anyway – it’s relatively simples.

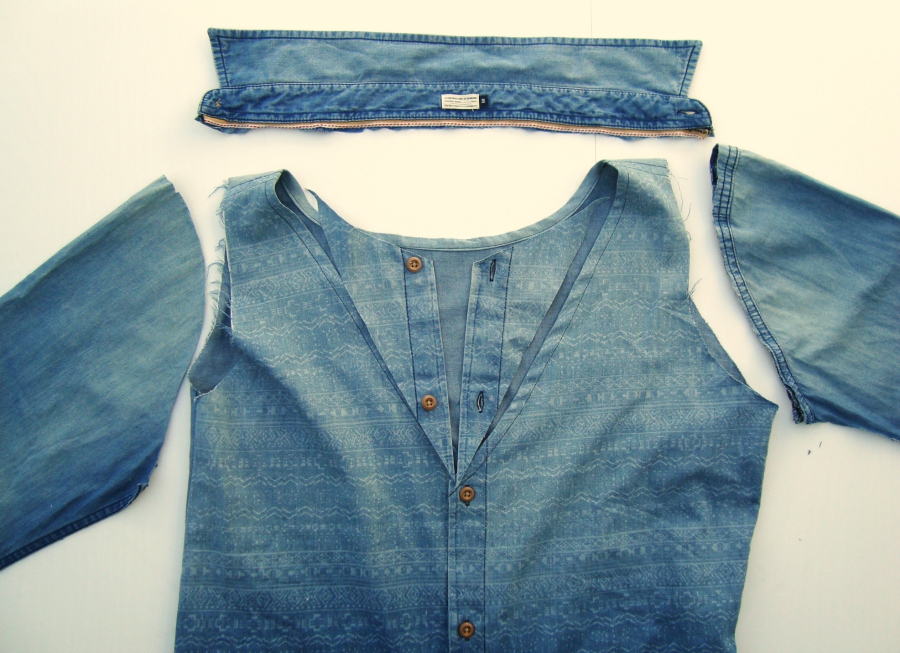
First I cut off the collar and the sleeves, and created a V-neck by cutting from the neckline to a point on the button band. I made sure not to cut too close to the actual button to give room for seam allowance.THE REFASHIONERS 2015 - WE THE SEWING - INGRID

I tried on the shirt back to front to figure out what I needed to do to the (new) front. Because of the yoke there was WAY too much fullness (especially for my very petite ‘assets’). The simple solution for me to just cut away the yoke, create a more rounded neckline by cutting off a chunk and then re-attaching the back by sewing new shoulder seams. See pic below.

Doing this gave me quite a tight fit so I decided I didn’t need any darts to shape it. If you have a fuller bust, I’m not sure how easy my yoke-removing method will be – but I guess you can just make sure to start out with a shirt that’s quite large in size.THE REFASHIONERS 2015 - WE THE SEWING - INGRID

To make sure I got an even neckline and V-shape, I folded the t-shirt as you can see in the picture below (before finishing the neckline I might add) and trimmed it.THE REFASHIONERS 2015 - WE THE SEWING - INGRID

Next I just took in the sides a little bit. The shirt fit me pretty well straight out of the packet, so no need to do anything radical. The neckline was finished by simply folding it over twice and stitching it down. The armholes were finished with bias binding.THE REFASHIONERS 2015 - WE THE SEWING - INGRID

Finally, I replaced the brown wooden buttons with a few pink ones, and a gold one to go on top – all from my mum’s old button stash.THE REFASHIONERS 2015 - WE THE SEWING - INGRID

And here is the result! I’ve left the last button undone on purpose as it gives the top a bit more shape. Also, it won’t actually close over my bum….  THE REFASHIONERS 2015 - WE THE SEWING - INGRIDTHE REFASHIONERS 2015 - WE THE SEWING - INGRID

AND I also used the scrap to make a small wallet for myself, and a make-up bag. I combined the denim fabric with leather that I painted pink. The lining is a lovely flowery fabric that used to be a curtain in my childhood room. Refash all-round people.THE REFASHIONERS 2015 - WE THE SEWING - INGRID

The wallet I’m keeping, but the make-up bag will be included in one of the prize packages up for grabs in September!

I’ve written this post before seeing what anyone else has made and I’m SO PUMPED for all the “reveals”.

Ingrid x

ps: Macklemore & Ryan’s ‘Thrift shop’ randomly came on when writing this. That is f’ing awesome.

First of all thank you Ingrid for introducing me to a song about a thrift shop, lol! That will be making it’s way onto my Spotify sewing playlist ! I adore that deep v button back. So simple and so effective. Denim shirts are such a classic and refashions from denim shirts seem to look unfailingly cool. Case in point here, right? If it’s any consolation Ingrid…I had a similar “wouldn’t fasten over the butt” situation here. But in the best tradition of refashioning…an apparent obstacle becomes a feature. Because actually, it adds shape and interest and looks better that way than it would buttoned up!

You can find Ingrid here and here. And as she says, she’s adding that cute handmade make up bag to the prize package!!  Take a look at ALL the amazing prizes to be won as part of The Refashioners 2015 Community Challenge. So get involved for a chance to win!!! Grab a shirt and get refashioning! You have until Sunday 27th Sept to enter! Stay tuned for more inspiration throughout the WHOLE of August!

DIY, how to, refashioning, Restyles, Sewing, the refashioners, the refashioners 2015, Thrifting, Tutorials

The Refashioners 2015 – Andrea

08/19/15

ANDREA - FOUR SQUARE WALLS - THE REFASHIONERS 2015

A quilt, huh? I guess you could say that I interpreted the word “refashion” a little bit differently than what Portia intended for this challenge! Even when I first received the email inviting me to participate (which still surprises me, given the fact I have ruthlessly abandoned my poor blog), I couldn’t imagine myself turning a shirt into another kind of garment. I immediately pictured a fun modern quilt in my head and I stubbornly refused to attempt anything else. I used multiple men’s shirts but I completely stripped them of their garment identities and forced them into funky triangle shapes and stitched the shirtiness right out of them. Let’s hope they’re enjoying their new life.ANDREA - FOUR SQUARE WALLS - THE REFASHIONERS 2015

I know that shirt quilts are not new concepts; people have been creating memorial quilts and t-shirt quilts for, I dunno, eons. If you search for them online, there are photos a-plenty. But I didn’t want to make a “shirt quilt,” I wanted to make a quilt that just happened to reuse secondhand shirts. Being set on this idea meant that the hardest and most time-consuming part of this project was not sewing the quilt, though I did suffer major procrastination on that. It was finding appropriate shirts that weren’t too “shirty” and that coordinated well and would also match my home decor. Big challenge! The majority of men’s shirts seem to come in muted neutrals or pastel colors, which aren’t really my cuppa tea. I love striped and plaid shirts but I don’t love that on quilts, so that was another issue.ANDREA - FOUR SQUARE WALLS - THE REFASHIONERS 2015

Luckily on my fourth (!!)  trip to the thrift store, I found some bold solid shirts that matched the color story of my home — which features a lot of blue, gray, red and yellow. You can see my obnoxiously yellow chair patiently modeling the quilt in many of these photos. That’s the kind of thing I’m drawn to.ANDREA - FOUR SQUARE WALLS - THE REFASHIONERS 2015

I used five shirts total — four solids and one checked shirt — and supplemented with some white quilting cotton. The quilt back is admittedly a bedsheet, but at least it’s still repurposing, yea?

I used a quilt pattern because I’ve only sewn a couple quilts in my life and am not skilled enough to think of my own designs and figure out the math of it all. I chose the Go West quilt pattern by Bonjour Quilts, which is relatively new. I essentially copied her color combo in the sample pattern, keeping the bright blue, red, white and gold in the same spots. This made it much easier to follow the instructions and not get confused about what sews to what. I still did a lot of labeling just in case. The blocks are made up of squares, rectangles and half-square triangles that are arranged in a way to create the interesting geometric pattern. It’s pretty simple.ANDREA - FOUR SQUARE WALLS - THE REFASHIONERS 2015

The pattern comes with instructions for three sizes — baby mat (48” x 42”), lap quilt (48” x 63”) and twin size (64” x 84”). I went with the baby size because I didn’t know how much fabric these shirts would yield and, well, I was quilting on a deadline! Surprisingly, I got a lot of fabric out the shirts I bought, and some of them were merely size medium. For most of the colors, I was able to cut them from the fronts and one sleeve of each shirt, leaving a full back and a second sleeve. I definitely could have made the lap quilt size from just these five shirts.ANDREA - FOUR SQUARE WALLS - THE REFASHIONERS 2015

For all my other quilts I’ve used natural cotton batting. For this one I went with the wispy polyester kind to save a couple bucks, and now I know the struggles of quilting with a loftier batting. It was more difficult to smooth the gritty batting out when basting the layers together, and I’m always SO impatient with the basting process anyway, so my quilt is puffier than I’d like and there are some areas where the fabric definitely needed to be pulled more taut before quilting.ANDREA - FOUR SQUARE WALLS - THE REFASHIONERS 2015

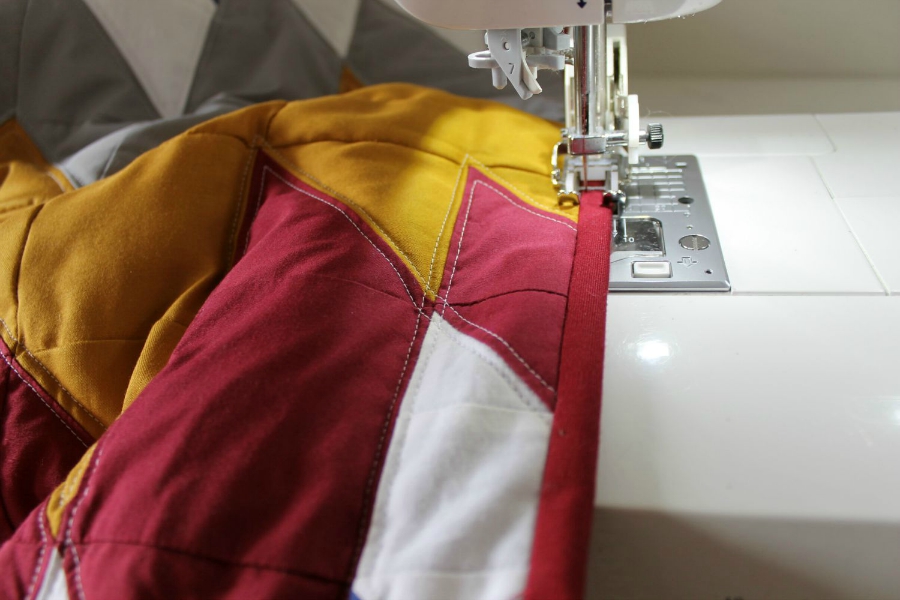
My sewing machine has great box feed technology and my walking foot is a champ, though, so getting it quilted through my machine was okay. I did straight line quilting that echoed the angles of the piecing. I used white thread for the top and bobbin so the design is mimicked on the contrasting red quilt back.ANDREA - FOUR SQUARE WALLS - THE REFASHIONERS 2015

Making a quilt out of shirts is a great way to save the lives of many donated or unwanted garments at once (and nab a TON of “free” buttons for your button stash), but it has its downsides because you’re at the mercy of your limited local thrift store inventory or your lover’s closet, versus the wide, wide world of quilting fabrics online, and it’s tricky to plan how many shirts are needed. It’s also a little more time-consuming to cut because unlike cutting from regular yardage, I had to cut in a single layer and cut one square at a time, but luckily since this is a small quilt it only took a couple evenings of labor for the cutting.ANDREA - FOUR SQUARE WALLS - THE REFASHIONERS 2015

I have some tips on types of shirts to look for if you decide to make a shirt quilt. The closer the match in weight for all the shirts you use, the better your piecing will look. Look for shirts that are medium-weight and 100% cotton if at all possible. Some poly is okay but it may be more difficult to press flat. Avoid shirts with lycra, or drapey rayon or silk shirts. Linen seems like it would make a yummy quilt, but the looser weave is shifty and can make it harder to cut perfect squares/rectangles. Some of these issues can be resolved by using interfacing or fabric starch. And of course, prewash your shirts to get the thrift store out of them!ANDREA - FOUR SQUARE WALLS - THE REFASHIONERS 2015

Thanks for hosting this fun series, Portia! Hope all you folks have been inspired to think of new ways to use old shirts.

Those COLOURS! It was seriously worth persevering to find this colour combo Andrea! I would love this draped over my armchair! So, after Wendy’s quilt blocked bib in yesterday’s post here we have Andrea’s modern take on a traditional “memory” quilt. ( I must direct you also to Handmade Jane’s very moving version of one of these quilts.)  Not only is it a great way of using up scraps from all the shirt refashions you’ll be doing in future 😉 it’s also a wonderful way of giving new purpose to those shirts that you just can’t bring yourself to get rid of. In terms of scale you can use this technique from something as small as a make up bag , bag, cushion…and from a baby quilt right through to a full size quilt. Cotton shirt fabric is perfect for quilting!!

You can find Andrea here and here. Are you inspired to get a shirt and get refashioning yet? Take a look at ALL the amazing prizes to be won as part of The Refashioners 2015 Community Challenge. Just get involved for a chance to win!!! Grab a shirt and get refashioning! You have until Sunday 27th Sept to enter! Stay tuned for more inspiration throughout the WHOLE of August!

DIY, how to, refashioning, Restyles, Sewing, the refashioners, the refashioners 2015, Thrifting, Tutorials

The Refashioners 2015 – Wendy

08/18/15

WENDY WARD - THE REFASHIONERS 2015

I love men’s traditional formal dress shirts with the bib fronts, I think that bib section provides the perfect blank canvas for a bit of textilian magic and have had ideas buzzing around for a long time. What more perfect excuse than the Refashioners?!WENDY WARD - THE REFASHIONERS 2015

I wanted to use one of the patterns from my book “The Beginner’s Guide to Dressmaking” as a starting point, here’s how I combined the two.

What do you need?

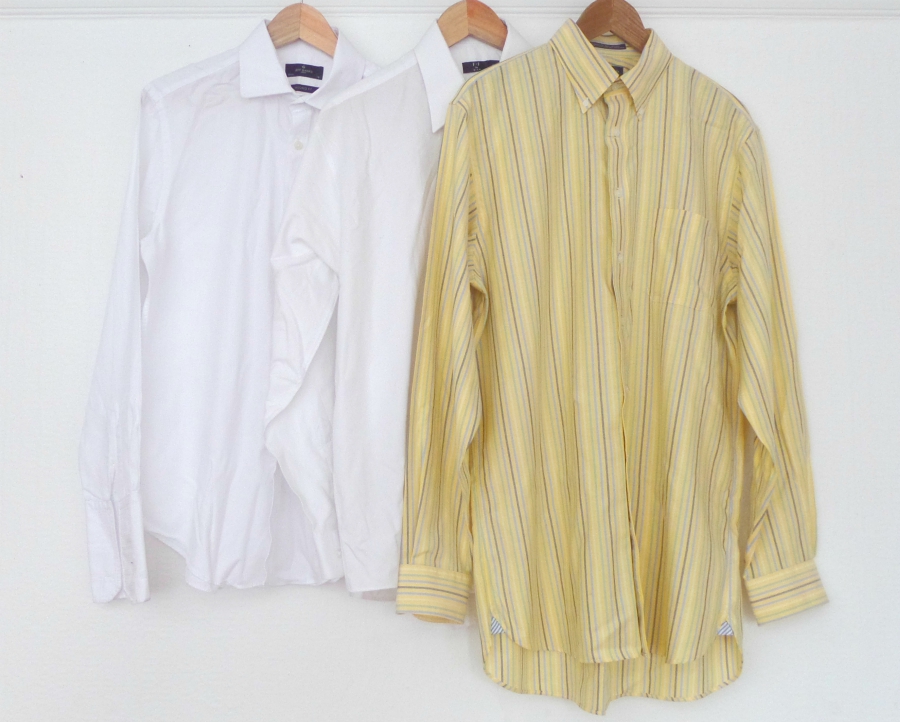
  • 2 large men’s white long sleeved shirts
  • 1 large men’s striped long or short sleeved shirt
  • lightweight iron-on interfacing.

WENDY WARD - THE REFASHIONERS 2015 Preparing the pattern:

I’ve used the sleeveless shift dress pattern from “The Beginner’s Guide to Dressmaking” as a starting point, but I wanted it to be a looser more flared shape.

Flaring the dress front and back:

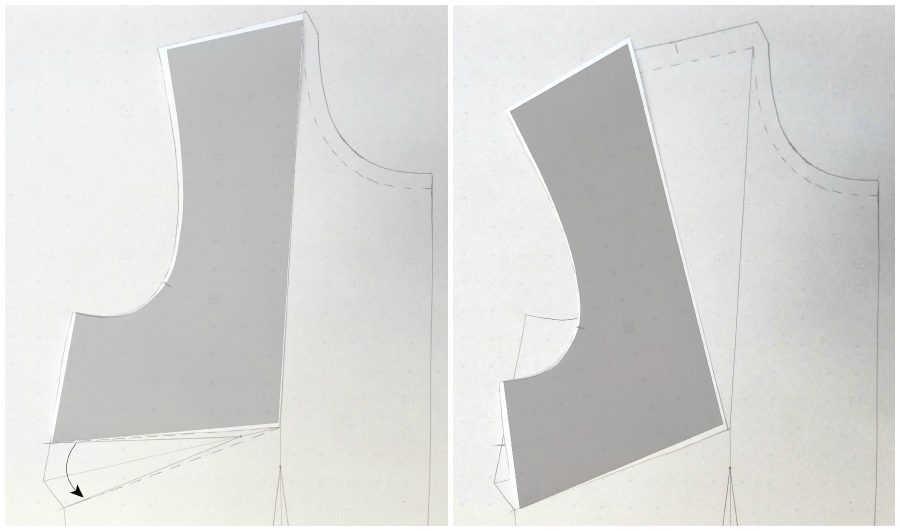
Move the bust dart to the neck end of the shoulder. To do this, draw a straight line through the middle of the bust dart and the middle of the waist dart, where they intersect is the bust point. Extend the bust dart to this point and draw a straight line in the new position (neck end of shoulder) to the bust point. pic2A


Trace off the section formed by the top edge of the existing (lengthened) dart and the line of the new dart onto a new piece of paper and cut out. PIC3WENDY WARD - THE REFASHIONERS 2015 - DRESS SHIRT - DRAFTING PICS (1)


Place this section back onto the pattern but “close” the old dart. WENDY WARD - THE REFASHIONERS 2015 - DRESS SHIRT - DRAFTING PICS (1)


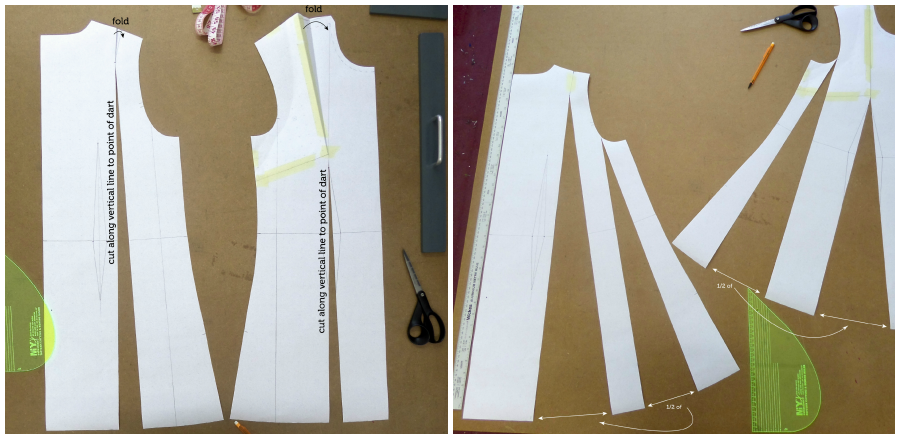
Drop a vertical line (parallel to the centre back) from the point of the shoulder dart on the dress back. Do the same from the point of the new bust dart that you’ve just created on the dress front. Cut up the lines and fold out the darts and the cuts will open. WENDY WARD - THE REFASHIONERS 2015 - DRESS SHIRT - DRAFTING PICS (2)

Drop a vertical line (parallel to centre front and centre back) in the same position on the armhole on the dress front and back, cut up the line leaving it just attached at the armhole and open each cut half the amount of the first cuts.

Re-Shape the neck:

Slightly lower the front and back neck so that the dress can be pull-on. Do this by placing the dress front and back together along the shoulder seam lines (overlap the seam allowances) to ensure a smooth join at the shoulder. WENDY WARD - THE REFASHIONERS 2015 - DRESS SHIRT - DRAFTING PICS (3)

Trace off your new dress front and back pattern pieces.

Trace off the bib front:

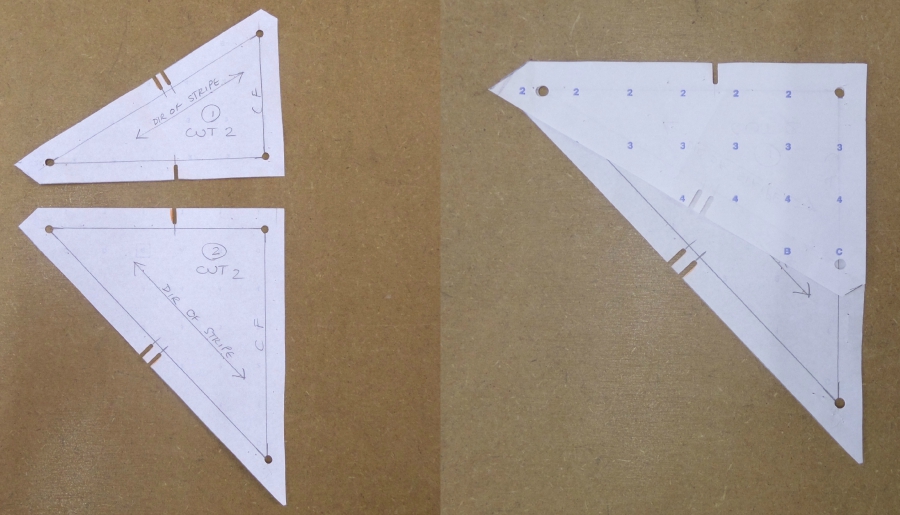
Draw the shape of the patchworked bib onto the dress front. This is the bib seamline. WENDY WARD - THE REFASHIONERS 2015 - DRESS SHIRT - DRAFTING PICS (4)

Add notches to the bib seamline and trace off the bib piece. Add seam allowance of 1cm maximum to the curved and notched bib seamline. Do the same to the dress front.

Work out patchwork design on bib:

Draw out your patchwork design onto the bib pattern piece and sketch in which direction you want the stripes to run – it’s useful to start on the half pattern and then mirror what you’ve done to see how it will turn out.  SAMSUNG CAMERA PICTURESAdd notches to the seamlines and trace off the individual pattern pieces, add seam allowance and number the pieces so that you know where they go when you’re piecing the bib section together! WENDY WARD - THE REFASHIONERS 2015


It will make joining these pieces easier if you also mark dots where the seamlines intersect. WENDY WARD - THE REFASHIONERS 2015


Cutting:

  • From the white shirts you will need 1 dress front / 1 dress back / 1 bib lining.
  • From the striped shirt you will need the patchwork bib pieces / bias strips to finish the armholes and neck.

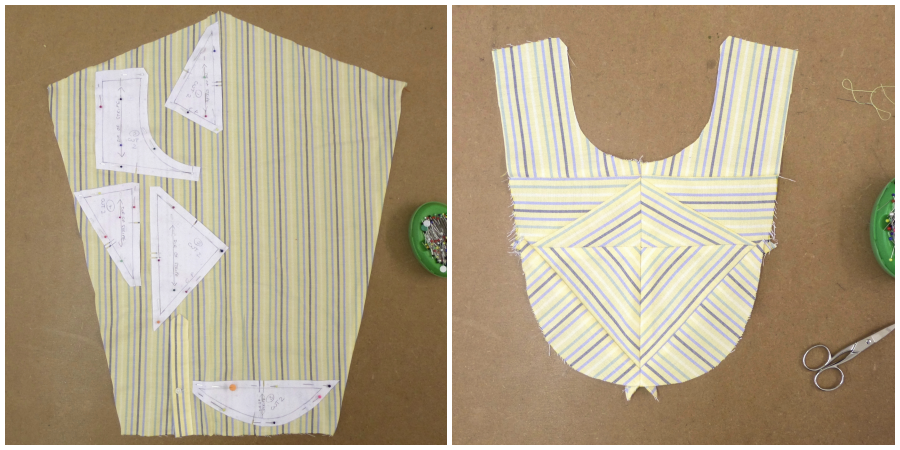
Prepare the shirts – I removed the sleeves and cuffs and cut the side seams to give me the biggest area of fabric to work with. WENDY WARD - THE REFASHIONERS 2015 - DRESS SHIRT


Patchwork together pieces from the white shirts until you have enough new “fabric” to cut the dress front and back. WENDY WARD - THE REFASHIONERS 2015 - DRESS SHIRT

A certain amount of “interpreting” of the pattern is ok here! As you can see I decided to make mine longer than my pattern so I could keep the original shirt hem. I’ve also placed the centre front of the pattern along the button stand.

Cut the patchwork bib sections very carefully noting stripe directions and mark the notches and dots accurately. WENDY WARD - THE REFASHIONERS 2015 - DRESS SHIRT

Putting it together:

Prepare the bib:

Join all the patchwork sections carefully, making sure the notches and dots match exactly. (above)

Interface the lining bib that you cut from the white shirt.Tack the 2 bib sections together with the wrong sides touching. WENDY WARD - THE REFASHIONERS 2015 - DRESS SHIRT

Neaten the edges of the bib.

Attach the bib:

Time to attach the bib to the dress front!  As this seam involves joining two opposite shaped curves a lot of pins will be required. Match the ends of the seam, the centres and the notches. Then work your way around in between, pinning at right angles on the seam line so that the pieces will fit. WENDY WARD - THE REFASHIONERS 2015 - DRESS SHIRT

WENDY WARD - THE REFASHIONERS 2015 - DRESS SHIRTI then tacked this seam, again on the seamline.  Trust me it makes the machining easier! Machine carefully with the dress layer on top.

Clip the curves of the dress layer only and press the seam away from the bib, towards the dress.WENDY WARD - THE REFASHIONERS 2015 - DRESS SHIRT


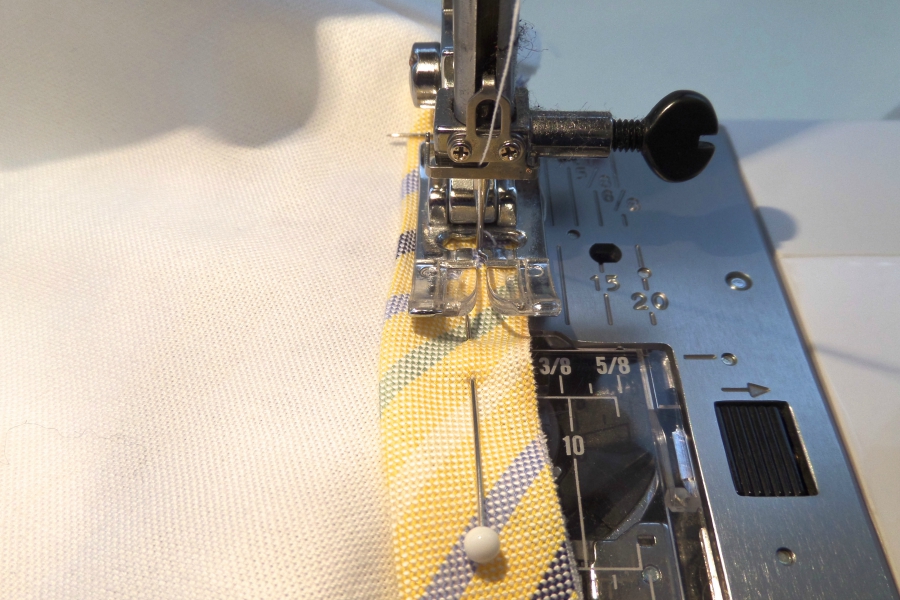
Topstitch the seam in place on the dress side of the seam. Use an edgestitch foot if you have one, it will make it much easier to keep your stitching an even distance from the seamline. WENDY WARD - THE REFASHIONERS 2015 - DRESS SHIRT


Great work, the bib is in! WENDY WARD - THE REFASHIONERS 2015 - DRESS SHIRT

Assemble the dress:

Join the shoulders and side seams and neaten the seams.

Finish neck and armholes:

Cut some 3cm wide bias strips from the shirt fabric that you have left over. Fold the strips in half along the length with the wrong sides touching and press. Tuck in one short end towards the wrong side. WENDY WARD - THE REFASHIONERS 2015 - DRESS SHIRT


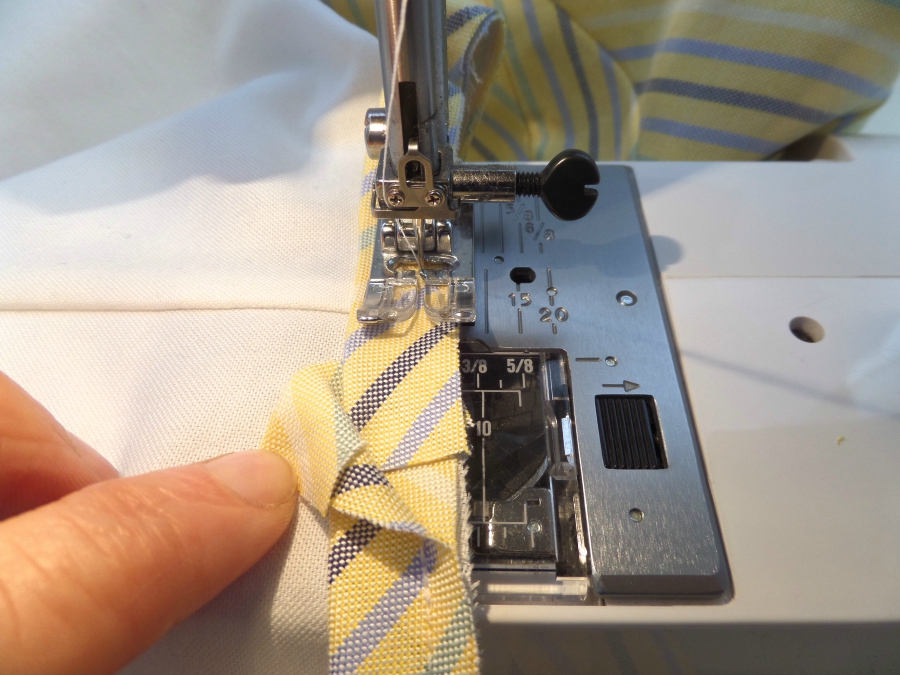
Starting with the tucked in end, place the binding to the right side of the neck with the 3 cut edges level. Pin the binding in place around the neck. WENDY WARD - THE REFASHIONERS 2015 - DRESS SHIRT


Machine with a 0.5cm seam allowance, start your machining just after the tucked-in end.WENDY WARD - THE REFASHIONERS 2015 - DRESS SHIRTWENDY WARD - THE REFASHIONERS 2015 - DRESS SHIRT


When you get back around to the start of the binding, tuck the binding inside the tucked-in end. WENDY WARD - THE REFASHIONERS 2015 - DRESS SHIRTWENDY WARD - THE REFASHIONERS 2015 - DRESS SHIRT


Clip the seam allowances around the curves, press them towards the binding and turn the binding around to the inside of the garment, just beyond the seam you’ve just machined. WENDY WARD - THE REFASHIONERS 2015 - DRESS SHIRT

Tack close to the loose folded edge of the binding and then machine in place.

Finish the armholes in the same way.

Press, wear, enjoy and be proud!WENDY WARD - THE REFASHIONERS 2015WENDY WARD - THE REFASHIONERS 2015WENDY WARD - THE REFASHIONERS 2015


Wow! Well THAT was pretty epic right?! Soooo much work has gone into this Wendy! Thank you so much. I adore the bib effect detail and let’s face it….who doesn’t adore a bit of directional stripe play?!  Incorporating quilting techniques and “piecing” fabric from a shirt is a great way of getting the maximum amount of yardage from your shirt. (look not only at the decorative bib on Wendy’s refashion…but also at the dress front and back…yep….also pieced! Combining smaller pieces to create a more usable/sizeable piece of fabric and the seaming involved creates added interest and texture too. I played around with this method in a much more simplistic way for my recent article for Simply Sewing Magazine (You can see the results in the cover image in my side bar). There are 2 methods of achieving this effect. Wendy takes the pattern cutters route by drawing her design onto an existing pattern piece then splicing it up along her design lines, adding seam allowances, then reassembling. It’s precise, accurate, and let’s face it…pretty impressive! I, on the other hand, am untrained. And my brain approaches this piecing idea in a different order. In my project for the last series of The Refashioners (and the shirt refashion for the mag) I piece my fabric together to FIRST form a larger flat piece of fabric. THEN cut the pattern piece from it. It’s my arse about face way of doing things! But both methods work and each will work for different people. If you like precision and detail…or…if you lean more towards a simplistic approach. Piecing your shirt pieces using quilt block techniques is a useful and fun approach to shirt refashions. Both in terms of practicality and decorative effect!

You can find Wendy  here and shop her pattern range here. She is a designer, teacher, pattern maker based in Brighton, and author of the awesome Beginners Guide to Dressmaking. And guess what….she’s adding a signed copy of her book to the prize package!!  Take a look at ALL the amazing prizes to be won as part of The Refashioners 2015 Community Challenge. And get involved for a chance to win!!! Grab a shirt and get refashioning! You have until Sunday 27th Sept to enter! Stay tuned for more inspiration throughout the WHOLE of August!


DIY, how to, refashioning, Restyles, Sewing, the refashioners, the refashioners 2015, Thrifting, Tutorials

The Refashioners 2015 – Tasha

08/17/15

­­­­­­­­­­­­­­

THE REFASHIONERS 2015 - TASHA - BY GUM BY GOLLY

Thanks so much to Portia for organizing another amazing round of the Refashioners, I’m so, so tickled to take part again! This challenge is great to push you outside of your comfort zone and really think about clothing and construction in different ways. Since this challenge was all about shirts, you can truly say you have to “think outside the box”… and what I started with was indeed a pretty boxy shirt!THE REFASHIONERS 2015 - TASHA - BY GUM BY GOLLY

My item started life as a men’s Hawaiian shirt, sent to me by the lovely Marie from A Stitching Odyssey. I am a huuuge sucker for Hawaiian themes. Hilariously, my first thought was the exact same as Oonaballoona’s and her Hawaiian refashion shirt . This shirt would look great on my step­dad, a stylish fellow with good taste in boisterous shirts. And likewise unbeknownst to one another, my refashion thoughts ended up going down a similar path to hers.THE REFASHIONERS 2015 - TASHA - BY GUM BY GOLLY

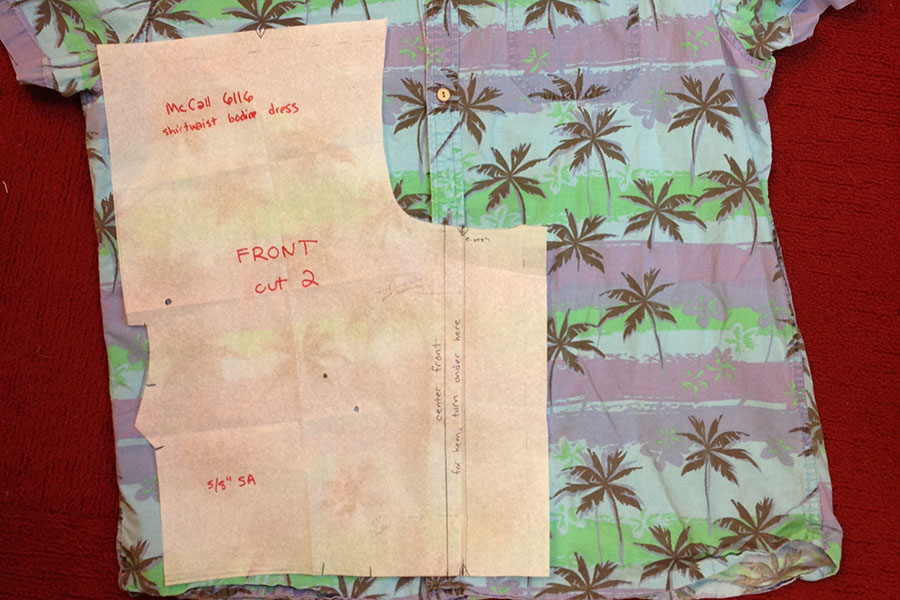
THE REFASHIONERS 2015 - TASHA - BY GUM BY GOLLYI turned mine into a vintage cropped top! My general plan was to use the shirt as constructed in the front, with the original button placket down the front as the button placket down the front of my cropped top. The main concerns were working around the armholes, the patch pocket (I knew it would be less faded underneath), and the button placement on the center front placket.

I used the bodice pieces of a vintage dress I’d sewn before, McCall 6116 from 1945, and instead of adding on a skirt, simply finished the bottom edge with bias tape. I actually did this once before last summer so I knew my idea was sound. Then since I was using the original button placket at center front, I finished the neckline with bias tape, too. Easy concept, right? But placing the front pattern pieces was HARD!THE REFASHIONERS 2015 - TASHA - BY GUM BY GOLLY

That probably took the longest of anything, plotting that out. Kimono sleeves on my pattern made the original shirt’s armholes fall beyond the shoulder seam line into the body of the shoulder a bit. I could have switched them to sleeveless, but I really like the kimono sleeves for extra coverage when I’m bearing a bit of skin elsewhere. The cropped top length made trying to place 3 of the original buttons in a pleasing and useful way difficult. And the less faded fabric under the patch pocket (once I ripped that off) was going to show up on a shoulder no matter what I did.

Of course, I couldn’t turn it all upside down and try that on for size either, as the palm trees were directional! In the end, I sloped the shoulder line down towards the armhole to place the original armhole seam within the seam allowance, figuring with kimono sleeves, you’d never know the difference. I placed one of the buttons at about the fullest part of my bust, making sure that the top most button fell beyond where I planned to topstitch the bias tape binding, but close enough to the top to be useful and not look too low.THE REFASHIONERS 2015 - TASHA - BY GUM BY GOLLY

THE REFASHIONERS 2015 - TASHA - BY GUM BY GOLLYI used Emmie’s gaping button band trick to add a secret inside button between the bottom two buttons, so that the top didn’t gape open under my bust, which worked perfectly. (Seriously genius idea.) I even kept the nice wood buttons.THE REFASHIONERS 2015 - TASHA - BY GUM BY GOLLY

THE REFASHIONERS 2015 - TASHA - BY GUM BY GOLLYActually the last button was broken, but the beauty of this refashion was I had plenty others to swap it with with the cropped top was so short compared to the original shirt. And last but not least… that patch pocket area, right?THE REFASHIONERS 2015 - TASHA - BY GUM BY GOLLY

Yeah. It’s totally just hanging out up on my shoulder left, as a shadowy remnant of the original shirt. There was just no way at all to work around that. So I’m calling it “living history”. It’s a “thing”, okay! It’s not a mistake, it’s a purposeful thing. ;­) I was going to take the original patch pocket and make it smaller and place it back on the shirt, but decided it was just too busy for that. So, the sole reminder of the patch pocket lives on with my incarnation up on my shoulder. To use up the last little bits of fabric that I could, I just threw together a matching headband.THE REFASHIONERS 2015 - TASHA - BY GUM BY GOLLY

There’s an off­center seam somewhere towards the back so that I could piece the remaining shirt fabric together, but it’s a headband, so who cares? I lined it with some turquoise cotton so that you get a peek of that when it’s tied at the top, or I can reverse it for the opposite look.THE REFASHIONERS 2015 - TASHA - BY GUM BY GOLLY

So that’s how I took a big ol’ men’s Hawaiian shirt and turned it into a vintage cropped top for summer. Which I think I’ll wear the hell out of!THER REFASHIONERS 2015 - TASHA (2)

Thanks again to Portia for organizing such an ambitious round of the Refashioners, and getting us to all think outside the box… but inside the “shirt” box. As her hashtag says, get shirty!

Ah! I love this so much Tasha! It’s very “you” and Marie did a GREAT job choosing that Hawaiian number!  Tasha makes good points about the things that need to be considered when cutting pattern pieces on existing garments. That armhole curve can be really limiting….even on an XL shirt there’s rarely enough for a  pattern piece with a grown on sleeve like this. Often the answer is to flip the shirt upside down and cut  it  from where the shirt is wider. However in this case….the directional pattern scuppered that idea! It’s these very obstacles in refashioning though that get your brain working in a kind of “right! I AM going to work this out” kind of way! And when you do overcome those obstacles and finally nail it like Tasha has here….it’s very satisfying indeed! And I like the little pocket shadow Tasha. Let it serve as a reminder of your ingenuity 🙂

You can find Tasha  here and here. Tasha has also very generously a selection of goodies from her private stash to the prize package!!  Take a look at ALL the amazing prizes to be won as part of The Refashioners 2015 Community Challenge. So get involved for a chance to win!!! Grab a shirt and get refashioning! You have until Sunday 27th Sept to enter! Stay tuned for more inspiration throughout the WHOLE of August!

DIY, how to, refashioning, Restyles, Sewing, the refashioners, the refashioners 2015, Thrifting, Tutorials

The Refashioners 2015 – Sarah

08/14/15

GREYS FABRIC - SARAH - THE REFASHIONERS 2015

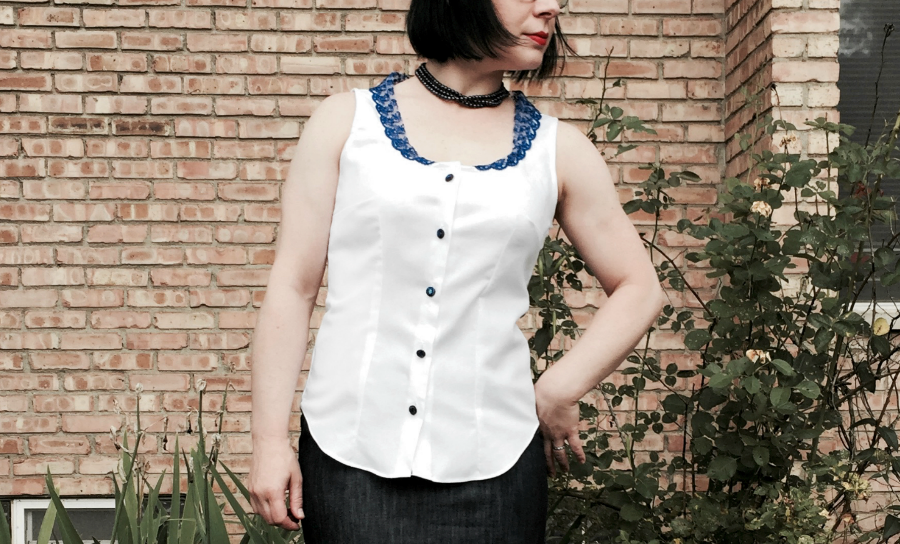
Hello, sweet sewists! This is Sarah from Grey’s Fabric and Notions, a li’l fabric shop located in beautiful Boston, MA. I was thrilled when Portia asked me to be a part of Refashioners 2015, but also nervous because, aside from a couple of tees that I awkwardly altered at the beginning of my sewing career, I tend to avoid refashions. I love the idea, I’m just not super confident when it comes to making alterations on finished garments. I think that is why, when confronted with a plain shirt, I ended up refashioning it into (brace yourselves) a slightly smaller shirt. I’m a real wild child.GREYS FABRIC - SARAH - THE REFASHIONERS 2015

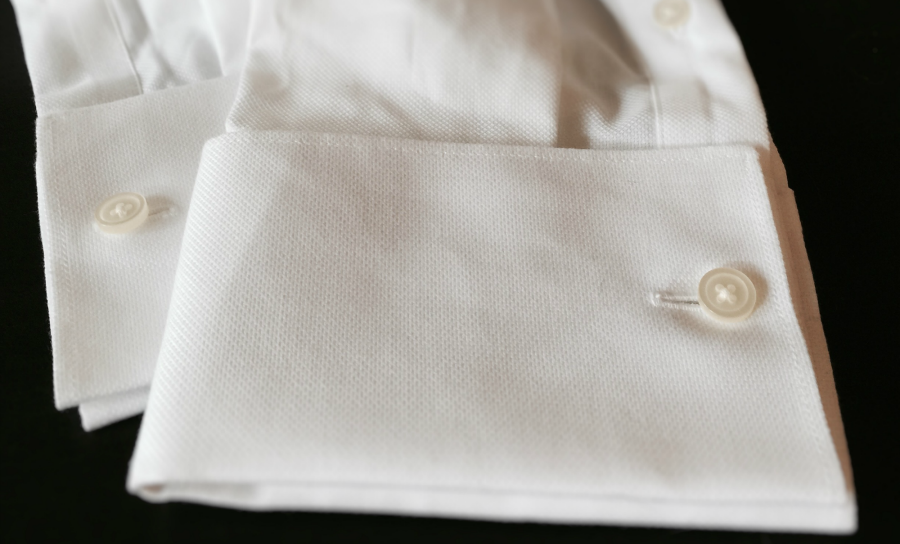
I started with a nice-looking button-up of John’s from Banana Republic that he never wore because the French cuffs didn’t fit quite right under his suit jackets. It was simple and boxy, as men’s shirts are wont to be, and while it’s still a simple design, it is pretty far removed from the original. Drat and blast for forgetting to take a full pic of the “before.”GREYS FABRIC - SARAH - THE REFASHIONERS 2015 (5)

My idea was to make it into a sheath dress (my favorite pattern of all time, actually) and I thought I had enough fabric after totally unscientifically holding it up and pinching some darts into it. Turns out, not so much. John is a size small and while it was more-or-less dress length on me as a shirt, after cutting it was once again, just shirt sized.GREYS FABRIC - SARAH - THE REFASHIONERS 2015

I considered buying more shirts to try to make up for the missing fabric, but ruled it out because it felt like just buying more and more stuff to try to fill the shirt-shaped hole in my soul was a little bit contrary to the make-do-and-mend spirit of the challenge. So, I decided to work with what I had.

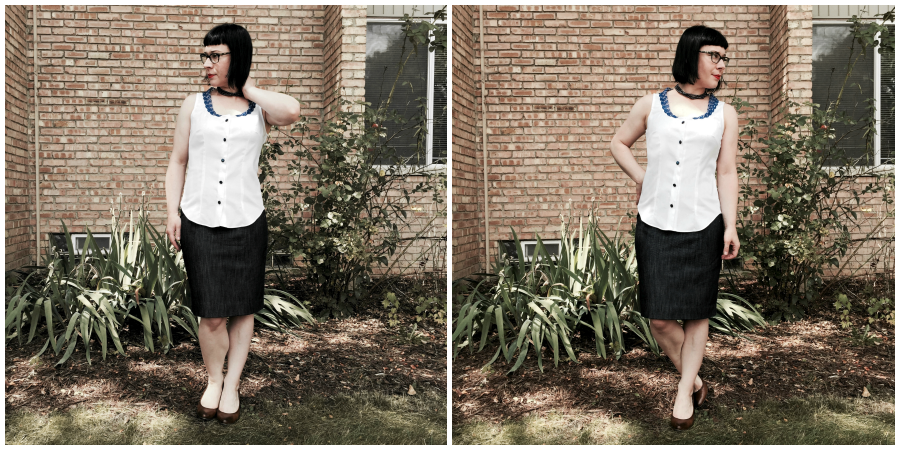
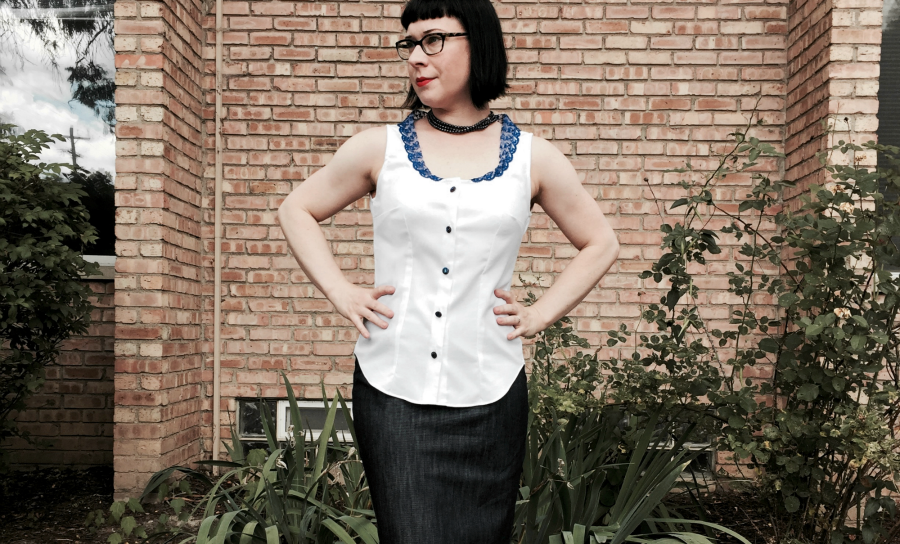
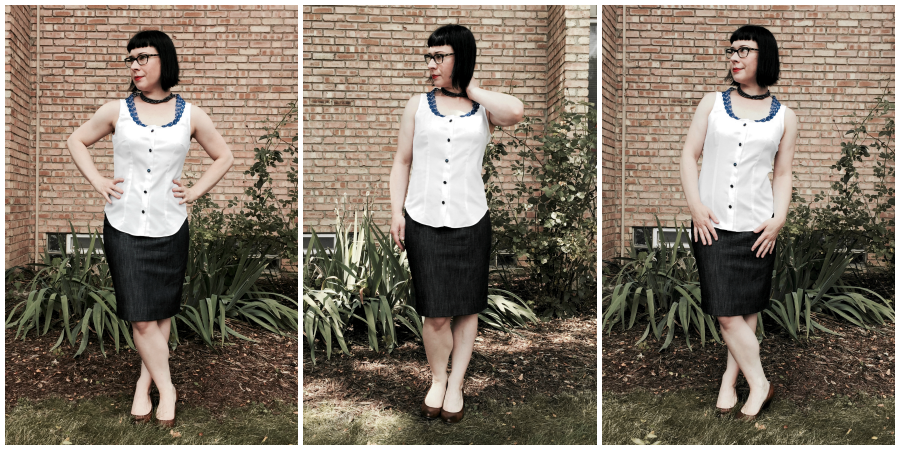
I kept the button plackets and shirt tail hem and cut the rest into the basic bodice of my sheath dress. I added four darts in the front and two in the back and finished the neck and arm holes with silk bias tape.GREYS FABRIC - SARAH - THE REFASHIONERS 2015

Since the button placement wasn’t quite right for my shape anymore (*shakes fist at boob gaping*), I switched the orientation of the plackets and closed up the original buttonholes with a small zig zag stitch. Then, I added more buttonholes to the other placket. Hilariously, I made three beautiful buttonholes going the wrong way from my markings and had to rip them out and start over. I’m glad that the Sensormatic buttonhole foot on my lover-ly Pfaff Creative Performance is so easy to use because I would have been really frustrated otherwise. I have a little video on my blog showing how fast they are.

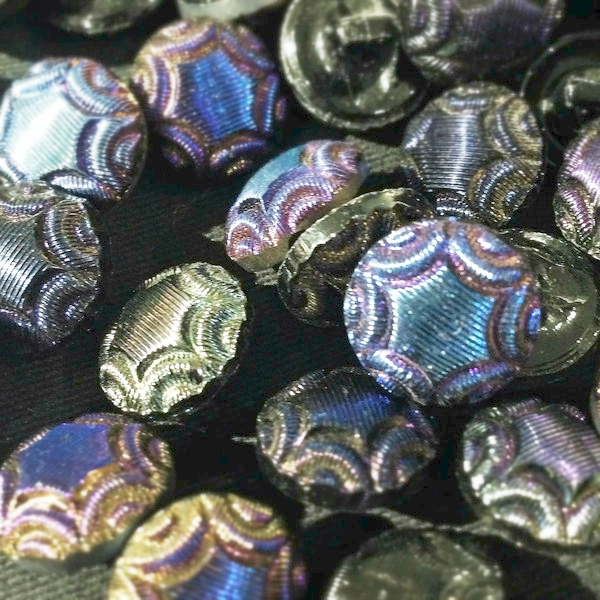
I added my favorite buttons, iridescent blue Czech glass shank buttons, to the front. I want to dive into a pool of these little lovelies and swim around, Scrooge McDuck style. Wheeeeee!15c7ec680a97e4d7300de9439aaf50e8_grande

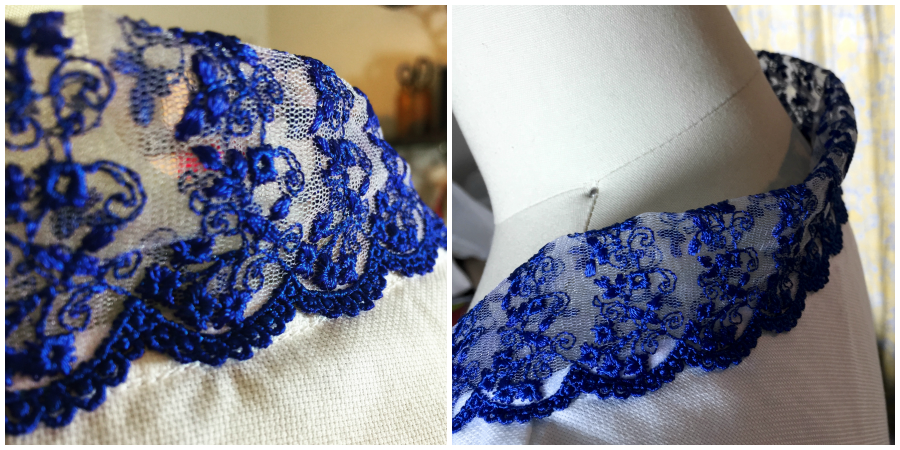
Then, I added lace to the collar. I tried a few different configurations before settling on the final version. I sewed it to the collar and then flipped it so that it is doubled over, adding a bit of volume. I started with the same lace, but in white and it was fine, but a little too bridal. Luckily, I have been learning to dye using fiber reactive dyes for our bra kits! The lace is rayon embroidered onto nylon net, which means that each fiber requires a different kind of dye. The rayon calls for fiber reactive and the nylon for acid dye. Because I used fiber reactive, the nylon stayed white and looks almost translucent, an effect that I quite like. I really love this lace and can’t wait to dye more. I hope to have some dyeing process shots up on my blog soon. Here are some detail shots:GREYS FABRIC - SARAH - THE REFASHIONERS 2015

Many thanks to Portia for inviting me to be part of this challenge! It was tons of fun and I’m loving seeing all the other refashions out there. Viva la Refashion!GREYS FABRIC - SARAH - THE REFASHIONERS 2015

Thank YOU Sarah!  Sassy!  I love that there is a touch of lingerie lace, knowing your love of bra making!! I’m always a little taken aback when talented sewers like Sarah say they don’t feel confident refashioning. But she’s not the only one to have said that during this and previous challenges 😉 There’s a temptation with this challenge to go all out and try a really complicated refashion. I know, because I feel it myself.  After all, I’ve lined myself up alongside all these awesome sewers! Gah!! (My shirt refashion is done and in the bag so no going back now! ) Personally I’m a great believer that keeping it simple can create as much of a show stopper refashion as a more complex one.  It really depends where that particular garment, and it’s restrictions, lead you. A few clever tweaks is often all it takes to completely transform a garment to suit your style. Those few darts, tucks and embellishments make the world of difference. So if  you’re thinking of trying your hand at refashioning (and entering to win that fantastic prize!) remember that the best refashions are almost always those that perfectly express the style of the person wearing them. Not necessarily the ones that were the hardest, and took the longest to do 😉 I think Sarah just proved that!

You can find Sarah  here and here. Greys Fabric  have also very generously added a $25 gift voucher to the prize package!!  Take a look at ALL the amazing prizes to be won as part of The Refashioners 2015 Community Challenge. So get involved for a chance to win!!! Grab a shirt and get refashioning! You have until Sunday 27th Sept to enter! Stay tuned for more inspiration throughout the WHOLE of August!

DIY, how to, refashioning, Restyles, Sewing, the refashioners, the refashioners 2015

The Refashioners 2015 – Zoe

08/13/15

It’s super exciting to be part of the Refashioners challenge again, and I feel really proud to be included in the handful of sewers who have taken part all three times. My life has changed significantly since the first one took place in 2011, and my refashions for this series have really reflected that!ZOE EDWARDS - SO ZO BLOG - THE REFASHIONERS 2015

With such an amazing selection of sewing/style bloggers for the 2015 edition, I can’t lie, I definitely felt a bit intimidated! Not that it is in any way a competition, of course, but I didn’t want to let the challenge down by making the least exciting project. So rather than allow myself to be overwhelmed by all the amazing things I imagined everyone else would be creating, I reminded myself that the most fun outcome for this challenge would be for each of us to make something that truly represents our own style and creative spirit. In that vein, I decided to make something for my daughter, as that is a major focus of my creative energies these days. I did consider making something for myself, perhaps an adult version of this top , but I also really wanted the outcome to be something that will see lots of wear, and I feel that a dress for her is more likely to.ZOE EDWARDS - SO ZO BLOG - THE REFASHIONERS 2015

Whilst this refashion project was underway, I visited the ‘Fashion on the Ration’ exhibition at the Imperial War Museum. It was all completely fascinating and inspiring, but the exhibits that spoke to me most were the sections where adult clothing had been transformed into clothing for infants and children. The parallel between those activities and what I was currently engaged in really struck me.

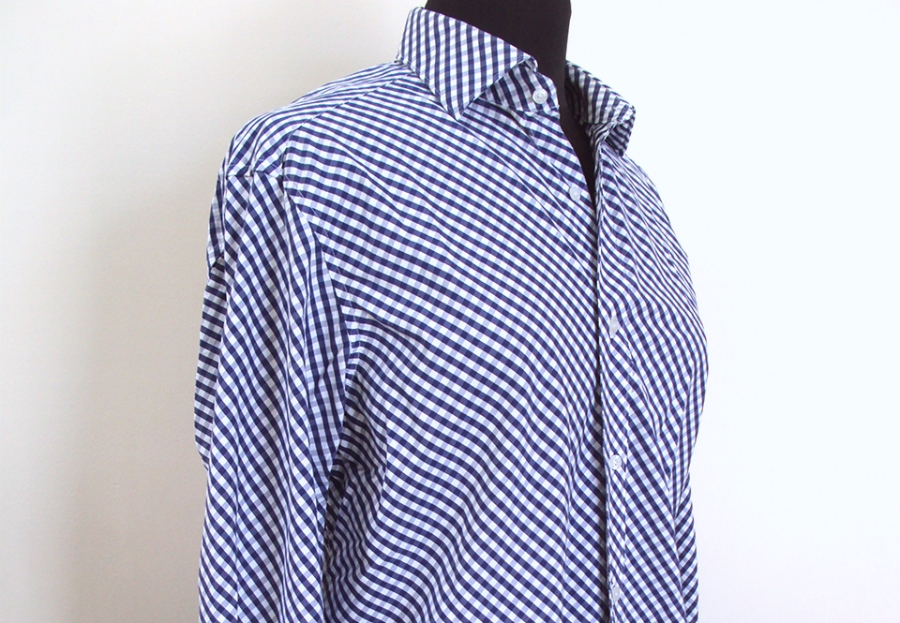
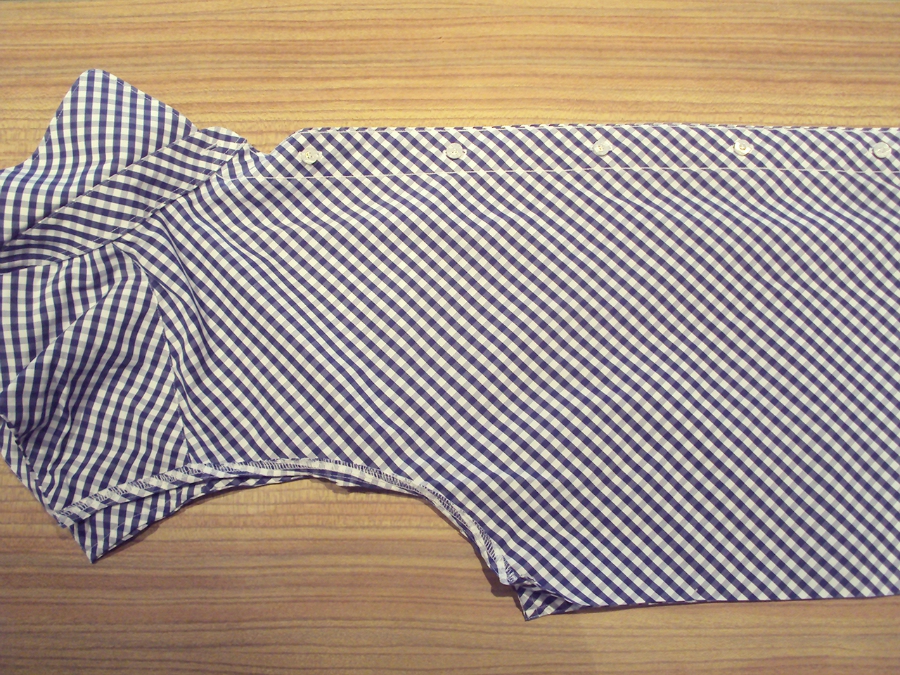
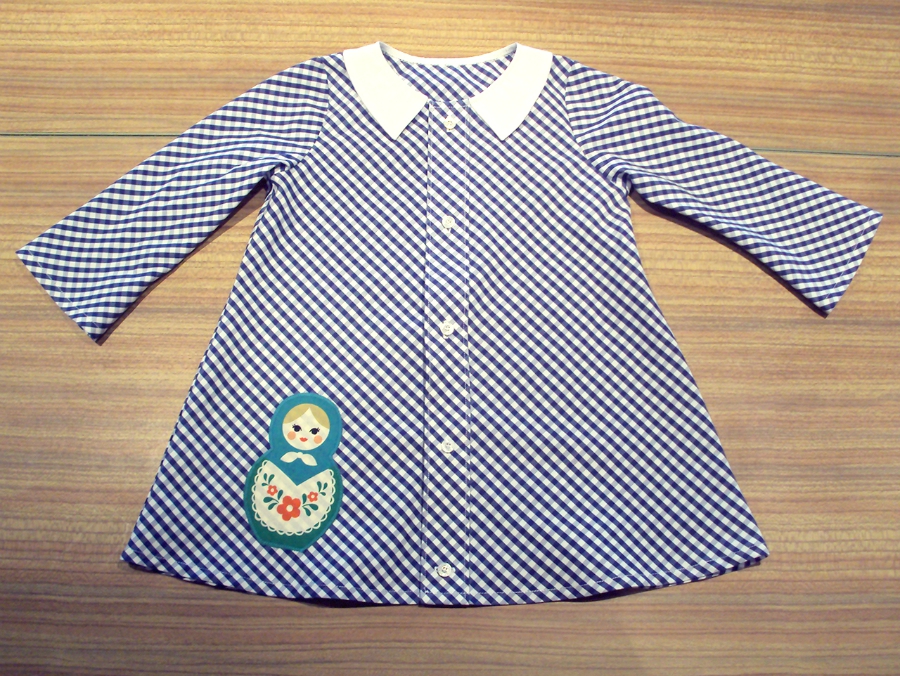
So on to the actual refashion… The shirt I received was chosen and sent by Sally from Charity Shop Chic. It was a men’s bias cut gingham dress shirt. My initial observations were that the shirt was in excellent condition, so I didn’t need to avoid certain parts of it, and in general the fabric was quite crisp.The Refashioners 2015 - Zoe Edwards

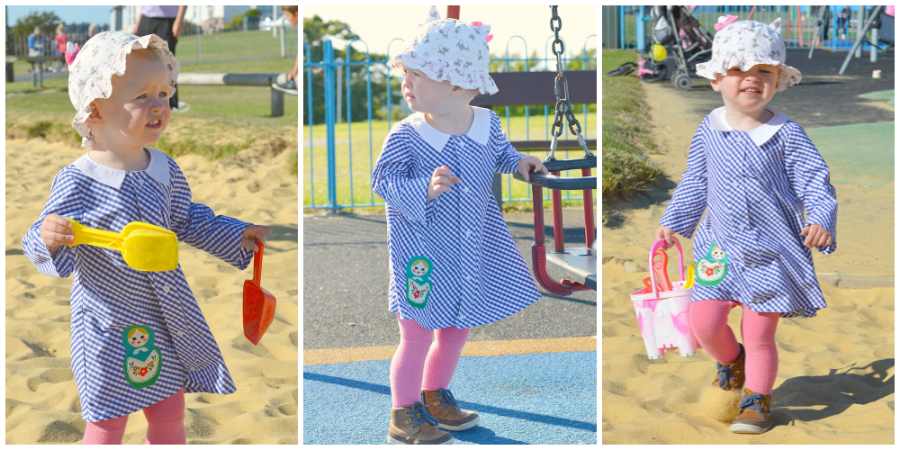
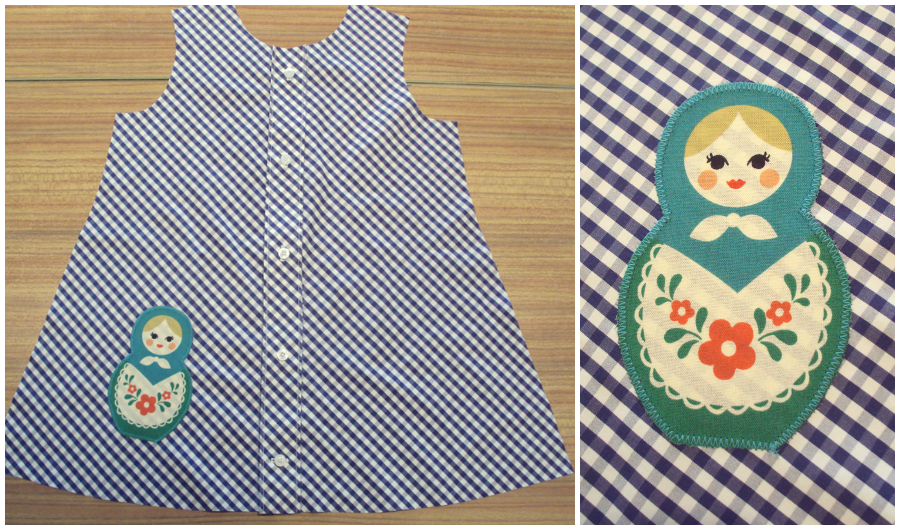
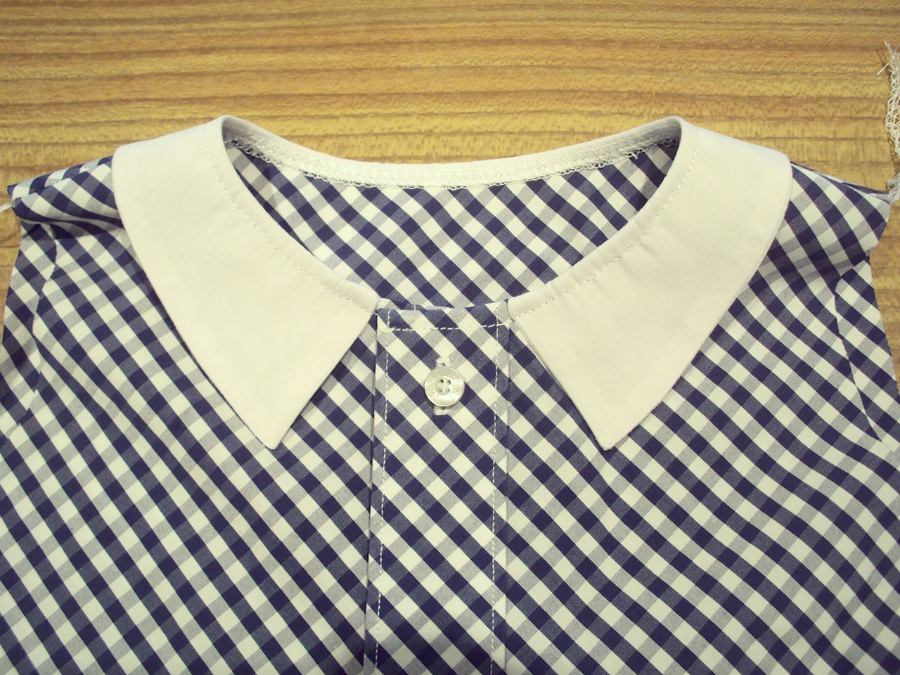
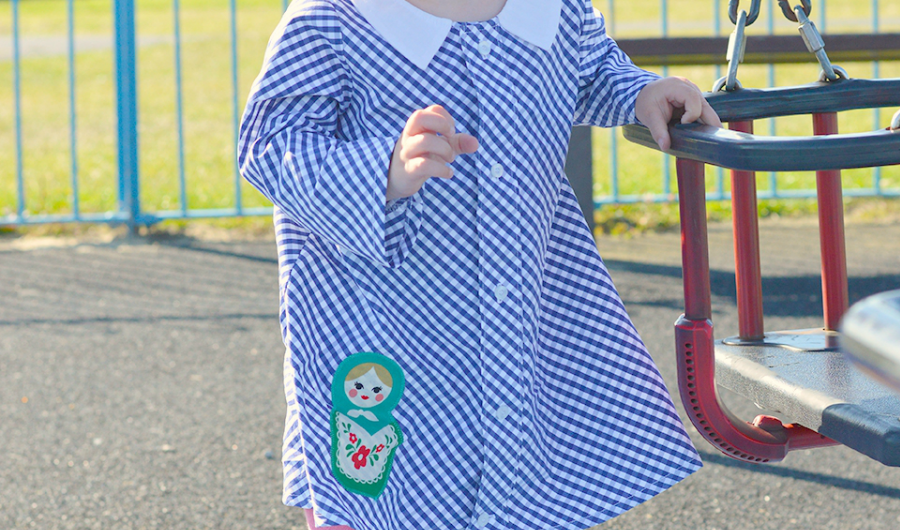
My favourite part to reuse when refashioning a shirt is the button stand. Who wants to mark out and make buttonholes and stitch on rows of buttons if they can help it?! So I knew I was going to retain that feature to form the fastening of the garment. I decided on a fairly uncomplicated silhouette and was lead towards an A-line as I felt that the crispness of the fabric would hold the shape well. The preppiness of the gingham leant itself to a cute little white collar, and I decided to use an applique to keep it looking like children’s wear.ZOE EDWARDS - SO ZO BLOG - THE REFASHIONERS 2015

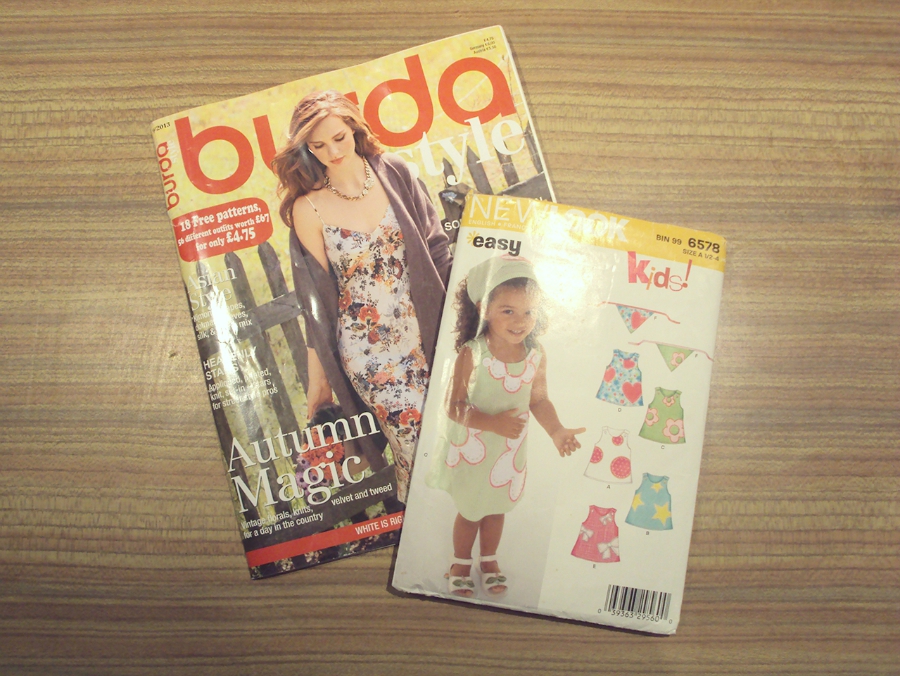
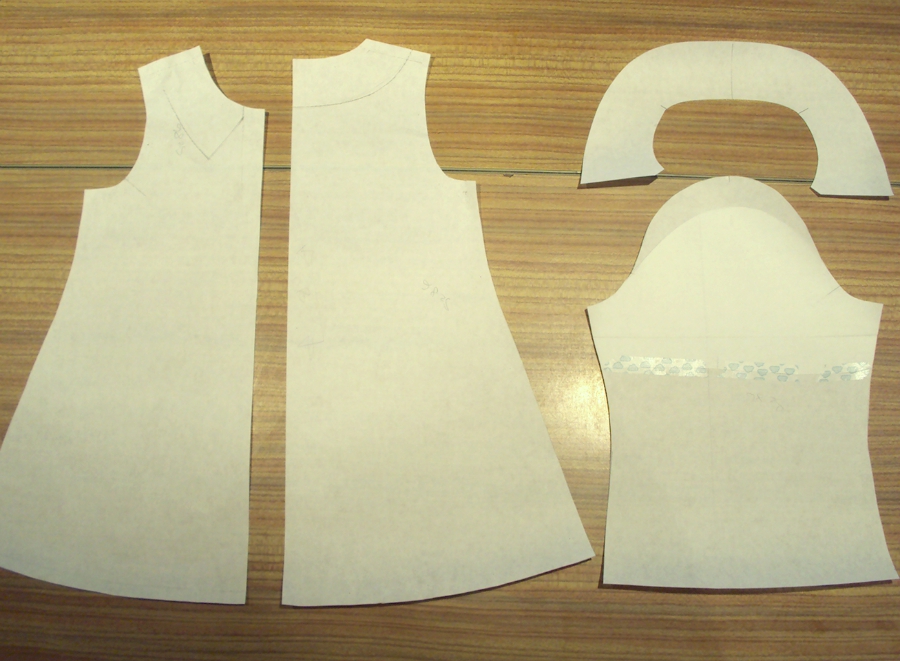
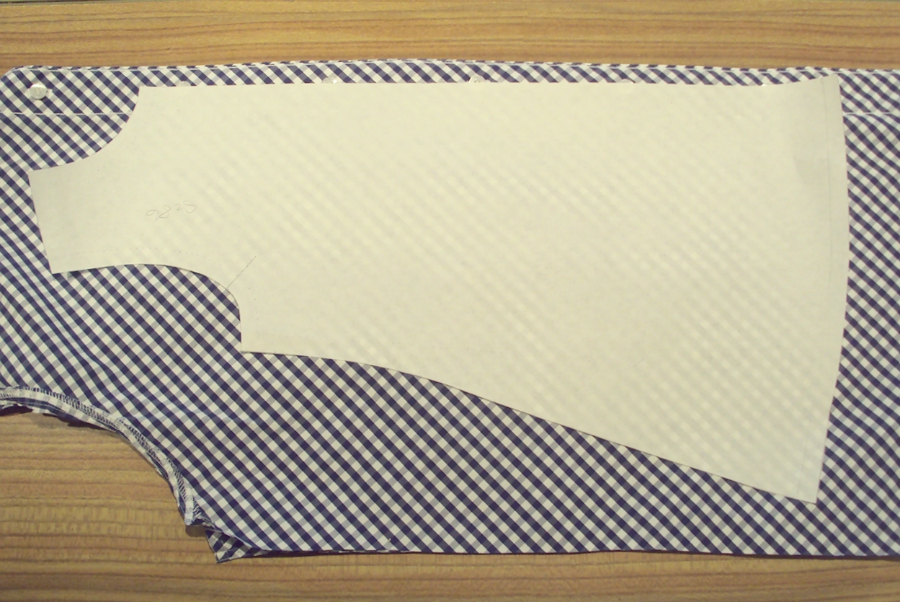
With the design elements in place, I foraged around my pattern stash for something suitable. I ended up making a franken-pattern from the babies’ blouse pattern in Burdastyle 9/2013 (which I have used in various guises twice before) and Newlook 6578. I self drafted the pointy collar, and initially altered the sleeve pattern piece to give it a slightly puffed sleevehead, which I later trimmed away again in favour of the original set in sleeve shape.ZOE EDWARDS - SO ZO BLOG - THE REFASHIONERS 2015

I dissected the shirt by cutting along the seam lines and pressed the front, back and sleeve pieces flat ready for cutting. A few years ago, whilst working for TRAIDremade, I learnt a trick to use when recutting shirts; button the shirt front pieces so that the right sides are together.ZOE EDWARDS - SO ZO BLOG - THE REFASHIONERS 2015

Then lay the front pattern piece on top so the Centre Front of the pattern runs down the centre of the buttons of the shirt front. That way you can cut through both layers of short front and don’t need to worry about getting the buttons and buttonholes positioned correctly. The only other thing was to make sure that the first button/buttonhole was positioned about 2.5/3 cms away from the top edge of the pattern.ZOE EDWARDS - SO ZO BLOG - THE REFASHIONERS 2015

I wanted to add the applique whilst the front pieces were still separate from the rest. I ummed and arred about what type of applique to add to this dress. Wjilst hunting through my scraps box looking for inspiration, I found this little matryoshka doll motif that I’d salvaged from the scraps hamper at a former employer’s years ago. Using iron-on bondaweb to secure it in place, I used a small zigzag to stitch round the edges.ZOE EDWARDS - SO ZO BLOG - THE REFASHIONERS 2015

The next task was to attach the front and back pieces at the shoulder seams. Because of the fiddly nature of sewing tiny children’s wear, I took the opportunity to prep and stitch on my collar at this point, before stitched side seams or inserted sleeves could make access to the neck hole any trickier. My method for attaching the collar was this: I basted it to the neck edge, then overlocked round the entire neck hole. Next, I folded the overlocking to the inside and topstitched it in place, which should keep the collar from flapping up too much.ZOE EDWARDS - SO ZO BLOG - THE REFASHIONERS 2015

With the most time consuming aspects complete, I inserted the sleeves in the flat, stitched the side and sleeve seams in one go, and hemmed both sleeves and bottom edge of the dress. Ta da!!!ZOE EDWARDS - SO ZO BLOG - THE REFASHIONERS 2015

ZOE EDWARDS - SO ZO BLOG - THE REFASHIONERS 2015The finished dress is currently a bit big for Dolores, but I had to stop her from wearing it too many times before we could take the photos of her wearing it…

ZOE EDWARDS - SO ZO BLOG - THE REFASHIONERS 2015

…so I’m classing it as a success!ZOE EDWARDS - SO ZO BLOG - THE REFASHIONERS 2015

Thanks so much to Portia for both inviting me to take part, and for all the energy and effort she has put in to organizing this challenge. Every element of this challenge has been thought through and carefully planned, and everyone was kept well informed at every stage so it was totally easy and fun to be part of it. I truly hope that all the (no-doubt amazing, although I haven’t seen any of the others at the time I’m writing this!) finished refashions will encourage everyone who likes to sew to consider reusing existing garments and textiles, rather than always buying new fabric, when they embark on a new sewing project to dress themselves, their families and even their homes.ZOE EDWARDS - SO ZO BLOG - THE REFASHIONERS 2015


Too. Flippin. Cute.  Oh my goodness! How adorable is Dolores?! Makes me smile just looking at that happy face! Shirts are fantastic sources of fabric for clothes for the little one’s right?? Pinterest is swarming with “Daddys Little girl” diy shirt dresses and I’ve seen some equally cute stuff for the boys too. Their diminutive size make kids clothes perfect for shirt refashions! (Sorry Dad! One more reason your shirts might get pilfered!) And thank YOU Zoe for being part of all 3 series. Mwah!

You can find Zoe here and here. And she has also very generously donated a copy of her Dolores Batwing Top pattern to add to the prize package!!  Take a look at ALL the amazing prizes to be won as part of The Refashioners 2015 Community Challenge. So get involved for a chance to win!!! Grab a shirt and get refashioning! You have until Sunday 27th Sept to enter! Stay tuned for more inspiration throughout the WHOLE of August!

Newer Posts
Older Posts
Portia
Follow
Sewbox

© Copyright 2026. Portia Lawrie. All Rights Reserved. Managed by WordPress Web Dev Cornwall .