• About
    • Contact
    • Press
    • Sponsor
  • DIY
    • Home & Garden
    • Jewellery & Accessories
    • Yarn Crafts
  • Sewing
    • patternless & self drafted
    • Refashions
    • Commercial Patterns
    • Sewing Tips
    • Overlockers
  • The Refashioners

Portia Lawrie

DIY, how to, refashioning, Restyles, Sewing, Tutorials, Uncategorized

Refashion: Colour Block Tee

09/17/15

I’m not sure refashions can get much simpler than this! This one first appeared in Issue 2 of Simply Sewing Magazine way back at the start of the year (hence the older pic!)…The licence for the content I create for Simply Sewing reverts back to me after 6 months. So I am reproducing it here for my records and your reference 🙂 Enjoy!!Colour Block Tee Refashion - portialawrie.co.uk

It’s a super quick and easy way to lengthen a jersey tee or just combine two plain tees for a bit of colour blocking interest.

One of the things I find with T Shirts is that, over time and many machine cycles, they shrink. Now I’m quite particular about the length of my tee as I hate flashing my midriff when I raise my arms, sit down lean over etc. So once a top sits a little too short on me, it ends up languishing unworn in my wardrobe. This quick and simple refashion solves the problem of a too short top AND nails the colour blocking trend, all in one fell swoop. What’s more, because we’re using the top of one tee and the bottom of the other, all the neck, sleeve and hemline finishing is already done! Colour Block Tee Refashion - portialawrie.co.uk

Cut your main tee (the light grey one in my case because I like the shape and fit of it) straight across from side seam to side seam, at the point you want the colour blocking to start, plus a little seam allowance. Retain the top portion.Colour Block Tee Refashion - portialawrie.co.uk

Cut the bottom half off your “donor” tee. (The dark grey one in my case. Ideally you want this one to be the same width or slightly wider than your main tee. I call it the “donor tee because it’s very kindly donating fabric to it’s  cousin, the light grey tee ;)) Colour Block Tee Refashion - portialawrie.co.uk

How much you cut off will depend on how deep you want your colour block band to be. For example, if you want a 12″ band, then measure 12″ up from the hem, plus a little seam allowance, and cut straight across at that point.Colour Block Tee Refashion - portialawrie.co.uk

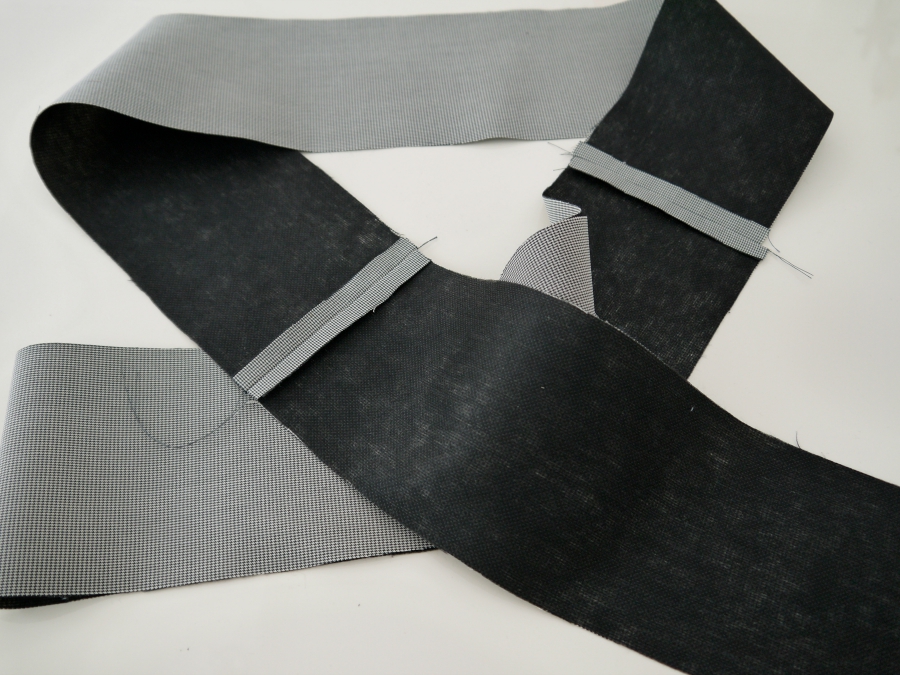
Then, mark with a pin, how much you need to trim off to have your colour block band, be the same width as the top portion of your main tee…Colour Block Tee Refashion - portialawrie.co.uk

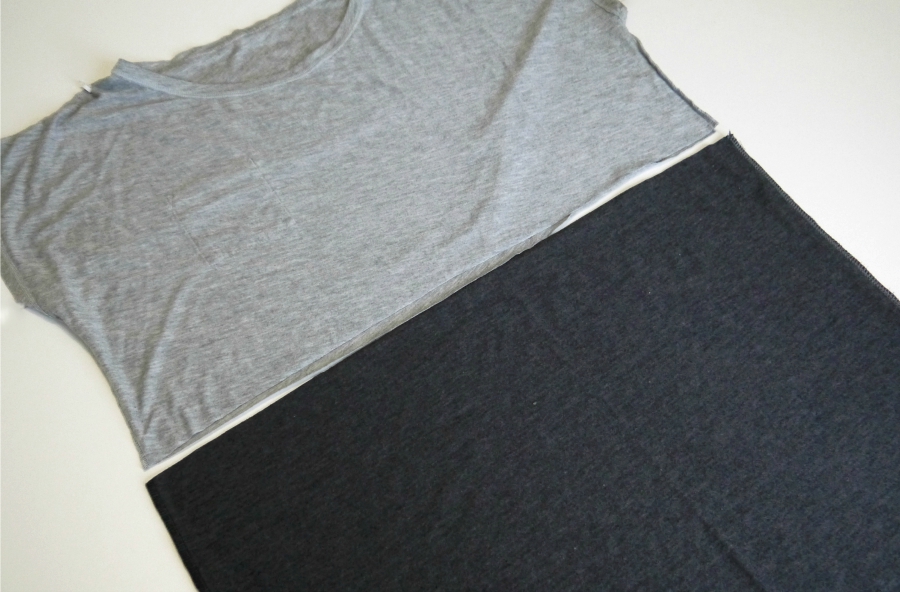
Sew, and trim the excess off the colour band to resize it. You need the side seams of the colour band to line up perfectly with the side seams of the main tee.Colour Block Tee Refashion - portialawrie.co.uk

Lay the two portions like so. The tee part right way out and the band part inside out, with the neckline of the tee facing the raw edge of the band…Colour Block Tee Refashion - portialawrie.co.uk

: Slide the tee all the way inside the band so that the two pieces are right sides together, and the raw edges of the tee line up with the raw edges of the band…Colour Block Tee Refashion - portialawrie.co.uk

Lining up the side seams first, and keeping raw edges even, pin and then sew all the way around.

Flip right side out, press the seam, and you’re done!Colour Block Tee Refashion - makery (9)


Tips:

T Shirt fabric can be a little tricky to work with. The raw edges can curl over and stretch out on jersey fabrics even if handled with care. To help with this, use a little spray starch on your fabric during construction, (especially along the cut edges) then launder it out afterwards

I used an overlocker for this project. But I happily sewed jersey fabric on my standard sewing machine before I was lucky enough to get an overlocker. They are fantastic for sewing with jersey but by no means essential, particularly on looser styles. A lot of modern sewing machines have a stretch stitch for exactly that reason. Failing that, use a straight stitch and hold the fabric under very slight tension/stretch as you feed it through the machine

Consider colour blocking skirts, jumpers and non jersey tops. Combine different textures and patterns. Combining different garments is a great way to rejuvenate and get more use out of old clothes as well as putting your own individual stamp on what you wear.


DIY, refashioning, the refashioners

Get Shirty: Baby Blues

09/13/15

Time for another little “fix” of your brilliant and inspiring shirt refashions! Am really enjoying watching these roll into Pinterest and IG. You gotta stop giving me ideas people! My sewing queue is sooooo long already, lol!

the refashioners 2015 - your makes

This refashion from @miushkamiushka on IG may look simple on the surface  but it actually takes skills and attention to detail to get everything to line up in the way that she has here. That waistband is made from cuffs people! For a self professed beginner, that’s awesome!

the refashioners 2015 - your makes

I want this lady as a cheerleader for The Refashioners!! If you read Nina’s post about this awesome sleep romper, you’ll see what I mean. This lady has an infectious enthusiasm (and great refashioning skills too!)

the refashioners 2015 - your makes

LOVE this quirky shirt refashion from Nicki. Simple genius!

the refashioners 2015 - your makes

This dress from Emma Miles is simply epic!

the refashioners 2015 - your makes

Men’s shirts are perfect for upcycling into clothes for the kiddos. And it’s nice to see the boys getting a look in too! This Mulberry Tunic is so gorgeous and man, is that boy gonna break some hearts when he grows up!?

the refashioners 2015 - your makes

These cutest of cute shorts are made from an upcycled chambray shirt. Simplicity itself but oh so gorgeous and….well…those LEGS!!!!

12

This make from The Secret Costumier is almost unrecognisable as the shirt it started out as. Love the front bodice shaping on this and the pops of colour chime beautifully with the pale blue don’t you think?


You guys are really embracing this challenge . LOVE it!! So keep em coming! Grab a shirt, get refashioning, share it, and be in with a chance of winning that awesome prize. Now worth just under £700!! Jaw dropping right?! We’ll be sharing a selection of your refashions right here throughout Sept and there’ll be inspiration posts to give you even more ideas and directions in which to go with your shirt refashioning. You have until 27th Sept to submit yours. 

Me Elsewhere, refashion, refashioning, the refashioners, the refashioners 2015, Uncategorized

Simply Sewing: Issue 8

09/11/15

I’m a little more excited than usual about this month’s issue of Simply Sewing Magazine! Not only because I was quite pleased with the way these little neon details elevated this plain sweater for my regular refashion piece…

Press - Simply Sewing - Issue 8


But also because there’s a full on 4 page feature on The Refashioners in this issue!!! (A little sneak peak of my new sewing #shedquarters in the background there too 😉 (I will be blogging that eventually but if you follow me on IG you’ll have seen ALOT about the process already!)Simply Sewing Refashioners FeatureSimply Sewing Refashioners Feature

They’ve also featured Erin’s project for The Refashioners and you’ll find a few of our refashioners in the article, contents and contributors pages and a little call to arms for refashioners everywhere on the front cover! Cool right?! Refashioning world dominaton is but a step away, ha ha!!

Apart from us there’s a load of cool stuff in this issue in particular so well worth a look.

Serious gratitude to Simply Sewing for all the support they’ve shown for this series.  Feeling humbly proud today.

Issue 8 on sale now 🙂 Print and digital subscriptions also available.


refashioning, the refashioners, Uncategorized

The Refashioners 2015 – Round Up & over to YOU!!!

09/03/15

Doesn’t seem like that long ago I was hitting “publish” on the first post in this series; and now here we are! At the end of the blogger element of The Refashioners 2015. August has been crazy behind the scenes here and to be honest I’m feeling a bit pooped. But in a very very happy way. Because man, just look at the inspiring ideas for shirt refashions these awesome ladies have come up with! Such ingenuity and variety here. (You can view each individual post via The Refashioners gallery in the menu bar)…THE REFASHIONERS 2015 - ROUND UP COLLAGE

So how about it? Are you feeling inspired to raid the charity shops or the wardrobes of your menfolk yet? Good. Because we are passing over the #getshirty baton to YOU now; and for the rest of September. And one lucky refashioner stands to win a HUGE prize package of sewing goodies now worth just under £700!!!!

The Refashioners 2015 Awesome Prize Package

NOTE: To clear up some confusion and/or questions. The refashions above are not entered into the community challenge element. They are purely for your inspiration and the prize package is purely for the community challenge element. ie JUST. FOR. YOU. 🙂

How will the final winner of said prize package be chosen? In the first instance we’ll be scouring through your submissions on Instagram and Pinterest (we being myself and the bloggers above) and sharing our favourites here throughout September. Taking into account reader response to those we’ll select a winner after 27th Sept and share that with you here shortly afterwards. And then my friends, The Refashioners 2015 will close it’s doors for another year! (Full prize package deets here. Entry deets here)

But WAIT! Don’t cry yet! (Just me then? Sniff). There is so much to be done between now and then! YOU lot have got so much to share (I know because you’ve already started sharing and it looks AWESOME!). And  I know increasing numbers of you have acquired your shirts and are ready to dive in (keep tagging me on IG peops I love seeing the progress shots too!). So, as a little bonus inspiration treat for you….. I’ll let you into a little secret….We had a secret pinterest board….The Refashioners 2015 - Getting Shirty Pinboard

It goes back to the early part of this year and it’s where myself and some of the other bloggers above pinned inspiration and ideas while WE were trying to work out what to do with OUR shirts. I thought you would likey alot. Since all our refashions are now “out of the bag” I made it “un-secret” so you guys can take a look at some more awesome shirt refashioning inspiration all in one space. Well, apart from here of course…keep coming back here, lol 😉


DIY, how to, refashioning, Restyles, Sewing, the refashioners, Thrifting, Tutorials

The Refashioners 2015 – Me (gulp!)

08/28/15

PORTIA LAWRIE - THE REFASHIONERS 2015 (1)

Aaaaand here we are! Unbelievably, at the end of an entire month of refashioning inspiration and…lets face it….more than a little genius thrown in for good measure! Helloooo again everyone! Feel like I haven’t seen you for aaaaaages!!

The trouble with organising an event like this is that, as the host, there’s an inevitable weight of expectation. Real or imagined. Actual or self imposed. Playing alongside this line up of talent is mildly intimidating. I can’t lie! But “comparison is the thief of joy” so let’s be real and stay true to ourselves. I’m not a couture technique kind of gal.  Never will be. I like simplicity. Both in terms of process and the finished garment. If I churned out something amazingly clever that just wasn’t me and I would never wear, you guys would know in an instant.  Trying to be something I’m not is not really my bag. So true to form, here’s a simple but oh so effective little refashion for you…..(secret squirell…..shhhh…..I actually really love this….just because it’s easy…don’t mean it doesn’t count, ha ha!)PORTIA LAWRIE - THE REFASHIONERS 2015 (2)

Ever noticed how an oversized man’s shirt, when worn, has the perfect armhole size, dropped shoulder and wide sleeve configuration for a kimono jacket??! That was my starting point….

THE REFASHIONERS 2015 - PORTIA LAWRIE (1)

This shirt had been sat in my stash for months. Even before my first email went out about this series. I think it was originally intended for a magazine article. But I ended up taking a different direction so it sat there. What I loved about this shirt was it’s size. Lots of fabric to work with. It’s colour. I love a versatile neutral. and last but not least, the fabric. Not easy to photograph, but it’s medium weight and drapey with a very slight sheen.

THE REFASHIONERS 2015 - PORTIA LAWRIE (2)

I started by removing the pocket. Often the biggest obstacle in a shirt refashion is having a pocket when you absolutely don’t want one. Luckily I managed to all but vanish the stitch marks using this technique.

THE REFASHIONERS 2015 - PORTIA LAWRIE (3)

Next, cut all around the button bands and collar to remove…

THE REFASHIONERS 2015 - PORTIA LAWRIE (6)

Stay stitch the neckline so it doesn’t distort as you work. If you’re like me and do lots of trying on and test pinning as you work out what you’re going to do (I tend to work things out on the fly rather than have a plan) then stabilising that neckline curve is a 2 minute job that’s well worth doing…THE REFASHIONERS 2015 - PORTIA LAWRIE (1)

Here’s how it looked at this stage. (I actually quite like this shape too!) But I continued…

THE REFASHIONERS 2015 - PORTIA LAWRIE (4)

Fold up your shirt along the length, lining up the shoulders and armhole curves…

THE REFASHIONERS 2015 - PORTIA LAWRIE (5)

This enables you to cut both sleeves equally in one go. I cut mine just below the elbow…

THE REFASHIONERS 2015 - PORTIA LAWRIE (2)

I reviewed the shape and proportions at this stage and decided on my next steps…

THE REFASHIONERS 2015 - PORTIA LAWRIE (8)

Lop off the shaped hem to shorten and create a boxier hemline…

THE REFASHIONERS 2015 - PORTIA LAWRIE (9)

Take a line from the shoulder point/neckline curve right down to the hem….it’s a gentle diagonal in this pic…but you could also go straight down at right angles. Either will work.

THE REFASHIONERS 2015 - PORTIA LAWRIE (10)

Mark a cutting line on both sides (eyeball if you’re brave…but I had a rep to protect on this occasion, lol!)…

THE REFASHIONERS 2015 - PORTIA LAWRIE (3)

And there you have your basic kimono shape. Just the neckline, hem and sleeves to finish…

THE REFASHIONERS 2015 - PORTIA LAWRIE (11)

Enter “donor” shirt number two! I had a moment of panic here. The stuff that I had planned to use for the kimono bands didn’t work out ( it was the remnants of this top and the combo really worked but in truth I bodged it!!) and I had nothing left in my stash that worked. So I nipped out to the local charity shop 10 minutes down the road and bought this one!

THE REFASHIONERS 2015 - PORTIA LAWRIE (12)

I pieced a band from the sleeves, interfacing the pieces before I joined them….you’ll want the finished band to be about an inch shorter than the neckline/opening or your jacket so measure accordingly…if you want a less structured, more fluid lapel, you could try skipping the interfacing. Which I may try next time.

THE REFASHIONERS 2015 - PORTIA LAWRIE (13)

Folded in half , RS together, the ends sewn, then turned through and pressed. (use a point turner or knitting needle to get those corners crisp) I had my neckline band…

THE REFASHIONERS 2015 - PORTIA LAWRIE (14)

Two important steps before applying the band. First press up the raw edge of the bottom hem by about half an inch.THE REFASHIONERS 2015 - PORTIA LAWRIE (15)

And notch into that neckline curve…up to but not through the stay stitching.

THE REFASHIONERS 2015 - PORTIA LAWRIE (16)

Baste or pin the band all the way around the RS of the neckline and opening like so. It’ll need a little bit of easing on around that notched neckline curve…

THE REFASHIONERS 2015 - PORTIA LAWRIE (18)

When you get to the hem part flip it over like so.  The WS of the hem flips over to the RS and encloses the bottom of the neckline band like so. (Ignore the extra seam allowance of the shirt fabric on the right. I was just playing with the placement a bit)

THE REFASHIONERS 2015 - PORTIA LAWRIE (17)

Sew right to the end of your hem fold like so and backstitch to secure…(I know this looks a bit odd if you’ve never used this technique before…but bear with me. It will make sense in a moment)

THE REFASHIONERS 2015 - PORTIA LAWRIE (19)

I trimmed and bound my raw edges at this stage. I didn’t take the bias tape all the way down to the end. Because we’re going to turn that through in a minute and I didn’t want the extra bulk preventing a nice sharp corner….

THE REFASHIONERS 2015 - PORTIA LAWRIE (20)

So here’s where we are at. This is the outside of the jacket. Looks a bit odd I know…

THE REFASHIONERS 2015 - PORTIA LAWRIE (21)

But look what happens when you turn that corner RS out 🙂 Creates a lovely clean finish. THE REFASHIONERS 2015 - PORTIA LAWRIE (22)

Here it is from the outside. Simply hem along that line where the pin is, and up to the seam where the band is joined to secure the hem allowance.THE REFASHIONERS 2015 - PORTIA LAWRIE (4)THE REFASHIONERS 2015 - PORTIA LAWRIE (23)

Here’s where we’re at…

THE REFASHIONERS 2015 - PORTIA LAWRIE (24)

Measure the sleeve opening….THE REFASHIONERS 2015 - PORTIA LAWRIE (25)

Create matching cuffs!THE REFASHIONERS 2015 - PORTIA LAWRIE (26)

Baste/apply…THE REFASHIONERS 2015 - PORTIA LAWRIE (27)

trim, bind, turn through, press everything…alot…

And you’re done!! Simples!PORTIA LAWRIE - THE REFASHIONERS 2015 (2)PORTIA LAWRIE - THE REFASHIONERS 2015 (1)PORTIA LAWRIE - THE REFASHIONERS 2015 (3)

And that’s it! Our job is done for another year and now it’s over to YOU!! Grab a shirt, get refashioning, share it, and be in with a chance of winning that awesome prize. Now worth just under £700!! Jaw dropping right?! We’ll be sharing a selection of your refashions right here throughout Sept and there’ll be inspiration posts to give you even more ideas and directions in which to go with your shirt refashioning. You have until 27th Sept to submit yours. 

I’d like to take this opportunity to thank all of the talented stitchers who shared their ideas with us this August. I for one, have a much longer sewing queue than I did at the start of August; there are so many ideas I want to try out!! Love and hugs and much gratitude to everyone involved. Phew…that’s it…we are done!

What now?

Over to YOU….show us what ya got!


DIY, how to, refashioning, Restyles, Sewing, the refashioners, the refashioners 2015, Thrifting, Tutorials

The Refashioners 2015 – Erin

08/27/15

THE REFASHIONERS 2015 - ERIN - CALIVINTAGE

Hello everyone, and a huge thanks to Portia for inviting me to take part in The Refashioners! First things first, I have to preface this by saying that I am a complete sewing novice who was absolutely terrified and intimidated by this project! But when Portia asked me if I’d be interested in participating, I knew it was just the kick in the butt that I needed to venture out and try something new. So I dove right in, scissors first, and completely destroyed my first “dummy” shirt. I suppose in retrospect that I could have drafted up some sort of pattern using butcher paper, but hindsight is 20/20, my friends. And it’s all a part of the learning process. So when it came to tackling my second try, I knew immediately that I was going to have to do something that maintained as much of the integrity of the original shirt as possible while still transforming it into something more wearable for me.THE REFASHIONERS 2015 - ERIN - CALIVINTAGE

Making this simple shirt took only a few little snips and stitches to complete. I tried it on to determine the length that I wanted to crop it up to, then used the excess fabric at the bottom of the shirt to fashion the ties for my wrap. Then I simply cut out the new neckline, sewed everything up, and added the wrap ties. Most wrap tops and dresses have a hole in one side to thread the tie, but because my ties were at the very bottom, I skipped that step entirely. In retrospect, I think I will probably add that little slit into the side, but it is still perfectly functional as is.THE REFASHIONERS 2015 - ERIN - CALIVINTAGE

I like the way the back of the shoulders is now a front yoke detail, and that it has a slightly oversized fit, but doesn’t leave me completely swimming in the garment. THE REFASHIONERS 2015 - ERIN - CALIVINTAGE

1. I started with a really nice vintage men’s shirt made in a textured cotton linen blend. I had actually bought it prior to the challenge thinking it might just hem it into a crop top and wear it with an oversized fit. At this point in the photo, I’d already removed the front pocket and inner tags using a seam ripper. The back of the shirt will eventually become the front, but don’t worry about the seam across the back! This will become the front bib of your new wrap top.

2. I tried on the shirt and marked where to cut the new hem, leaving a bit of sewing allowance. Then I simply chopped off the bottom of the shirt using the grid pattern on the shirt as a guide. If it had been a solid, I probably would have used a straight edge to help myself along. The remaining pieces of the shirt will later become the ties for the wrap!
THE REFASHIONERS 2015 - ERIN - CALIVINTAGE
3. After cutting the shirt, I simply ironed the new hem in place and took it for a pass through the sewing machine.
THE REFASHIONERS 2015 - ERIN - CALIVINTAGE
4. Since I don’t have a dress form, I just went ahead and put the shirt on again to mark the new neckline and wrap back with a few pins. To cut, I folded the shirt in half lengthwise to try and get both sides to mirror one another. Then I simply ironed the new hems and sewed them up!
THE REFASHIONERS 2015 - ERIN - CALIVINTAGETHE REFASHIONERS 2015 - ERIN - CALIVINTAGETHE REFASHIONERS 2015 - ERIN - CALIVINTAGE
5. The last step isn’t pictured, but all I did was cut the remaining fabric in half lengthwise and then sewed them into two simple fabric ties to affix to the ends of the wrap on the shirt. If you’d like your wrap to be a bit more secure, you can cut a hole along one side seam of the shirt to thread your belt through, but since I have them affixed to the very bottom of the shirt, it also works just fine like this.
THE REFASHIONERS 2015 - ERIN - CALIVINTAGETHE REFASHIONERS 2015 - ERIN - CALIVINTAGE
 And that’s a wrap! (See what I did there?) It may not be the trickiest of ideas, but it works for me. The best part is that it’s something that I will genuinely wear and I’ve learned so much in the process!


Just goes to show, that even if you consider yourself a novice sewer, if you keep it simple you can still totally transform your shirt! I love this Erin . Thanks so much for leaping in and trying something new!  The yoke front and the fact that the wrap is at the back is an edgier twist on a classic wrap blouse. And of course, as ever, wonderful styling 🙂

You can find Erin here and here. And don’t forget amazing prizes to be won as part of The Refashioners 2015 Community Challenge. Including a little something handmade from Erin! So get involved for a chance to win!!! Grab a shirt and get refashioning! You have until Sunday 27th Sept to enter! Tomorrow is the last of the blogger inspiration posts and then it’s over to you!!!

DIY, how to, refashioning, Restyles, Sewing, the refashioners, the refashioners 2015, Thrifting, Tutorials

The Refashioners 2015 – Sasha

08/26/15

Sasha - Fruits Flowers and Clouds - The Refashioners 2015

For me “refashion” does not simply mean recovering the fabric from a garment and making  another garment but also recombining the existing elements to give new life and meaning to an old garment. I’ve always been quite attracted by the styles merging the very masculine with the very feminine so the idea of taking a men’s dress shirt and mixing it with the feminine shape of the victorian underbust corset, as my first refashion was very exciting to me.Sasha - Fruits Flowers and Clouds - The Refashioners 2015


The road was not without bumps. I had no clear view of how to go about it and spells of “I don’t have enough fabric” anxiety.  So here it is: my first refashion and I’m very pleased with the result. I anticipate I’ll be wearing this a lot.

Process outline:

The original shirt – a men’s size 42 dress shirt in cotton twill.Sasha - Fruits Flowers and Clouds - The Refashioners 2015

Take off the collar unit and the cuffs and form a neck dart.

Mirror everything from one side to another ( I used tailors wax tracing paper and a tracing wheel to do so).Sasha - Fruits Flowers and Clouds - The Refashioners 2015

Blend the neckline and trim the excess.

Measure and cut along a line under the bust leaving intact the button placket and including seam allowances.Sasha - Fruits Flowers and Clouds - The Refashioners 2015

Sasha - Fruits Flowers and Clouds - The Refashioners 2015

Pin, measure and cut the sleeves and sides to create a sloping/drop shoulder short sleeve which also has the effect of reducing the overall fullness of the shirt.

Pin a couple of pleats in the sleeve, make a slit and attach the cuffs. Depending on the original shirt size they are potentially going to be smaller than your bicep circumference. I ended up by creating an extension tab with two buttons to close the gap.Sasha - Fruits Flowers and Clouds - The Refashioners 2015

Measure the neckline opening, shorten the original collar stand accordingly and use it to create a mandarin collar.

Sasha - Fruits Flowers and Clouds - The Refashioners 2015

Gather the excess fabric under bust and at the back

Drape a form fitting midsection from a large strip of fabric. Be sure to cut based on the abdomen circ + ease + sa. I mistakenly did not and ended up having to insert some triangles at the sides.Sasha - Fruits Flowers and Clouds - The Refashioners 2015

I pinned also a couple of darts to help shaping the back. I considered doing so for the front also but in the end I decided against it as I prefer it more relaxed. With the remaining fabric from the body and the sleeves create a long strip (under bust circ. + hips circ. times three)…Sasha - Fruits Flowers and Clouds - The Refashioners 2015

…and create 1″ pleats. I used some light fusible interfacing to help hold the pleats because my fabric was too soft and drapey.

Attach a row of pleats and the original shirt tails&hem (reduced in size to fit the waist piece) to the bottom of the waist piece.Sasha - Fruits Flowers and Clouds - The Refashioners 2015

Attach the waist piece to the upper bodice sandwiching in between another row of pleats.Sasha - Fruits Flowers and Clouds - The Refashioners 2015

Attach the waist piece to the button placket. Trim the button placket and close the hem! Done!Sasha - Fruits Flowers and Clouds - The Refashioners 2015Sasha - Fruits Flowers and Clouds - The Refashioners 2015

Thank you again to Portia for inviting me. When she asked me to join the stellar cast of this year’s Refashioners I must admit I felt a bit scared.  Honored but scared. First I never did a refashion before and second have you seen the heavy talent she enrolled!!!

Talent that includes you Sasha! Wow! Hard to believe Sasha’s never refashioned before. But this is exactly why I’ll often approach sewers who don’t refashion to be part of the blogger challenge. You just get a fresher take on things that way. One of the biggest aims of The Refashioners is to show refashioning in a different light. That as well as it’s eco credentials,  it can be creative, edgy, modern, individual and uber cool. Think I just aptly described Sasha’s refashion there don’t you? Job done then!

You can find Sasha here and here. We are almost at the end of a month of  refashion inspiration and ideas!  Next week sees the community challenge element gather pace and don’t forget amazing prizes to be won as part of The Refashioners 2015 Community Challenge.  So get involved for a chance to win!!! Grab a shirt and get refashioning! You have until Sunday 27th Sept to enter! 

DIY, how to, refashioning, Restyles, the refashioners, Thrifting, Tutorials

The Refashioners 2015 – Wendy (again!)

08/25/15

WENDY WARD - THE REFASHIONERS 2015

While I love denim, I used to think that “double denim” was a bit of a fashion sin. Now I’m a convert. What’s not to love about a unique denim shirt dress? I took 3 men’s Levis denim shirts in different denim washes, all size L and turned them into two very different shirt dresses.WENDY WARD - THE REFASHIONERS 2015

Yes, 3 denim shirts, 2 shirt dresses, there was one shirt casualty that was simply plundered for “spare parts”, but I think it was worth it. Here’s what I did.

What do I need?

2 large men’s denim shirts will make 1 shirt dress, 3 shirts will make 2 dresses(ideally all the same size, style and brand so that you know they’ll be the same dimensions) WENDY WARD - THE REFASHIONERS 2015

How to do it?

Remove the collars – using an unpicker, remove the stitching around the top of the collar stand until the collar can be removed. Don’t unpick any further than you need to. WENDY WARD - THE REFASHIONERS 2015WENDY WARD - THE REFASHIONERS 2015WENDY WARD - THE REFASHIONERS 2015

If you like a grandad style shirt collar you could leave your shirt like this and just restitch around the top edge of the stand – tack the edges together first to make the machining easier to do and more accurate. WENDY WARD - THE REFASHIONERS 2015WENDY WARD - THE REFASHIONERS 2015

Swap the collars around between the shirts. If any of the collars are worn or marked, turn them over so that the side that was on the top is now on the underside of the collar. This is what’s known as “turning a collar” and very thrifty 1940’s housewife business!

To reattach the collar, fold it in half to mark the centre.  Do the same to the open top edge of the collar stand. WENDY WARD - THE REFASHIONERS 2015WENDY WARD - THE REFASHIONERS 2015

Slot the collar inside the open edges of the stand matching the pins marking the centre back neck .WENDY WARD - THE REFASHIONERS 2015

Pin, tack and topstitch the collar in place trying to stitch along the original seamline as close as possible .WENDY WARD - THE REFASHIONERS 2015

Collars swapped! WENDY WARD - THE REFASHIONERS 2015

Now for the brutal stuff….I cut the bottom off shirt 1 as low as I could to keep as much length in the top of the shirt. Simply chalk a straight horizontal line across the shirt and cut it off! Try and go in the middle of two press studs or buttons.

I cut the bottom off shirt 2 as high as I could (just below the pockets) to keep as much length on the bottom as possible. Make sure this line also runs in the middle of two press studs or buttons.

I removed the patch pockets from shirt 3 so that I could remove as much length as possible from the bottom of the shirt. I cut the shirt across where I’d removed the pockets which gives that nice “shadow” of the pocket remaining where the denim has faded around it. WENDY WARD - THE REFASHIONERS 2015

To reassemble the long sleeved shirt dress (made from the top of shirt 1 and the bottom of shirt 2), pin the 2 cut edges together matching up the side seams. WENDY WARD - THE REFASHIONERS 2015

Make sure that the press studs or buttons down the centre front of the shirt will still fasten once the 2 parts of the shirt are joined. Machine, neaten the edges together and press the seam down towards the hem. It might need topstitching in place to keep it flat.

To reassemble the short sleeved shirt dress (made from the top of shirt 2 and the bottom of shirt 3), pin the 2 cut edges together matching up the side seams.WENDY WARD - THE REFASHIONERS 2015

Check that the press studs or buttons will still fasten once this seam is sewn. Machine, neaten the edges together and press the seam down towards the hem. It might need topstitching in place to keep it flat. WENDY WARD - THE REFASHIONERS 2015

Decide what length you want the sleeves and cut the sleeves straight off at right angles to the top sleeve, leaving enough for a hem (approx. 3cm).  Chalk a line 3cm above the cut edge of the shortened sleeve on the inside of the shirt. Press the hem up so that the cut edge is level with this line, then turn again along the chalk line and press. Pin in place and machine. WENDY WARD - THE REFASHIONERS 2015

And there you have it – 2 totally wearable new shirt dresses from 3 baggy denim shirts destined for the “decorating clothes” pile!

Refashioning “pick n mix” or denim “mash up”!  Whatever you call it, a GREAT way to mix things up and make plain shirts more interesting! As  a child of the 80’s double denim holds a little fear for me too, lol 😉  But I think I may have been swayed here Wendy …. Thank you so much for this and your previous post. Inspiration aplenty!

You can find Wendy here and here. And don’t forget amazing prizes to be won as part of The Refashioners 2015 Community Challenge*. Including a signed copy of Wendy’s Book! So get involved for a chance to win!!! Grab a shirt and get refashioning! You have until Sunday 27th Sept to enter! Stay tuned for more inspiration throughout the WHOLE of August! After this week it’ll be over to you. So start sharing your shirt refashions for a chance to win!

*To clarify, the bloggers that have taken part in this year’s blogger challenge (ie the daily posts on this blog throughout August) are not entered to win that prize package. That is JUST for you! I wanted to clarify as a few comments made me think I haven’t made that clear. All of the posts throughout August have been for purely for your delight and inspiration. So go forth and refashion for a chance to win that awesome prize!

DIY, how to, refashioning, Restyles, Sewing, the refashioners, the refashioners 2015, Thrifting, Tutorials

The Refashioners 2015 – Dixie

08/24/15

DIXIE DIY - THE REFASHIONERS 2015

Hello all you Refashioners out there! I admit, I’m not usually much of a Refashioner. I get easily overwhelmed in giant thrift stores but I love this challenge and I’ve been participating since the beginning so how could I say no? Plus, I love getting surprise stuff in the mail, so exciting!DIXIE DIY - THE REFASHIONERS 2015

This go around I chose to exchange shirts with the lovely Heather Lou of Closet Case Files. She kindly sent me three shirts to work with so I was able to do two refashions.

First I made a loose-fit, sleeveless, peplum top out of a black and white shirt. The key to this top is getting the most fabric you can for the peplum and using a big enough shirt that can still be put on over your head as the buttons won’t be very useful in the end.DIXIE DIY - THE REFASHIONERS 2015

I started by taking off the sleeves. I used the front and back pieces from the Grainline Archer pattern to trim the sides off the shirt (the Archer has no darts which makes it a good base for a dart-less men’s shirt). Since the original shirt was only a men’s medium I didn’t have to cut the shirt much smaller to fit me.DIXIE DIY - THE REFASHIONERS 2015

Next I took some body measurements and lopped off the bottom third of the shirt.DIXIE DIY - THE REFASHIONERS 2015

With the leftover fabric from the shirt hem and the two sleeves I cut rectangular chunks out of the fabric, all the same length but varying widths.DIXIE DIY - THE REFASHIONERS 2015

I then stitched them all together, hemmed the bottom, and gathered the top.DIXIE DIY - THE REFASHIONERS 2015

This flannel check fabric hid the seamlines well and it was easy to match the print.I sewed the peplum to the bottom of the shirt.

DIXIE DIY - THE REFASHIONERS 2015

Lastly, I adjusted the shoulder line as the shirt originally reached past my shoulders, and I bound the armhole with self bias tape.DIXIE DIY - THE REFASHIONERS 2015

The only problem was that this shirt was a little big on me but not big enough that I could re-draw an entirely new armhole. I had to work with the existing armhole which meant the opening is pretty low. Oh, well, I’ll just wear a tank top under it instead.DIXIE DIY - THE REFASHIONERS 2015

*******

My second refashion used a 2XL men’s striped shirt and I turned it into shorts. This works best with a fabric that’s fairly thick (so you don’t end up with VPL) and a shirt that has the longest button placket you can find.DIXIE DIY - THE REFASHIONERS 2015

I wanted to try out the Katy and Laney Tap Shorts pattern but with a twist. I chose view A which allowed me to play with the angle of the stripes. This pattern originally uses a side zip opening but I decided to repurpose the shirt’s button placket and utilize that instead.

First I cut apart the whole shirt, including slicing off both sides of the button placket. This shirt was big enough to fit all my pieces easily.

I assembled the pattern like normal except I didn’t sew up the side seams or add the waistband yet.

From there I folded my seam allowances on the side seams to the right side and pressed. I went ahead and hemmed each leg at this point, too.

Now comes the placket – I split each placket in half, evenly distributing the buttons (three for each side of the shorts). I trimmed each section to make all the pieces the same length.

I folded up the very bottom of the placket pieces 1/4″ and stitched down.DIXIE DIY - THE REFASHIONERS 2015

I layered the plackets over the leg pieces with the center line of the placket sitting right on the folded edge of the leg pieces (buttons on the back side, button holes on the front).

Next, I sewed the plackets up the sides of the shorts following the two rows of original topstitching on the placket. This stitches down the seam allowances from the leg pieces.DIXIE DIY - THE REFASHIONERS 2015

As you can see in the photo above, the placket pieces were too short compared to the side seams. Rather than shorten the legs to compensate, I lowered the waistline and chopped off an extra inch from the top of the shorts.DIXIE DIY - THE REFASHIONERS 2015

That adjustment meant I needed to re-draft my waistband piece to be larger, as well as add another 5/8″ on the side seams to allow for the overlap of the button placket. I attached the waistband pieces, made a horizontal buttonhole on each side and added buttons I had cut off from the cuffs.DIXIE DIY - THE REFASHIONERS 2015

And finally, I know from experience that if you don’t at least partially sew the button plackets together you’ll get major gaping so I buttoned my shorts up to the second button from the bottom and stitched the plackets together on either side, again following the original topstitching.

I can still easily get in and out of the shorts by only opening the top two buttons.DIXIE DIY - THE REFASHIONERS 2015

Well, that’s it! Thanks for reading and I hope you’re inspired to do your own refashions. – Dixie

It’s fair to say the word “genius” can be over used. Not in the case of those shorts Dixie! A seriously ingenious placement of those button plackets!! Wow!! Wouldn’t a denim shirt be a great base garment for this?! Love the stripe play too. And Dixie makes a good point about the bonus of working with a shirt with a strong check like the first one. You basically have a fantastic cutting and measuring guide built into the fabric!

You can find Dixie here and here. And don’t forget amazing prizes to be won as part of The Refashioners 2015 Community Challenge. Including a copy of Dixie’s Bonnell Dress pattern! So get involved for a chance to win!!! Grab a shirt and get refashioning! You have until Sunday 27th Sept to enter! Stay tuned for more inspiration throughout the WHOLE of August!

DIY, how to, refashioning, Restyles, Sewing, the refashioners, the refashioners 2015, Thrifting, Tutorials

The Refashioners 2015 – Sally

08/23/15

CHARITY SHOP CHIC - THE REFASHIONERS 2015

The raw materials for my refashion were chosen and sent to me by Elisalex from By Hand London. As you can see, naughty Elisalex (never one to play by the rules) selected not one but two shirts in similar sizes and colour schemes.CHARITY SHOP CHIC - THE REFASHIONERS 2015

One shirt was stripy taupe and white.CHARITY SHOP CHIC - THE REFASHIONERS 2015

The other was also taupe and white, but a subtle dotted pattern. The fabric was thinner and had an element of stretch to it.CHARITY SHOP CHIC - THE REFASHIONERS 2015

I don’t know how she found two shirts in the exact same colours, but she’s right, they were destined to be together.

My ideas for combining contrasting fabrics in shirts were limited to bowling shirts and cowboy/country and western shirts. Since I already have a bowling shirt in my wardrobe, I went for a cowboy shirt.

To combine pieces of one shirt with pieces of another, some fairly drastic shirt surgery was required. I started by amputating the sleeves from both shirts.

I cut the yoke from the donor (stripy shirt), leaving a pointy edge.  I just cut this by eye, but I did fold the shirt over to try and make it the same on the left and right.CHARITY SHOP CHIC - THE REFASHIONERS 2015

Then I pinned the donated yoke to the recipient shirt and cut roughly around it.CHARITY SHOP CHIC - THE REFASHIONERS 2015

I prepared the yoke for transplant by folding up 5mm and pressing. Then I grafted it onto the recipient with white topstitching.CHARITY SHOP CHIC - THE REFASHIONERS 2015

CHARITY SHOP CHIC - THE REFASHIONERS 2015I also took the opportunity to do some minor cosmetic work; taking in the sides under the arms and using bias tape to finish the armholes.CHARITY SHOP CHIC - THE REFASHIONERS 2015

I made flat felled seams at the sides, in keeping with the original shirt.

For decoration, I added some basic hand embroidery (chain stitch only) in a contrasting shade of pink.

CHARITY SHOP CHIC - THE REFASHIONERS 2015 (9)CHARITY SHOP CHIC - THE REFASHIONERS 2015

I also cut off the buttons and added pink ones, which I think really helps distance it from its origins.CHARITY SHOP CHIC - THE REFASHIONERS 2015 (10)

Overall I like the look of it but now seeing these pictures, it’s crying out for some pink piping to emphasise the yoke shape – I may add that at some point.CHARITY SHOP CHIC - THE REFASHIONERS 2015

All in all, a successful transplant!

Thanks Portia for inviting me to be a part of the series again, I had a blast!

Thank you Sally!! And congratulations on your nuptuals!! (Psss…Sally only went and got married 2 days ago peops!!) Love the way these 2 prints complement eachother. Combining shirts is a great way to give yourself more fabric to work with and add visual interest. This has me thinking….you could probably take two shirts…do this for both….and still end up with 2 shirts with the colour/print blocking in the opposite configuration!  Hmmmmm…….

You can find Sally here and here. And don’t forget amazing prizes to be won as part of The Refashioners 2015 Community Challenge. Including a copy of Sally’s Bellini shirt pattern! So get involved for a chance to win!!! Grab a shirt and get refashioning! You have until Sunday 27th Sept to enter! Stay tuned for more inspiration throughout the WHOLE of August!

Newer Posts
Older Posts
Portia
Follow
Sewbox

© Copyright 2026. Portia Lawrie. All Rights Reserved. Managed by WordPress Web Dev Cornwall .