• About
    • Contact
    • Press
    • Sponsor
  • DIY
    • Home & Garden
    • Jewellery & Accessories
    • Yarn Crafts
  • Sewing
    • patternless & self drafted
    • Refashions
    • Commercial Patterns
    • Sewing Tips
    • Overlockers
  • The Refashioners

Portia Lawrie

christmas, christmas 2012, Crafting, DIY, Gift Wrap Ideas, salt dough, Tutorials

Salt Dough Gift Toppers…

12/19/12

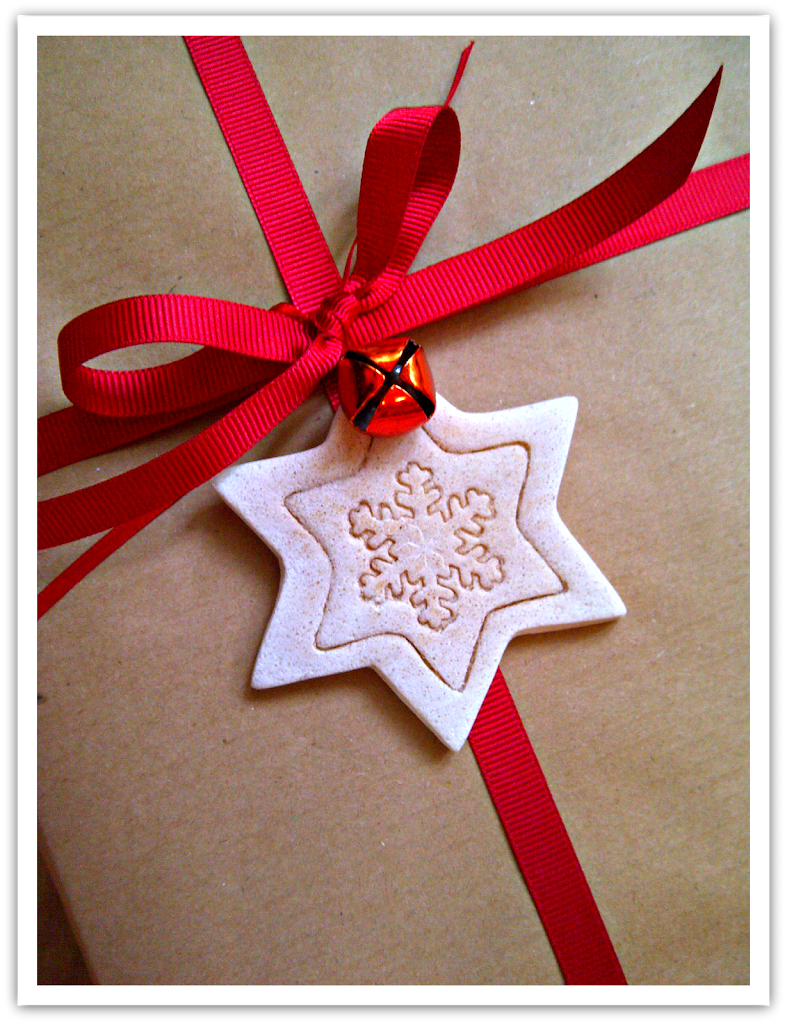
I’ll let you in on a little secret. These were meant to go on our tree. But I liked them so much atop brown parcel paper and tied with bright red ribbon, that they’re going to decorate our Christmas gifts this year instead! (Although I might still whip up a few for the tree as they’re super quick to do) I had originally planned to paint and glaze them too. But the natural texture and colour was telling me to leave them be. “We’re perfectly fine as we are thankyou”. That’s what they told me after 2 snowballs and a mini bottle of Rose wine gifted to me by one of my Avon customers…What? It was my birthday at the weekend. I’m allowed! Yep, 38 years and still not feeling remotely “grown up”!
I made some of these a couple of years ago but never finished decorating them. A couple of weeks ago I dug them out, painted them white and then set about decorating them with a folk art design with a red sharpie. They didn’t work out how I would have liked them so I decided to have another stab at them this year…

Anyhow, onto the scintillating subject of salt dough or “store cupboard fimo” as I like to call it 😉

Below: As I mentioned, I made some salt dough shapes last year so you can find the full low down on how to make the dough in this post. But essentially it’s a ratio of 2 parts flour + 1 part salt + 1 part water (tepid not cold). Blend the salt and flour first, then add the water and work into a dough. Following that formula you can make any amount of dough that you like. If you want a really smooth finish then make sure you knead it thoroughly. But I quite like the texture result of a slightly less smooth dough…

Above: I used a variety of cookie cutters to experiment with, and found these sugarcraft snowflake stampers/punches. They can be used to press out actual shapes from the dough, just like a cookie cutter; or simply to emboss the surface of the dough.

Below: For these star shaped gift toppers, I cut the main shape using a larger star cutter. Then with the next size down I “embossed” a border; then using my sugarcraft stamp I added an embossed snowflake to the centre. I also cut some smaller stars with just the embossed snowflake in the centre….

Above: The humble drinking straw makes a perfect hole punch for your hanging loop hole..

Below: There are a number of ways to dry out salt dough shapes. You can let them air dry for several days. Erm, no thanks. Our house is too tiny to have trays of these hanging around for days on end. You can bake them in the oven on a very low heat. Well yes. But firstly, our oven has conked out just in time for Christmas (!) and secondly; in my experience they don’t stay flat and have a tendency to catch and scorch in the blink of an eye. My weapon of choice in these matters is definitely the microwave. I left my shapes to air dry a bit overnight. Then, place them in batches, face down on baking parchment, on a microwaveable plate. Weight down with another FLAT plate. (I used a spare glass microwave plate). This will ensure they stay nice and flat and don’t bubble up during the drying out process. Then microwave on full power in 1 minute bursts, checking them as you go and wiping away any accumulated moisture from the plate. It usually takes 1-4 minutes depending on the overall size and thickness of the dough…

Below: They can still scorch in the microwave, which is why it’s important to check them between 1 minute bursts. But in this case I like the way a bit of added colour has enhanced the embossed details. I tried out a few different shapes and designs. The little round ones were cut using the little metal case that a tealight comes in. The “stylised garland” design on the heart shape was a bit of an experiment. I made the line indentations using the the edge of a ruler and added the “baubles” with a very narrow drinking straw…

And while all this was going on, Elliott was happy creating his own take on gingerbread men….

Hope all your Christmas preparations are going smoothly!
christmas, christmas 2012, Crafting, crochet, DIY, gift ideas

DIY Gift Idea: Leather /Suede Crochet Hook Roll

12/10/12

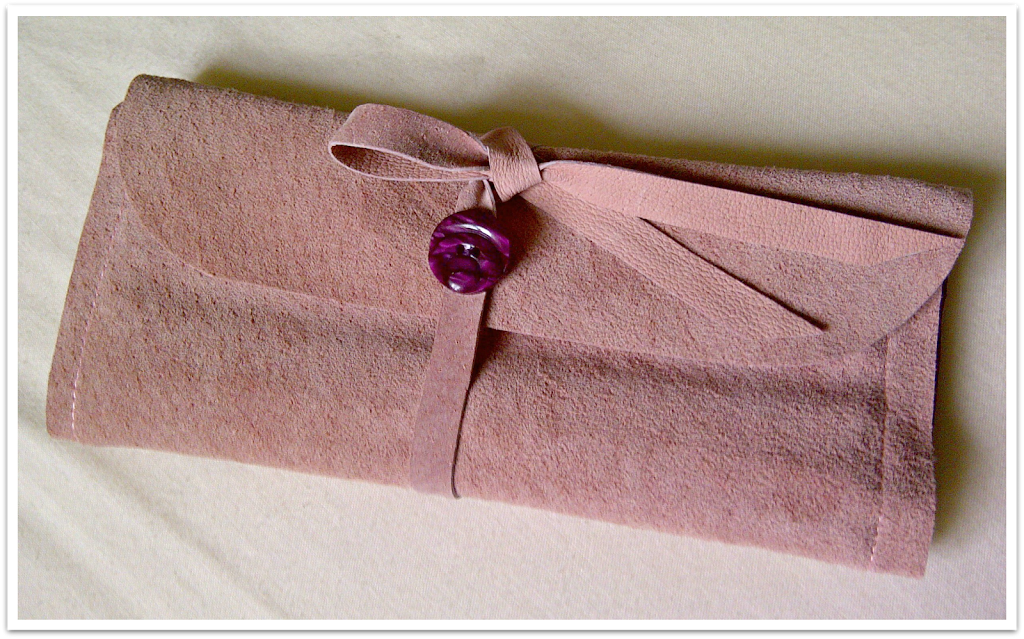
Stop Press! Over a week into December, and I’ve just got my first handmade gift finished! (Someone needs to get a serious wriggle on!) This little suede crochet hook roll (step by step to follow tomorrow) made to house a set of bamboo crochet hooks I found on eBay. (Superfast delievery too if you’re interested!) You may recognise the suede from a previous project….

Kerry may recognise the button. It’s from the ONLY giveaway I’ve ever won…

The inner “pocket” is made from a remnant of some thrifted curtains….

So essentially this neat little needle roll cost me zero to make!

If you fancy making one, there’ll be a step by step up here tomorrow.

How’s your gift making going? Any handmade gift ideas/tutorials to recommend? I’m all ears!

christmas, chutney, Crafting, Crafty Christmas Capers, DIY, embroidery, Tutorials

Embroidered Jam Pot Covers….

12/20/11

Back in the Autumn I made a couple of varieties of chutney as Christmas gifts. Spiced Marrow Chutney and a Tangy Beetroot Chutney using a combination of recipe ideas from this brilliant site. They’ve been “maturing” since October so should be perfect for the Christmas table by now. The only thing left to do was make them look all Christmassy and add a little personal touch to them; so I opted for some hand emroidered jam pot covers tied with grosgrain ribbon….(I actually had about 12 jars in total but some had already been gifted before I had a chance to take these photos!)

I got all OCD on getting the right size circle for my covers. Just didn’t like the idea of cutting a square and trimming it to size once in place. I just KNEW I would screw it up that way. So if anyone else is as mildly obsessive about these things as me here’s my method…

I had several sizes of jar so just repeated the process for each different size. Firstly draw round the the lid of the jar on a sheet of paper…

Then find the centre point of the circle by folding it in half lengthwise then across the width. It’s actually the circle itself that needs to be folded in half so I held the paper up to the light as I was folding so as to see through it and line the edges of the circle up as I was folding…

Measure the diameter of the circle, let’s say this one was 3″. Then mark a point the exact same distance, 3″, from the centre point, extending out beyond your original circle, on each of the four fold lines…

Then find a plate/bowl/object (or use a compass if you want to be super precise!) and use it to draw a circle that encompasses these four points equally(ish)…

Et voila…Cut out your template(s)….

Because I planned to emroider my covers I cut out heavy weight iron on interfacing the exact same size as my jar lids….

And some squares of fabric slightly larger than my templates…..

Place fabric square RS down on the ironing board. Centre the interfacing sticky side down on top of the fabric and press to adhere. Then pin the template on top of this making sure the centre circle of the template lines up with the circle of interfacing….

Cut around the template with pinking shears…

It should look like this…

I then embroidered snowflakes on each cover with embroidery floss. These are a combination of French Knots, Lazy Daisy Stitch, and Back Stitch and took about 15 mins each to do so great as a last minute personal touch…

Secure the covers to the jar tops with elastic bands then tie with ribbon……

There are so many ideas out there for “Gifts in a Jar” and these would add a nice finishing touch to anything in a jar. Not just chutneys  🙂
Px

christmas, foraging, Recipes

A Little Christmas Tipple…..

10/04/11

Being a thrifty kinda gal, I love a good freebie. Mother nature is generous indeed and if you know where to look, when to look and what to look for…..then hedgerows, woodland and fields (so long as you’re not trespassing!!) are great sources of fruits, herbs, berries and more.  The whole foraging thing is such fun to me and an area I really want to learn more about. For instance, when it comes to wild mushrooms? I see them all the time but wouldn’t have a clue and knowing my luck I’d end up picking something hallucinogenic, or worse! Some berries can be toxic too. So I err on the side of caution for now (I have a few foraging books on my wishlist!) and stick to what I know. My favourite summer tipple is to make Elderflower champagne. OMG, if you haven’t tasted the stuff before, oh how you have missed out. It’s heavenly on a summers day and oh so simple to make. Alas, I totally missed the boat this year.

Our weird seasons this year, meant that the Elderflowers came out much earlier. There was so little sunshine (essential to release the fragrance) and they went over so quickly that I didn’t have a chance to gather my supplies and free a space in my day to make it. So, I decided instead to wait patiently for the subsequent berries to ripen and try my hand at some Elderberry Wine instead. So when my step mum was visiting at the weekend we picked these (with permission of course) from our neighbours tree. Just look at the colours……..

As luck would have it, my step mum used to be an avid winemaker so knew just the right technique to get the berries off the stalks……

Even the bare stalks are gorgeous to look at. I love this time of year for it’s stunning colour palette…

Eventually you end up with a bowl of  beautful shiny Elderberries (pick out any remaining stalk)

This is the recipe I’m following….

Elderberry Wine
There are any number of recipes for elderberry wine, but this one can be drunk either hot or cold.
Ingredients:
  • 1 kg (approx 2lb) elderberries, stripped from stems
  • 4 1/2 litres (one gallon) of water
  • 454g (1lb) of raisins
  • Pinch of ground ginger
  • Six cloves
  • 1/2 tsp of wine yeast (eg, Burgundy)
  • 150 ml (1/4 pint) of brandy
Method:
  1. Rinse the berries in cold water, and place them in a large plastic container. It’s essential to remove every last piece of stalk, which can impart a bitter taste to the wine.
  2. Boil the water, pour it over the berries and leave it to stand for 24 hours.
  3. Press the mixture through a muslin cloth.
  4. Put the juice and all the other ingredients, apart from the brandy and yeast, into a preserving pan and simmer gently for an hour, skimming when necessary.
  5. Allow the mixture to cool and, when it is lukewarm, stir in the yeast. Transfer it into a fermentation jar, top up, fit an air lock and leave to stand in the dark for two weeks.
  6. Rack off into a clean vessel and add the brandy. Then siphon off into clean, corkable wine bottles.
This wine is best if allowed to mature for a few months – so Christmas is a good time to bring it out.
It’s all “blup-blup’ing” away in the Demijohns as we speak. I shall let you know how I get on. It’s either going to be really really gorgeous…..or really really bad head inducing. We shall see..;)
Px 
Portia
Follow
Sewbox

© Copyright 2026. Portia Lawrie. All Rights Reserved. Managed by WordPress Web Dev Cornwall .