• About
    • Contact
    • Press
    • Sponsor
  • DIY
    • Home & Garden
    • Jewellery & Accessories
    • Yarn Crafts
  • Sewing
    • patternless & self drafted
    • Refashions
    • Commercial Patterns
    • Sewing Tips
    • Overlockers
  • The Refashioners

Portia Lawrie

Giveaways, Uncategorized

Giveaway: Dutch Label Co

03/06/18

From time to time I get offers from various companies to try out their products. So when Dutch Label Shop got in touch and I had a look at their products, I said “yes please!”. As well as labels like these, they do care labels, size labels,  hanging tags etc and if you’re interested in starting your own line of handmade products this could be an excellent port of call for you. Labels like these are also handy as hanging loops and in instances where you can’t readily tell the front and back of the garment between each other; a label can solve the problem! (I think I saw a post on IG where someone had their labels printed with “this is the back” for that very reason, lol).Dutch Label Co Giveaway (1)

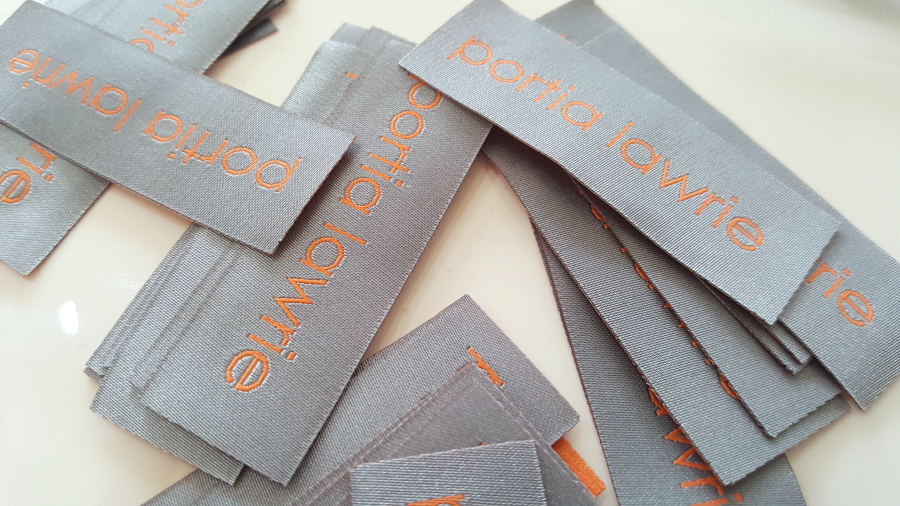
I was nowhere near as imaginative and witty as that. I blanked when I was placing my order so just used my name. (Hey, maybe I could start my own line of handmade products!) I got some for me and some blue ones for little man, to sew into his school clothes etc. I think he may well have the poshest labels in school, ha ha!

As a side note, I can’t work out how the label is as smooth on the reverse as it is on the front. Labels I’ve seen in the past have always had a loose weave on the back. AND the ends don’t seem to fray either. These really do have a quality feel to them. (And I’m not just saying that because I got some free. Nominette once sent me some labels too; and while those were perfectly good,  I’d say these are of a superior quality.)

Dutch Label Co Giveaway (1)

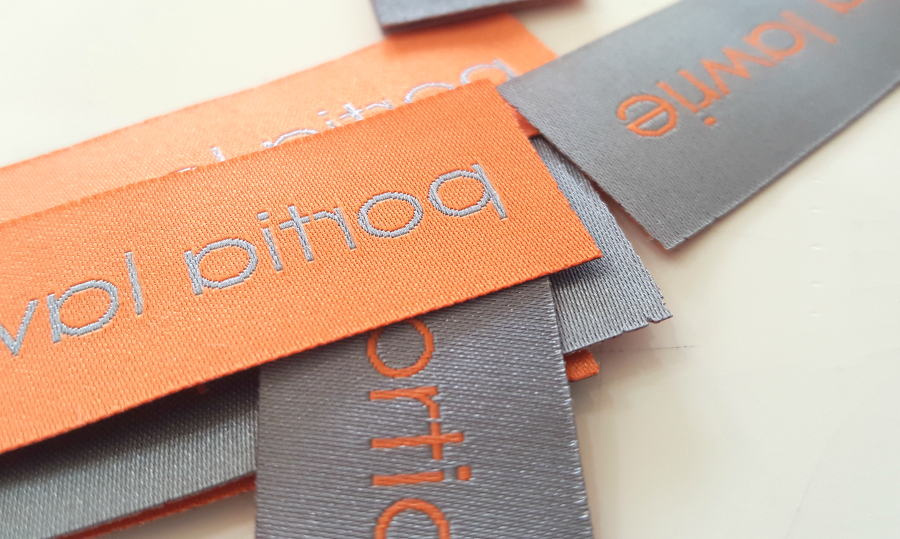
Dutch Label Co sent me a code that allowed me to have a certain number of labels. That was waaaaay more than I will ever use. So I decided to use my voucher to order 30 more generic ones that I could give away to one of you. And these are they….Dutch Label Co Giveaway (1)

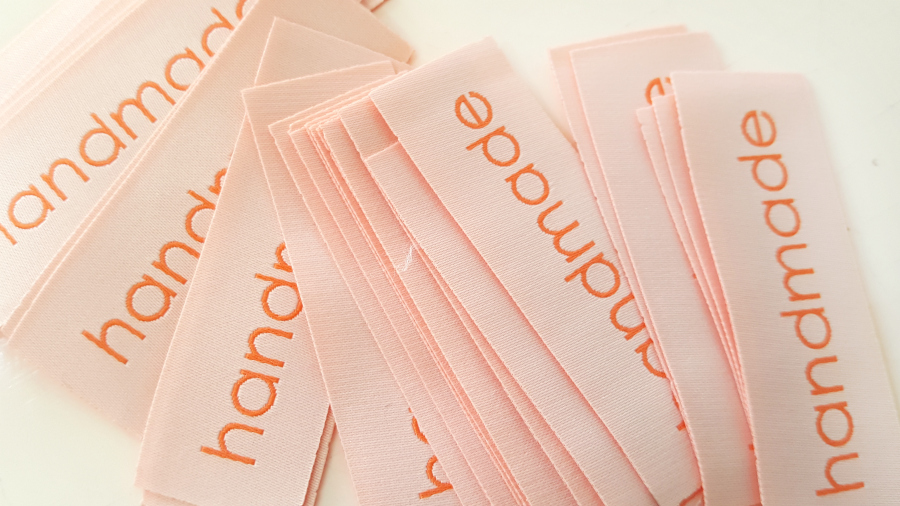
If you like them and fancy adding them to your habby stash; simply leave a comment below. That’s it. (But if you want to give me a follow on IG, I’m getting very close to a milestone on there!) Open worldwide. Closes for entries at Midnight GMT on Sunday 11th March. Winner notified by email.

Good luck!

PATTERN HACKS, simply sewing, Simply Sewing Magazine

HACK: OUT OF MY COLOUR COMFORT ZONE

03/02/18

PATTERN HACK for ISSUE 39 - SIMPLY SEWING

Thought I’d share with you today….one of my recent projects for Simply Sewing magazine. It’s a hack on Maven Patterns “French Dart Shift” (which I thoroughy recommend by the way. The drafting is ace. Fabric on this make is from Minerva Crafts.) Available in issue 39 of the mag if you want the tute. You might wonder about the title of this post. Out of my comfort zone…PATTERN HACK for ISSUE 39 - SIMPLY SEWING

Well you probably know I’m hesitant with colour in my own makes. Preferring to stick to a palette of neutrals (ok. ok. Shades of grey.) But the thing about being commissioned by a magazine is that sometimes (most of the time actually) they ask you to make something that you would never in a million years make for yourself. In this instance, it’s a dress (don’t do dresses) AND there’s a punchy, in your face colour combo (I don’t do colour either).PATTERN HACK for ISSUE 39 - SIMPLY SEWING

Aside from the quality of the finish, the thing I am most pleased about is the way all the colours work together. (OK, grey could be considered a non colour. But baby steps!). For someone who, left to their own devices, would not use color in this way, this feels like an achievement. I am calling this my Neopolitan Ice Cream meets 60’s air hostess dress. (Snappy)

PATTERN HACK for ISSUE 39 - SIMPLY SEWING

I’m starting to get more of an eye/instinct for how colours go together and becoming bolder with my ideas for colour (at least for the mag….for now). And that’s entirely down to being pushed out of my comfort zone pretty much every month for the last 3 years I’ve worked with Simply Sewing!

In fact I have another rather colorful creation I’m just finishing up for the mag today which I’m REALLY excited about 😉


Modelled images courtesy of Immediate media. If you want to keep up with my contributions/tutorials for the mag,  you can subscribe to the mag here.


DIY, how to, Sewing, Tutorials

TIP: Encased Elastic Waistband (another way)

02/26/18

Encased Elastic Waistband (another way)

Really there is nothing more comfy than a wide elasticated waistband is there? It’s also generally regarded to be one of the quickest and easiest of the waistband options to execute. Especially when you’re new to sewing. Now this may just be me, but bear with me here. Yes an encased elasticated waistband is pretty straightforward. But I’ve always found it to be….erm…..fiddly and annoying! Attaching a safety pin  (or similar) to one end of the elastic. Feeding it through  the already sewn casing where it will invariably twist or get snagged on the seam allowances at some point on it’s journey. Wrestling it out the other side and then attempting to get the ends of the elastic under the presser foot with and entire garment hanging off the end of it. And let’s not forget absent mindedly sewing the elastic “twisted” and only realising after you’ve closed up the casing.

Ok that was a bit disproportionately ranty. But if any of it sounds familiar then you too might want to try a different way. Which is how I’ve started constructing my elasticated waistbands recently.

Start with your elastic already sewn together in a loop and your waistband casing also already sewn together in a loop and folded in half. RS out. Your waistband should be the same length as the circumference of the garments wiastline. It should be double the width of your elastic + approx 6mm (thats 3mm either side for wiggle room  for the elastic) + the original seam allowance (usually 5/8″ either side). If you already have a pattern piece for your waistband….use that and simply add 6mm to the width 🙂

Encased Elastic Waistband (another way)

Place the elastic inside the casing with the edge of the elastic butted up to the fold…( I haven’t left quite enough seam allowance here. There’s a better example of the ideal amount of seam allowance a couple of pics further down)Encased Elastic Waistband (another way)

Place under the presser foot. (A zipper foot can be handy here but not vital). Keeping the elastic butted up against the fold sew a long machine basting stitch 3mm away from the edge of the elastic. In this pic you may be able to see I am holding the whole thing at tension and using my thumb to feel where the edge of the elastic is . Keep feeding it through the sewing machine like this. Once you reach a point where there is more casing left than elastic, with the needle down, lift the presser foot. Ruche the casing over the elastic (towards the back of the machine), until the bit you have left to sew lays flat. Lower presser foot. Finish sewing/basting 🙂Encased Elastic Waistband (another way)

You’ll end up with an encased elastic waistband. It just isn’t attached to your garment yet! BUT it’s easier to sew in my view and the bottom edge of the elastic is not going to snag on any seam allowances so should run smoothly through the casing. You’ll also never have that scenario where you accidentally sew the casing a smidge too small for your elastic (which leads to distorted/curling elastic) because you are sewing the casing using the elastic itself as a guide. (This pic is also a better example of the amount of seam allowance left either side of the elastic)Encased Elastic Waistband (another way)

To attach the waistband simply pin to together RS together and raw edges aligned as pictured…Encased Elastic Waistband (another way)

Serge or sew just to the right of your line of basting stitch which should be more or less your original seam allowance…Encased Elastic Waistband (another way)

Once waistband and garment are sewn together, and the raw edges finished, press the SA down towards garment, remove basting and your done!Encased Elastic Waistband (another way)

This will work on wovens or knits. The only caveat is to be careful using this with pockets that are secured at the waistline as this could create a little too much bulk in these area, depending on the weight of the fabric. In seam pockets that sit further down are a ok 🙂

DIY, how to, refashioning, Tutorials, Uncategorized

DIY: Embroidered Neon Sweater

02/08/18

DIY Neon Embroidered SweatshirtThis is a super quick way to update a plain sweater. This particular design works best with a chunky knit jumper in a plain stitch like stockingette or rib stitches (I think this one is fishermans rib but knitters out there will be able to correct me.) Using the very pronounced stitch as a guide, and simply highlighting it by embroidering over the top of it with your chosen yarn. Simple as! You can use leftover yarn from your stash so it’s a great scrab buster too!DIY Neon Embroidered Sweatshirt

I used a fab neon yarn from Minerva crafts which you can find here. To start off your embellishment, thread your yarn onto a yarn needle.  Secure the yarn to the wrong side of your sweater. Pass your yarn up through to the RS of the sweater at the top left of the V stitch you want to embellish, then insert into the point at the bottom of the V stitch…..and back up again at the top right of your V stitch.DIY Neon Embroidered Sweatshirt

Then insert the needle again into the centre point at the base of your V. Bring the yarn back up again at the top left of the next V stitch you want to embellish…and so on…DIY Neon Embroidered Sweatshirt

Continue until you are happy with your design and level of embellishment. I’m firmly in the less is more camp so I went for a really simple design using lines of V stitches in varying lengths…DIY Neon Embroidered Sweatshirt

You don’t have to just stick to Vs of course. Essentially, in a plain knitted sweater like this you have a very even grid of stitches and you can use this as a guide for any kind of embroidered repeating pattern. The X motif is just another example of many you could do. But think for instance of the variety of sashiko patterns that you could adapt for use with this technique?DIY Neon Embroidered Sweatshirt

DIY Neon Embroidered Sweatshirt

Here’s the guts of mine!!DIY Neon Embroidered Sweatshirt

Et voila!! A simple update on a plain winter sweater for next to nothing and in hardly any time at all!DIY Neon Embroidered SweatshirtDIY Neon Embroidered Sweatshirt


This tutorial first appeared in Simply Sewing Magazine under license in 2017. I write a regular piece for Simply Sewing every month. To keep up with the latest tutorials you can subscribe here 🙂 Modelled images courtesy of Immediate Media Ltd.

DIY, how to, organising, Sewing, Tutorials, Uncategorized

DIY: Felt Needle Organiser

01/30/18

MACHINE NEEDLE HANGING ORGANISER A few days ago I posted details of this on Instagram. People kinda went a bit nuts for it. (Hey I don’t mind being called a genius on social media. Schucks. (“Feigns humility but secretly enjoys the flattery”) It’s not genius (we’ll leave that term to groundbreaking, world changing scientific discoveries). But genius offen lies in simplicity. And I guess it’s one of those super simple, easy to do kinda things that solves a few problems in one go.

Life is full of petty little annoyances which on their own could be called trivial. But collectively…if you spend a whole day subjected to petty little annoyances? That amounts to one BIG annoyance. I’m a great believer that if you can check off those buggers one by one…then cumulatively, when you lump all those solved problems together, that leads to a much less annoyed (read calmer and nicer) individual.

Someone commented on IG that this seems alot of faff for needles. It’s actually not faffy at all. Can’t have taken me more than 10 minutes to cut and sew (not counting taking the photographs in between) and it is super duper easy too. And those 10 minutes will hopefully solve some of those pesky annoyance critters.

So I have several bug bears when it comes to those little machine needle packets:

  1. Having my needles to hand
  2. Finding the packet I want quickly. (I semi addressed that here but it’s still open to improvement)
  3. Knowing I’m running low at a glance and need to restock
  4. Remembering what needle is currently in the machine (I always forget)
  5. When a needle has been used, but not yet ready for the bin, it usually goes in a pin cushion to save it. Then I forget what it is and throw it out anyway.

(NB: I am fully aware that needles are colour coded or marked (in frikkin microscopic writing) to identify their type. But going through every single packet to find the matching colour codes; or cracking out a microscope (which I don’t have) to read the engraved numbers? Well that’s the very definition of faff to me. )MACHINE NEEDLE HANGING ORGANISER

I really don’t need to write a tutorial for this. It’s pretty apparent how this is made.

I used this felt.  Bought for another project that never materialised so it’s been sat in my stash for like, two years??!! (Hangs head in shame). So yes, this quick and easy make will not only save your sanity, it’s also a great stash buster. You don’t have to use felt. Leather scraps word would work. As would a little quilted version in fabric. Or fabric stiffened with interfacing. Neoprene could be quite funky! Anyway…you get the idea.

It’s a rectangle. With narrow strips sewn across it ( the strips need to be approx half the height of a needle packet)…then separated into individual pockets with lines of stitching. That’s it.MACHINE NEEDLE HANGING ORGANISER

MACHINE NEEDLE HANGING ORGANISER

So lets work through the various problems this hangy felt thing solves. Firstly,  I can organise my needles by type and then size in the little individual pockets. When inserted upside down, I can clearly see the part of the casing that shows the needle type and size AND the number of needles of each type and size that I have left. (That solves 1, 2 & 3 from my list).MACHINE NEEDLE HANGING ORGANISER

When I have a needle that I’ve used but still has some life left in it, I can pin it through the felt right infront of it’s corresponding packet. That solves number 5.MACHINE NEEDLE HANGING ORGANISER

This pocket at the bottom…in a different colour…is where I place the pack that corresponds to the needle currently in my machine. And that solves number 4. Boom!MACHINE NEEDLE HANGING ORGANISER

You could up the anti by embroidering each pocket with the needle type you plan to store in it. This only occurred to me after I’d made the thing. But I did a little tester to see how it would look and I kinda like it!MACHINE NEEDLE HANGING ORGANISER

My hangy thing is held up using these clips. If I recall correctly I actually found them in a charity shop. But you can get them quite readily on Amazon. I quite like these black ones!MACHINE NEEDLE HANGING ORGANISER


Then it’s simply hung from some of these net curtain wire end loops (I have no idea of the proper name for them) screwed into my wall right behind my machine.MACHINE NEEDLE HANGING ORGANISER

MACHINE NEEDLE HANGING ORGANISER

MACHINE NEEDLE HANGING ORGANISER

In the interests of keeping it real and just in case you had any misconceptions about my level of organizing, take a look at that overflowing zip draw and that draw of thread spools. Neither of which will actually close now. They might get their own felt hangy thing one day….or not.

Freebies, Giveaways

GIVEAWAY: Spring Knitting & Stitching Show Tickets

01/10/18

GIVEAWAY: Spring Knitting & Stitching Show

The Spring Knitting & Stitching Show will soon be upon us. Crazy right?! Only just got past the whole New Year thing and here we are already talking about Spring shows. But seriously, it’s like 49 days away or something! The Knitting & Stitching Show is the UK’s biggest textile art, craft and design event and the Spring show opens its doors to thousands of crafters at Olympia London on 1st-4th March 2018.  I’ve NEVER been before and will be going for the first time this year. Super excited to spend a day soaking up all things stitchy!

“From embroidery to dressmaking, needle felting to crochet, there are over 200 workshops and free demonstrations hosted by expert tutors, covering every textile craft imaginable.  Whether you’re a complete beginner, an expert seamstress or somewhere in between, there is something for everyone, and with nine workshop classrooms, it’s the biggest Spring show programme ever.”
GIVEAWAY: Spring Knitting & Stitching Show

There are loads of intriguing looking exhibitions, workshops, demos and stalls on offer….odds are some fabric and yarn will be making it’s way home with me and I may well try out one of the workshops while I’m there…

“Galleries by leading textile artists, graduates and groups are sure to inspire, with exhibitions by Kate Whitehead (Not From The Stork), Anne Kelly (Folk Tales), Dionne Swift and her students from around the world (Collective Stitches), City Lit (Making), The Quilters Guild (Commemorating World War 1) and SAQA (Concrete & Grassland).  

 Contemporary cross stitch kingpin, Mr X Stitch (Jamie Chalmers) will be hosting The Mr X Stitch Guide to Cross Stitch, featuring new work by artists pushing the boundaries of the genre, plus cross stitch and canvas work from the Royal School of Needlework archives”

GIVEAWAY: Spring Knitting & Stitching Show

GIVEAWAY: Spring Knitting & Stitching Show

GIVEAWAY: Spring Knitting & Stitching Show“If craft shopping is your bag, you’ll find plenty of opportunity to indulge in a little retail therapy with more than 150 specialist retailers under one roof.  From yarn and fabric, buttons and beads to the latest sewing machines and gadgets.“ 

If this sounds like your cup of tea, and like me you fancy spending a day having a mooch and sampling what’s on offer, then read on! I have 5 pairs of tickets to give away to 5 of you AND if you can’t wait and want be sure of snagging your tickets, an exclusive discount code too!GIVEAWAY: Spring Knitting & Stitching Show

Giveaway:

I have 5 pairs of tickets for the show, redeemable any day except Saturday 3rd March. To enter the giveaway simply leave a comment on this post by midnight GMT on 31st January 2018. Be sure to let me know how you would like me to contact you if you win! Winners will be selected at random and notified using the contact method given. (5 winners will each receive 1 pair of tickets)

Discount

If you don’t want to leave it to luck and instead want to purchase your tickets, then just enter the code MAKERY18 at checkout and it will give you £2 off advance adult tickets and £1 off advance concessions.


Good luck and might see you there!!!

challenges, competitions, Dressmaking

Can a refashion win again??

01/04/18

Regular readers of this blog will know that last year, I won this….

Yep. You’re looking at Dressmaker of the Year 2017. Mad! What makes me particularly proud is that the coat that won it was a refashion. Didn’t just win the upcycling category. It won the whole darn thing. Says something about how the perception of refashioning is changing dontcha think??

Well think of this as a call to arms my fellow refashioners! Once again the spotlight is up for grabs. Entries for Dressmaker of the Year 2018 are open now and until 19th March, including a category for refashionng (they call it upcycling. Semantics.) Now I happen to know there are some PHENOMENAL refashions out there from all of you who entered community challenges in the last few series of The Refashioners. Yes….past makes count , and you can enter as many different garments as you like. (Link to prizes, terms and how enter at the end of this post). So get entering those makes into this comp, and let’s show how awesome, creative and stylish refashioning can be!

dressmaker of the year 2018

I’m not allowed to enter this year. Sniff. Instead, they’ve asked me to come along and be on the judging panel for this years finalists! Eeep! So I shall be casting my eye over your fabulous entries along with some other names you may have heard of 😉 (I may potentially embarrass myself by fangirling Vicky Gill. )

dressmaker of the year 2018

There are 6 categories to enter. You can enter as many different garments as you like. (You don’t have to make something especially for the comp. It can be something you have already made and are particularly proud of INCLUDING your Refashioners makes don’t forget!)  Here is where to enter and the amazing prizes to be won. Good luck!!

dressmaker of the year 2018


DIY, how to, Tutorials

DIY: Recycled Gift Tags

01/02/18

Around this time of year I end up with a bunch of cards from my Birthday (also in December) and Christmas. I always feel a pang of guilt even putting them in the recycling bin. Especially when you’re like “oooh what a lovely card!” followed by “such a shame to throw it away!” That last sentence btw….be careful….that’s hoarder speak right there!

Anyway, this year, rather than throw the lovely cards away I decided to repurpose them as gift tags!RECYCLED GIFT TAGS


Really simple. Stanley knife, metal ruler, cutting mat and hole punch. I guess the trick is visualising where to cut and what would make a good “stand alone” image. I could definitely see the potential in this birthday card…RECYCLED GIFT TAGS


Start by seperating the front section from the back….RECYCLED GIFT TAGS


Having said that, don’t rule out the back piece entirely! That “enjoy part” would make a good tag right? Just check with every potential tag you are going to cut from your card, that the back is plain and clear for writing on…RECYCLED GIFT TAGS


Use the lines on your cutting mat to make sure everything is lined up and square and get cutting…RECYCLED GIFT TAGS


Once you’ve cut your tags, punch a hole ready for some ribbon or string et voila! Lovely card finds new purpose as lovely gift tags! RECYCLED GIFT TAGS


I probably won’t have to buy another gift tag all year tbh. I have a whole stack cut from birthday and Christmas cards. Here’s a few more examples (I did a load more after these pics were taken too. It’s kind of addictive!)RECYCLED GIFT TAGSRECYCLED GIFT TAGSRECYCLED GIFT TAGSRECYCLED GIFT TAGSRECYCLED GIFT TAGS


As a side note that I thought you’d enjoy, my Christmas gift tags this year were also recycled; but in a slightly different way. I took a bit of a shine to the packaging of a curtain pole we ordered for the new house (we bought a house in August). Black on one side. White and perfect for writing on on the other. So I naturally sliced it up into loads and loads of narrow rectangles…RECYCLED GIFT TAGS

The addition of a punched hole and some glitter duck tape and decorative washi tape transformed them into luxurious and glam gift tags. What’s more, this part is great for getting the kiddos involved with. Elliott had fun decorating these with random bits of tape and was super proud to see his tags on the pile of presents under the tree 🙂RECYCLED GIFT TAGS

So yeah. Anyone who sent me a card this year may well end up having it gifted back to them in the form  of a gift tag on a present. (Wonder if they’ll notice!). But much better than throwing those lovely Christmas and birthday cards away right?

Happy New Year to you all!

The Refashioners 2017

The Refashioners 2017 – And the winner is….

11/17/17

So here we are! At the end of another series and about to announce the winner of The Refashioners 2017. Yet again it’s been jaw droppingly brilliant. So many great refashions. So much creativity and skill on display. So many suits given a new lease of life and hopefully….many more people discovering the rewards that come from reusing garments and seeing them as a source of fabric and potential.

The task of  establishing  a winner from the sea of awesome creativity that was the community challenge this year was, as you can imagine, a tough one! How on earth to choose from all those great makes ….?! (You can check out all the community entries on  instagram and facebook.)

I sought feedback from everyone involved in this years series. And in the end it was apparent that aside from an overall winner we just had to recognise a couple of other entries as well. But first….drum roll…

The winner of The Refashioners 2017  is…..

The Refashioners 2017 - ToyaIn the end we were so impressed with several elements of Toya’s make. The style and wearability. The versatility of each of the pieces to be worn separately or  in combination with eachother. The number of garments squeezed out of one suit is seriously impressive in itself and the overall quality of fit and finish…The Refashioners 2017 - ToyaThe Refashioners 2017 - Toya

There’s something here for  everyone to take inspiration from.  No matter what your sewing level at least one of these will be achievable.  More advanced sewers might tackle the jacket….but equally a pencil skirt is achievable at any skill level. There’s a  combination of complexity and simplicity between these three pieces that is truly inspiring no matter your sewing level. And in the end that is what The Refashioners is about. Inspiring as many people as possible to give refashioning a try.

Toya didn’t stop there though….she’s also responsible for this adorable mini collection all made from a single dyed linen suit that was covered in stains and had seen better days. Another stunning  and inspiring transformation…The Refashioners 2017 - community challenge entriesThe Refashioners 2017 - community challenge entries


So there’s our winner!! Thoroughly deserving I hope you agree!!

But there are 2 other entries that deserve recognition. Both very popular. Both clever and skilled and inspiring in different ways.

Firstly Liesl. Huge amount of work and detail has gone into this and a very close call for winning overall….The Refashioners 2017 - challenge entries


Secondly, Kate’s dress is such a clever and creative use of panelling and piecing and the shoulder details painstakingly assembled from tiny strips of fabric and piping are such an creative and subtly showstopping feature…The Refashioners 2017 - community challenge entries (3)

Both Liesl and Kate will receive a £50 voucher to spend at Minerva Crafts and £25 to spend with Fiskars.  Awesome job ladies!

Blown away once again by the creativity on display in our amazing sewing community.  I think I’ve really put people through the wringer with this year’s theme! if it’s any consolation….next year….might be slightly different…..and arguably much easier…probably  😉

For now, thank you to all the bloggers that kick started this series, to all the official and prize sponsors for the series, and most importantly, YOU! Another year. Another awesome series of The Refashioners. Nailed.


refashioning, the refashioners, The Refashioners 2017

The Refashioners 2017 – 1 week to go!

10/25/17

Actually it’s a little under a week! The community challenge for The Refashioners 2017 closes for entries at midnight GMT/UK time on Tuesday 31st October. (Just check out that prize!!) It really isn’t too late to get your entry in. Just keep it simple! Often those are the best kind of refashions. Seriously!

If you’ve got your suit unpicked but struggling for direction and inspiration check out all the blogger makes from this years series, our pinterest board, instagram and facebook.

Here’s a few of the community challenge entries so far to inspire and delight!! (Click the link below the image for more details).

The Refashioners 2017 - community challenge entries (3)Source.

The Refashioners 2017 - community challenge entries Source.

The Refashioners 2017 - community challenge entries The Refashioners 2017 - community challenge entries Source.

The Refashioners 2017 - community challenge entries

Source.

The Refashioners 2017 - community challenge entries

Source.

The Refashioners 2017 - community challenge entries Source.

The Refashioners 2017 - community challenge entries Source.

The Refashioners 2017 - community challenge entries Source.

So….If you fancy getting your entry in, chop chop!! There are loads of other intriguing WIPS appearing in my feed that I am itching to see final photos of!! Like seriously exciting ones. You are really refashioning up a storm out there guys!! So exciting! There is still time….

  • Check out our pinterest board for inspiration
  • Check out the amazing prize package (yes you could win all that!)
  • Go grab a suit and dive in!

The Refashioners 2016 - Huge Prize Package

….If you haven’t familiarised yourself with what the actual challenge is yet, essentially we want you to refashion an old, unworn or unloved suit! Simple as that! What counts as a suit you say? Definition here! (See also previous comments!)

The Refashioners 2017 - Prize Package

Man’s suit. Ladies suit. Suit jacket on it’s own. Doesn’t matter.  Interpret how you see fit. If you’re breathing new life into something “suity” that would otherwise go unworn or be thrown away, THAT’S what counts.

BUT, if you want to be in with a chance of winning one of these amazing prize packages you’ll need to SHARE that refashion with us in one of the following ways:

  • On Instagram: Share a pic using the hashtags #therefashioners2017  and #suitsyou
  • On Facebook: There is a community board here where you can post your makes (You will need to request an invite to join)

Only entries shared via the above 2 methods will be entered into the competition. Closing date for entries is 31st October 2017 Midnight GMT.

Good luck!!! Get refashioning.

Oh and by the way…The Refashioners is going on the road this November!! If you fancy attending our very first “in person” workshop in London on 4th November….full deets here!!


Newer Posts
Older Posts
Portia
Follow
Sewbox

© Copyright 2026. Portia Lawrie. All Rights Reserved. Managed by WordPress Web Dev Cornwall .