• About
    • Contact
    • Press
    • Sponsor
  • DIY
    • Home & Garden
    • Jewellery & Accessories
    • Yarn Crafts
  • Sewing
    • patternless & self drafted
    • Refashions
    • Commercial Patterns
    • Sewing Tips
    • Overlockers
  • The Refashioners

Portia Lawrie

DIY, jewelry, refashioning, the refashioners, the refashioners 2013, Thrifting, Tutorials

The Refashioners 2013 – Me!

06/16/13

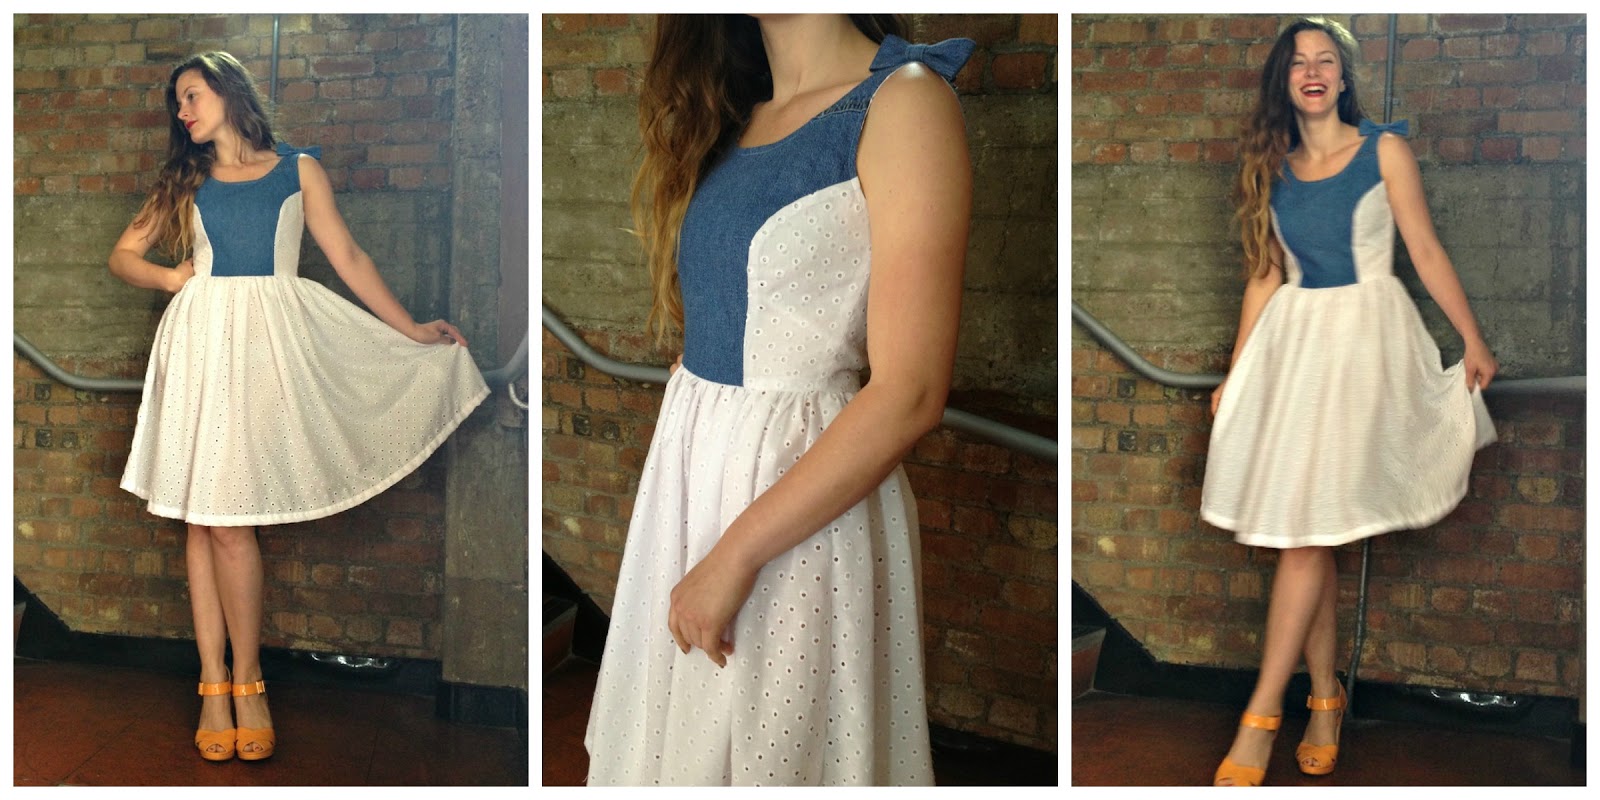
Well peops…today is the 11th and final instalment of The Refashioners 2013! I don’t know about you, but the past fortnight of guest posts from some of the blogosphere’s most talented and ingenious stitchers has left me gobsmacked and inspired in equal measure. It’s been an honour to host these ladies here on my little ole blog and I’ve been so gratified by all the hard work that they’ve put in, AND the fantastic response the series has received from all of you out there in blog land.

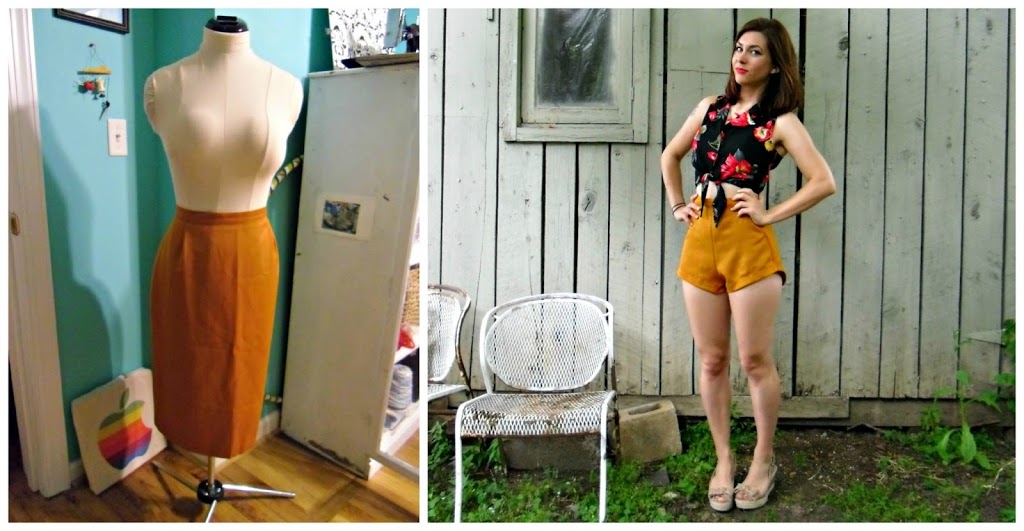
But just in case any of you were under the illusion that I had managed to side step my own challenge and sit back while the others racked their brains as to what to do with the items I sent them….fear not! Sally very kindly sent me my very own little mystery package to transform; and my jaw kinda hit the floor when I saw what was inside! A rather showy little beaded number! This project was a challenge for me, not least because my “style” (if you can call it that!) has never been particularly showy or embellished. So what to do? How to incorporate all that beading in a slightly more subtle incarnation? Enter the “bumble bead” skirt!

Refashion Inspiration! Don't miss out on the new upcoming series of The Refashioners at www.portialawrie.co.uk

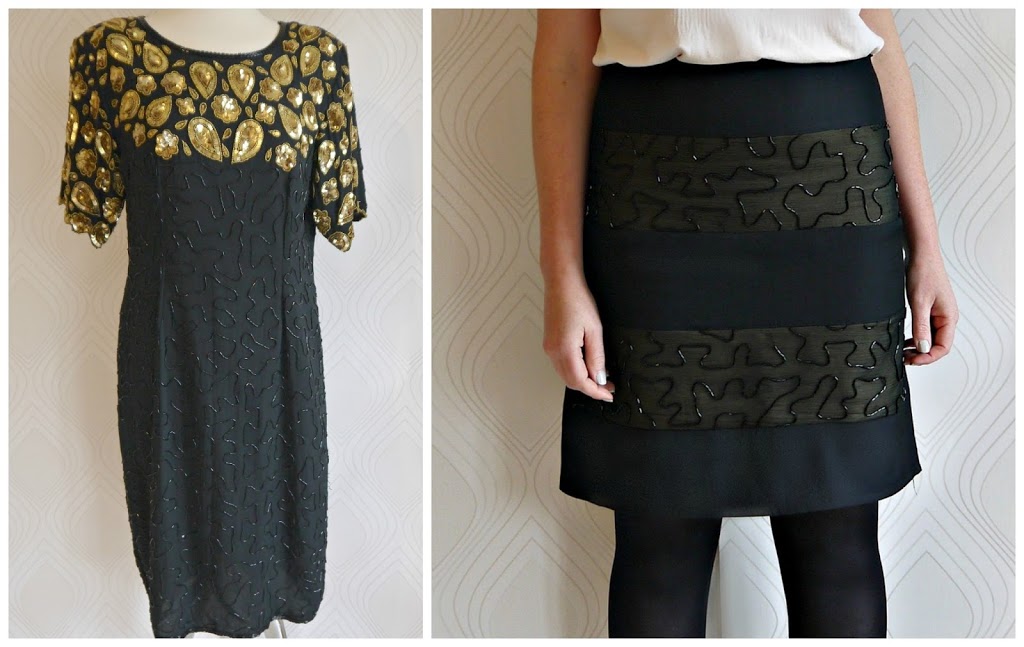
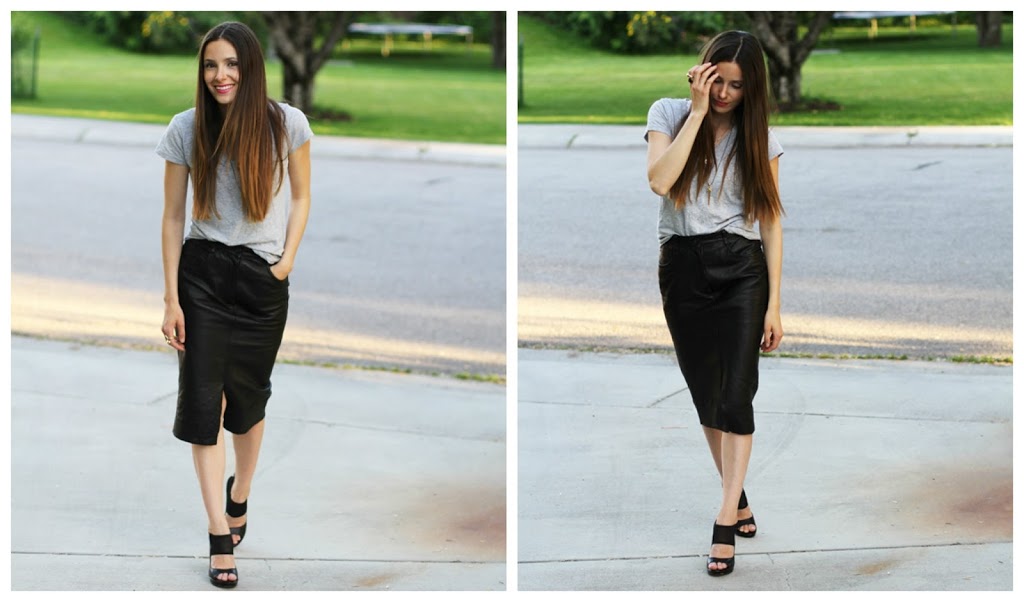
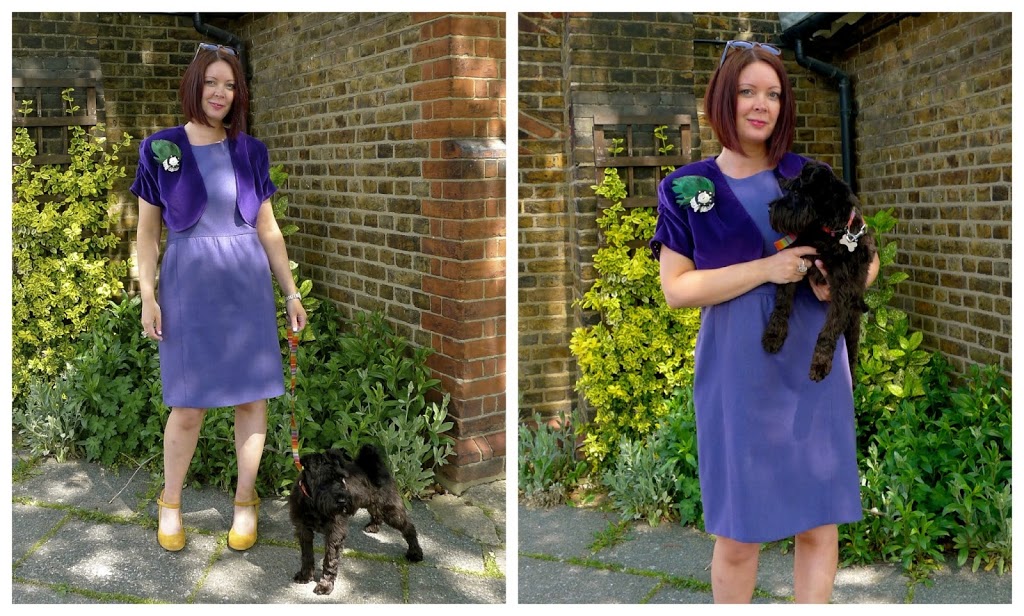
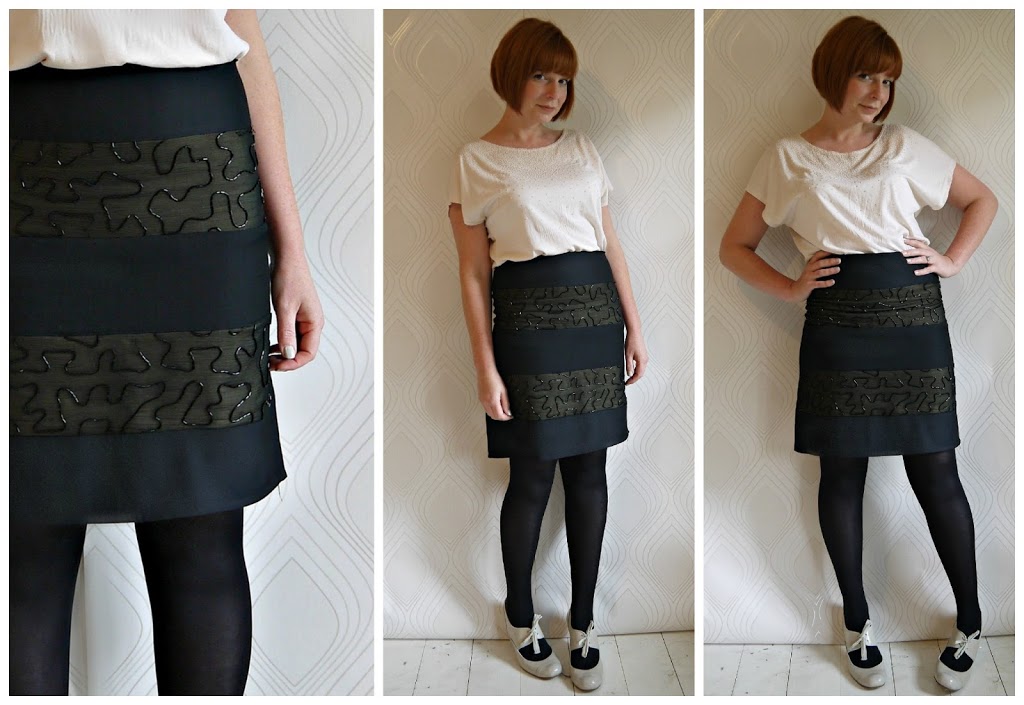
I’ve been inspired recently by colour and texture blocking. So I decided this was the perfect opportunity to try out an idea that’s been buzzing around in my head for a while. This outfit heralds a couple of rarities for me. Legs out, heels on, and much more dressy than my normal uniform. Although I feel a little at odds being “dressed up”, I’m rather pleased with the overall look, and the finished garment. The bugle beads lend themselves rather nicely to what feels like a kind of 20’s vibe with a modern twist…or is that just me??

Refashion Inspiration! Don't miss out on the new upcoming series of The Refashioners at www.portialawrie.co.uk

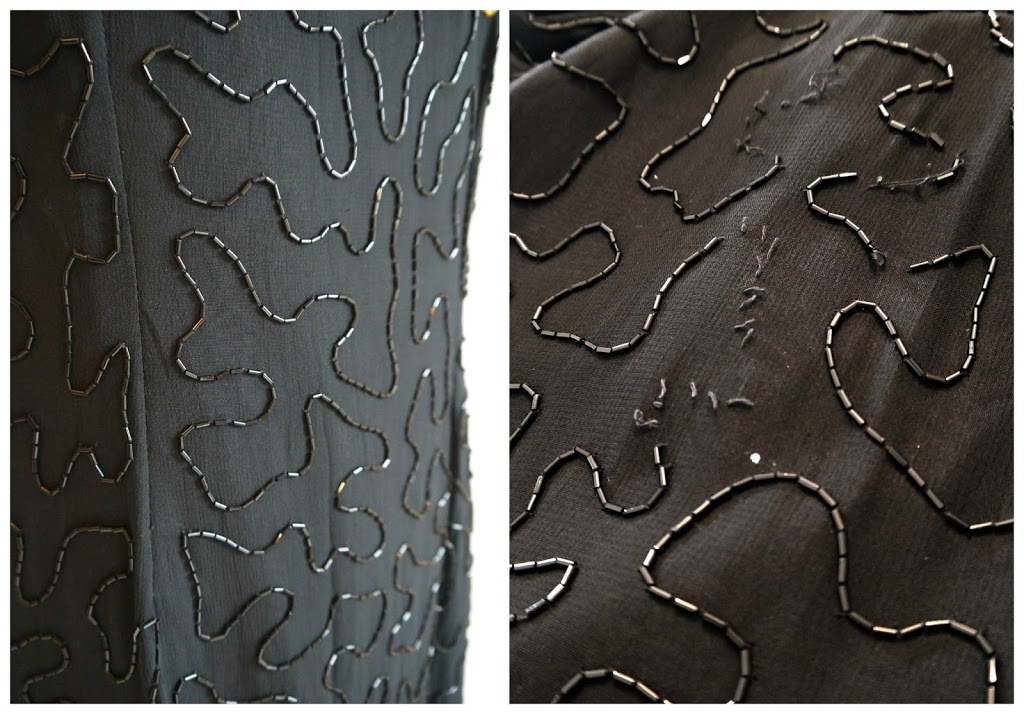
This garment had it’s technical challenges from the outset. The beads are sewn in a continuous undulating pattern onto a top layer of chiffon. The problem with this kind of embellishment is that once a thread snags/breaks…you’re likely to lose whole lengths of the beading. There were several “bald” patches (like the one below right) around the dress. Add to that the prospect of cutting and sewing across beads, and, well…let’s just say , I was nervous about this one! I wish I could have included audio with this post. So you could hear the sound of the pitter patter of beads hitting my sewing room floor at pretty much every stage of this make….

Refashion Inspiration! Don't miss out on the new upcoming series of The Refashioners at www.portialawrie.co.uk

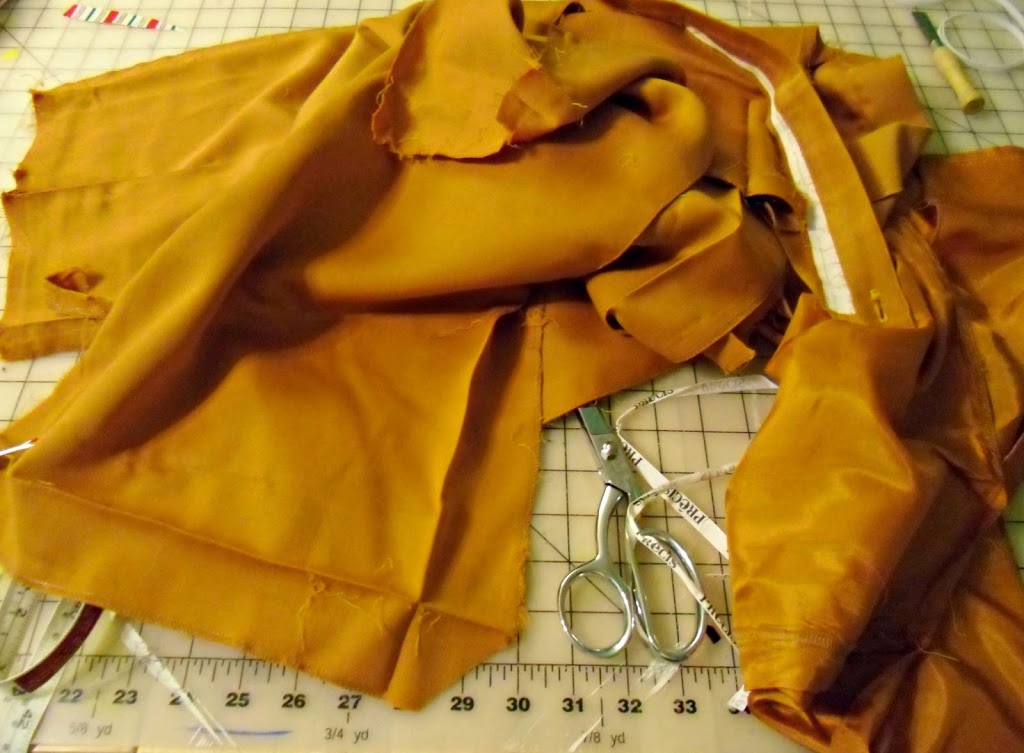
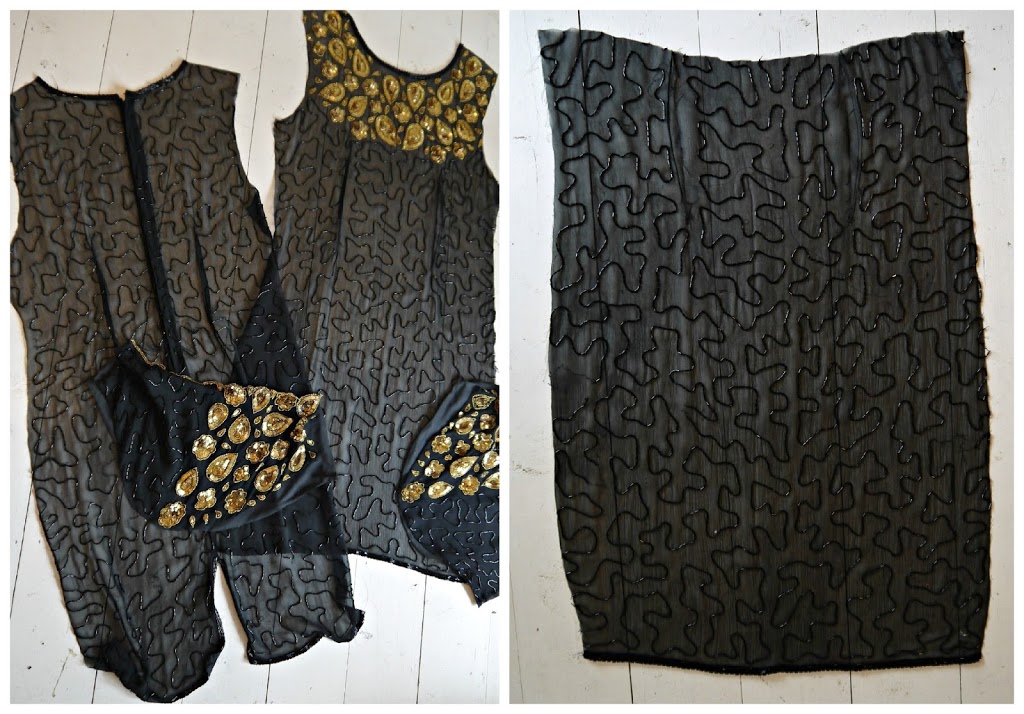
I decided to make a feature out of the beaded chiffon. So my first step was to deconstruct the dress(below left), remove the lining (set aside for later!) and  figure out what workable pieces of chiffon I had. In the end it was the front panel that gave me the most options because most of the beading was intact and it was the largest piece of beaded fabric uninterrupted by seaming/zips etc (below right)…

Refashion Inspiration! Don't miss out on the new upcoming series of The Refashioners at www.portialawrie.co.uk

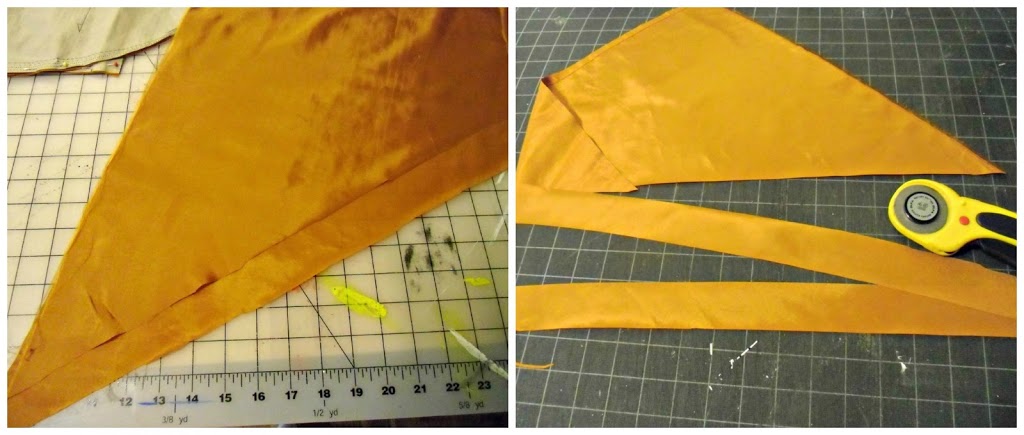
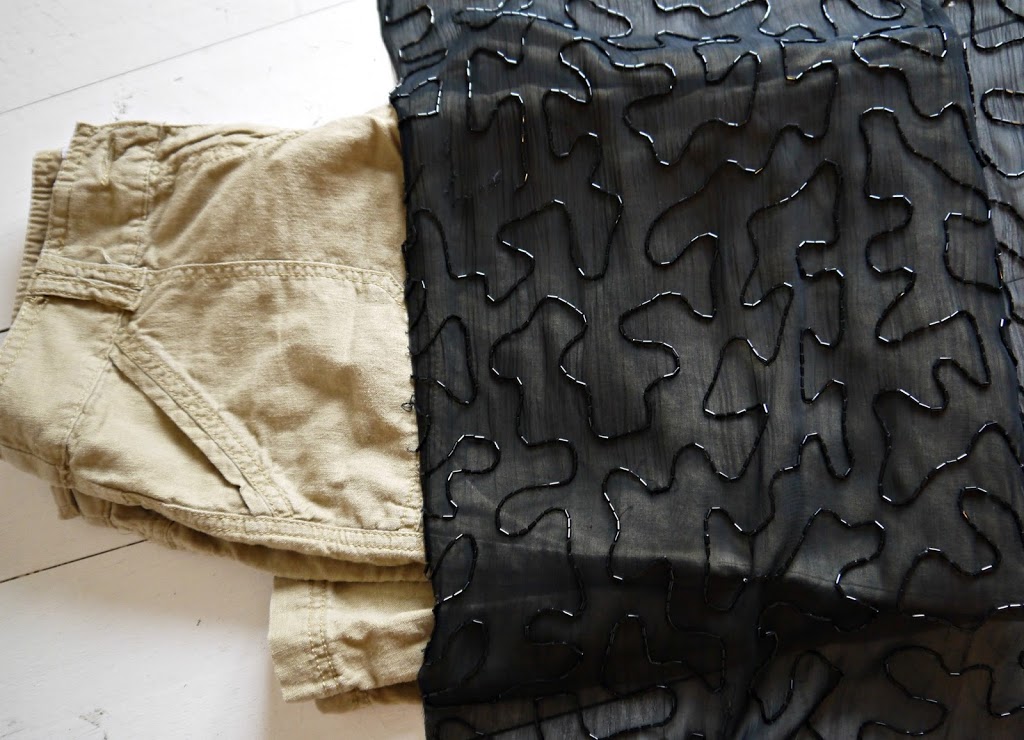
While I wanted to make a feature of the sheer fabric…I didn’t want it to be see through. So I nabbed a pair of sandy coloured linen trousers from my refashioning pile to see how it would look as an underlining to the chiffon…that’ll do then!

Refashion Inspiration! Don't miss out on the new upcoming series of The Refashioners at www.portialawrie.co.uk

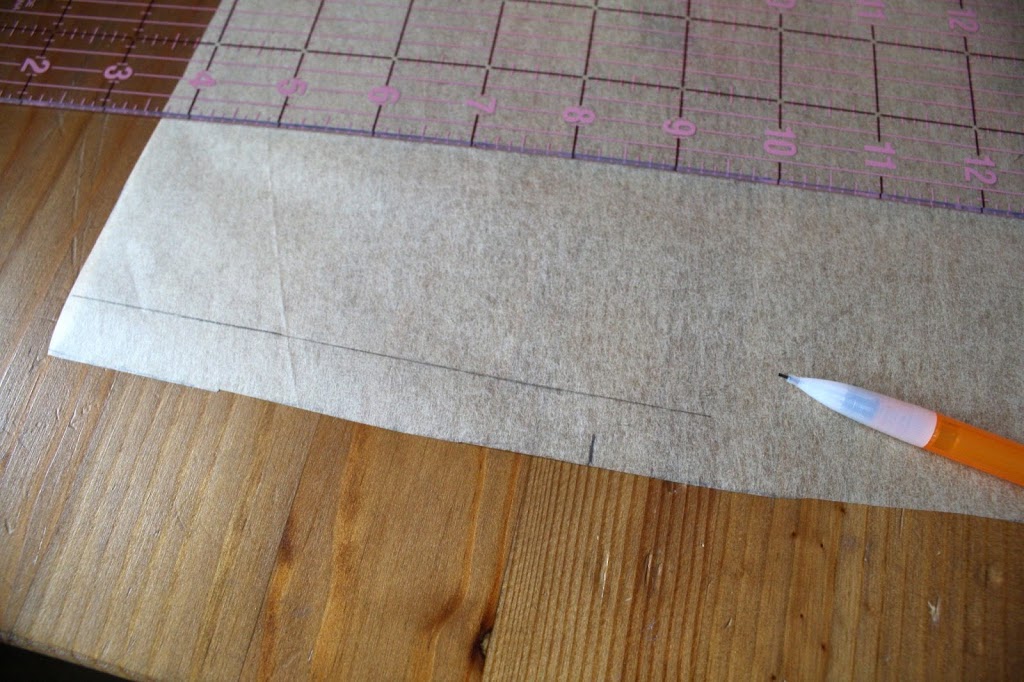
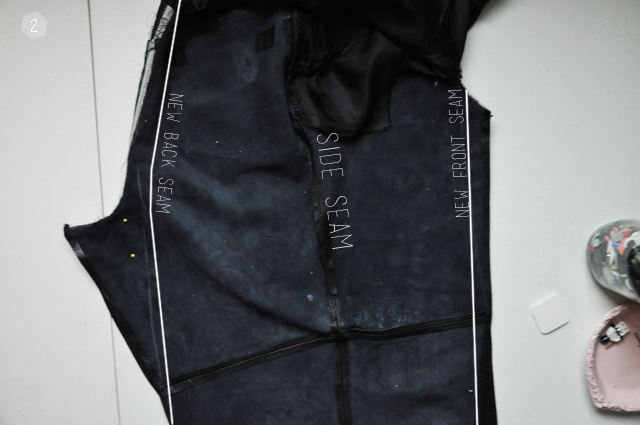
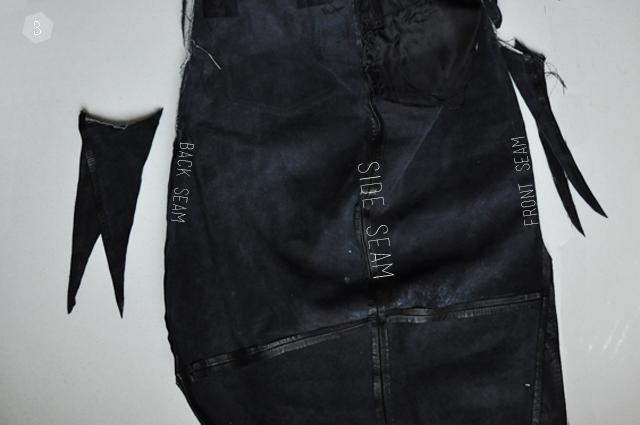
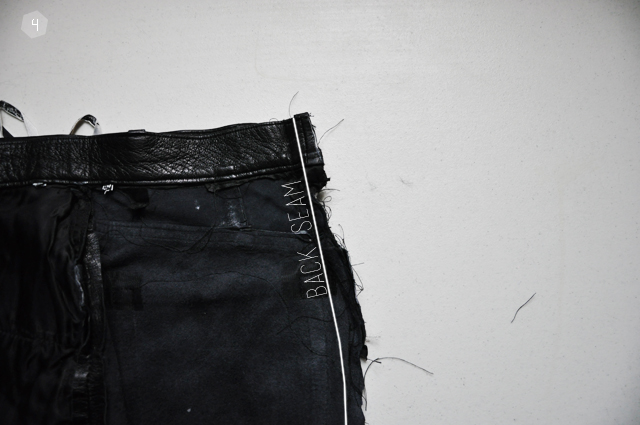
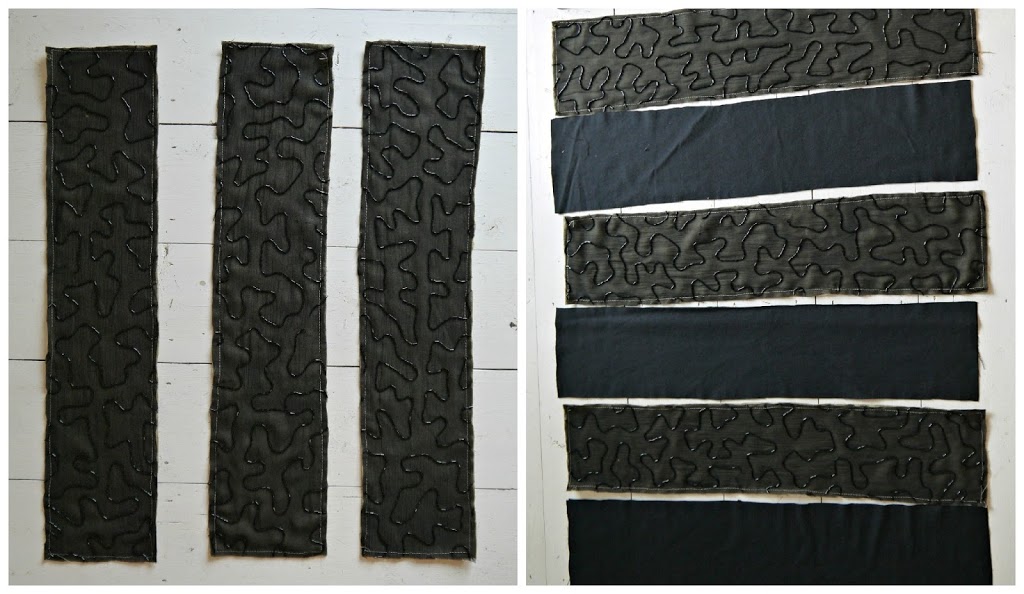
From one of the trouser legs I set about making my panels. After cutting along all of the side seams I was left with 2 large oblongs. I folded then in half lengthwise and squared off all the edges….

Refashion Inspiration! Don't miss out on the new upcoming series of The Refashioners at www.portialawrie.co.uk

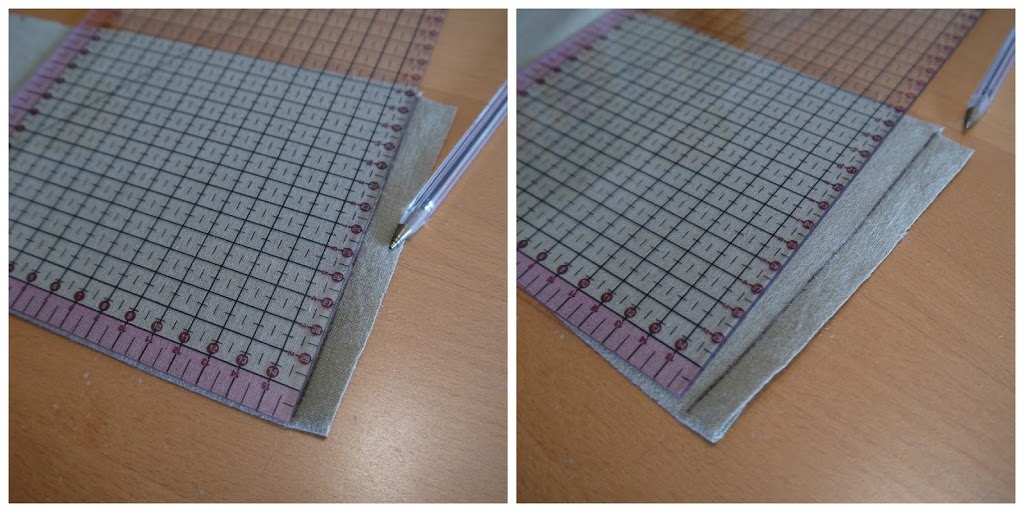
Cut along my squared off lines and then along the fold…

Refashion Inspiration! Don't miss out on the new upcoming series of The Refashioners at www.portialawrie.co.uk

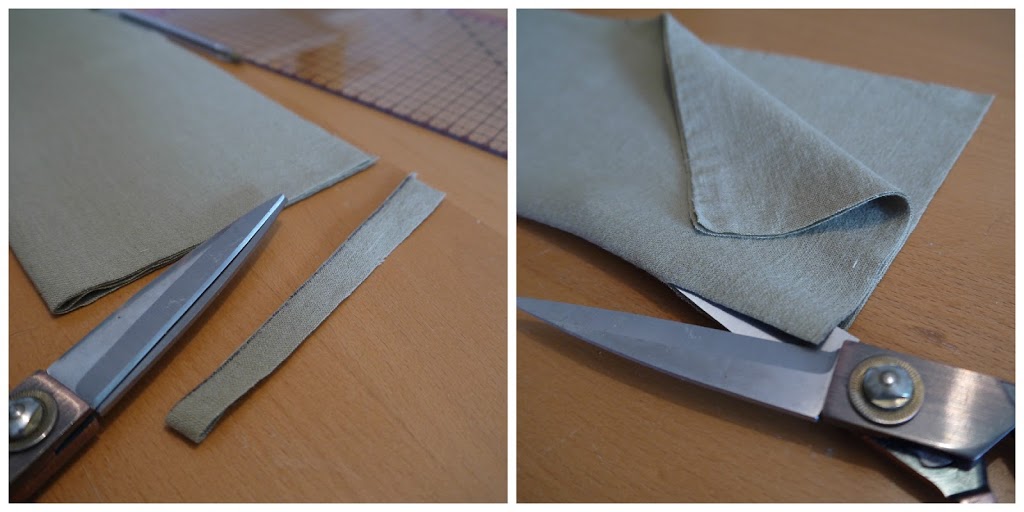
This gave me 4 linen panels…(in the end I only used 3)…

Refashion Inspiration! Don't miss out on the new upcoming series of The Refashioners at www.portialawrie.co.uk

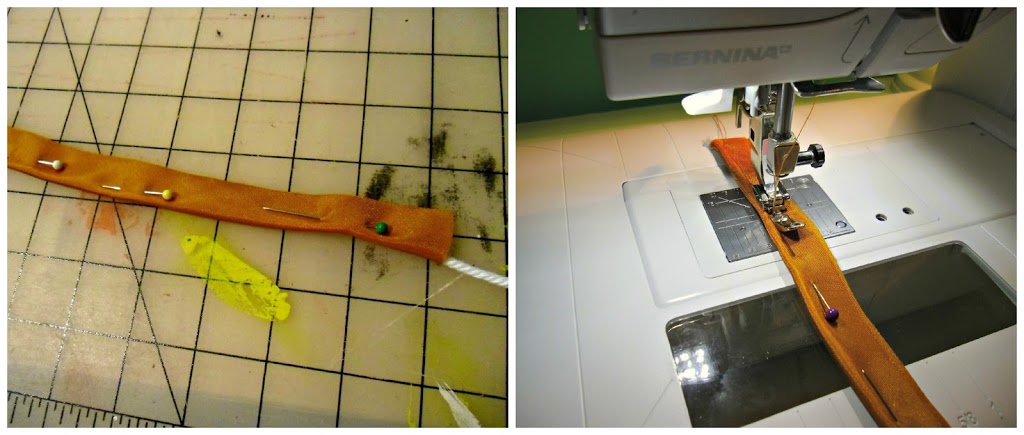
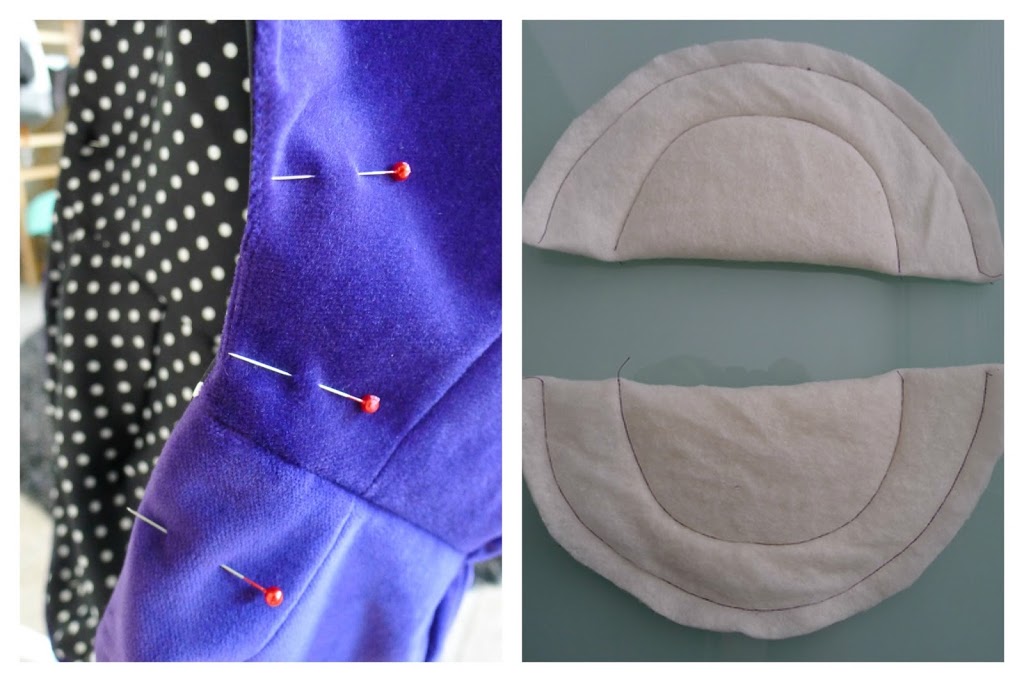
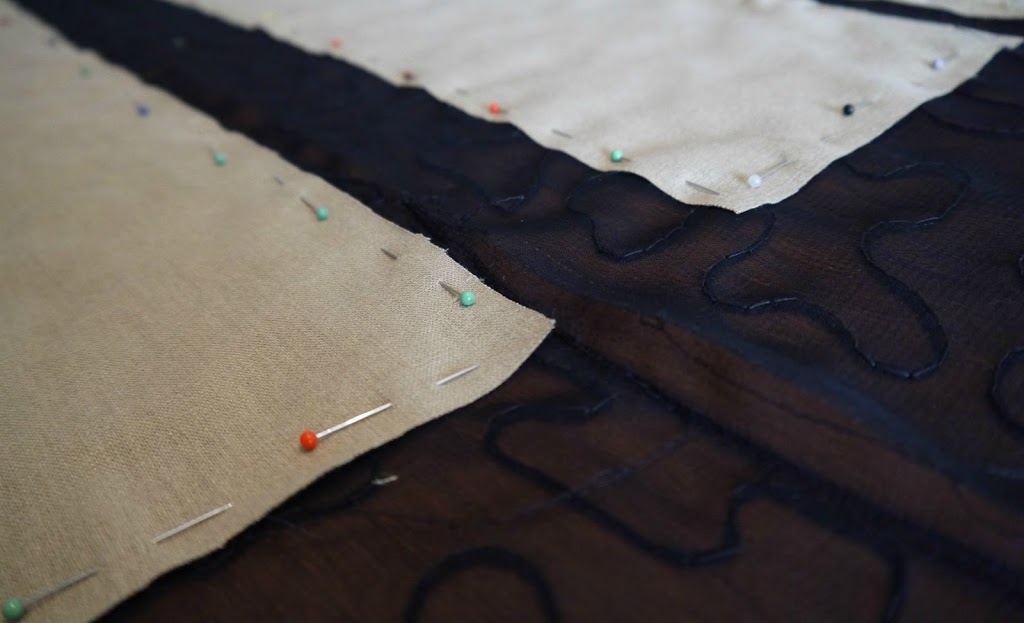
I pinned these to the underside of my beaded chiffon…

Refashion Inspiration! Don't miss out on the new upcoming series of The Refashioners at www.portialawrie.co.uk

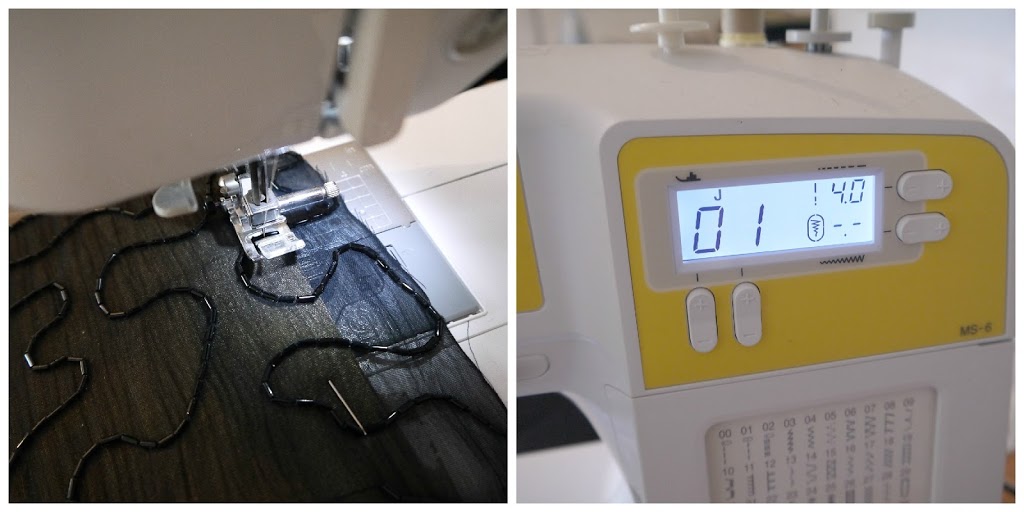
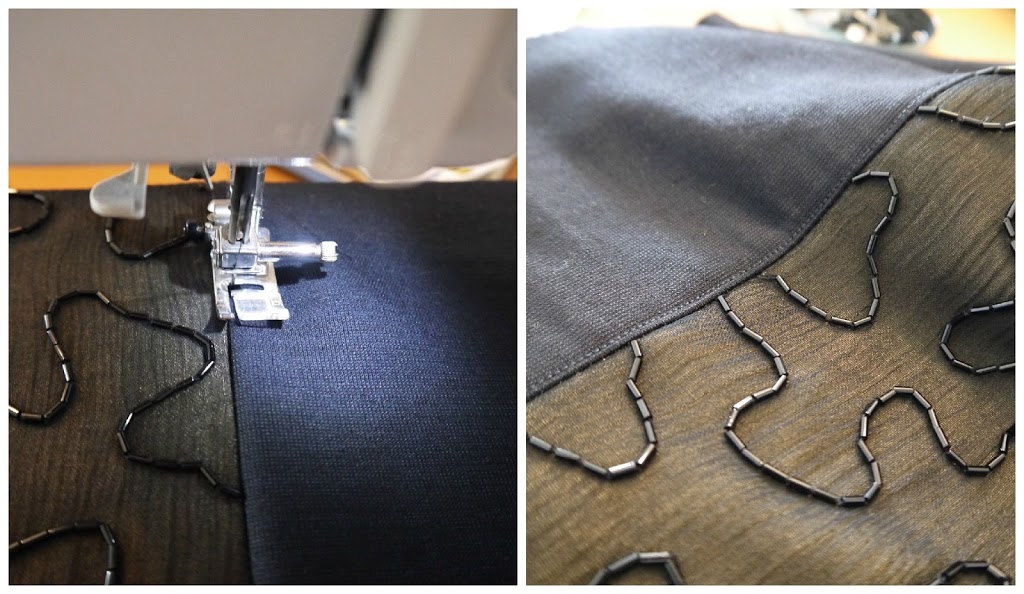
Now to stitch the underlining panels to the chiffon. I opted to sew with the beads facing upwards because a) I didn’t want the beads  getting ground up or falling into the feed dogs of my machine, and b) I could better see what I was doing. If the needle hits those beads at the wrong speed/angle then the needle is history and/or you have bits of glass bugle bead shattering everywhere. (Just trust me, ok!) I opted for a long stitch to give the needle a better chance of skipping over the beads rather than through them. For the most part, this strategy works. (Only one broken needle) But, GO SLOW! Very, very, very slow…and watch the needle on every downstroke. If it looks like it’s gonna hit, stop, lift the presser foot and adJust the position of the fabric oh so slightly, then carry on….

Refashion Inspiration! Don't miss out on the new upcoming series of The Refashioners at www.portialawrie.co.uk

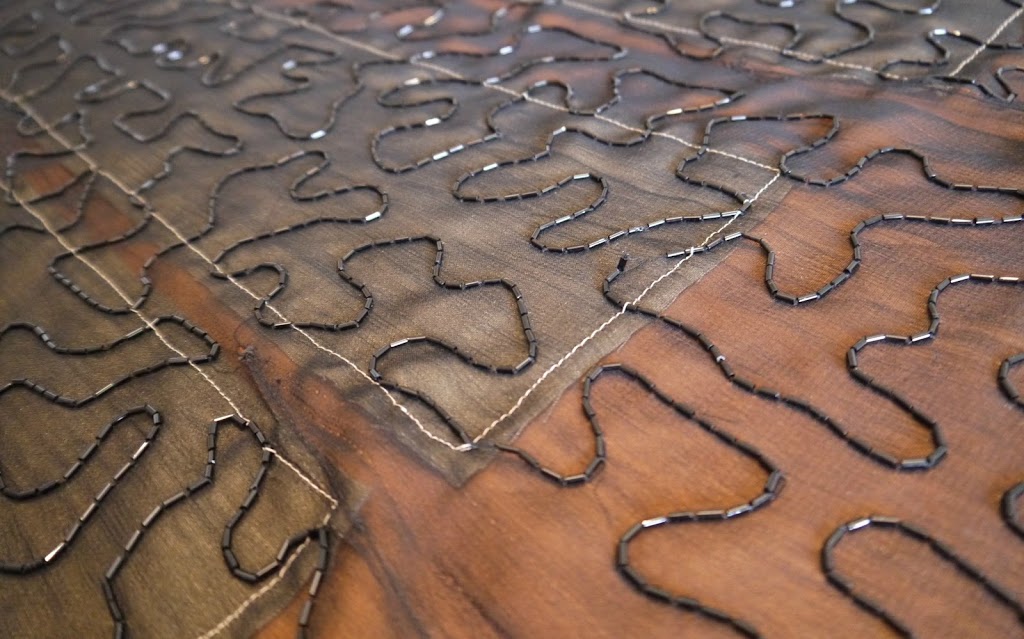
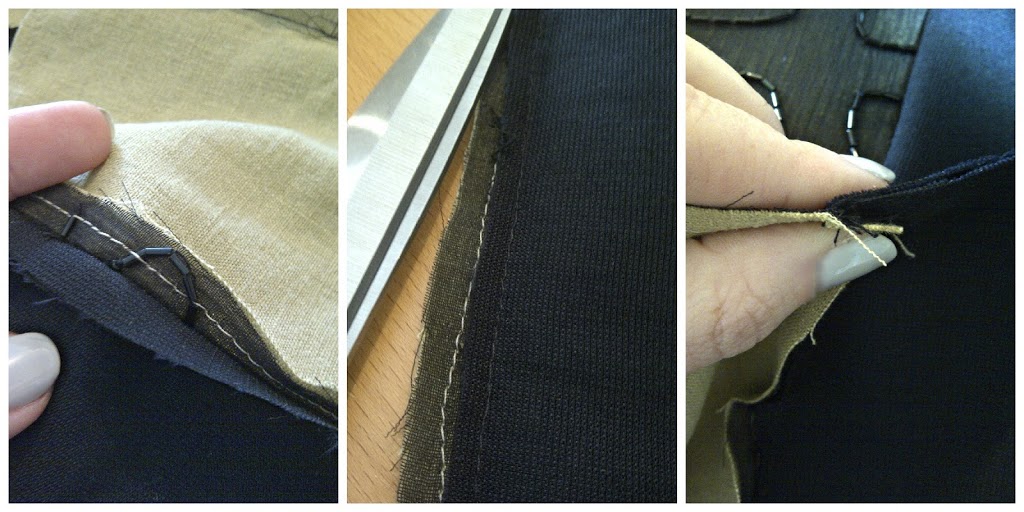
Voila, underlining stitched to beaded chiffon…

Refashion Inspiration! Don't miss out on the new upcoming series of The Refashioners at www.portialawrie.co.uk

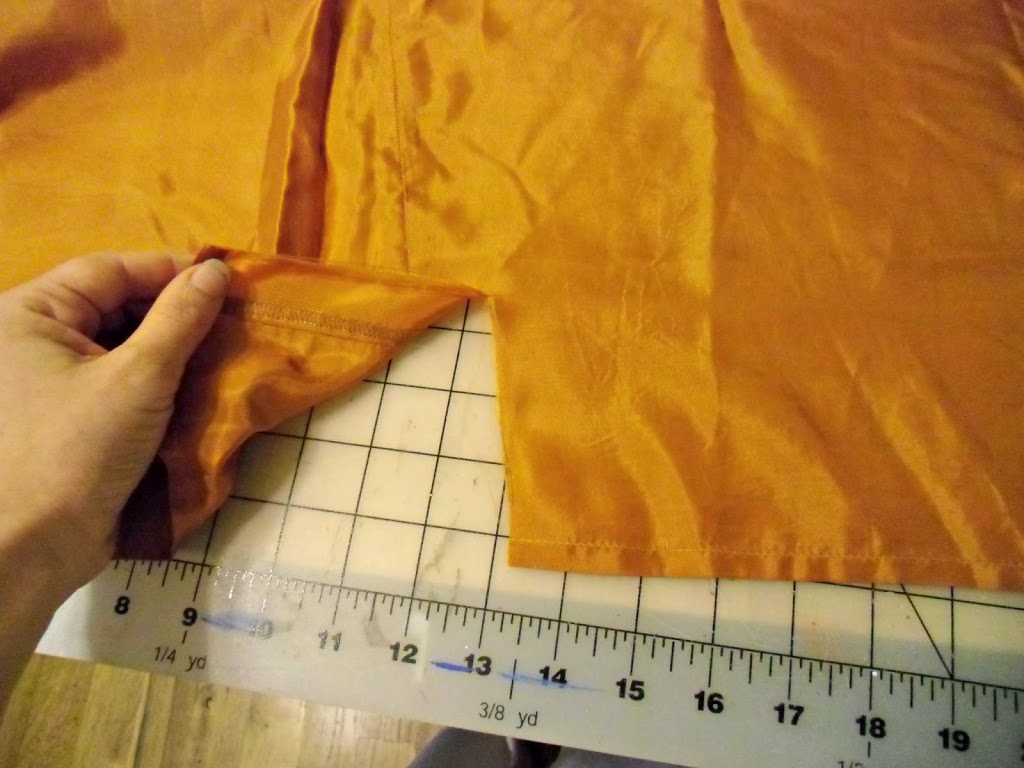
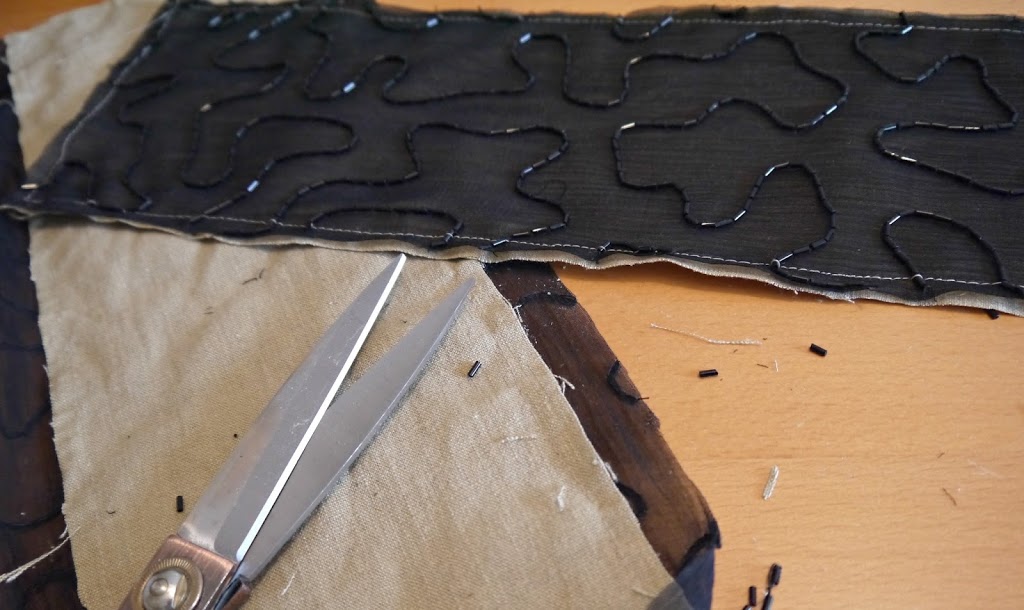
Trim close to stitching. It was tricky to cut this as every inch or so my lovely (once sharp) dressmaking shears would snag on a bead (man it sets your teeth on edge when stainless steel crunches on glass beads!). So again, it was a slow process, adjusting the angle of the cut ever so slightly to avoid the beads…

Refashion Inspiration! Don't miss out on the new upcoming series of The Refashioners at www.portialawrie.co.uk

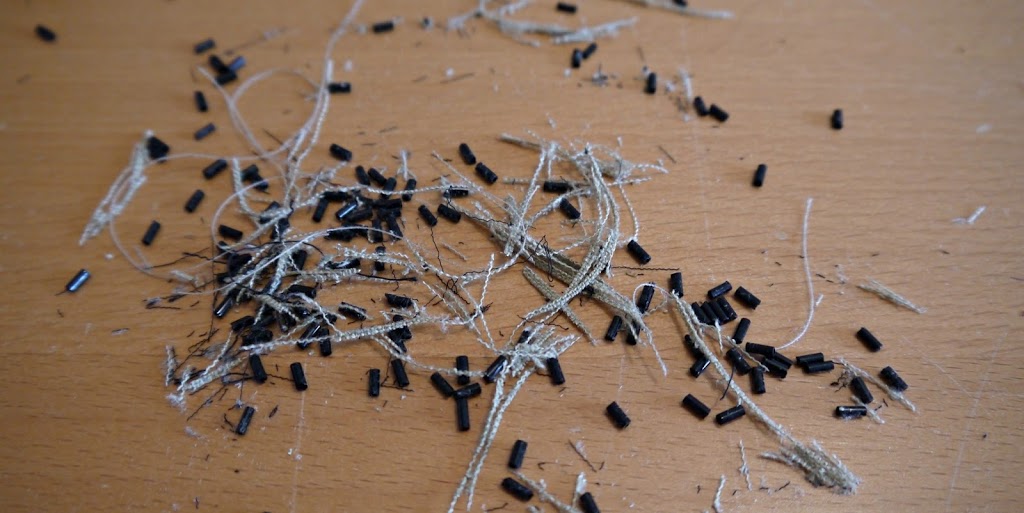
My floor is covered in this stuff!

Refashion Inspiration! Don't miss out on the new upcoming series of The Refashioners at www.portialawrie.co.uk

Anyway, finally 3 underlined panels (below left) I then cut contrasting solid black panels from some plain black fabric in my stash….

Refashion Inspiration! Don't miss out on the new upcoming series of The Refashioners at www.portialawrie.co.uk

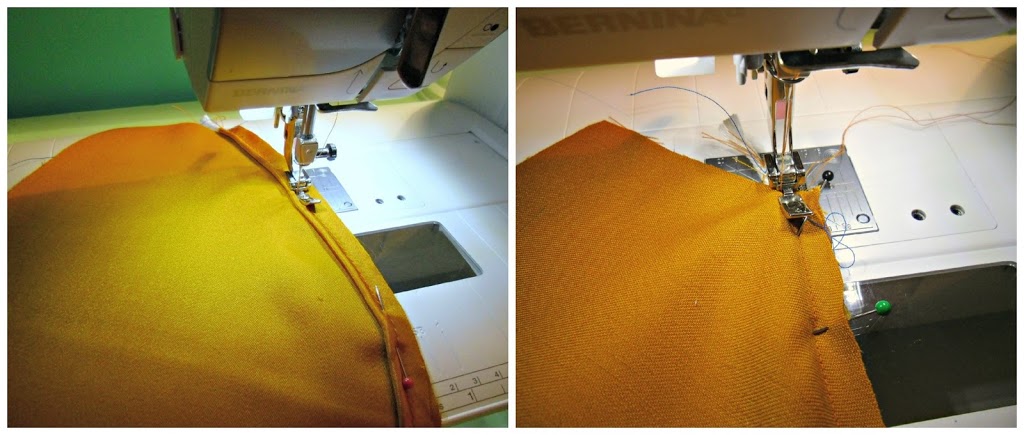
Then sewed them all together, much as you would a patchwork, again using a long stitch. However a long stitch will not hold this skirt panel together for very long and the seams look all puffy, right? ‘Cos I can’t press those puppies properly because of those pesky beads, you see?! Sooooo…..

Refashion Inspiration! Don't miss out on the new upcoming series of The Refashioners at www.portialawrie.co.uk

I removed all of the beads that fell within the seam allowances on each panel (left), graded the seams (middle) then flipped the seam allowances away from the beaded sections…

Refashion Inspiration! Don't miss out on the new upcoming series of The Refashioners at www.portialawrie.co.ukRefashion Inspiration! Don't miss out on the new upcoming series of The Refashioners at www.portialawrie.co.uk

Becauce there are no beads under the black piece now, I can topstitch with a normal stitch length (below left) which reinforces the seams and allows the edges to sit flat and flush instead of puffing up (below right)….

Refashion Inspiration! Don't miss out on the new upcoming series of The Refashioners at www.portialawrie.co.uk

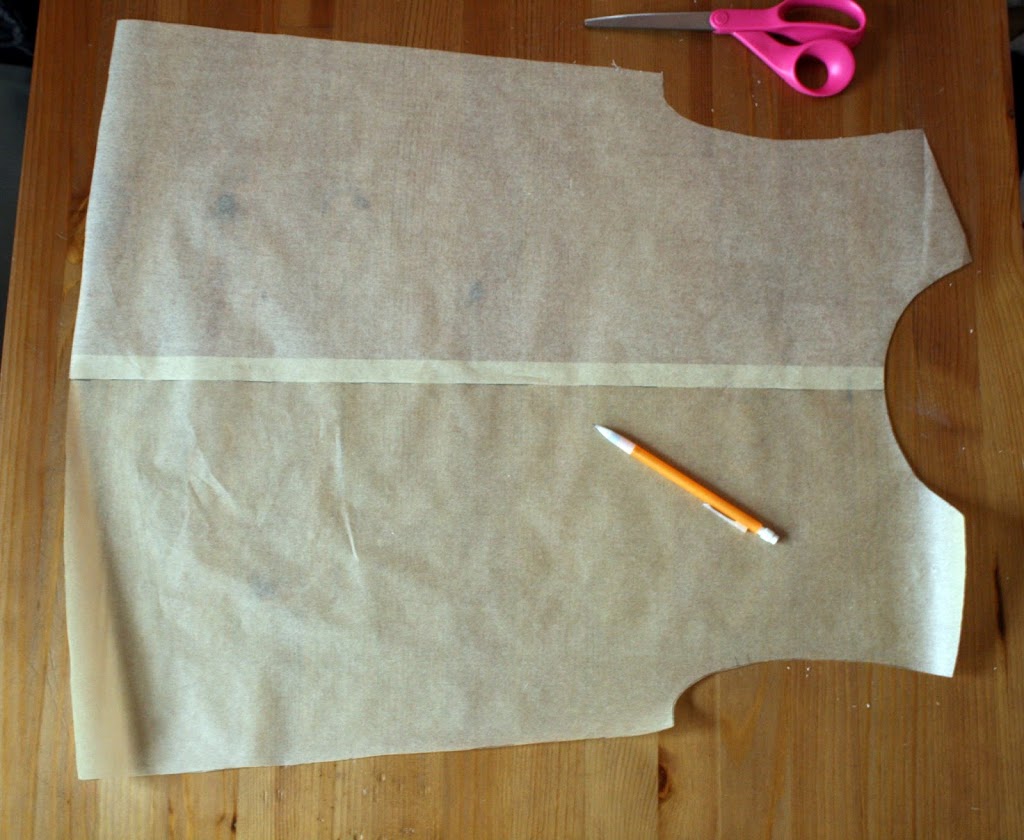
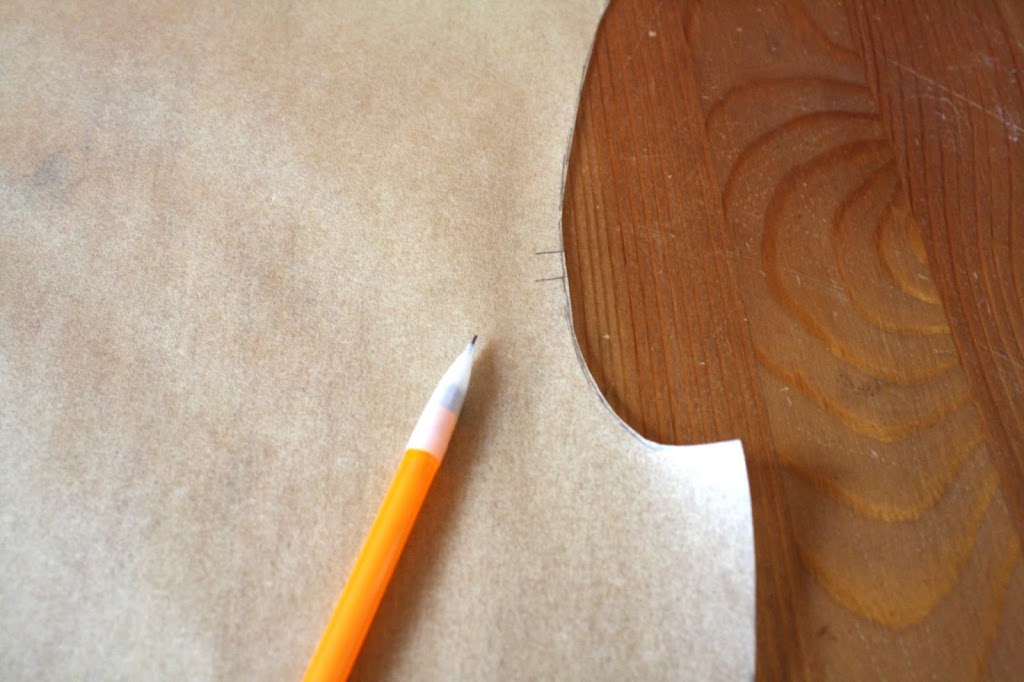
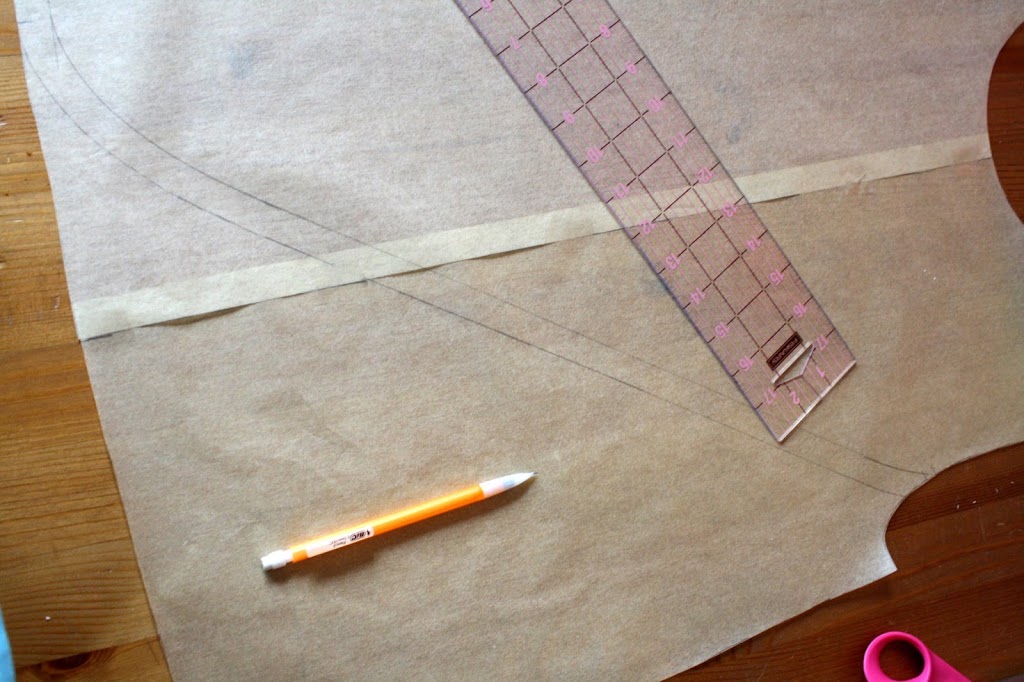
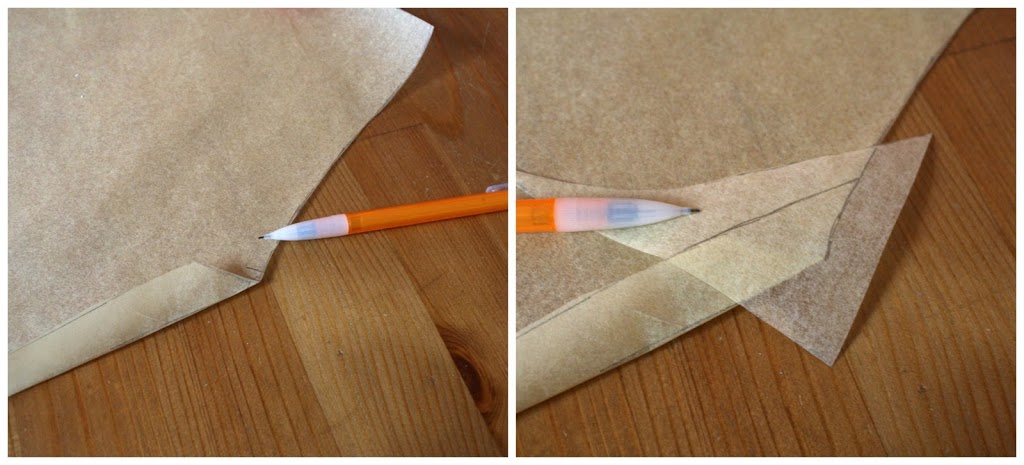
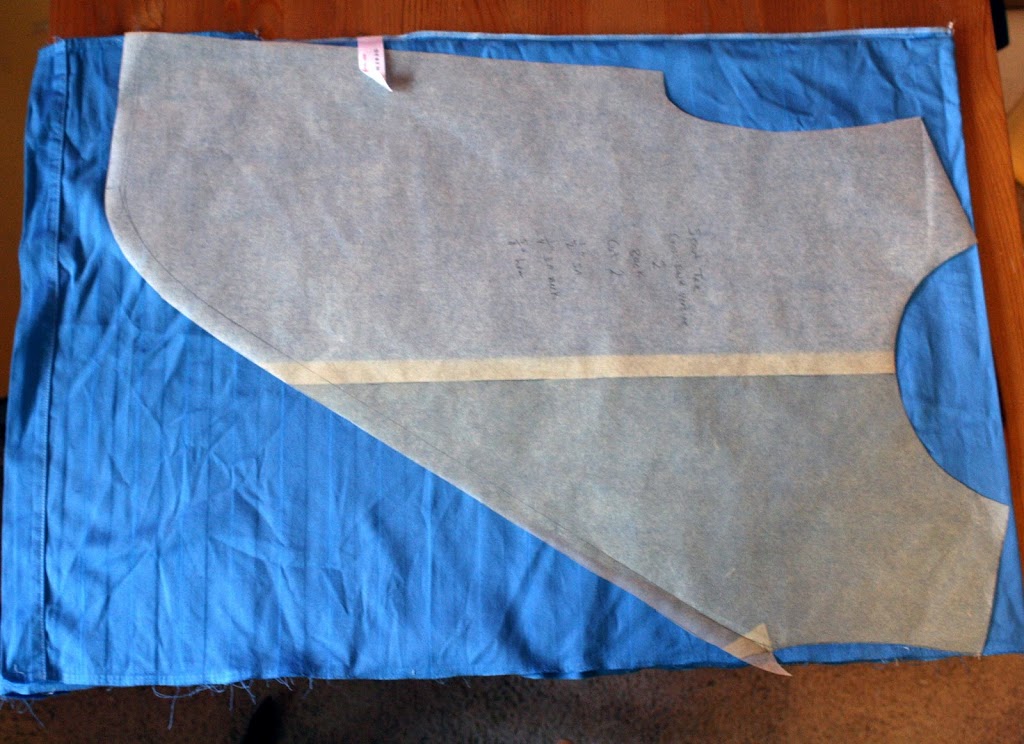
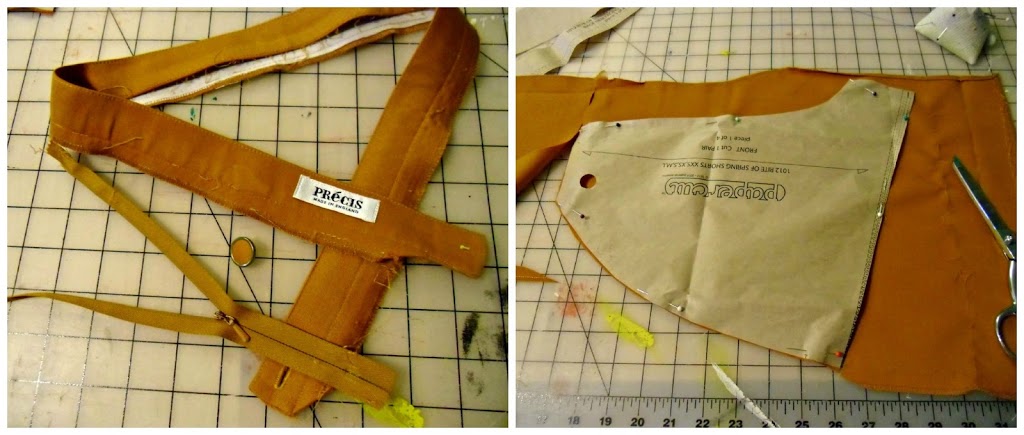
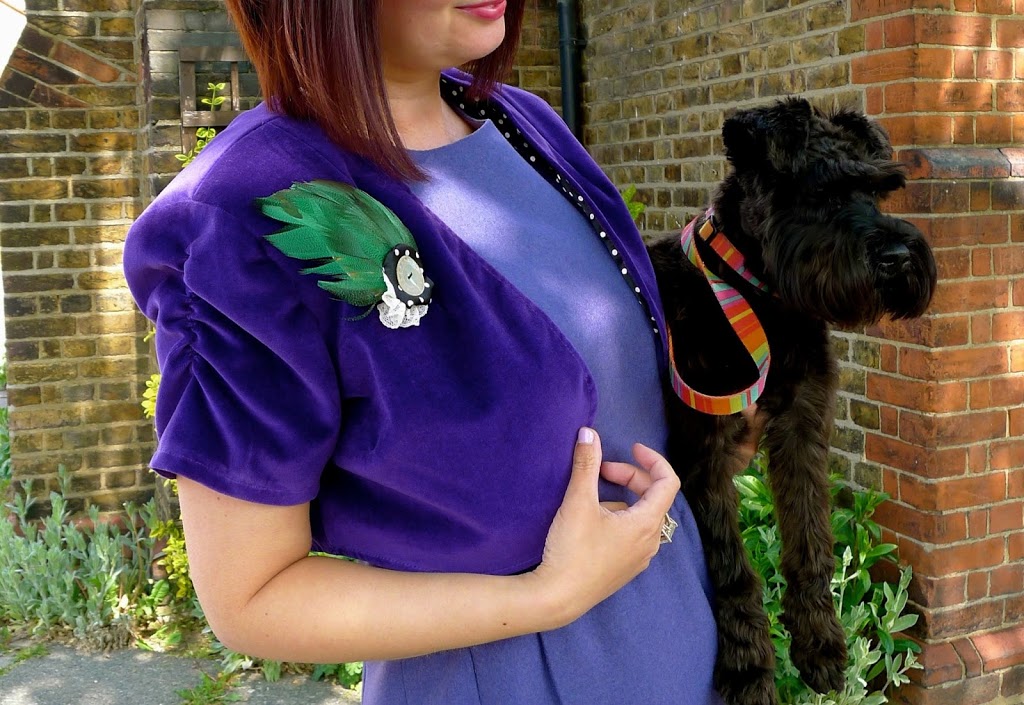
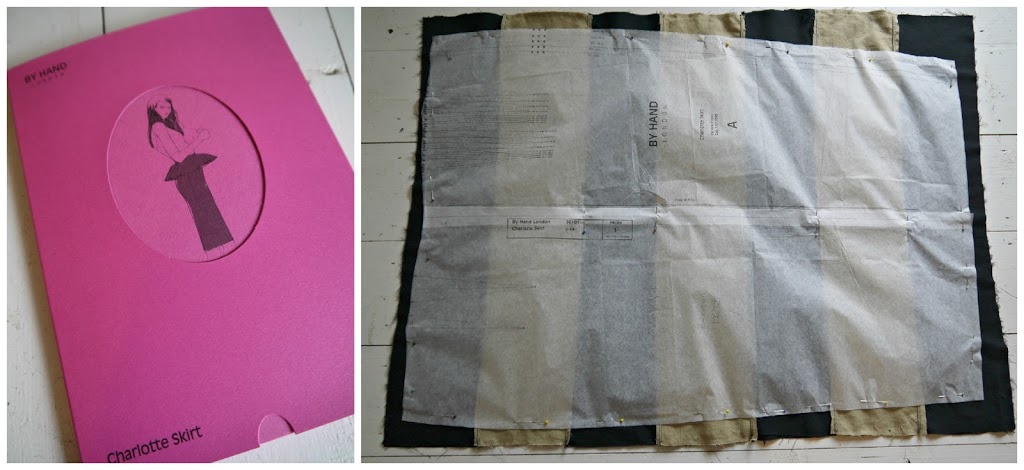
Phew! I now had what was basically a flat piece of fabric to work with. Enter the Charlotte Skirt pattern. I simply cut my front piece from my panelled piece of fabric. (That’s the reverse you can see, with the linen backing. Looks even more like a bumble bee!) The back pieces I cut from more of the plain black fabric…

Refashion Inspiration! Don't miss out on the new upcoming series of The Refashioners at www.portialawrie.co.uk

One sticking point was that the darts on the panel overlapped onto the beaded section. I wasn’t going to be able to dart the beaded section. B*****ks! Well, as luck would have it the fabric I was using had some stretch. So I just sewed the skirt as normal without the darts in front, then pinned it to fit at the waist/side seams…..worked just fine!

Refashion Inspiration! Don't miss out on the new upcoming series of The Refashioners at www.portialawrie.co.uk

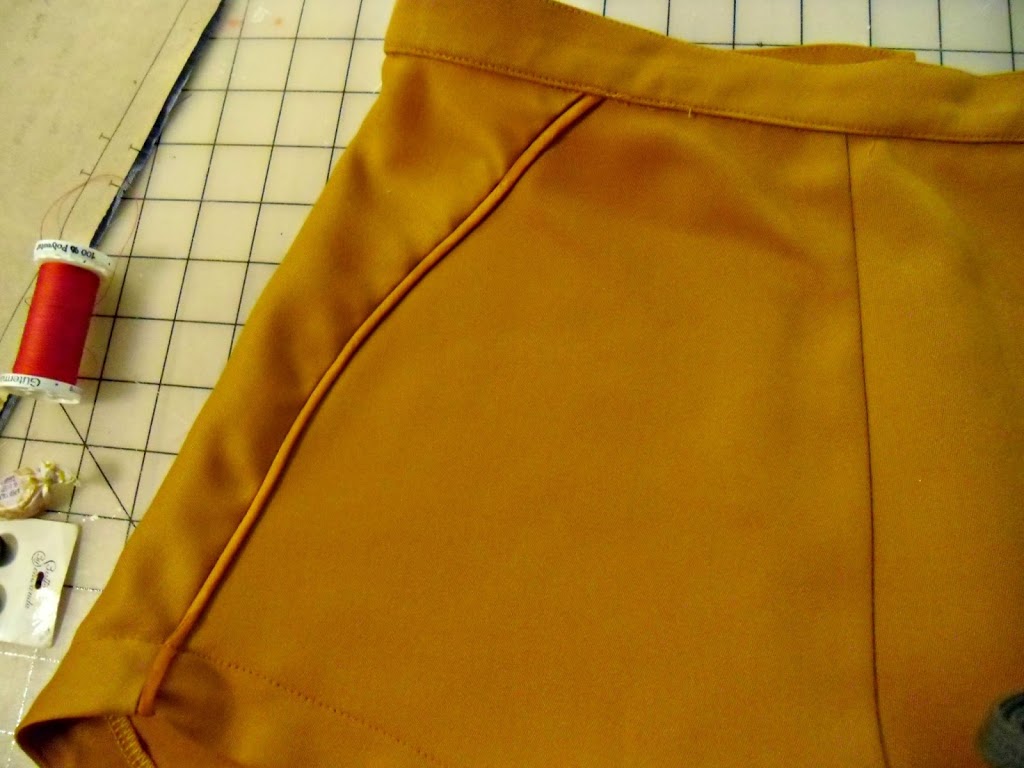
The rest of the construction was as per the pattern apart from the waistband, which I faced with grosgrain ribbon. (Just find a faced waistband more comfy). I used the original zip by shortening it and then hand picked it. (I don’t think I’ll ever machine a zip in since discovering the hand picked method early on in my sewing journey). The side seams received the same topstitch treatment as the panels. I also used the lining from the original dress to line this baby. The eagle eyed might notice that there are only 2 beaded panels in the final skirt as opposed to 3. Well, in the end, when it came to it, the length just looked totally wrong. Like AWFUL. It just hit at the wrong spot on my calf. It was only a matter of an inch or so to make it right. But if I had just taken up the bottom black band by that, then the panelling effect would have been completelyout of balance. Taking it up to the next panel would’ve meant hemming over beads! Ack!.So I just lopped the bottom 2 panels off, et voila!

Refashion Inspiration! Don't miss out on the new upcoming series of The Refashioners at www.portialawrie.co.uk

Essentially I created the blocked front section using patchwork techniques; just in straight panels instead of squares/triangles etc. This technique can be employed to create your own unique piece of flat fabric using scraps/sections from any number of garments. Once you have your flat piece of fabric you can just go ahead and cut your pattern piece as if it were any other piece of fabric. When it comes to incorporating colour blocking into a commercial pattern, it seems to me to be a much more straightforward route to do it this way;  (make your colour blocked fabric first, then cut your pattern piece from it) as opposed to slicing your commercial pattern up into various pieces then tracing them and adding seam allowances, cutting all the fabric seperately then having to stitch it back together again. Don’t you think??

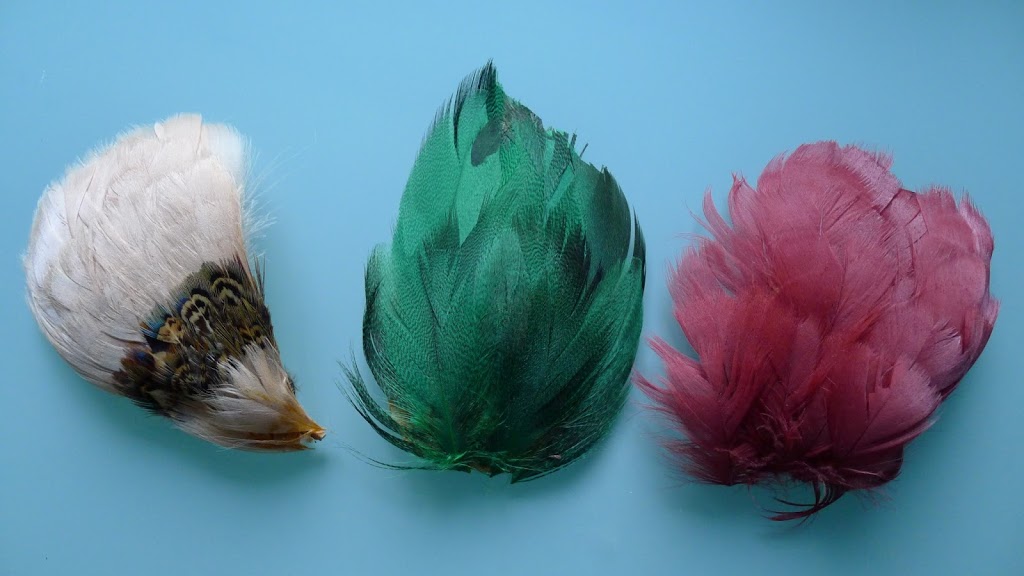
Anyways, I didn’t stop there. Some of you might be wondering about the rest of the dress? Well yes. Actually I did sit there and unpick all those beads over 2 evenings. Sad? Moi? Yup! What did I do with them? Ooooohhhhh…..
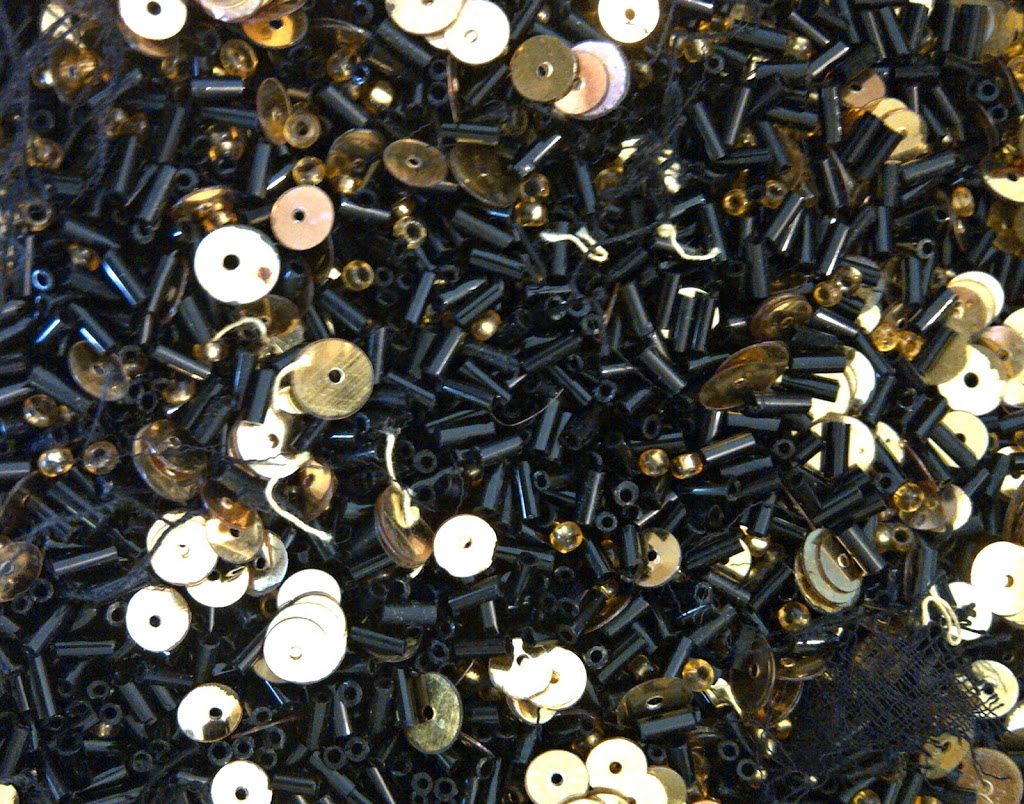
Refashion Inspiration! Don't miss out on the new upcoming series of The Refashioners at www.portialawrie.co.uk

I made these too….

Refashion Inspiration! Don't miss out on the new upcoming series of The Refashioners at www.portialawrie.co.uk

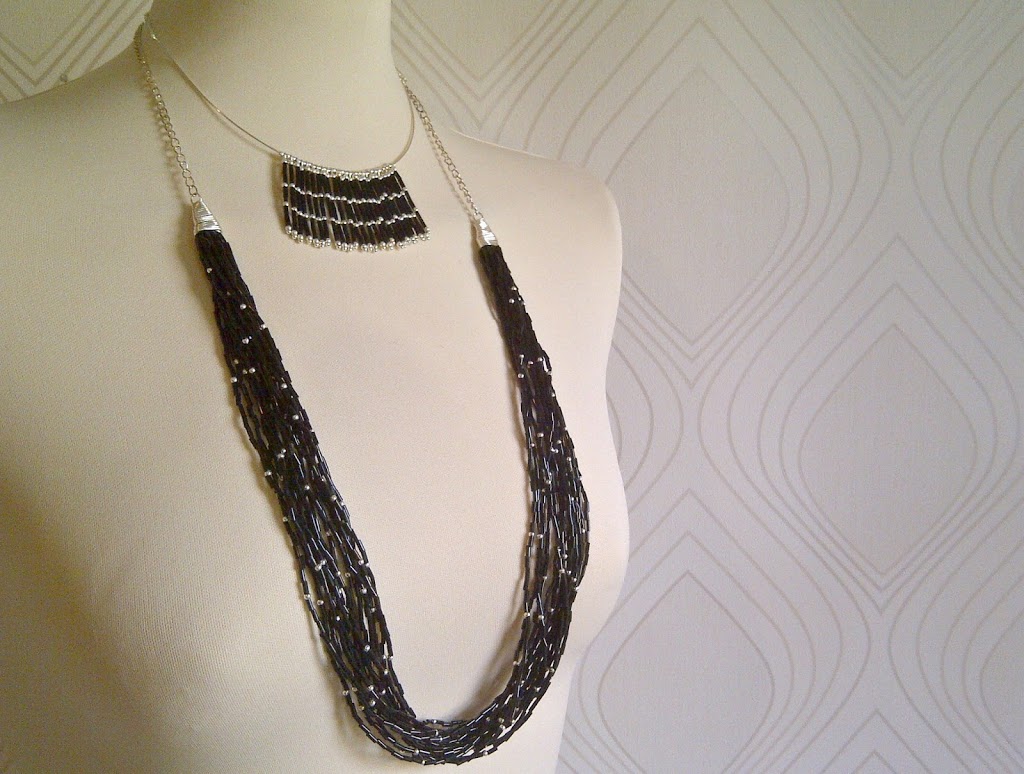
There are far too many photos in this post already, so I have some separate DIY posts lined up for these.

But in the meantime a MASSIVE MASSIVE THANKYOU to all the ladies that took part this year!! Has it inspired you to get out there and raid the charity shops (or plunder the depths of your wardrobes) for unloved items to lavish a bit of refashioning love on? I do hope so 🙂

By Hand London, DIY, Elisalex Dress, refashioning, the refashioners, the refashioners 2013, Thrifting, Tutorials

The Refashioners 2013 – Elisalex of By Hand – London

06/14/13

Is it shameful to admit that I actually really liked the mystery item that Portia sent me to refashion…? I was even lacking a good denim shirt in my life… But that’s not what this is about. I’m sure Portia didn’t sign us up to The Refashioners just to send us thrifted freebies!

Refashion Inspiration! Don't miss out on the new upcoming series of The Refashioners at www.portialawrie.co.uk

So, slightly reluctantly, I set about envisioning this shirt as something else. First thoughts were a button down mini skirt with a bandeau top made from a sleeve – but seeing as the shirt already fit me perfectly, there wasn’t going to be nowhere near enough fabric to fit around my backside, so that wasn’t going to work at all.  With a trip to the Deep South coming up, I eventually decided to use the denim combined with some white Broderie Anglaise cotton to make myself a dress worthy of the Grand Ole Opry (any old country lovers here? No? Hmmm just me then…). 
Refashion Inspiration! Don't miss out on the new upcoming series of The Refashioners at www.portialawrie.co.uk


Shamelessly I went for my own namesake pattern, the Elisalex Dress, and only just managed to squeeze out the front and back bodice pieces from the sleeves and back panel of the shirt.

Refashion Inspiration! Don't miss out on the new upcoming series of The Refashioners at www.portialawrie.co.uk

Refashion Inspiration! Don't miss out on the new upcoming series of The Refashioners at www.portialawrie.co.uk

The rest of the dress came together super easily and quickly – I’ve made about a squillion of these babies by now so you know I can do that sh*t in my sleep! – and I decided on a pretty gathered skirt as opposed to the main tulip variation. With some of the sleeve’s leftovers I made a pair of little bows which I handstitched to the shoulders. I absolutely LOVE the resulting dress – and it’s right up my street with just the right amount vintage white trash country singer! Just need to get me some cowboy boots and a matching hat…
Refashion Inspiration! Don't miss out on the new upcoming series of The Refashioners at www.portialawrie.co.uk


But what about the rest of the shirt, I hear you cry! Fear not ladies, I’m definitely not one to advocate waste of any kind so you can be sure that the rest of the shirt went to very good use.

Refashion Inspiration! Don't miss out on the new upcoming series of The Refashioners at www.portialawrie.co.uk

 I simply traced over the missing back panel and replaced it with the last of the white cotton Broderie, and hey presto! A sufficiently white trash sleeveless shirt – not quite to my taste but immediately snapped up by our very own Victoria:

Refashion Inspiration! Don't miss out on the new upcoming series of The Refashioners at www.portialawrie.co.uk

 So there you have it folks, one denim shirt becomes one entirely new dress and one refashioned shirt (and just a tiny pile of scraps for the bin). Now all we need is a flight back to Nashville… Anyone?

Refashion Inspiration! Don't miss out on the new upcoming series of The Refashioners at www.portialawrie.co.uk

 Portia, I can’t even begin to thank you for inviting me to be a part of the second (and hopefully annual?!) Refashioners! I am beyond flattered that you thought of me and humbled to be among such prestigious company.


Elisalex of By Hand – London (and Stitch Me Softly)

Oh, my, bloomin’ word! Back of the net Elisalex! Denim and broderie…a classic combo AND two new garments from one teensy denim shirt! Actually I concur. The denim shirt was actually quite nice to start off with and I’d toyed with the idea if embellishing the front and back yokes myself. Which was another option. But my refashioning pile was large enough as it was and I knew this would be in good hands. Love the substitution of the tulip skirt of the Elisalex dress, with a simple gathered one. Totally changes the vibe of the original pattern. “Pieced” patterns like this, where the garment element (ie bodice in this case) is assembled from several smaller pattern pieces, are a great way to use small bits of fabric harvested from garments. Especially when you opt for the contrasting fabrics route as Elisalex has done here.  And you needn’t run off and buy a length of fabric to emulate the skirt section in this refashion either. Bag yourself a denim shirt from the clothing rail of your local charity shop…..then go off and peruse the linens section for some pure cotton (vintage floral??) bedlinens/vintage tablecloths…

Dixie DIY, DIY, refashioning, the refashioners, the refashioners 2013, Thrifting, Tutorials

The Refashioners 2013 – Dixie of Dixie DIY

06/13/13

Hey readers and refashioners! I’m so excited to be included again in this challenge. Last time I played along I got a matching button down top and shirt and others received clothing as well. This year I expected similar garments but Portia had something up her sleeve. Pillowcases! Two standard sateen pillowcases with subtle stripes.
At first I thought – well this’ll be easy. It’s basically just fabric. I can do whatever I want, but as I worked on it I realized that these pillowcases presented their own challenges. When I looked at these pillowcases I thought it was quite enough fabric for a project but I really had to be efficient with my fabric.
I knew immediately what I wanted to do. I decided to make a variation on the Grainline Scout Woven Tee and add a cross-over layered back.
 Refashion Inspiration! Don't miss out on the new upcoming series of The Refashioners at www.portialawrie.co.uk
First I dyed both pillowcases in my washing machine with iDye. They came out a nice shade of blue.
Next I worked on my pattern pieces. My front and sleeve pieces will remain the same I just need to adjust the back piece. I traced the back piece and created a full size piece.
Refashion Inspiration! Don't miss out on the new upcoming series of The Refashioners at www.portialawrie.co.uk
Then I measured about 5″ in from the side seam, made a mark and drew in the stitching line.
 Refashion Inspiration! Don't miss out on the new upcoming series of The Refashioners at www.portialawrie.co.uk
After that I decided I wanted my overlapping pieces to connect at the armcye. The sleeve cap markings make an easy match point.
Refashion Inspiration! Don't miss out on the new upcoming series of The Refashioners at www.portialawrie.co.uk
Now I connect the point at the hem to the armcye point using a french curve. This will be my stitching line.
 Refashion Inspiration! Don't miss out on the new upcoming series of The Refashioners at www.portialawrie.co.uk
From there I measured and drew new seam allowances.
 Refashion Inspiration! Don't miss out on the new upcoming series of The Refashioners at www.portialawrie.co.uk
After I cut off the excess from the pattern piece I folded the seam allowance under. At the top I noticed there’s a gap from the armscye edge and the seam allowance so I used a scrap piece of paper that I taped to the seam allowance and drew a connecting section.
Refashion Inspiration! Don't miss out on the new upcoming series of The Refashioners at www.portialawrie.co.uk
Now I’m ready to cut. This new larger back piece justbarelyfit on one pillow case. I squeezed out as much room as I could.
 Refashion Inspiration! Don't miss out on the new upcoming series of The Refashioners at www.portialawrie.co.uk
For the sleeves there was just enough room down where the pillowcase opened to cut out a piece. I cut the second sleeve from the other pillowcase.
The other pillowcase was too narrow to fit a full size front piece so I cut the front with a center seam, making sure to match the side seam stripes. Unfortunately whoever sewed these pillowcases wasn’t so careful. I had to seam-rip and re-sew the front seam to match the stripes. Even so, I accidentally sewed the stripes off by one. Oops. But it’s nothing that normal people would notice. These stripes are made by alternating the weave, they’re not printed so they’re not very noticeable.
To assemble I sewed the bodice side seams then stitched the hem. You have to hem it before you attach the sleeves. I matched the back armcyes and basted the layers together.
The rest is easy. I just assembled everything following the normal pattern instructions.
Refashion Inspiration! Don't miss out on the new upcoming series of The Refashioners at www.portialawrie.co.uk
The look is pretty cool and it’s a simple pattern alteration if you want to try it at home – so long as you have enough fabric. 😉
Thanks Portia so much for including me again! I loved receiving my package wondering what was going to be inside. I often refashion clothes in my own wardrobe but I tend to get overwhelmed going to thrift shops so having someone else do the dirty work for me and I just get to be creative is pretty fun. 😉
Dixie of Dixie DIY
I am sooooo doing this! I’ve been pondering the Scout Woven Tee for a while but I think this has just sealed the deal for me! Who’d have thought you could turn 2 standard pillowcases into a cute, edgy top like this? I sent Joanne and Dixie a pair of pillowcases each; and as a result we have 2 very different takes from the same starting point. Interesting, no?! 
Just the act of dyeing these pillowcases has transformed them and brought out the woven stripe, which is a great touch. I love garments where the “business” is all going on at the back and plain in front. It gives an unexpected twist 😉
Brilliant Dixie!!
cotton & curls, DIY, leather, refashioning, the refashioners, the refashioners 2013, Thrifting, Tutorials

The Refashioners 2013 – Liz of Cotton & Curls

06/12/13

When Portia asked me to join in with these talented group of ladies, I was so excited! I feel so honored to be among this group. And challenge-wise I thought “no biggy”, refashioning is second nature.  Then her package arrived. 2 words – Leather pants. Thats when I started to worry!! Not only have I never really worked a lot with leather, but there is NO room for mistakes and I’m the kind of woman that is glued to my seam ripper.  But I will say I’ve ALWAYS wanted a real leather skirt, I love the edgy, yet feminine style. It has always been a little dream of mine to make a leather pencil skirt, and now, thanks to Portia and this refashioner’s challenge, I can finally make one! Now that I knew what to make, I didn’t know exactly how to go about making it. Making them into a skirt…easy, doing that with leather is the HARD part. In the end I was surprised how easy this split leather was to work with and found this skirt to be perfect! My machine didn’t have a hard time sewing it, because the leather was soft and thin split leather, and I bought a special needle for the task. Here’s how…
Refashion Inspiration! Don't miss out on the new upcoming series of The Refashioners at www.portialawrie.co.uk

1. Seam rip open the inside seam of the leather pants. Make sure to seam rip the top stitch and seam that is just under the zipper flap area.

Refashion Inspiration! Don't miss out on the new upcoming series of The Refashioners at www.portialawrie.co.uk


2. Turn the pants inside out matching the side seams together in the middle. The front seam will be on one side and the back seam will be on the other side. Mark where the new seams will be with marking chalk or whatnot. It will be a fairly straight line on both sides.

Refashion Inspiration! Don't miss out on the new upcoming series of The Refashioners at www.portialawrie.co.uk


3. Sew along the new back seam marking only.  Then cut the extra fabric off. Don’t sew the new front seam together just yet, just cut near the soon-to-be seam (allowing for the seam allowance).
Refashion Inspiration! Don't miss out on the new upcoming series of The Refashioners at www.portialawrie.co.uk

4. (Optional) – if you need it taken in, you can you take it in the back (be careful of the butt pockets-you don’t want to take it in too much that they get too close) or the side seams. It can get pretty thick, so I cut the waistband (instead of just fold) first then sewed it together the size I needed. You may have to do this on both sides if it is really big.
Refashion Inspiration! Don't miss out on the new upcoming series of The Refashioners at www.portialawrie.co.uk

5. Cut the skirt to the desired length. I wasn’t planning on hemming because leather doesn’t fray, so I made sure to cut the bottom very even and straight.
Refashion Inspiration! Don't miss out on the new upcoming series of The Refashioners at www.portialawrie.co.uk

6. Now, on the centre front seam, fold under the top side – mimicking and following the topstitch (that follows the flap coming out from under the zipper) that you seam ripped previously. 
Refashion Inspiration! Don't miss out on the new upcoming series of The Refashioners at www.portialawrie.co.uk
7. Topstitch it down to the other front half side of the skirt.
Refashion Inspiration! Don't miss out on the new upcoming series of The Refashioners at www.portialawrie.co.uk
8. Looks like this! I left a 5 or so inches in the front not sewn, if you do this then you can hem or not. If you want the edges hemmed under, do this with an iron and some no-sew fusible tape or just hand stitch it in the inside without going through the leather. (look at number 10)
Refashion Inspiration! Don't miss out on the new upcoming series of The Refashioners at www.portialawrie.co.uk
9. Topstitch the back seam by sewing down the seam allowance while you do it.
Refashion Inspiration! Don't miss out on the new upcoming series of The Refashioners at www.portialawrie.co.uk
10. Optional – If you want to hem the bottom, you can do it with no-sew fusible tape and an iron. I just cut the bottom very straight.
Refashion Inspiration! Don't miss out on the new upcoming series of The Refashioners at www.portialawrie.co.uk
Overall, I really love how it turned out and already have some plans for it in some future posts. I’m excited to wear this in the real world! 
Refashion Inspiration! Don't miss out on the new upcoming series of The Refashioners at www.portialawrie.co.uk
I find it to be totally versatile in that I can make it feminine or edgy, casual or dressy or a mixture of all the above. Thanks to Portia for including me! 
Liz from Cotton & Curls
OH – MY – GOSH! Unlike Liz, I have never wanted a leather pencil skirt; but somehow she manages to make it look like a fantastic idea! This looks uber cool, and as Liz says, super versatile; and all from a £2 thrifted pair of leather “pants”. (One of those words that means something completely different on this side of the pond!) I know alot of people that have been hesitant about sewing with leather. But really, most standard machines can handle it. As long as it’s clothing weight leather, you use proper leather needles and, in my experience, using a walking foot helps avoid slippage! Dodgy leather and suede garments crop up all the time in charity shops and the leather or suede they’re made from is great for bags, purses, wallets, cuffs, leather bound planners or books etc. Or with a little tweaking, as wearable garments once more!  Just goes to show, those dodgy 80’s trousers needn’t be overlooked in future….!! Stunning job Liz! 
DIY, joanne, refashioning, stitch and witter, the refashioners, the refashioners 2013, Thrifting, Tutorials

The Refashioners 2013 – Joanne of Stitch & Witter

06/11/13

When Portia first asked me to be part of 2013’s crop of Refashioners I was delighted, overwhelmed and scared. Completely and utterly sh*t scared to be honest. I hadn’t sewn in what seemed like a lifetime, save the odd maternity Renfrew and a pair of dungarees for the boy.
After a lot of hemming and hawing I said YES PLEASE PORTIA but begged a little leniency with her chosen item. Portia was gracious enough to go easy on me I think. But perhaps too easy – for when I saw what was in my package my mind boggled at the choices!
Portia sent me… a pair of pillowcases! Cotton – great. Polka dot – great. But what to do with them? Could I whip up a pretty cushion? Chop up the pillowcases for a homespun style quilt? Nope, too simple – I wanted to make something to wear goddammit. It had been too long. So after trawling through my pattern collection and ruling out dresses (not enough material) and blouses (did I mention I was scared of sewing?) I alighted on one that was damn near perfect for me – the Kelly skirt by Megan Nielsen. 

Refashion Inspiration! Don't miss out on the new upcoming series of The Refashioners at www.portialawrie.co.uk


With a high waist and a roomy skirt it was ideal for my podgy little post C-section tum. But did I have enough material? After a lot of unpicking, rewashing to reduce the visibility of the original stitching and careful ironing I laid it all out.

Refashion Inspiration! Don't miss out on the new upcoming series of The Refashioners at www.portialawrie.co.uk

I had to reduce the length of the skirt by a couple of inches and I had to (ssh!) disregard all the golden rules about grainlines. I also had to sew two pieces together to accommodate the waistband. But I had enough – just!

I used a pretty lavender polkadot vintage fabric from my stash to underline all the pieces and provide a contrast pocket lining.
Refashion Inspiration! Don't miss out on the new upcoming series of The Refashioners at www.portialawrie.co.uk


During the making of this skirt I made just one mistake – but it was a biggie. Instead of laying fabric right sides together to cut out the front pieces for the skirt (which feature a curved corner to accommodate the front pockets) I stupidly laid the two pieces of pillowcase right sides up and cut. It was only when I came to insert the pockets that I realised I effectively had two fronts with a right hand pocket… and no extra material to recut the pattern piece! It was time for an uber-patching up effort.
Refashion Inspiration! Don't miss out on the new upcoming series of The Refashioners at www.portialawrie.co.uk


I’m sure there’s a better way to fix it but I just took some remnant material and patched it onto the offending curve. It wasn’t perfect and it would be visible in the final skirt but it was the only option I had. It’s not so obvious in the final garment, I hope you agree!
The rest of the project was easy peasy. It’s such a simple pattern I urge any beginners to try it. I used seven pearly buttons to complete the skirt… et voila!
Refashion Inspiration! Don't miss out on the new upcoming series of The Refashioners at www.portialawrie.co.uk


When I was 90% through I suddenly had a panic. What if I had completely misunderstood the point of The Refashioners? Maybe the idea was to take an item and improve it, not rework it entirely?! But to me refashioning can cover any sort of improvements, from just a bit of embroidery or new buttons, to changing the function and look of the item in its entirety.  Pillowcase to pretty skirt! What’s not to like?
Thank you Portia for pushing me out of my comfort zone and making me love sewing again after my hiatus. I can’t wait to make another Kelly skirt in denim or cord and I’m seeing all sorts of home furnishings in my local charity shops in a brand new light! Now I just can’t wait to see what all the other girls have been up to!

Joanne of Stitch & Witter

Joanne, thankyou so so much for agreeing to take part. We’ve missed your wit and general loveliness on the blogging circuit and I know for a fact there will be very many readers pleased to see your lovely mug back on t’internet! I’m more than a little honoured that you chose this series to break your “hiatus”! 
I LOVE the fit and shape of this pattern! Just LOOK what you can squeeze out of a pair of pillowcases peops!  I think these cost me about 50p each from my local charity shop. The linens section of a charity shop/thrift store is a fantastic source of plentiful and affordable fabric. They’re usually natural fibres like cotton and in the case of curtains, can come in some rad patterns and colourways. As Joanne so aptly puts it, “refashioning can cover any sort of improvements, from just a bit of embroidery or new buttons, to changing the function and look of the item in its entirety”.
What is not to LOVE?!
charity shop chic, DIY, refashioning, sally, the refashioners, the refashioners 2013, Thrifting, Tutorials

The Refashioners 2013 – Sally of Charity Shop Chic

06/10/13

It’s amazing what you can get in a charity shop for £1…
Refashion Inspiration! Don't miss out on the new upcoming series of The Refashioners at www.portialawrie.co.uk


This enormous trench coat had potential, but had clearly seen better days. The size, obviously, was completely wrong for me and made me look like a spy from the 1980s and/or Inspector Gadget! There was a white paint stain on the back, as though the previous owner had leant on a newly-painted railing. Probably the biggest problem though, was that the belt was missing. A trench coat without a belt? Now that really is a challenge.
Refashion Inspiration! Don't miss out on the new upcoming series of The Refashioners at www.portialawrie.co.uk

My initial thoughts were to make this into something totally different – I was going to go for a halter-neck dress. On mulling it over though, on what possible occasion would one wear a sleeveless halter-neck dress made from really thick waterproof fabric? Final decision was that it would have to stay as a coat, but I wanted to make it look as different as possible from the original, with as many feminine features as possible.

As my inspiration I’m looking at this Burberry trench coat worn by pre-pregnancy Kate Middleton – not my usual fashion icon but I love this coat! The flounce at the bottom really makes it. Here’s the final coat, which I am rather happy with!
Refashion Inspiration! Don't miss out on the new upcoming series of The Refashioners at www.portialawrie.co.uk


I started by cutting off rather a lot at the hem, 40.5cm less seam allowance, just below the bottom button. I cut through the coat and the lining in one go.
Refashion Inspiration! Don't miss out on the new upcoming series of The Refashioners at www.portialawrie.co.uk


I then cut off the sleeves quickly, as close to the seams as possible.
Refashion Inspiration! Don't miss out on the new upcoming series of The Refashioners at www.portialawrie.co.uk


I also trimmed a reasonable amount from the sides, about 6cm less seam allowance, cutting through all the layers. I pinned to check the fit before restitching the side seams in their new location. I followed the rough shape of the old coat for my new side seams, that is, ever so slightly flared out at the hips. I also sewed the new side seams for the lining.
Refashion Inspiration! Don't miss out on the new upcoming series of The Refashioners at www.portialawrie.co.uk


At this stage, I fixed two of the buttons at the front that were hanging off.
Here’s what I was left with; (below left) a good solid base for putting the whole lot back together.
Refashion Inspiration! Don't miss out on the new upcoming series of The Refashioners at www.portialawrie.co.uk

Next, the most exciting part – the flounce! In order to draw my pattern, I needed to know how much material I had to play with. I folded the offcuts from the bottom of the coat in half, and drew around it on tissue paper. (above right) I then folded it in half again, so I’m working with a quarter of the finished flounce.

Then, working within the lines, I drew a rough circular arc. It was looking too tight, so I redrew it going slightly outside the lines on one side and was much happier. I made my flounce about 20cm deep, and it ended up having a corner pieced together. Because the rest of the flounce has seams through it from the original coat, the pieced-on part looks perfectly fine.
Refashion Inspiration! Don't miss out on the new upcoming series of The Refashioners at www.portialawrie.co.uk


Here’s the shape of the whole thing. I did a very tiny hem at the bottom. I was going to do a rolled hem, but turning under once seemed to be enough so I left it like that.
Refashion Inspiration! Don't miss out on the new upcoming series of The Refashioners at www.portialawrie.co.uk


After attaching the flounce, the coat was starting to take shape. Here’s a close up, taken before I finished the straight edges of the flounce.
Refashion Inspiration! Don't miss out on the new upcoming series of The Refashioners at www.portialawrie.co.uk


Now, to tackle the belt. I used the slightly curved sections I cut off the sides – I basically added some interfacing, sewed them together, turned the loop and added some rows of topstitching.
Refashion Inspiration! Don't miss out on the new upcoming series of The Refashioners at www.portialawrie.co.uk

The resulting belt is so short! It just about fits around my waist. Obviously I haven’t got a belt buckle, but I worked out that if I tie it twice it takes on a bow shape, rather unexpectedly adding another feminine feature. I rather like it!

Refashion Inspiration! Don't miss out on the new upcoming series of The Refashioners at www.portialawrie.co.uk


Final task was to tackle the sleeves. This was a big job. I had to psyche myself up with a cup of tea. First, I removed the sleeve seams and all the seams holding the sleeve head. Here’s what the deconstructed sleeve head contained – a shoulder pad, some sewn-in interfacing and some stabilisation (the white fleecy strip).
Refashion Inspiration! Don't miss out on the new upcoming series of The Refashioners at www.portialawrie.co.uk


The shoulders were much too wide for me, so I had to trim a good bit off the armscyes. This meant losing the belt loops from the epaulettes.
Refashion Inspiration! Don't miss out on the new upcoming series of The Refashioners at www.portialawrie.co.uk


My new sleeves were going to be bracelet length – another new feminine feature. I wanted to keep the cuffs with the button detail on, so that meant cutting some off the top. I marked 8cm down from the highest point and the lowest point (less seam allowance) and joined the two points with a curve, following the rough shape of the original curve. I did the same on the back, but separately as the curves are different.
Refashion Inspiration! Don't miss out on the new upcoming series of The Refashioners at www.portialawrie.co.uk


I basted on the reclaimed sewn-in interfacing, trimming it to the new shape where necessary. I used gathering stitches on about the top third of my sleeves in order to set them in. My new sleeve shape was far too big for the armscye curves, so the gathered section forms a nice little puff sleeve effect – yes, another feminine detail.
Refashion Inspiration! Don't miss out on the new upcoming series of The Refashioners at www.portialawrie.co.uk


I added the stabiliser and the shoulder pad afterwards.
Refashion Inspiration! Don't miss out on the new upcoming series of The Refashioners at www.portialawrie.co.uk


The epaulettes were now too long, as the shoulder had come in about an inch. I moved the button in by a suitable amount then refolded the strips. I added a stitch at the new fold point to help keep it in place. I didn’t bother with re-adding the old belt loops as it was rather fiddly.
Refashion Inspiration! Don't miss out on the new upcoming series of The Refashioners at www.portialawrie.co.uk

Last thing to do was to make the lining match up. (Above middle) I pinned the sleeve lining to the body lining, incorporating small pleats around the sleeve head to take up the excess fabric. Then I patiently hand-stitched it together. (Above right).

Here’s the final coat, which I am rather happy with! As a result of taking it in at the sides, the white paint stain has been vastly reduced but is still visible; I don’t think it’s all that noticeable though. My flounce is a bit bigger than the inspiration picture but I like it!
Refashion Inspiration! Don't miss out on the new upcoming series of The Refashioners at www.portialawrie.co.uk

Overall, I really enjoyed this challenge! I was very excited to see what Portia had sent me and delighted when it arrived. It was great to be pushed out of my comfort zone a little by not having full control over the original garment. To be honest, I don’t think I would have chosen this coat if I found it myself – the paint stain and the lack of belt would probably have been deal-breakers – but that said, I am really pleased with how it turned out. Trench coats, after all, never go out of style.

Thanks for organising, Portia!

Sally of Charity Shop ChicExcuse me while I pick my jaw up off the floor! Such a dramatic transformation! Even more astounding when you consider that the base garment cost a mere £1 and the genuine article retails for just under £1000!! Now if THAT’s not a good reason to ransack your local charity shop and get refashioning, Well, I don’t know what is!
One of the things I love about Sally’s refashions is how ambitious they are. Her technical skills are pretty awesome. I knew that whatever I sent Sally had to be a challenge otherwise she’d end up  all “HA! Is THAT the best you can do?!” Am I right, or am I right Sally?! (For the record, Sally volunteered to send me MY mystery garment as part of this challenge. Let me tell you…I’m pretty sure that’s what she was thinking when she selected it! I seriously had my work cut out there!)
The fabric of this coat was that really velvety gaberdine. So it felt delicious. I knew it would also be really massive on Sally, which would give her lots to work with and some spare fabric to address the belt issue if she so wished. I confess, I missed the stain on the back! Sorry Sally! In any case, Sally was more than equal to this challenge. A stunning transformation from “fugly” to fashion forward. A total triumph!

DIY, refashioning, So Zo..., the refashioners, the refashioners 2013, Thrifting, Tutorials, Zoe

The Refashioners 2013 – Zoe of So Zo…

06/07/13

I was really excited to have a stab at making a maternity garment for this refashioning challenge. I think that sometimes it can be tempting to undertake a refashion (or a ‘from-scratch’ sewing project too for that matter) simply because you’ve had an idea and want to see it actualized, with little thought to whether or not the final garment will ever get worn. I know I’m guilty of this from time to time. The garment refashioning/upcycling/remaking that women did during the era of rationing in the UK in the 1940’s was done because they needed to create wearable things for themselves and their families. I have tried to reflect that wartime sense of refashioning-for-necessity by making a genuinely useful men’s-shirt-to-maternity top that has been designed to accommodate a growing bump. During pregnancy of course, the contents of a woman’s regular wardrobe becomes increasingly useless and the prospect of acquiring a whole new maternity selection can be prohibitively expensive. I’d like to think that a relatively quick refashioning project like this one would be a welcome addition to that increasingly depleted selection of garments!

This refashion doesn’t have to be for creating maternity wear either. By skimming in the side seams a bit more, the process is equally viable for creating a nice non-maternity smock top. Those who occasionally follow my Refashion Friday posts will know that I’ve done quite a few men’s-to-women’s shirt refashions, but they usually involved a lot of deconstructing, re-cutting and reconstructing. For this challenge I wanted to take a looser and quicker approach that someone may be more likely to try for themselves. Here’s what I did….

Refashion Inspiration! Don't miss out on the new upcoming series of The Refashioners at www.portialawrie.co.uk

I started this refashion by removing the sleeves from the shirt and the cuffs from the sleeves, cutting carefully along the seam lines.

Refashion Inspiration! Don't miss out on the new upcoming series of The Refashioners at www.portialawrie.co.uk

Time to try on the body of the shirt. I did this to assess two things:
1) By how much (if at all) you’d like to take the top in at the side seams at around the bust, waist and hips. Note that removing excess width from the side seams around the top of the garment will also make the armholes less deep, which you may prefer. I pinched out fabric evenly from both side seams of the garment and pinned it to get the kind of width I was aiming for. It’s important to remember at this stage that elastic will be added around the under bust line, so we don’t want to pinch out so much fabric that the elastic doesn’t have a job to do!

Refashion Inspiration! Don't miss out on the new upcoming series of The Refashioners at www.portialawrie.co.uk

2) To find where my under bust line is. I made a mark of this at the centre front on the button stand.

After turning the garment through to the wrong side, I transferred the side seam reshaping I wanted to make to the side seams on the inside. I decided I only wanted to take some excess width out from the bust area (which also raised the depth of the armholes which were too low) but wanted to retain the width of the hips so I angled the line of pins accordingly. Using the line of pins as a guide, I stitched along this line removing the pins as I went. After stitching, I trimmed off the excess fabric 1 cm from the
stitching line and used my overlocker/serger to neaten the raw edges and prevent fraying during laundering.

Refashion Inspiration! Don't miss out on the new upcoming series of The Refashioners at www.portialawrie.co.uk

Now that I’d addressed the width of the garment, it was time to add the elastic to give the garment some shape. With a tape measure, I measured around my torso along the under bust line. I then took 3 cms (1”) off that measurement and cut a piece of ½” wide elastic to this length. Folding the elastic in half and then in quarters, I marked these points on the elastic in pencil. (If you’re playing along at home, you will now have three small pencil marks along one side of the elastic.)

Refashion Inspiration! Don't miss out on the new upcoming series of The Refashioners at www.portialawrie.co.uk

Next I pinned the elastic to the wrong side of the top along the starting at the centre front where I marked the bust line height on the button stand. Positioning the central elastic pencil mark at the centre back of the top I also did the same to the two other elastic pencil marks at the corresponding side seams. I stretched the elastic between the pinned points so it matches the fabric and placed some ‘inbetween’ pins to secure it further.

Refashion Inspiration! Don't miss out on the new upcoming series of The Refashioners at www.portialawrie.co.uk

‘Tis time to stitch the elastic down. Starting at one end of the elastic, I stitched two parallel lines along the edges of the elastic pulling the elastic as I stitched (once again for those playing at home, take your time with this stage, this can be a bit fiddly!). The elastic is meant to gather the fabric up evenly when stitched down and the tension is released.

The inside of my top was now looking like this! At this point I would say it is a good idea to try your top on and see how the refashion is developing. If you chose an under bust line that didn’t align with the position of a button and button hole at the centre front, you may or may not experience a bit of gapping where the elastic is pulling the shirt. If you do have some gapping, hand stitch a press stud/popper to act as another button where the elastic stops and starts.

Refashion Inspiration! Don't miss out on the new upcoming series of The Refashioners at www.portialawrie.co.uk

Now it was decision time: how to finish the armholes. The quickest and easiest way would be simply to narrowly turn over the raw edge and topstitch around the armhole. The more time consuming but arguably more ‘polished’ method is to harvest some fabric from the sleeve and create your own bias binding to stitch around and finish the armhole.

Refashion Inspiration! Don't miss out on the new upcoming series of The Refashioners at www.portialawrie.co.uk

I went with the latter. With the armholes finished and an anchor patch applied, my maternity top was complete!

Refashion Inspiration! Don't miss out on the new upcoming series of The Refashioners at www.portialawrie.co.uk

Finally, I’d like to take this opportunity to thank Portia for her hard work and organisation of this whole project and for asking me to be part of it. She puts so much effort into the promotion of refashioning as an exciting and enjoyable creative endeavour, she’s a total inspiration I’m sure you’ll agree!

Zoe of So Zo…

Aw, schucks! Thanks Zoe! Literally, right back at ya! This is a total case in point of how a refashion needn’t be complicated or time consuming to totally transform the shape and style of a garment. You don’t need to totally deconstruct a garment. (Unless you want to of course!)
Also totally concur with Zoe. One of the most fundamental benefits of refashioning a garment is that it enables you to take what you have and tweak it to suit you. Your needs, (maternity or other) and your personal style (stripes and anchors for Zoe, naturally!).
I think my favourite parts of this refashion are it’s simplicity, fit, and the directional interest that the stripes cut on the bias create around the armholes. I think we can all agree that Zoe is one yummy retro mummy to be in this number!

DIY, lauren, lladybird, refashioning, the refashioners, the refashioners 2013, Thrifting, Tutorials

The Refashioners 2013 – Lauren of Lladybird

06/06/13

Hot Hot Shorty Shorts

You know, I’ve refashioned hundreds of garments, but this is the first time I’ve ever given full reign to someone else and let them choose the starting point. This is mildly terrifying, because you have no idea what might pop up in your mailbox, not to mention you can’t shove it in the garbage can and pretend it never happened should something go terribly wrong (oh yes, I do this. Often. No shame.).
This is what ended up in my mailbox – a large pencil skirt in my favorite shade of Nard-Dog orange. After hearing everyone else talk about how evil and sneaky Portia was with what she sent (I was one of the last people to receive my package, figures!), I was actually pretty relieved!
I would have loved to put this thing on and model it for y’all, but srsly that shit was so big I could literally pull it over my shoulders without unzipping the zipper. I had to pin it to my form to keep it from falling off.

Refashion Inspiration! Don't miss out on the new upcoming series of The Refashioners at www.portialawrie.co.uk

I knew exactly what I wanted to make the minute I pulled it out of the package – pin-up style shorty shorts, using the Rite of Spring shorts pattern from Papercut Patterns. Saucy!

The very first thing I did was rip the entire skirt apart. The fabric is actually a really lovely cotton sateen, lined with some polyester lining in a slightly darker shade of orange. I pulled the seams apart, ripped out the hem, and ironed everything flat.

Refashion Inspiration! Don't miss out on the new upcoming series of The Refashioners at www.portialawrie.co.uk

I saved the zipper and the button, as well as kept the waistband intact. The pieces were juuuust big enough where I could fit my pattern pieces on, cutting one layer at a time…

Refashion Inspiration! Don't miss out on the new upcoming series of The Refashioners at www.portialawrie.co.uk

In true refashioner’s form, I decided to utilize the lining as well – and turned it into bias piping!

Refashion Inspiration! Don't miss out on the new upcoming series of The Refashioners at www.portialawrie.co.uk

First, I established a straight edge by giving one side of the fabric a good rip. Determining the straight edge makes it easy to find the bias – just fold the edge over to form a triangle, then cut.

The resulting angle is right along the bias, making it easy to cut your bias strips.
(No, my cutting mat didn’t magically turn black – that’s just my self-healing mat. Apparently, rotary cutters are 100000x easier to use when you have a self-healing mat WHO WOULDA THOUGHT)

Refashion Inspiration! Don't miss out on the new upcoming series of The Refashioners at www.portialawrie.co.uk

To make the piping, I folded one bias strip around a piece of cording. Then sewed it shut, using a long basting stitch.

Refashion Inspiration! Don't miss out on the new upcoming series of The Refashioners at www.portialawrie.co.uk

I used my zipper foot to baste the piping along the edge of the fabric. When sewing the front and back pieces together, I made sure to sew just barely outside the existing stitching to be sure that everything was nice and enclosed. 

Refashion Inspiration! Don't miss out on the new upcoming series of The Refashioners at www.portialawrie.co.uk

Et voilà! Piping!

Refashion Inspiration! Don't miss out on the new upcoming series of The Refashioners at www.portialawrie.co.uk

There’s not much else to say about the construction of these shorts… I basically just followed the pattern and treated my pieces like plain ol’ fabric. I did reuse the skirt waistband, instead of cutting/interfacing/sewing a new one… partially out of laziness, partially because I wanted to keep some of the ~flavor of the original garment.  I also reused the button and the zipper! Can you believe the zipper was EXACTLY the right length? Fate, y’all. Fate.The shitty non-fate part was when I cut off the end of the waistband with the button hole (since it needed to be shortened by several inches), thinking, “I can make a prettier button hole with my machine.” Spoiler: It’s not prettier, I done goofed that one. But it works!

Refashion Inspiration! Don't miss out on the new upcoming series of The Refashioners at www.portialawrie.co.uk

One thing I like to do with my refashions is keep the original label on the garment. It cracks me up to think that someone might see these shorts and be familiar with this brand, and wonder why the hell they produced a single pair of booty shorts. HAHA.

Speaking of booty shorts…

Refashion Inspiration! Don't miss out on the new upcoming series of The Refashioners at www.portialawrie.co.uk

Well, what do you think?? I would have loved to make a matching top – this one is thrifted, soooo close enough! 

Refashion Inspiration! Don't miss out on the new upcoming series of The Refashioners at www.portialawrie.co.uk

…but my time management tends to run either super-duper early, or at the last possible second. Guess which one this falls under? 😉

Ha, Portia is probably staring at these pictures thinking, “I’ve made a huge mistake.” (and you know, I should probably be thinking the same thing, with regards to SHINY COTTON SATEEN ON MY ASS, WHAT WAS I THINKING), but this is what happens when you give me free reign to make whatever I want. I end up half-naked in a pair of booty shorts :B

Refashion Inspiration! Don't miss out on the new upcoming series of The Refashioners at www.portialawrie.co.uk

I had a lot of fun with this project! Letting someone else choose the refashion definitely pushed me out of my comfort zone, and coaxed me to try new things (like utilizing the rest of the skirt – the lining, the button, the zipper, even the waistband – instead of *just* using the main fabric). I love my shorty shorts and I’m excited to wear them out all summer – maybe even to the Hot Chicken Festival? They are the color of hot chicken, after all J

Thanks for letting me be a part of this, Portia!
Lauren of Lladybird
 
I’m ACTUALLY staring at these pictures and thinking, “I WISH I could rock a pair of half naked booty shorts like THAT!” These are phenomenal Lauren. I love the piping detail. It really ramps up the retro vibe. I’m picturing retro bowling shoes and a striped tee. Cute! Great re-use of the fabric and notions! Now go get you some hot chicken girl. You deserve it!
 
 
by gum by golly, DIY, refashioning, tasha, the refashioners, the refashioners 2013, Thrifting, Tutorials

The Refashioners 2013 – Tasha of By Gum By Golly

06/04/13

 Hello everyone, it’s Tasha from By gum, by golly! I was so excited when Portia asked me to be part of the Refashioners project. I am not a consummate refashioner like she is, so I knew this was going to be a good sewing challenge for me. And what did Portia send me? A men’s flannel shirt that dwarfed my dress form!
I really was stumped at first. But as it happened, when I got the shirt in the mail I was sewing up a gathered skirt from a 1940s pattern, and it hit me not longer after: turn the shirt into a skirt!

Refashion Inspiration! Don't miss out on the new upcoming series of The Refashioners at www.portialawrie.co.uk

My plan was this: use the basic shape of the shirt as-is. The length of the shirt from the yoke to hem was a perfect skirt length for me if I used a narrow seam allowance and left the original hem intact. The front and back would be gathered into a waistband that buttoned at the center front with an overlap, above the original button placket. This all meant cutting off the back yoke, collar and sleeves, and carefully taking off the front pockets with a seam ripper.

Refashion Inspiration! Don't miss out on the new upcoming series of The Refashioners at www.portialawrie.co.uk


I then cut down the side seams, and narrowed the back by cutting off the few inches on either side of the armhole so it was a rectangle. I left the front  with the armholes intact because in a flash of brilliance I realized I could make inseam pockets like in the Sewaholic Cambiepattern! You can see what the front and back looked like after cutting, but before I lopped off another little bit on the front to get them the same length:
Refashion Inspiration! Don't miss out on the new upcoming series of The Refashioners at www.portialawrie.co.uk

I made a pocket pattern piece based on the Cambie pocket piece, (above right) making the scooped side the same shape as the former-armhole of the shirt. I used the sleeves as fabric to cut out the pockets. That’s when I realized the sleeves had the plaid pattern upside down! So I corrected that on my pockets.

Because believe it or not, I actually had enough fabric to match up the plaid!
Refashion Inspiration! Don't miss out on the new upcoming series of The Refashioners at www.portialawrie.co.uk


However, no matching plaid on the back: it was upside down, too! But since I was preserving the original hem, the back stayed that way.
I used the back yoke to construct the waistband. I thought I was going to have to piece the waistband together with lots of seams originally, but as it turned out the yoke was a double-layer of fabric, so the waistband only has one seam. And with the busy plaid, you’d never know that I did all my math backwards, so the seam is off-center. (Excuse the messy work table!)
Refashion Inspiration! Don't miss out on the new upcoming series of The Refashioners at www.portialawrie.co.uk


Last but not least, I swapped out the buttons for some matching vintage ones.
You can see what the finished inseam pockets looked like. Can you believe that they were once armholes?
Refashion Inspiration! Don't miss out on the new upcoming series of The Refashioners at www.portialawrie.co.uk


In the end I had a wonderful and very cozy new skirt!
Refashion Inspiration! Don't miss out on the new upcoming series of The Refashioners at www.portialawrie.co.uk


When I started the project I wasn’t even convinced there was enough fabric to pull it off, but I have to say I’m tickled pink with the final skirt! And now I’m not sure I’ll ever be able to pass up a nice, extra large men’s shirt at the thrift store again.
Oh Portia, look what you started…

Tasha of By Gum, By Golly

Firstly, I love that Tasha has a pair of shoes that perfectly matches the turquoise in the plaid! Secondly…erm…GENIUS!! Using the original armhole curve as shaping for the pockets! Isn’t that just one of those things where you smack your forehead and wonder why that never occurred to you before? I know I did! I am soooo trying that….Thankyou so much Tasha 🙂
This shirt was actually quite poorly made and a boxy unflattering shape. What stood out for me when I found this in the charity shop was the lovely colour way, supersoft feel of the fabric and the fact that it was 100% cotton. Being a large men’s shirt there was scope there. I love that Tasha has proved that you can refashion and STILL retain that authentic vintage look and feel to your makes. It’s all in the details and the styling…
Did you Make That, DIY, Karen, refashioning, the refashioners, the refashioners 2013, Thrifting, Tutorials

The Refashioners 2013 – Karen of Did You Make That

06/03/13

When someone sends you an oversized, purple velvet shirt in the post, what do you do? Faint? Laugh? Wring your hands?

Refashion Inspiration! Don't miss out on the new upcoming series of The Refashioners at www.portialawrie.co.uk


Miss P had invited me to take part in her second Refashionistas challenge. I like being challenged, so I was in there like a shot. All we’d had to do was give Portia a hint about our preferences and I’d mentioned the colour purple. Well, I was taken at my word. Hung out to dry might be another way of putting it!
This wasn’t luxury velvet, it was thick cotton velvet. I’m amazed anyone ever thought this was a good idea as a shirt – you’d pass out from the heat, wearing that thing. It felt more like upholstery velvet. What, oh what, to do?
I took Ella for a walk. By the time I arrived back home, I knew my plan. I ordered the V8812 pattern and then … sat on my behind for two months. This experience has taught me that I’m a deadline fiend, a fact that makes me feel really uncomfortable. I like to think I’m organised, but clearly not!
It helped that I knew exactly what I was going to do, so once work began it went fairly smoothly. I’ve

had an ambition for a while to work with velvet, but I’ve always been put off by the horror stories. Velvet’s nap can become damaged during pressing and even from the pressure of a sewing machine foot. So, basically, any normal part of the sewing process is a risk to your fabric! Gulp.Fortunately, I was working with the ‘working man’s club’ type of velvet rather than the ‘American Bar at The Savoy’ type of velvet.  My fabric friend was going to stand up to abuse. Even so, I joyfully used my velvet pressing board.  My sister had found this rare item for me at a car boot sale.

Refashion Inspiration! Don't miss out on the new upcoming series of The Refashioners at www.portialawrie.co.uk

What can I tell you about construction? Because the velvet was thick I had to trim away any excess in the darts. I varied from the pattern instructions by inserting a full lining in polka dot satin – yum. I absolutely did not ignore the pattern instructions for shoulder pads. This bolero needs shoulder pads!

Refashion Inspiration! Don't miss out on the new upcoming series of The Refashioners at www.portialawrie.co.uk

There was one fairly significant variation I made. The sleeves. They were really not doing it for me. Boxy and too long. I trimmed 1.5 inches from the length and – I still don’t know where this inspiration came from – I decided to add an elasticated gathering down the centre of the sleeves. I think this gives the sleeves a feminine touch sorely needed. I also think this would only work with certain fabrics.

Refashion Inspiration! Don't miss out on the new upcoming series of The Refashioners at www.portialawrie.co.uk

Finally, I carried the refashioning theme through to make a brooch out of some vintage hat feathers I found at Camden Passage market. The feathers cost £1-£2 each and I liked how the emerald green worked against the purple, so set to with a button and some lace. What do you think? Yay or nay? I’m sure this isn’t to everyone’s taste!

Refashion Inspiration! Don't miss out on the new upcoming series of The Refashioners at www.portialawrie.co.uk

I hope I turned a monstrosity into a fairly sophisticated make. I learned some lessons about velvet, I used my imagination and I enjoyed the liberating high of slicing into a garment with shears. Hack, hack, hack! Surprisingly, this ickle bolero used up most of the fabric from a voluminous shirt, probably because of the wide shoulders.

Refashion Inspiration! Don't miss out on the new upcoming series of The Refashioners at www.portialawrie.co.uk

A word should be said about the photos. I paired the bolero with the Simplicity 4934 dress I made last summer with Beth of Sunny Gal Studios. That’s one great dress, I’m not gonna lie! As I prepared for the shoot, Ella chewed her way through two tubes of body lotion, a hotel sewing kit, the contents of my bedroom bin and a sewing magazine. This little dog needed a distraction, so she came out with me when I went to take the photos. She calmed down almost immediately. Turns out my dog’s a super model…

Karen – from Did You Make That

Karen’s not kidding! This shirt was SERIOUSLY “hugly” in it’s former state. I did feel a fleeting pang of guilt as I packed it up to send off to Karen. (Soon replaced by a mischevious cackle which by the sounds of it Karen heard when she opened her parcel. I’m kidding Karen, I’m kidding!) It’s saving graces in my view were the colour, quantity and weight/sturdiness of the fabric. It absolutely did not work as a shirt. But I just knew there was potential there; and WHAT potential Karen has uncovered! From dodgy 80’s shirt to a sophisticated and elegant bolero fit for a day at the races. Pass the Pimms Karen…..

Newer Posts
Older Posts
Portia
Follow
Sewbox

© Copyright 2026. Portia Lawrie. All Rights Reserved. Managed by WordPress Web Dev Cornwall .