• About
    • Contact
    • Press
    • Sponsor
  • DIY
    • Home & Garden
    • Jewellery & Accessories
    • Yarn Crafts
  • Sewing
    • patternless & self drafted
    • Refashions
    • Commercial Patterns
    • Sewing Tips
    • Overlockers
  • The Refashioners

Portia Lawrie

DIY, how to, leather, refashion, refashioning, rit dye, Tutorials

DIY: Dyed Leather Gloves (inc DIY leather conditioner & cleaner)

12/01/14

As I mentioned in my previous post, I had a stockpot of the Rit Dye simmering on the stove whilst I worked on another project. (Deets of that to follow soon I promise. Just waiting for some decent daylight to photograph it, as it’s soooo grey skies here right now it’s not even funny! If you follow me on instagram you’ll know what the “big project” is…just not the end result 😉 Today I thought I’d share another little experiment with Rit dye. Whilst my stockpot was simmering away I began pondering what else I could use all that lovely rich dye liquor for. I like to get value for money! (BTW, did you know you can bottle unused Rit dye liquid once it’s cooled and reuse it months later! Apparently so…result, huh?)

Anyway, I decided on a whim to randomly chuck this pair of leather gloves into the mixture…and what do you know? It worked! They didn’t crisp up when they dried and the result is relatively even…so I guess…you CAN dye leather with Rit dye!

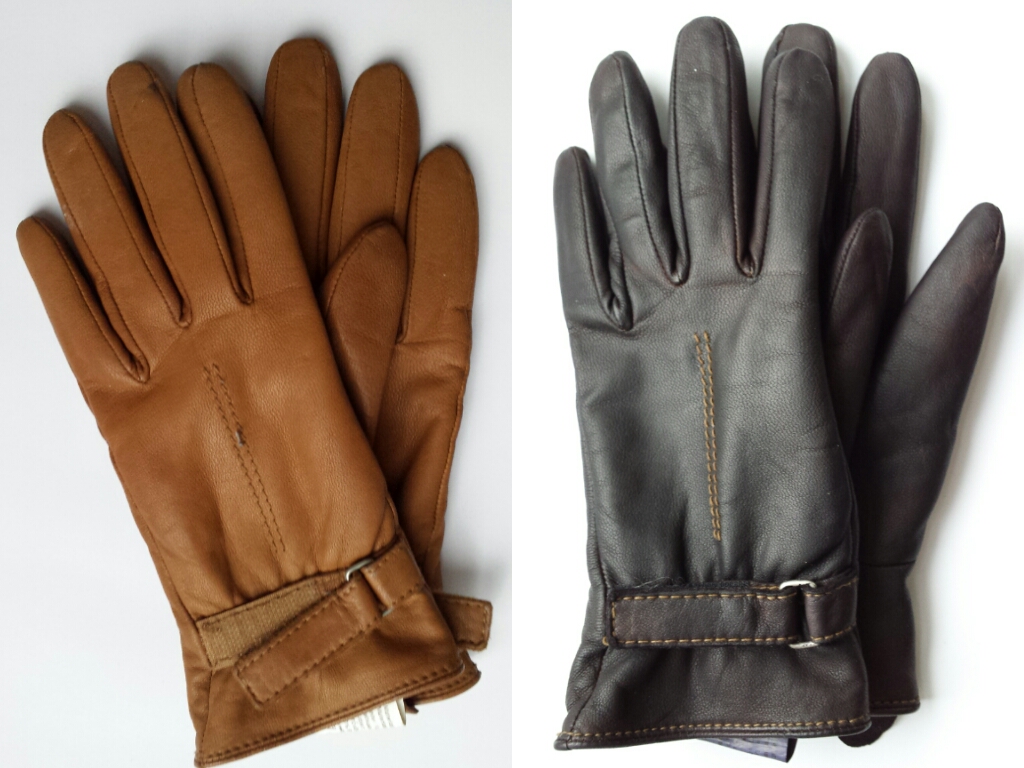
Essentially I started with these soft leather gloves that I had thrifted and then never worn because the colour never quite fit with any of my coats. (£2 in case you were wondering ;). My dye was already mixed and simmering but as I mentioned in my previous post, was MUCH more concentrated than the instructions required. (The black and maroon powder packs you see + the whole bottle of navy liquid dye to 10pints of water gave me a concentrated dye solution that was an inky blue/purple).
1) Simply submerged my gloves in the stock pot and left for an hour with the lid on.
2) Turn them every 10 mins or so to ensure even coverage
3) Remove after an hour and rinse relentlessly in running water, graduating from hand hot to cold until it runs clear.
4) Leave to dry thoroughly (mine took a couple of days!). I wouldn’t personally be tempted to speed this process up (with a hairdryer for instance) as I’d be worried about “crisping” or shrinking the leather. I guess I thought I’d pushed my luck enough having them simmering in a dye bath for an hour, lol!

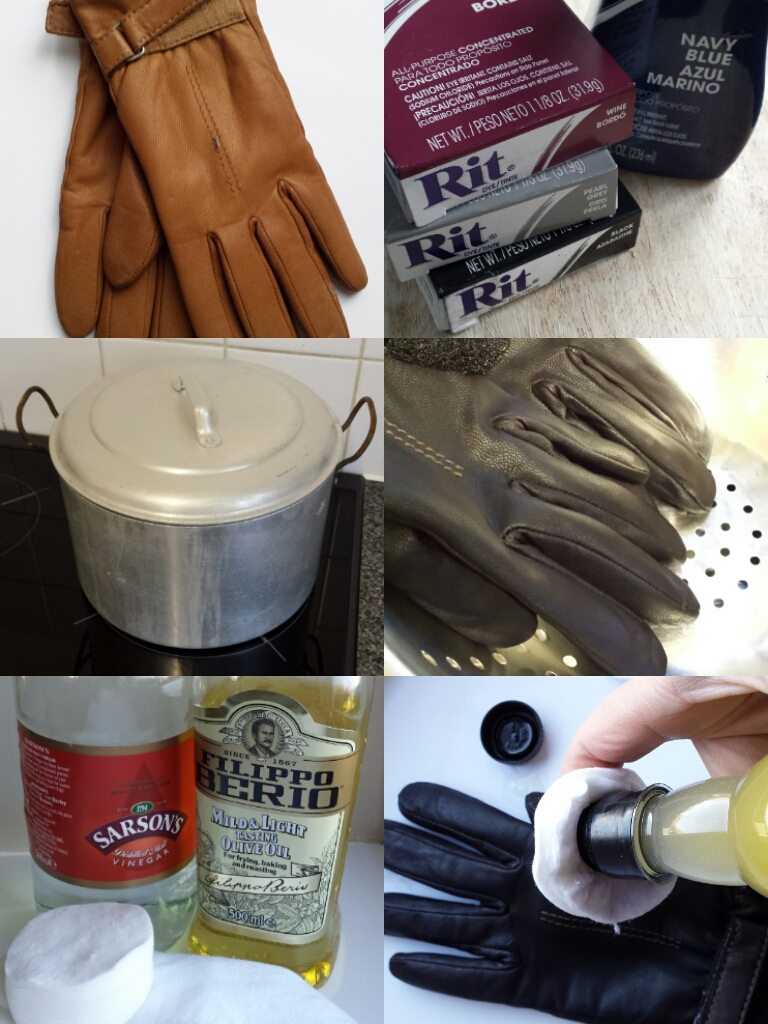
When they were finally dry I treated them to a bit of conditioning. You don’t need special products either. This works beautifully on leather of any kind. Shoes, bags, sofas…saddles!
1) Just mix equal parts of white vinegar and olive oil in a bottle.
2) Shake well and apply to leather using a cotton wool pad
3) Buff to a soft shine with a soft cloth
Et voila! Trust me when I tell you…do not bother buying expensive leather creams again. This stuff really works 🙂
4) As a final touch spray with Scotchgard or similar

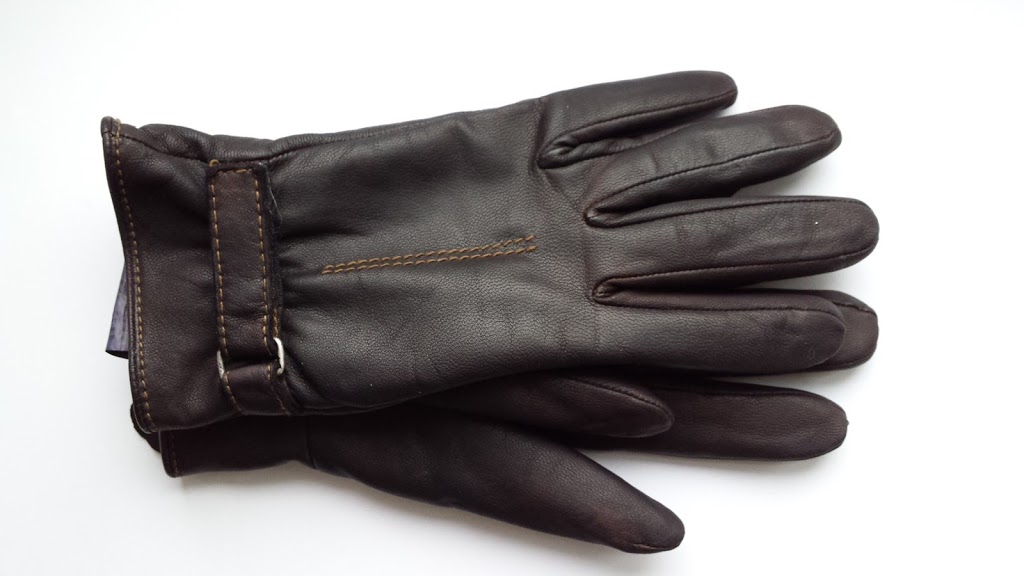
So, here they are, my new, old, gloves! I like that the stitching wasn’t dyed and now contrasts with the new colour… and talking of colour…you can just about make out an aubergine tinge in these pics…not what I expected AT all. But I really love it! There are a few areas where the dye got veeeery subtly patchy (like in the creases of the leather) which lends them a slight vintage feel too…I totally knew that would happen of course… ahem…cough…;)

I’m quickly learning with dye projects, not to be too invested in achieving a specific colour. Results are not guaranteed to be what you plan! I think it’s better rather to aim for a particular area on the colour wheel and remain open to where that takes you. Sometimes it’ll be a triumph! (Sometimes not!) Even though it may be a case of more luck than judgement…shhhh…don’t tell anyone that part….just let them tell you how clever you are 😉

NB: as a little “disclaimer” and in the interests of full disclosure…I haven’t yet had a chance to wear these out. While I’m confident the exterior is colour fast due to the scotchgard, I’ve yet to test the colour fix on the inside fabric except a rub test on a towel which was fine…on sweaty hands though it’s possible it could transfer and I could end up all Smurfette…I guess I could turn them inside out and use a spray fixative of some kind…but I’ll risk it and see what happens I think…will keep you posted on that!

UPDATE: All is fine. No dye transfer on wearing for a full afternnoon!

cotton & curls, DIY, leather, refashioning, the refashioners, the refashioners 2013, Thrifting, Tutorials

The Refashioners 2013 – Liz of Cotton & Curls

06/12/13

When Portia asked me to join in with these talented group of ladies, I was so excited! I feel so honored to be among this group. And challenge-wise I thought “no biggy”, refashioning is second nature.  Then her package arrived. 2 words – Leather pants. Thats when I started to worry!! Not only have I never really worked a lot with leather, but there is NO room for mistakes and I’m the kind of woman that is glued to my seam ripper.  But I will say I’ve ALWAYS wanted a real leather skirt, I love the edgy, yet feminine style. It has always been a little dream of mine to make a leather pencil skirt, and now, thanks to Portia and this refashioner’s challenge, I can finally make one! Now that I knew what to make, I didn’t know exactly how to go about making it. Making them into a skirt…easy, doing that with leather is the HARD part. In the end I was surprised how easy this split leather was to work with and found this skirt to be perfect! My machine didn’t have a hard time sewing it, because the leather was soft and thin split leather, and I bought a special needle for the task. Here’s how…
Refashion Inspiration! Don't miss out on the new upcoming series of The Refashioners at www.portialawrie.co.uk

1. Seam rip open the inside seam of the leather pants. Make sure to seam rip the top stitch and seam that is just under the zipper flap area.

Refashion Inspiration! Don't miss out on the new upcoming series of The Refashioners at www.portialawrie.co.uk


2. Turn the pants inside out matching the side seams together in the middle. The front seam will be on one side and the back seam will be on the other side. Mark where the new seams will be with marking chalk or whatnot. It will be a fairly straight line on both sides.

Refashion Inspiration! Don't miss out on the new upcoming series of The Refashioners at www.portialawrie.co.uk


3. Sew along the new back seam marking only.  Then cut the extra fabric off. Don’t sew the new front seam together just yet, just cut near the soon-to-be seam (allowing for the seam allowance).
Refashion Inspiration! Don't miss out on the new upcoming series of The Refashioners at www.portialawrie.co.uk

4. (Optional) – if you need it taken in, you can you take it in the back (be careful of the butt pockets-you don’t want to take it in too much that they get too close) or the side seams. It can get pretty thick, so I cut the waistband (instead of just fold) first then sewed it together the size I needed. You may have to do this on both sides if it is really big.
Refashion Inspiration! Don't miss out on the new upcoming series of The Refashioners at www.portialawrie.co.uk

5. Cut the skirt to the desired length. I wasn’t planning on hemming because leather doesn’t fray, so I made sure to cut the bottom very even and straight.
Refashion Inspiration! Don't miss out on the new upcoming series of The Refashioners at www.portialawrie.co.uk

6. Now, on the centre front seam, fold under the top side – mimicking and following the topstitch (that follows the flap coming out from under the zipper) that you seam ripped previously. 
Refashion Inspiration! Don't miss out on the new upcoming series of The Refashioners at www.portialawrie.co.uk
7. Topstitch it down to the other front half side of the skirt.
Refashion Inspiration! Don't miss out on the new upcoming series of The Refashioners at www.portialawrie.co.uk
8. Looks like this! I left a 5 or so inches in the front not sewn, if you do this then you can hem or not. If you want the edges hemmed under, do this with an iron and some no-sew fusible tape or just hand stitch it in the inside without going through the leather. (look at number 10)
Refashion Inspiration! Don't miss out on the new upcoming series of The Refashioners at www.portialawrie.co.uk
9. Topstitch the back seam by sewing down the seam allowance while you do it.
Refashion Inspiration! Don't miss out on the new upcoming series of The Refashioners at www.portialawrie.co.uk
10. Optional – If you want to hem the bottom, you can do it with no-sew fusible tape and an iron. I just cut the bottom very straight.
Refashion Inspiration! Don't miss out on the new upcoming series of The Refashioners at www.portialawrie.co.uk
Overall, I really love how it turned out and already have some plans for it in some future posts. I’m excited to wear this in the real world! 
Refashion Inspiration! Don't miss out on the new upcoming series of The Refashioners at www.portialawrie.co.uk
I find it to be totally versatile in that I can make it feminine or edgy, casual or dressy or a mixture of all the above. Thanks to Portia for including me! 
Liz from Cotton & Curls
OH – MY – GOSH! Unlike Liz, I have never wanted a leather pencil skirt; but somehow she manages to make it look like a fantastic idea! This looks uber cool, and as Liz says, super versatile; and all from a £2 thrifted pair of leather “pants”. (One of those words that means something completely different on this side of the pond!) I know alot of people that have been hesitant about sewing with leather. But really, most standard machines can handle it. As long as it’s clothing weight leather, you use proper leather needles and, in my experience, using a walking foot helps avoid slippage! Dodgy leather and suede garments crop up all the time in charity shops and the leather or suede they’re made from is great for bags, purses, wallets, cuffs, leather bound planners or books etc. Or with a little tweaking, as wearable garments once more!  Just goes to show, those dodgy 80’s trousers needn’t be overlooked in future….!! Stunning job Liz! 
DIY, gift ideas, leather, Tutorials

DIY – Leather Gadget Case

03/26/12

Recently I’ve been playing around with some leather and suede scraps and thought I’d share this super quick project with you.  This method could be applied to any slimline tech gadget such as ipads/phones, kindles, tablets etc. (or my cheap and cheerful mobile!) The leather I’m using was harvested from a pair of 80’s pink suede trousers that I picked up from the £1 rail in my local charity shop. So you could either keep an eye out in charity shops for old leather jackets, bags etc OR leather scraps are readily available online from auction sites and craft suppliers….

The first thing I did was make a template/pattern as follows:

  1. Draw around your phone/gadget on paper
  2. Smooth out the lines using a ruler/curve so they’re nice and even and symmetrical
  3. Add on a seam allowance to the sides and bottom
  4. I used a cotton reel to draw in a little half circle in the middle of the top line to enable me to access my phone once it was in the case

Then to cut out:

  • I didn’t want to use pins to fix my template to my leather scrap in case it left holes. So I stuck it down with masking tape. I seem to recall that freezer paper (?) will temporarily adhere to a surface so I guess you could make a template out of this to solve that problem.
  • I then cut one piece for the back and one for the front. I left the back piece with a straight top edge and cut my little semi circle from the front piece only
  • I made sure I had the right needles for the job!
  • Again, I didn’t want to pin my front and back pieces so I used these mini pegs I had in my stash. Paper clips or bulldog clips would work just as well too. I pieced mine so the soft sude part was on the inside and the leather on the outside

To construct:

  • Then with a longer machine stitch (test on scraps first to establish what works best) stitch all the way around the sides and the bottom. Backstitch either side of the opening to reinforce. I used a walking foot on my machine to help feed the leather through evenly. I stitched only half way into the seam allowance to allow for the depth/thickness of my phone. (If I were really accurate I would have measured the width of my phone at the start, divided by 2 and added this to the template at the start before adding the seam allowance. But I was winging it a bit!)
  • Then trim close to the stitching line

Next time I make one of these, I’ll probably stay stitch the top edges to reinforce, and maybe try out a bit of embellishment…..but otherwise I’m super happy with my new phone case!

Happy Monday to you! The sun is shining and I’m a happy gal today 🙂 What are you up to?

Portia
Follow
Sewbox

© Copyright 2026. Portia Lawrie. All Rights Reserved. Managed by WordPress Web Dev Cornwall .