• About
    • Contact
    • Press
    • Sponsor
  • DIY
    • Home & Garden
    • Jewellery & Accessories
    • Yarn Crafts
  • Sewing
    • patternless & self drafted
    • Refashions
    • Commercial Patterns
    • Sewing Tips
    • Overlockers
  • The Refashioners

Portia Lawrie

refashioning, the refashioners, The Refashioners 2016

The Refashioners 2016: And the winners are….

10/14/16

This is a really exciting decision to reveal! But HARD. Man this was hard! This years challenge, I think it’s fair to say, has captivated people’s imagination, creativity and ingenuity more than any series before it. Maybe it’s because we ALL have old pairs of jeans that we keep meaning to “do something with” and this challenge has given us the impetus to actually get on and do it.  Maybe it’s because denim is such an awesome, versatile and timeless fabric. Maybe it’s because jeans themselves throw up so many challenges that the only option is to take the ingenuity up a gear in order to overcome them. Maybe the inspiring makes that have been appearing all over this blog & the various social media channels has opened our eyes to the potential in old pairs of jeans. That jeans refashioning is NOT inevitably going to end up looking all “Becky home Ecky” (unless you want it to which is equally fine of course!). Maybe, just maybe, it’s a combination of all of those things. This years challenge has achieved everything I wanted it to….and then some!! I have been FLOORED by the amount of time, thought and creative energy that has gone into everyone’s makes.  Which of course has made it all the harder to arrive at this decision. But arrive at a decision we must. So without further ado…

1st-prize


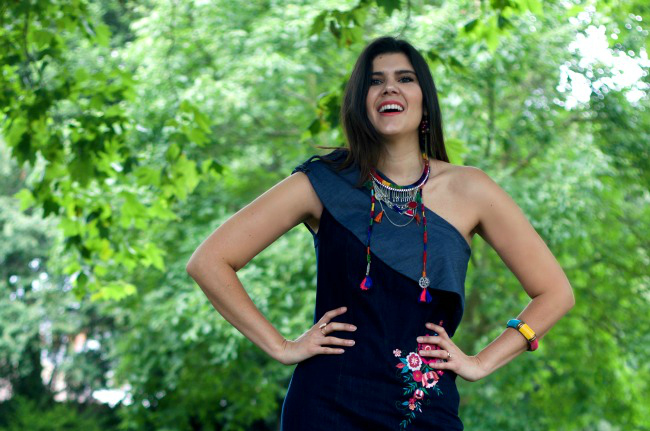
This dress by Messy Essy had me (well, all of us) floored from the moment we saw it. The sheer AMOUNT of work that went into this is almost enough on it’s own. That intricate central panel of  quilt pieced cubes itself took days of painstaking work. When I first saw that on it’s own (before it became a dress!) it occurred to me that you could frame it and put it on a wall as a piece of art in it’s own right. Add to that the careful thought and placement of the various hues of blue to achieve not only a 3d cube effect, but an ombre 3d cube effect!!! Hello!! Then, add to that the way it sits perfectly as part of the overall design of the dress, brilliantly executed and perfectly suited to the wearer. The simple elegance of this dress when worn, belies the intricacy and skill needed to make it. All of this making “the cuboid dress” a worthy winner of the first prize.The Refashioners 2016 - Your Makes - Vol I

You can read more about Essy’s process and thoughts on the challenge here.


special-recognition

Our special recognition prize goes to Selmin for this awesome denim sweatshirt. The general consensus is that it was just so well executed, so wearable. Edgy, bang up to date, makes clever use of the original seams. The colour blocking is so well considered and the subtle sashiko detailing acts to tie all of those blue hues together even further. I’ve heard it said that many people prefer their refashions not to look like they were made from jeans. I don’t think this does, but it does subtly nod to the garment’s original incarnation, and denim’s workwear history; and plays a little homage to the way clothes used to be repaired rather than thrown away. Yet it does all this whilst looking modern and, more importantly, really reflecting the wearers individual style. And I just love it for all of those reasons. (And actually would like to steal it for myself!!)The Refashioners 2016 - Your Makes - Vol 2

You can read more about Selmin’s process and thoughts on the challenge here.


It has honestly been astounding, and at times quite emotional (I know I’m a sop) each time a new entry popped up.  And to read all of your blog posts and hear what you have gained from this challenge. That it was hard, but you were glad you did it. That it made you realise that if you push yourself out of your comfort zone, you realise how much more you are capable of. In many instances that this refashioned garment is your proudest make to date. That you will never look at a pair of old jeans in the same way again. That you’ve caught the refashioning bug despite having never really considered it before. Seeing all of those makes and hearing all of your thoughts on this challenge, has made me so proud. Proud that I set the ball rolling on this challenge. But the truth is, I am not responsible for all of this. You all are.  I just set the scene and lit the touch paper. And just LOOK where our sewing community took it. THAT I am proud to be a part of.

Thank you to everyone who lent their energy to this years challenge. And while you may not have won “the big prize”, you have inspired me. And you have inspired your fellow sewers. And you have proven yet again how amazing our sewing community is. Hopefully you will have taken new things from this challenge that you never knew about yourself and about refashioning. And those are all wins. Bigger ones in my book. So thank you.

Question is……what the hell do I come up with to top this next year????!!!!

refashioning, the refashioners, The Refashioners 2016

The Refashioners 2016: Your Makes – Vol III

10/11/16

So this will be the last round up of your makes before the winners are revealed on Friday. Eeeeep! It’s not been possible to share everyone’s makes here on the blog but you can see them all by perusing the Instagram, Pinterest and Facebook posts that people have been submitting for the past couple of months. There are LOADS and there has been so much creativity and ingenuity out there. This challenge seems to have really captured the imagination!!

So without further ado, check out these beauties….the refashioners 2016 - your makes - vol 3

Source

the refashioners 2016 - your makes - vol 3

Source

the refashioners 2016 - your makes - vol 3

Source

the refashioners 2016 - your makes - vol 3

Source

the refashioners 2016 - your makes - vol 3

Source

the refashioners 2016 - your makes - vol 3

Source

the refashioners 2016 - your makes - vol 3

Source

the refashioners 2016 - your makes - vol 3

Source

the refashioners 2016 - your makes - vol 3

Source

the refashioners 2016 - your makes - vol 3

Source

the refashioners 2016 - your makes - vol 3

Source

the refashioners 2016 - your makes - vol 3

Source
the refashioners 2016 - your makes - vol 3

Source

the refashioners 2016 - your makes - vol 3

Source

the refashioners 2016 - your makes - vol 3

Source

the refashioners 2016 - your makes - vol 3

Source

the refashioners 2016 - your makes - vol 3

Source

the refashioners 2016 - your makes - vol 3

Source

the refashioners 2016 - your makes - vol 3

Source

the refashioners 2016 - your makes - vol 3

Source

the refashioners 2016 - your makes - vol 3

Source

The next time you hear from me on here, it will be to announce the winners of The Refashioners 2016. How on earth we arrive at that decision I don’t know! So feel free to chime in in the comments with your favourites!

See you Friday!!

refashioning, The Refashioners 2016

The Refashioners 2016: Competition now CLOSED!

10/02/16

That!s right. Tis done! Midnight on Friday 30th September saw The Refashioners 2016 draw to a close. Sniff! Can you believe it’s been 2 months of non stop jean refashioning inspiration?!!

The refashioners 2016 is now closed

We’re not quite done yet obviously. There’s the small matter of choosing the winners. And that my friends, is going to be a mammoth task! The sheer number and quality of this year’s entries has been overwhelming. Not to mention the surge in last minute entries has left me with a ton of  blog reading to do! I still want to share some of those entries with you. So here’s the plan:

  • Winners will be announced on Friday 14th October
  • Between now and then, I’ll be sharing even more entries


Why the “delay”? I read every blog post/social media post because I want to give proper consideration to each and every entry. You lot have put your heart and soul into it this year (in a way I haven’t seen in previous series) and THAT deserves to be reciprocated by me. But it’s a big task. I also have some private stuff going on at the moment that is eating up my time like you wouldn’t imagine. So I would beg your patience until 14th Oct, ‘cos it’s just little ole me steering this big hairy mammoth that this years series has become. (But boy, that’s a great problem to have, right?!)

Thank you in advance for that….and thank you a million times over to all the bloggers who shared their creativity and time in August……and to all of you who have done the same.

Ah-Ma-Zing!

Stay tuned 😉

refashioning, the refashioners, The Refashioners 2016, Uncategorized

The Refashioners 2016 – Your Makes – Vol II

09/20/16

Welcome to Vol II of your makes. And maaaan! They just keep coming! So SO good. As a reminder (or a kick up the backside if you prefer it that way) there are 10 days left until the deadline! (30th September. Midnight. BST/UK) So if you want to enter to be in with a chance of winning that amazing prize, then get moving! I’d also like to clarify that not appearing in one of these round ups does NOT mean your entry is out of the running. It simply means that I couldn’t use your images for reasons of size/resolution/quality etc. So make sure there are plenty of large size images knocking around for me to use. Either on one of the sharing groups (detailed below) or on your blog. Because I want to share as many as possible on here!

So…what’s been coming in? Wellllll…….The Refashioners 2016 - Your Makes - Vol 2

Big love for this fab sweatshirt from Selmin of Tweed & Greet. The subtle little sashiko detail is so perfect!

The Refashioners 2016 - Your Makes - Vol 2

Although I don’t wear dresses, I could be tempted by this. Right up my style strata!  If I wore dresses then this dress by Stitch Remedy would be in my wardrobe for sure. Love it.

The Refashioners 2016 - Your Makes - Vol 2

Vicki’s briliantly executed refashion has yielded a supremely wearable wardrobe staple. More deets and images in her facebook post here.

The Refashioners 2016 - Your Makes - Vol 2

What a difference some dye makes!  Looks like 2 completely different jackets right. Also intrigued by the back yoke of Linda’s jacket. Are those the original crotch curves I wonder??

The Refashioners 2016 - Your Makes - Vol 2

Proving that denim isn’t all blue is this awesome floral bomber from Trish.

The Refashioners 2016 - Your Makes - Vol 2

I didn’t realise I needed a relaxing neck pillow until I saw this from Sewing a la Carte! Complete with Refashioners 2016 embroidered on one of the loops!

The Refashioners 2016 - Your Makes - Vol 2

This bag by Vicky Myers is the perfect combo of denim and sashiko. Full details/tutorial here.

The Refashioners 2016 - Your Makes - vol II

This dress from Helen is a brilliant feat of engineering. You MUST hop over to her blog post and check out the insides of this too!

The Refashioners 2016 - Your Makes - vol II

Great waistcoat from Debra. The pocket details and original patches of wear/pocket shadows really caught my eye on this one.

The Refashioners 2016 - Your Makes - Vol 2

I’ll leave you with this beautiful face and a real one of a kind jacket from Falafel and Bee.  More beautiful photographs and detail here.

Inspired now?

You can see all last month’s awesome inspiration posts here. And if you’re inspired to get your refashion on and enter the Community Challenge and be in with a chance of winning some epic prizes…DO IT! Like….NOW!  Deadline for entries is 30th Sept. Midnight GMT (BST/UK).

The Refashioners 2016 - Huge Prize Package

….I think you’ve got the idea now right? Essentially we want you to refashion some jeans! (You can find the full details/small print of the brief here). BUT, if you want to be in with a chance of winning one of these amazing prize packages you need to SHARE that refashion with us in one of the following ways:

  • On Instagram: Share a pic using the hashtags #therefashioners2016  and #jeanius (using any other variation of the hashtag may result in me missing your entry)
  • On Pinterest: There is a community board here where you can pin your makes. (You will need to request an invite to join)
  • On Facebook: There is a community board here where you can post your makes (You will need to request an invite to join)

Only entries shared via the above 3 methods will be entered into the competition. Closing date for entries is 30th September 2016 Midnight BST/UK. Good luck!!

refashioning, the refashioners, The Refashioners 2016, Uncategorized

The Refashioners 2016: Over to you!

08/31/16

I tell you what….I think this year’s series is shaping up to be the best so far. Something about this theme, and the (amazing) blogger inspiration posts, the way you are all engaging and embracing this challenge, and the STUNNING competition entries that are already coming in…something about all of that tells me this is gonna be good. REALLY good. The aim in selecting this years theme was not only to encourage the reuse of existing garments and textiles…but also to put pay to this idea that all denim refashions are “Becky home eccy” (to coin a rather amusing phrase that I’ve heard several times recently). And, well….I think we’re achieving that don’t you? Just take a look at what the series has yielded so far…THE REFASHIONERS 2016 - BLOGGER ROUND UP

Looks pretty impressive when all put together like that doesn’t it?!! Not a “Becky” in sight…and there is more….SO much more to come! If you haven’t seen already…there are some phenomenal competition entries coming in already.(I’ll be sharing those as they come in over the next few weeks) I’m floored by the amount of work that has gone into some of them, and also by the sentiments that are being expressed in terms of what you are all learning and gaining from this challenge. For me, there couldn’t have been a more gratifying and exciting start to this challenge.

So, if you haven’t already done so, get yourself involved. I can’t wait to see what you come up with!

You can see all this month’s awesome inspiration posts here. And if you’re inspired to get your refashion on and enter the Community Challenge and be in with a chance of winning some epic prizes…DO IT! Deadline for entries is 30th Sept. Midnight GMT.

The Refashioners 2016 - Huge Prize Package

….I think you’ve got the idea now right? Essentially we want you to refashion some jeans! (You can find the full details/small print of the brief here). BUT, if you want to be in with a chance of winning one of these amazing prize packages you need to SHARE that refashion with us in one of the following ways:

  • On Instagram: Share a pic using the hashtags #therefashioners2016  and #jeanius
  • On Pinterest: There is a community board here where you can pin your makes. (You will need to request an invite to join)
  • On Facebook: There is a community board here where you can post your makes (You will need to request an invite to join)

Only entries shared via the above 3 methods will be entered into the competition. Closing date for entries is 30th September 2016 Midnight GMT. Good luck!!

DIY, how to, refashioning, Sewing, the refashioners, The Refashioners 2016, Uncategorized

The Refashioners 2016 – Me (no pressure!)

08/30/16

THE REFASHIONERS 2016 - ME (7)**UPDATE: This coat has been shortlisted as a finalist in the “Dressmaker of the Year” competition for Make it Today: Dressmaker magazine in both the refashioning and readers choice categories. If you’d like to vote for me you can do so here! You have until 25th April 2017.   OK, back to the post…….**

I think sometimes, because I run this challenge, there is a misconception that I am some kind of  refashioning queen. I certainly don’t regard myself in this way. I prefer to think of myself as a refashioning cheerleader.  Much less pressure! The Refashioners challenge has always been about inspiring other people. To showcase  what  they can do with refashioning, rather than showcasing my own skills. It may come as a surprise to some when I say, that I have never refashioned jeans in this way before. The extent of my jeans refashioning is mainly centered around re-fitting and reshaping existing jeans. I’ve never completely deconstructed jeans and turned them into something else. Never. So in selecting this year’s theme I was pushing myself as far out of my own comfort zone as anyone else! Of course, I was characteristically laid back about that. It’ll be fine, I thought! Won’t take long, I thought! Ha!  This project was characterised  by challenges, delays, changes of direction, obstacles and frustrations. But I got there!

I’d originally shelved this idea as “too ambitious” and decided on another idea, that would have been relatively quick and easy. (That’s MY comfort zone people!). As the projects from the other bloggers popped into my inbox it became apparent that great minds think alike. And my intended project was going to be similar to a few others. I wanted the series to offer as much variety of ideas as was humanly possible so I did an about turn about a fortnight ago and came right back to this idea…..The Refashioners 2106 - MeThe Refashioners 2106 - Me

Quilted denim! Because of course, when it’s hotter than it’s been all year, sizzling temperatures are the perfect time to work on a big thick quilted coat. Naturally!  I knew I wanted a thigh length coat. I figured I could get enough fabric from 2 pairs of jeans (wrong!) for the shell and I had lining etc in my stash. I also knew I would have to piece the shell together from smaller component parts. The green jacket above gave me a massive eureka moment there. I fell in love with that diagonal yoke and the directional use of quilting lines and my idea was born….

The Refashioners 2106 - Me

I don’t think I was the only one to snap up the Tamarack Jacket by Grainline as soon as it was released! This was the perfect opportunity to crack it out.  I lengthened the front and back sections by 6″ and shortened the sleeves by 2″. Cut it out and sew it up, I thought. Hmmm….maybe I’ll toile to test the size & fit first before I cut into my scarce denim. Then ensues 3 days (I kid you not) of faffing and fitting around the sleeve/shoulder area. The drop shoulder of the pattern was not working for me at all. Twisting and drag lines that I was worried would translate weirdly to the thick quilted denim I had planned. (I have narrow forward shoulders) I tried in vain to fix it. I could probably have just gone with it. With hindsight. But my inner obsessive came out at this point (and stayed with me for the rest of this make) and I couldn’t let it lie. So I lopped the top off the pattern and spliced in a set in sleeve configuration. Which I then proceeded to fit within an inch of it’s life and after about 4 days of faff,  I had my base pattern…..

The Refashioners 2106 - Me

Turns out that switching to a set in sleeve was a good move. Not just for fit, but because the pattern piece is MUCH narrower that that of a drop sleeve. Handy when they need to be cut from narrow jeans legs….just saying 😉

I sat for a while staring at my pattern on the morning that I started this part. Swiping through my pinterest images. Basically procrastinating and being indecisive. I was still thinking about lines, directions, how to break up the pattern pieces. So I threw down a quick and very crude sketch to try and get things moving thinking I would end up doing a few sketches. But this one was enough….The Refashioners 2106 - Me


It cleared the “log jam” in my brain and from then on I knew what I was working towards. So I began to transfer the style lines from my pencil sketch, onto the pattern itself…

The Refashioners 2106 - Me

From then I traced each piece of individually…

The Refashioners 2106 - MeThe Refashioners 2106 - Me

Added seam allowances, marked the grainline, and named my pattern pieces (that one made me snigger!)…

The Refashioners 2106 - Me


The Refashioners 2106 - Me

I ended up using 2 pairs of jeans (I actually needed 3 which I’ll come to in a minute) This pair was languishing on the £1 rail of the charity shop. Lot’s of panels, pockets, worn and wrinkled areas. They were very wide (44″ waist) but very short. And because of the construction or complex darts and pannelling “flat” fabric was sparse on this one. But I really liked the denim and thought the pocket shadows on this pair would be awesome…so they went home with me…The Refashioners 2106 - MeThe Refashioners 2106 - MeThe Refashioners 2106 - Me

The second pair (above) was a pair of size 10 fitted jeans donated to me by a friend when they no longer fit. Normally size 10 fitted jeans would not be “up there” when it comes to amount of useable fabric. However….

…these were huge bell bottom jeans! Ha! They provided the perfect amount of fabric from which to cut all four pieces for the bottom of my coat..The Refashioners 2106 - MeThe Refashioners 2106 - Me

Cut on the cross grain…the longer back pieces were cut from the widest part of the leg at the bottom (so the outer leg seam now runs horizontally across my pattern piece) and the shorter front piece cut from the middle part of the leg….also on the cross grain.

The Refashioners 2106 - Me

One problem you may encounter with more fitted/flared/shaped jeans is the fabric not laying flat once you’ve cut up the inseam. This is due to the shaping built into the curved side seam.

On the reverse, look what happens to the fabric either side of the seam line when you pinch it together….The Refashioners 2106 - MeThe Refashioners 2106 - Me

Essentially you can add some shaping of your own at that side seam to counteract the original shaping to get the fabric to lay flat 😉

Middle sections of the coat were cut from the upper legs of the £1 jeans.  I took my time to line up the details on the fabric (pocket shadows etc) so that they would be symmetrical on the finished coat…The Refashioners 2106 - Me

When deconstructed…because of all the panels on these nutty jeans…Apart from the torso area, the pieces I was left with after this were actually quite narrow! Which was a pain in the arse because I had planned on cutting my yokes and sleeves from that pair of jeans too. There was no way THAT was happening…

I still had the bum part of the bell bottoms left so I played around for a while seeing if I could squeeze them out of that. I could….but it wasn’t ideal. It would be wonky off grain (like, not even cross grain!) and I would have original seams intersect at the armhole where I was already worried about bulk. Plus I had these sections earmarked to cut pockets and binding from…The Refashioners 2106 - Me

My project had stalled. It became apparent that I would need a 3rd pair of jeans to have enough fabric for the yoke and sleeves to match. (Another design element that I had become obsessed with). Problem was I didn’t have another pair of jeans and a scour of the local charity shops, twice,  proved fruitless. I couldn’t find a pair of jeans in the right weight of denim. (Because of the quilting I had planned I needed lightweight denim; which the other two pairs were). In the end I had to use a denim remnant from my stash if I had any hope of getting this finished in time. I couldn’t afford to wait for the right pair of jeans….so on this occasion I conceded defeat and the yokes and sleeves are cut from stash fabric. I was gutted by this BUT it is TOTALLY possible to get those pieces (and the sleeves) out of a pair of jeans if you have them as evidenced by the measurements shown below…The Refashioners 2106 - MeThe Refashioners 2106 - Me

I do feel a little like I “let the side down” here. I overestimated the fabric I would have from my £1 pair of jeans and got caught out because of all the panelling etc. But I had to move on and finish this thing….if I could have waited and found that third pair of jeans I would have done. But at this stage, and this close to deadline….I had to compromise.

Moving on…I used what I had left to cut bias strips for the edge binding…The Refashioners 2106 - MeThe Refashioners 2106 - Me

I cut strips in the 3 different colours of denim I used so each section of the coat opening and hem would be bound in it’s corresponding denim…

This is all I was left with from the bell bottoms. The front torso area….which I used to cut the pockets for the coat…The Refashioners 2106 - Me


Before I could begin construction there were some holes and rips in some of the pieces I had cut…some from a slipped seam ripper…The Refashioners 2106 - MeThe Refashioners 2106 - MeThe Refashioners 2106 - Me

….and some from where I had removed the rivets during deconstruction…

A pretty simple fix from the underside …The Refashioners 2106 - MeThe Refashioners 2106 - Me

I just applied patches of interfacing to protect against future tearing etc…

The Refashioners 2106 - Me

With all my pieces now cut I began assembling my shell. My first attempt at joining the yoke to the middle was a fudge…The Refashioners 2106 - MeThe Refashioners 2106 - Me

I’d just gone onto auto pilot and aligned raw edges and stitched. When I turned it out it was, of course, off!!

So as a reminder for anyone else who may want to attempt this, the pieces need to be joined so the seamlines match. NOT the raw edges…so the whole thing is sewn slightly offset. By an amount equal to your seam allowance…The Refashioners 2106 - MeThe Refashioners 2106 - Me

And then everything lines up perfectly!

Front sections were joined top middle and bottom. Back section is the same and then joined together with a CB seam…The Refashioners 2106 - MeThe Refashioners 2106 - Me

I get really obsessed with getting intersecting seams to line up. I pinned at these points first and foremost. With the pin going directly through the seamlines on both layers to ensure the are lined up…The Refashioners 2106 - MeThe Refashioners 2106 - Me

This gives me accurate alignment where several seams intersect like at the point of this back yoke (and makes me feel “like a boss!”)

The Refashioners 2106 - Me

The lining I used had also come from a charity shop several months ago. It had the softest flannel underside and the shiniest satin RS. It had obviously been exposed to light whilst folded because there was fading along all the fold lines. It had turned a peachy colour in those areas which I actually really liked. So I decided to make a subtle feature out of it  and found a variegated peach/thread with shades of pale khaki and cream in it to use for the quilting lines on this side of the fabric…(That streak of faded peach is placed centrally on the back piece of the finished coat lining. Only I can see it. That’s how obsessed I got with detail and symmetry on this make!!)The Refashioners 2106 - Me

I did a few practice swatches and loved that effect in particular…

The quilting part itself presented a couple of challenges. Not least because the sturdy nature of denim kind of fights the batting..and instead of the batting pushing the denim up…the denim is inclined to flatten the batting…which diminishes the look of the quilting…The Refashioners 2106 - MeThe Refashioners 2106 - Me


In the end I found I had to use a pretty thick (cotton) batting in order to get the “loft” I needed to make the quilting visible. This had a knock on effect with the overall sturdiness of the finished garment. This was going to be one seriously thick and sturdy coat!!

I made a quilt sandwich for each piece and was ready to get started quilting. This is the extent of my quilting experience to date. I am NO expert, lol!The Refashioners 2106 - Me

I began by hand basting length wise and width wise. I did NOT want this shifting or distorting. Construction of this thick wadge of quilt sandwich was going to be tricky enough without that. So baste people. Definitely baste. This wadding was self adhesive but denim didn’t stick as effectively to it as quilting cotton. So it was definitely worth the added “security” not to skip this step!

I first quilted the diagonal yoke seam and the horizontal hip seam….then laid down my vertical quilting lines between those two points….using my variegated thread on my bobbin…The Refashioners 2106 - MeThe Refashioners 2106 - Me

And dark thread on the top…

I used 1″ masking tape as a quilting guide to keep my lines straight and evenly spaced. Starting in the middle and working outwards. I started and finished my lines of stitching just a fraction inside those diagonal yoke and horizontal hip stitching lines and left loooong tails of thread….The Refashioners 2106 - MeThe Refashioners 2106 - Me

Which I then secured by hand and buried within the quilting channels. I was determined to achieve a clean finish on the inside and have all the quilting lines meet and line up perfectly on the lining where any mistakes would be really obvious. I counted, 172 thread tails secured and buried by hand to achieve that finish…The Refashioners 2106 - Me

But it was well worth it. That back piece in particular, the quilting lines on that lining, remain one of my favourite elements of this coat, to the point where I almost want to wear it inside out, lol!The Refashioners 2106 - Me

I repeated this process on all 5 pattern pieces, edge stitch all around the edges of my pattern pieces and cut away the excess batting/lining and I was ready to finally construct this thing!

The Refashioners 2106 - Me

I won’t go step by step into the actual construction because that is all in the pattern instructions for the Tamarack jacket. But I will share with you the parts that go “off pattern”. Including a solution I found for the bulk element of this make…the pattern is designed for lighter weight fabrics so the seams wouldn’t be as thick as this!

As you can see on this shoulder seam…pressing these seams flat was gonna be a challenge. Super thick!The Refashioners 2106 - MeThe Refashioners 2106 - Me

I peeled back the lining and trimmed the batting right up to the seam line…

Ta dah! Bulk reduced…The Refashioners 2106 - MeThe Refashioners 2106 - Me

…and seam presses flat!

I repeated that process on shoulder seams and side seams and I was ready to insert my sleeves which had me all kinds of scared. Because…The Refashioners 2106 - Me

Well….these suckers are so thick they stand up on their own, ha ha!! This picture kills me every time I look at it. This was becoming more like an engineering project than dressmaking. At this stage I was working right at the limits of what my little Janome could cope with…every line of stitching, every bit of binding…everything added just a liiiiitle bit more bulk. I swear my little Janome whimpered when I approached her with these…The Refashioners 2106 - MeThe Refashioners 2106 - Me

Basting the sleeve in place was a must. Luckily I had removed a great deal of ease from the sleeve cap so easing the sleeve head in was relatively trouble free.

And ta dah!  They were in! I basically had my coat!The Refashioners 2106 - MeThe Refashioners 2106 - Me


Of course a coat needs pockets. What I really wanted was a nice clean welt or inseam pocket that wouldn’t visually disrupt the quiltiing lines of the bottom section. But I had to compromise here. The fabric was just too thick for the turning required for that kind of pocket. So patch it would have to be.

I played with a couple of ideas. The one below was what I wanted. The angled pocket opening echoes the same angle as the yoke, and the curved corner echoes the curve of the hem…(see….told you I was getting obsessed with symmetry)The Refashioners 2106 - MeThe Refashioners 2106 - Me

Buuuut I didn’t have enough fabric left for that (of course not. That would be too helpful, lol!) so I squeezed what I could out of the leftovers of the bell bottom jeans. My plan was to quilt them so that the quilt lines matched the ones on the coat itself. Blending the pockets visually with the coat. But I was worried about adding more bulk and used only a thin layer of batting on the pockets so it didn’t work out. The pockets are actually the only part of this coat that niggle me a little. But you gotta have pockets on a winter coat, right?

Last, but definitely not least is the 28″ chunky gold zip that finishes this make off. Basted then rebasted in place to ensure that when it’s zipped up, all those points at the yoke and hip line up perfectly…The Refashioners 2106 - MeThe Refashioners 2106 - Me

All the binding is single fold, in an effort to reduce bulk, and edge stitched in place. So there’s a very slight raw edge finish to all the binding. Which actually I really like. I like all the contrasts of this make. The utility/worn feel of the denim, with the luxury feel of the lining and gold zip, and the precision of the quilting against the rawness of the denim edges. It’s a coat of contrasts. Of juxtaposition if you like. It’s a coat of many elements. It’s a coat of blood, sweat (literally) and stress.  It’s definitely one of a kind. And I absolutely love it and couldn’t be prouder. Even though it was a bitch to me at times I wholeheartedly forgive it. All I can say is…it better be a bloody cold winter this year after all this! 😉The Refashioners 2106 - Me

THE REFASHIONERS 2016 - ME (7)

THE REFASHIONERS 2016 - ME (7)THE REFASHIONERS 2016 - ME (7)THE REFASHIONERS 2016 - ME (7)

Turns out, this project, was the hardest, most stressful, and longest I have ever undertaken (largely because I am my own worst enemy and became somewhat obsessed and uncompromising). But it was also the most satisfying because, despite (or maybe because) of the challenges and the blood, sweat and near tears that went into this, (I didn’t quite cry, but “head in hands with bewildered look” became a firm favourite during this make.)  I persevered.  And eventually, I won.  And I’ve ended up with a garment  that I am SO proud of.  That I look at and think, I can’t believe I actually made that! You see, I think when we challenge and push ourselves, we find we are capable of much much more than we ever thought.

So, are you ready to challenge yourself too? This is me, signing off, pouring myself a stiff gin, and handing the baton to you guys for a month. Show us what you got people!!!

You can see all this month’s awesome inspiration posts here. And if you’re inspired to get your refashion on and enter the Community Challenge and be in with a chance of winning some epic prizes…DO IT! Deadline for entries is 30th Sept. Midnight GMT.

The Refashioners 2016 - Huge Prize Package

….I think you’ve got the idea now right? Essentially we want you to refashion some jeans! (You can find the full details/small print of the brief here). BUT, if you want to be in with a chance of winning one of these amazing prize packages you need to SHARE that refashion with us in one of the following ways:

  • On Instagram: Share a pic using the hashtags #therefashioners2016  and #jeanius
  • On Pinterest: There is a community board here where you can pin your makes. (You will need to request an invite to join)
  • On Facebook: There is a community board here where you can post your makes (You will need to request an invite to join)

Only entries shared via the above 3 methods will be entered into the competition. Closing date for entries is 30th September 2016 Midnight GMT. Good luck!!

refashioning, the refashioners, The Refashioners 2016

The Refashioners 2016: Elisalex

08/26/16

THE REFASHIONERS 2016 - ELISALEX DE CASTRO PEAKE - BY HAND LONDON


REFASHIONERS 2016 – A Fish Called Elisalex

Let me begin by stating for the record that denim is not my jam. In fact, thinking back over the last two Refashioners challenges I’ve been a part of (thank you Portia!), menswear is also not really my jam, and needless to say, denim menswear is the least my jam. For that, I’d like to extend my deeply heartfelt gratitude to Portia for pushing me well and truly as far away from my comfort zone as she possibly could!

All joking aside, that’s one of the things I look forward to most with The Refashioners. Although we, as a community, are united by our mutual love of fabric and sewing machines, we couldn’t be more diverse in terms of aesthetics – yet we manage to appreciate and celebrate each other as a whole, without siphoning ourselves off into bitchy sub-cliques (I’m looking at you, Fashion Industry) – and it’s that wonderous diversity that really shines through when a bunch of women – and man! – who essentially do the same thing, and are given the same materials to work with, come up with such an inspiration smorgasbord! Fabulous.

Anyway, where was I…? Right, me no likey denim. Having said that, the dress I made from the denim shirt two years ago, and the off the shoulder top I made from a man’s shirt last year have both been much loved and much worn, so I wasn’t worried in the slightest about the #jeanius brief. I headed straight for Pinterest and started thinking in terms of how to make denim work for me and my aesthetic ideal. While I love the unstructured off-duty look, and could definitely rock a floaty chambray trapeze dress, we’re talking jeans here – heavy duty fabric, built to last not drape – so I found myself drawn to an uber feminine silhouette, immediately excited by all the curves and figure sculpting potential of panelled jeans denim…THE REFASHIONERS 2016 - ELISALEX DE CASTRO PEAKE - BY HAND LONDON

 As I was hatching my plan, a favourite 80s film suddenly sprang to mind, and one scene from A Fish Called Wanda in particular where Jamie Lee Curtis meets John Cleese for the first time and pretends to be a nerdy law student in order to strike up a conversation with him, and happens to be wearing a knockout denim dress that barely contains her bosom so what hope does the poor man have anyway?  And so it was decided – I set out to make the Wanda dress….

THE REFASHIONERS 2016 - ELISALEX DE CASTRO PEAKE - BY HAND LONDON


I came home from the charity shop with three pairs of men’s jeans – two mid blue and one a darker indigo, with a view to making a panelled wiggle dress contrasting the light and dark denim in order to further accentuate the curvaceous silhouette.

Luckily our Kim Dress pattern could not have been more perfect, and with a little hackaroo to the petal skirt I had me the perfect pattern, and better yet, all the panels fit perfectly on my limited supply of fabric harvested from the jeans.

THE REFASHIONERS 2016 - ELISALEX DE CASTRO PEAKE - BY HAND LONDON THE REFASHIONERS 2016 - ELISALEX DE CASTRO PEAKE - BY HAND LONDON THE REFASHIONERS 2016 - ELISALEX DE CASTRO PEAKE - BY HAND LONDON THE REFASHIONERS 2016 - ELISALEX DE CASTRO PEAKE - BY HAND LONDON


The construction was pretty straightforward, although when I say it took me all day to turn the bodice out to the right side, having joined the shell to the lining (a pretty printed cotton I snaffled from Amy aka Almond Rock’s recent destash), I literally mean exactly that. The summer holidays had just begun so I had sewn up the lining and joined it to the bodice one morning while my son was watching post-breakfast cartoons. I started trying to turn it out to the right side through the shoulder straps before heading out to the skatepark, but quickly realised it would be one of those that gives you a bit of hell before it magically pops out and you have yourself a bodice, so I took it out with us.

THE REFASHIONERS 2016 - ELISALEX DE CASTRO PEAKE - BY HAND LONDON


I wrestled with that bodice, I fought, I gnawed and clawed while my son skateboarded, throughout lunch, back at home, back out at the park… I had a break over dinner then hit it hard again at bathtime (not mine of course), and by God it was 10.50pm by the time I got the whole thing out, minus two nails and having significantly compromised the integrity of my front teeth. That lonesome beer I found lurking at the back of my fridge must have been heaven sent.

After the bodice debacle, the rest of the dress came together super quick and was a dream to sew.

THE REFASHIONERS 2016 - ELISALEX DE CASTRO PEAKE - BY HAND LONDON THE REFASHIONERS 2016 - ELISALEX DE CASTRO PEAKE - BY HAND LONDON THE REFASHIONERS 2016 - ELISALEX DE CASTRO PEAKE - BY HAND LONDON THE REFASHIONERS 2016 - ELISALEX DE CASTRO PEAKE - BY HAND LONDON THE REFASHIONERS 2016 - ELISALEX DE CASTRO PEAKE - BY HAND LONDON


The finished dress fits like a glove, and feels like a pair of super-Spanx with bonus in built lower back support, but in a really sexy way. I have never received more wolf-whistles, propositions and “Corrrr, blimey!”’s in my life, and so my conclusion is this – me likey denim now!

THE REFASHIONERS 2016 - ELISALEX DE CASTRO PEAKE - BY HAND LONDON (1)THE REFASHIONERS 2016 - ELISALEX DE CASTRO PEAKE - BY HAND LONDON


Finally, and in homage to the image that inspired me to make this dream dress come true, I felt it would be rude not to try and recreate that scene. I’d like to thank the two random blokes we dragged away from the pub for being such great sports, and my sister for her flawless direction and photography skillz.THE REFASHIONERS 2016 - ELISALEX DE CASTRO PEAKE - BY HAND LONDON THE REFASHIONERS 2016 - ELISALEX DE CASTRO PEAKE - BY HAND LONDON


Thank you Portia for having me on the Refashioners again! It has been a meaty challenge, as ever, and one that has left me with a newfound love and respect for denim as well as a killer dress – score and score!

THE REFASHIONERS 2016 - ELISALEX DE CASTRO PEAKE - BY HAND LONDON


Sheesh Elisalex!! I’m not even sure what to say to this one except maybe….AROOOOGA! (Another 80’s reference Jessica Rabbit is the only clue you’re gettin’!) I am literally speechless. Such a well conceived and brilliantly executed idea. I can only apologise for the strain caused to your nails and teeth trying to turn that bodice and in terms of pushing you out of your comfort zone…you are most welcome!

You can find Elisalex here or here. And if you’re inspired to get your refashion on and enter the Community Challenge and be in with a chance of winning some epic prizes…DO IT! Deadline for entries is 30th Sept. Midnight GMT.

The Refashioners 2016 - Huge Prize Package

….I think you’ve got the idea now right? Essentially we want you to refashion some jeans! (You can find the full details/small print of the brief here). BUT, if you want to be in with a chance of winning one of these amazing prize packages you need to SHARE that refashion with us in one of the following ways:

  • On Instagram: Share a pic using the hashtags #therefashioners2016  and #jeanius
  • On Pinterest: There is a community board here where you can pin your makes. (You will need to request an invite to join)
  • On Facebook: There is a community board here where you can post your makes (You will need to request an invite to join)

Only entries shared via the above 3 methods will be entered into the competition. Closing date for entries is 30th September 2016 Midnight GMT. Good luck!!

refashioning, the refashioners, The Refashioners 2016

The Refashioners 2016: Erin

08/25/16

THE REFASHIONERS 2016 - ERIN - CALIVINTAGE
When it came to working on the latest Refashioners challenge, I knew I wanted to do something simple. Mostly because it had to be simple. My sewing skills are beginner at best, and I know nothing about how to draft a pattern, so these projects are always a bit tricky for me. Fortunately, I tend to love to wear very simple designs. I own a lot of huipil style dresses and tops, and I adore them even if they are essentially two pieces of fabric sewn together. So I got to thinking about other styles of clothing in a similar vein and it dawned on me: a poncho! Which is, by design, “a single large sheet of fabric with an opening in the center for the head,” according to the Wikipedia definition.

THE REFASHIONERS 2016 - ERIN - CALIVINTAGE

THE REFASHIONERS 2016 - ERIN - CALIVINTAGE

I used the legs of two pairs of jeans to create the fabric for the vest, which is essentially an open-front poncho.

THE REFASHIONERS 2016 - ERIN - CALIVINTAGETHE REFASHIONERS 2016 - ERIN - CALIVINTAGETHE REFASHIONERS 2016 - ERIN CALIVINTAGE

The fabric panels for the vest portion of the jacket were simply the legs of the jeans. Bonus: you now have some jorts to wear in the summer, if that’s your thing.

Simply trim the pieces of fabric until they are identical in size, and you’re ready to start sewing.

THE REFASHIONERS 2016 - ERIN CALIVINTAGETHE REFASHIONERS 2016 - ERIN CALIVINTAGE
I lined-up the bottom hems of the trousers to create the bottom hem of the vest. Face the fabric inwards and sew both the two pairs of panels together horizontally across the top edge. These are the two shoulder seams.THE REFASHIONERS 2016 - ERIN CALIVINTAGE
THE REFASHIONERS 2016 - ERIN CALIVINTAGETHE REFASHIONERS 2016 - ERIN CALIVINTAGE

Now that the shoulder seams have been sewn, we’ll sew up the back of the jacket. Place the two long panels RS together and sew along the back, stopping short of the shoulder seams.

THE REFASHIONERS 2016 - ERIN CALIVINTAGE

Now you have created an open-front poncho. You can stop here and ponder different variations. The remaining edges can be finished and worn as a vest.

THE REFASHIONERS 2016 - ERIN - CALIVINTAGE

You can leave an opening for the collar and continue sewing down the front for a top, or you can add  sleeves to create a jacket…

THE REFASHIONERS 2016 - ERIN CALIVINTAGE

Which is what I did! I decided to get a bit adventurous and used two more trouser legs to create the arms for a jacket. I cut the fabric in such a way that I was utilizing the finished hems of the trousers as much as possible while constructing my jacket. (they ended up being my cuffs)

Simply line-up your trouser leg with the shoulder seam, pin it in place, and sew it on. Once those have been attached, you can sew the side seams and finish the front edges.

THE REFASHIONERS 2016 - ERIN - CALIVINTAGETHE REFASHIONERS 2016 - ERIN - CALIVINTAGETHE REFASHIONERS 2016 - ERIN - CALIVINTAGE


 As a very optional last step, I decided to use a natural indigo dye to create a single deep blue shade for the entire garment, but this isn’t really necessary if you start with a pair of dark wash jeans.

THE REFASHIONERS 2016 - ERIN - CALIVINTAGETHE REFASHIONERS 2016 - ERIN - CALIVINTAGE
And there you have it!  A simple denim poncho jacket ready to wear!

THE REFASHIONERS 2016 - ERIN - CALIVINTAGETHE REFASHIONERS 2016 - ERIN - CALIVINTAGE

The fun part is that you can do the same with a closed front if you prefer a shirt, or you can skip adding the arms for a shorter length vest or top. Hope you enjoy!

Gloriously simple right?!! The earliest clothes were made from simple rectangles of fabric and while clothes have gotten alot more complicated construction wise since ancient times; the appeal of simple styles and shapes has endured through it all. If anything it’s seen a significant resurgence in recent years. Refashions (sewing in general in fact) needn’t be complex. It’s all just shapes sewn together. So start with simple rectangles, (conveniently you have some sat right there in the legs of those unloved jeans!) sew them together in different configurations, try stuff….see what happens 😉

You can find Erin here or here. And if you’re inspired to get your refashion on and enter the Community Challenge and be in with a chance of winning some epic prizes…DO IT! Deadline for entries is 30th Sept. Midnight GMT.

The Refashioners 2016 - Huge Prize Package

….I think you’ve got the idea now right? Essentially we want you to refashion some jeans! (You can find the full details/small print of the brief here). BUT, if you want to be in with a chance of winning one of these amazing prize packages you need to SHARE that refashion with us in one of the following ways:

  • On Instagram: Share a pic using the hashtags #therefashioners2016  and #jeanius
  • On Pinterest: There is a community board here where you can pin your makes. (You will need to request an invite to join)
  • On Facebook: There is a community board here where you can post your makes (You will need to request an invite to join)

Only entries shared via the above 3 methods will be entered into the competition. Closing date for entries is 30th September 2016 Midnight GMT. Good luck!!


refashioning, the refashioners, The Refashioners 2016

The Refashioners 2016: Sally

08/24/16

THE REFASHIONERS 2016 - SALLY - CHARITY SHOP CHIC

This year’s challenge for “The Refashioners” refashion series is to remake a pair of jeans into something, with the majority of the finished project coming from the source garment, that is, it should be a mainly denim item.

Personally, I rarely work with denim as I do worry that I’d get carried away and end up with something like this, that is, something very obviously having been made from a pair of old jeans. It looks a bit strange because there are very few garment types that are typically made from the same heavy denim as jeans are – even denim jackets use lighter weight denim.

So, my target garment for this fabric had to be another pair of jeans. Cut up jeans to make more jeans, you ask? What is the point?

Well, the look I’m hoping to emulate is a designer pair of jeans which is made from… old jeans. These Vetements Fall 2015 jeans originally retailed at $1450 (here they are on Net a Porter) and they came in several different styles. The label basically bought up loads of vintage Levi 501s (!!) and cut them up using their own pattern to make an interesting new style.

Key to the look is the ‘pocket within a pocket’ shapes on the back (no actual back pockets), seams down the front and back legs, and uneven, unfinished hems.

These were absolutely everywhere at one time… like you could barely read a fashion blog without seeing them at some fashion week or other.

I actually read quite a few articles praising these jeans before coming across one that mentioned they use TWO pairs of vintage Levis for each finished pair. Two! Pairs! Of vintage, wearable jeans!

Of course, I’m going to emulate these using something ugly and turning it into something… interesting, if not 100% beautiful.

I started with a pair of ordinary jeans.

THE REFASHIONERS 2016 - SALLY - CHARITY SHOP CHIC


These particular jeans are bog standard Marks and Spencer dad-jeans of absolutely no fashion merit of any kind (no vintage Levis were harmed in the making of this project). The only criteria for selection were that they were a little big on me (but not massively outsized) and they are a fairly light wash (so the pocket shapes will show up once the pockets are removed).

THE REFASHIONERS 2016 - SALLY - CHARITY SHOP CHIC

I picked these up in my local Cancer Research shop for £2. Bargain!

First step obviously was to remove the back pockets and remove the lint (urgh). Note the lovely colour difference between the washed areas and the original denim (this is key to getting the look).

THE REFASHIONERS 2016 - SALLY - CHARITY SHOP CHIC

I unpicked the waistband everywhere except the centre front section (that would be hard to sew back on).

THE REFASHIONERS 2016 - SALLY - CHARITY SHOP CHIC THE REFASHIONERS 2016 - SALLY - CHARITY SHOP CHIC

I also unpicked the back seam.

I merrily cut up the back legs and at ninety degrees into the centre back seam.

THE REFASHIONERS 2016 - SALLY - CHARITY SHOP CHIC

Sewing the back sections in gave me the look I wanted for the pocket sections, but my overenthusiastic seam allowance left me with a bit of a gap at centre back, as it turns out.

THE REFASHIONERS 2016 - SALLY - CHARITY SHOP CHIC

Trying them on, I made a new centre back seam.

THE REFASHIONERS 2016 - SALLY - CHARITY SHOP CHIC

Because of the aforementioned gap, I ended up with a dark blue stripe in the middle. No big deal.

THE REFASHIONERS 2016 - SALLY - CHARITY SHOP CHIC

I cut up the front legs, making sure to cut far enough away from any rivets that I could sew it back together without having to sew over any.

THE REFASHIONERS 2016 - SALLY - CHARITY SHOP CHIC

I included the pocket bags in the seams, so the front pockets still work.

THE REFASHIONERS 2016 - SALLY - CHARITY SHOP CHIC

The slight colour variations in the wash help emphasise the new style lines, I think.

THE REFASHIONERS 2016 - SALLY - CHARITY SHOP CHIC

I made some fitting adjustments on the back seams to make them a bit tighter, but overall the fit was OK.

THE REFASHIONERS 2016 - SALLY - CHARITY SHOP CHIC

The only issue was to shorten the waistband accordingly.

I cut it and reattached it in two places (to avoid bulk from seam allowances at the join between the centre back seam and the waistband). I actually ended up sewing the belt loop back on by hand as it was more than my machine could take!

THE REFASHIONERS 2016 - SALLY - CHARITY SHOP CHIC THE REFASHIONERS 2016 - SALLY - CHARITY SHOP CHIC

And here are the finished jeans!

THE REFASHIONERS 2016 - SALLY - CHARITY SHOP CHIC

There is room for my phone in the front pockets, just about.

I left the hems uneven and unfinished. To get them to unravel a bit, I just ran them through the washing machine.

THE REFASHIONERS 2016 - SALLY - CHARITY SHOP CHIC

The back pocket pattern I think looks great!

THE REFASHIONERS 2016 - SALLY - CHARITY SHOP CHIC THE REFASHIONERS 2016 - SALLY - CHARITY SHOP CHIC

Thank you Portia for asking me to be part of this series again!


Yep, been seeing these everywhere too! Such a subtle change that completely transforms a pair of jeans from shapeless and styless to fitted and edgy. Not only does this process provide really interesting style details but it also fixes the issue of a too big pair of jeans. Win win I’d say! Thank you so much Sally!!

You can find Sally here or here. And if you’re inspired to get your refashion on and enter the Community Challenge and be in with a chance of winning some epic prizes…DO IT! Deadline for entries is 30th Sept. Midnight GMT.

The Refashioners 2016 - Huge Prize Package

….I think you’ve got the idea now right? Essentially we want you to refashion some jeans! (You can find the full details/small print of the brief here). BUT, if you want to be in with a chance of winning one of these amazing prize packages you need to SHARE that refashion with us in one of the following ways:

  • On Instagram: Share a pic using the hashtags #therefashioners2016  and #jeanius
  • On Pinterest: There is a community board here where you can pin your makes. (You will need to request an invite to join)
  • On Facebook: There is a community board here where you can post your makes (You will need to request an invite to join)

Only entries shared via the above 3 methods will be entered into the competition. Closing date for entries is 30th September 2016 Midnight GMT. Good luck!!

refashioning, the refashioners, The Refashioners 2016

The Refashioners 2016: Rachel

08/23/16

THE REFASHIONERS 2016 - RACHEL - HOUSE OF PINHEIRO

“They (jeans) have expression, modesty, sex appeal – all I hope for in my clothes.” -Yves Saint-Laurent. {My challenge motto.}

The Refashioners always been a yearly inspirational series for me. I love challenges that get people reinventing something that once-was and making it up-to-date. Anything that inspires people to think out of the box. This year grand-theme of “jeanius” got me whistling ‘Tiny Dancer’ while rummaging every local charity store around. Yes …. some occasional pirouettes were also witnessed by the locals.

For a long time I been looking for an excuse to draft a Lanvin inspired one-shoulders flounced denim dress.

THE REFASHIONERS 2016 - RACHEL - HOUSE OF PINHEIRO

One of the things that makes having a jeans theme so fascinating for me is that the material- ‘denim’- is consider one of oldest fabrics in the world but is the epitome of youth/cool. Never gets ‘dated’ so rummaging for older pieces felt like a personal treasure hunt.

At first I as looking for the perfect combination of shades of blue. Strangely my biggest challenge was to find the ‘raw materials’ with reasonable prices. Where the second hand shops valuing the jeans using the price of gold? Luckily Portia came to my rescue with a car boot full of used denim. For my body con design to work my denim had some level of stretch.

THE REFASHIONERS 2016 - RACHEL - HOUSE OF PINHEIRO

I came home with 3 pairs with different percentages of lycra content. When working with materials with different characteristics is important that placement is done correctly as the fabrics will behave differently when sewn together. I had to stabilise some of the side seams. I’m glad it all worked perfectly including the side zipper.

My self drafted pattern looked like long strips of rhythmic gymnastics ribbon. A total of 6 pattern pieces using mainly the legs. As each denim pair had a different leg length I had to apply creative problem solving.

THE REFASHIONERS 2016 - RACHEL - HOUSE OF PINHEIRO

The different patches end up being my favourite design feature. The only piece of old the bolt-fabric used was the flounce which was made by cutting a circle. A piece of one of the waistband was used as an epaulette. If you fancy trying this design but don’t want to draft a pattern you can simply unpick each leg forming long strips and drape over a mannequin or yourself.

My plan was just to have a denim dress. Simplicity in itself. But you know when you look at a finished project and feel is missing something? More is more suddenly. Fringe is always a great compliment for denim because the way the fabric is weaved. I imaged someone else would probably do it so I went for contrasting colour fringe trim instead.

THE REFASHIONERS 2016 - RACHEL - HOUSE OF PINHEIRO

After watching Gucci on snapchat (seriously addictive stuff and future subject for long therapy sessions) I felt so inspired by all their embroidery work over Tian prints. If you are into fashion & history of art I highly recommend looking at their latest work. It was inspired by “Bird and Flower’ Chinese 10th century painting.

THE REFASHIONERS 2016 - RACHEL - HOUSE OF PINHEIRO

This thoughtful ‘feeling moment of harmony’ influenced me on choice of design and colour of my embroidery. One of the places I teach, CCB Rochester, has a selection of embroidery machines. I was able to sew the embroidery design with a six needle embroidery machine. You can freehand embroidery on whatever machine you own.

THE REFASHIONERS 2016 - RACHEL - HOUSE OF PINHEIRO THE REFASHIONERS 2016 - RACHEL - HOUSE OF PINHEIRO

That’s all from me. Many thanks to Portia for hosting such a creative and inspiring challenge! Now my pirouettes will look a lot more fun in this dress.

So Rachel returning to that ongoing theme with jeans refashioning….narrowing her pattern pieces so she could squeeze them out of narrow trouser legs. It’s a key way of overcoming the scarcity of fabric, as pretty much all our bloggers have demonstrated. Let’s not forget the perks of stretch denim too! Perfect for form fitting refashions like this. And embellishment! Yay! Embroidery (elaborate like this or simple like sashiko), applique/patches, (floral, modern or like the beautiful japanese boro textiles Marilla and Wendy referenced). Oh and while we’re at it, have a think about bleaching ( a la Rosie!) and dyeing too. Techniques like shibori/tie dye and batik can be used with dye, or in relief with bleach. There are soooooo many ways you can transform the fabric itself before you even sew a stitch!

You can find Rachel here or here. And if you’re inspired to get your refashion on and enter the Community Challenge and be in with a chance of winning some epic prizes…DO IT! Deadline for entries is 30th Sept. Midnight GMT.

The Refashioners 2016 - Huge Prize Package

….I think you’ve got the idea now right? Essentially we want you to refashion some jeans! (You can find the full details/small print of the brief here). BUT, if you want to be in with a chance of winning one of these amazing prize packages you need to SHARE that refashion with us in one of the following ways:

  • On Instagram: Share a pic using the hashtags #therefashioners2016  and #jeanius
  • On Pinterest: There is a community board here where you can pin your makes. (You will need to request an invite to join)
  • On Facebook: There is a community board here where you can post your makes (You will need to request an invite to join)

Only entries shared via the above 3 methods will be entered into the competition. Closing date for entries is 30th September 2016 Midnight GMT. Good luck!!

Newer Posts
Older Posts
Portia
Follow
Sewbox

© Copyright 2026. Portia Lawrie. All Rights Reserved. Managed by WordPress Web Dev Cornwall .