• About
    • Contact
    • Press
    • Sponsor
  • DIY
    • Home & Garden
    • Jewellery & Accessories
    • Yarn Crafts
  • Sewing
    • patternless & self drafted
    • Refashions
    • Commercial Patterns
    • Sewing Tips
    • Overlockers
  • The Refashioners

Portia Lawrie

Search Results for: label/Top Draftalong

Uncategorized

Top Draftalong – The fun stuff! Some initial thoughts…

04/09/12

It’s been a while! When last we discussed the Top Draftalong, I’d finally finished all that fitting malarkey (Hurrah!) and traced my pattern onto card to create my block. (Where are you at?) So I thought I’d share with you my thoughts on the first round of actual drafting. The fun part! First of all, excuse the quality of these sketches. They’re just some roughs I threw down on paper while Elliott was busy in the ball pit at our local indoor play centre. Part of my multi tasking/fitting it all in plan 😉

I’ve opted to keep it simple (baby steps!) and with summer and Me Made May on the horizon, (I’m still pondering that one) some simple lightweight tops in a nice drapey fabric, will fit the bill just nicely.

Style 1
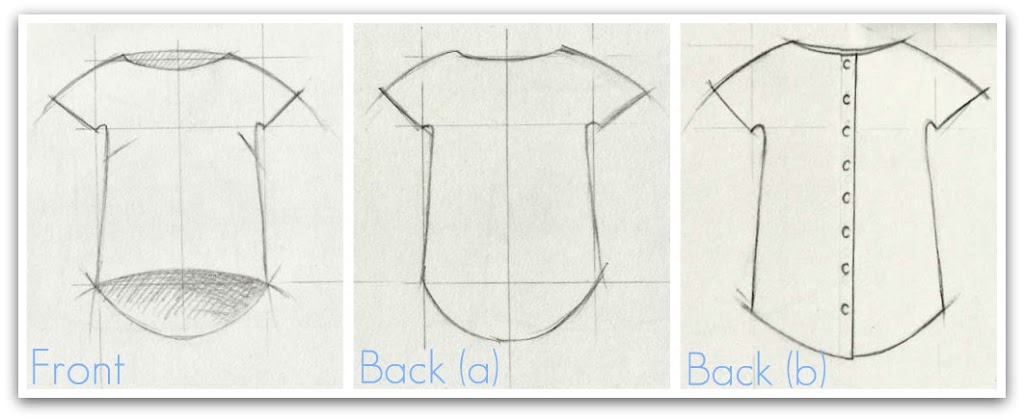
Sleeveless, slightly flared/A line top with bust darts, scoop neck to front, lower scoop neck to back. Graduated hemline, scoops up at the front and down at the back (no builders bum!) and maybe a button back…

Style 2
Slightly flared/A line top with bust darts, bateau neck to front and back. Kimono sleeves. Hemline scoops up at the front and down at the back and maybe a button back…

Style 3
Gently fitted top with bust darts, Peter Pan collar, kimono sleeves and maybe a button back…

My thinking is that the kimono sleeve is a great first foray into self drafting as it is drafted as a simple extension of the shoulder line rather than a seperate pattern piece. A little like the self drafted top tutorial I posted a while ago. Plus it’s one of my personal faves. A good alternative to a sleeveless top if, like me, you’re a little self conscious of your upper arms being on show. I’m a big fan of button backs but have steered clear of them on commercial patterns in the past because of my sway back issues. But since I’ve now fixed that on my toile/block, I’m hoping I can sucessfully revisit the idea. The button back will involve drafting facings, so while we’re at it we may as well go down the route of learning to draft the neckline facings too. I’m thinking for the first round of drafting, a combo of styles 1 & 2. Anyone wanting a sleeveless top can skip the kimono sleeve drafting. Similarly, anyone wanting a plain backed garment can skip the drafting of the button placket. Then for the second round perhaps we can move onto style 3 and drafting the collar.
What say you? Any thoughts or preferences peops?

Follow my blog with Bloglovin

fabric, goldhawk road

Fabric heaven and a chance encounter….

04/02/12

If you are based in the UK anywhere near London,  I’ll bet you can probably guess where these pictures were taken. Roll upon roll of gorgeous silk crepe at rock bottom prices…

Piles of Dupion and sand washed silk stacked high…

Of course it’s the fabric mecca that is Goldhawk Road…

I had a rare “day off” from mummy duties last week. The weather was beautiful (look at that deep blue sky!!) and I introduced one of my very good friends to the wonders of Goldhawk Road. She was suitably stunned and impressed by the volume and variety of bargainous fabrics that it had to offer….

We went at a very civilised pace and stopped for a coffee to fondle our repective purchases in the privacy of a local cafe 😉

I was pretty restrained but still spent more than I had intended, but that’s what Goldhawk Road can do to a gal I guess! This lightweight drapey viscose (yes viscose but not the nasty kind!) is destined to be the first top I draft as part of our Top Draftalong (next post is imminent, I promise Winnie!)….(£4.95/m)

This pastel stripe, medium weight, cotton seersucker is another matter. No firm ideas yet. Any suggestions wholeheartedly welcome! (£4.99/m)

Top is a small silk remnant destined for a college project. (£6/m)
Middle is a cotton linen blend for a simple self drafted tunic idea I had. (£3.99/m)
Bottom is a gorgeous lightweight pure wool.( Haggled to £6/m) If the grey tunic works out well, it will probably end up as another variation of that…

The day also resulted in one of those random occurrences that has you scratching your head and thinking somone “up there” has had a hand in it. Serendipity. Know what I mean? A chance encounter with a complete stranger. We both thought that we recognised eachother, but we couldn’t fathom any possible connection that meant we might have met before. She turned out to be an author. Sewing and crafting (among other things) funnily enough. I happen to write a blog about sewing and crafting among other things. We talked briefly about her book and my blog and I passed her my details. I had a lovely email that evening, and a beautifully wrapped package arrived at my home today. The details of which I shall share with you very shortly! Suffice to say, I’m pretty excited!!
Oh, and the picture on the right is especially for Karen…just in case you were wondering!

DIY, kimono tee pattern, Pattern Drafting, Tutorials

Draft your own simple top……A Simple Tutorial

10/21/11

Firstly, forgive the top of my head being lopped off in this photo. I’ve been experimenting with pin curls and hadn’t got round to taking them out when I took this picture. Secondly, yes Karen, you do recognise this fabric! Purchased at the Fabric Fandango, and mindful of Karen’s warning about how much it creases (oooooh how it creases!!) I thought it would be perfect for a simple project like this so as to keep future ironing as easy as possible!
Now, back to the subject in hand….pattern drafting. My toile for the Top Draftalong is FINALLY finished!!!! (More on that to follow) Which means that the design drafting element of the draftalong is imminent, and not a moment too soon in my view. ( Have I mentioned how much I detest fitting…?) Anyway, I thought I’d limber up my drafting muscles with a fun and, yes, easy peasy lemon squeezy, quick and simple “freestyle” drafting project that anyone could do. Seriously. You could draft AND make this top within a couple of hours. Faster if you’re not a slow coach sewer like me. Even if you have never put pencil to paper and drafted anything before in your life. Don’t believe me? Here’s how….

Start with a rectangle and calculate the length of the sides as follows:
A = Bust or Hip Measurement (whichever is the larger) + 2-3″ (ease) divide by  4 and + 3″
B = Required length of top + desired hemming allowance
Mark which is your side seam and which is your centre back/front line….

A = Mark a point approx 8″ down the side seam from what will be the top of your pattern. (This will be your armhole. I made mine 8″. Your’s may be slightly more or less depending on how big you want your armhole opening to be).
B = Along the bottom edge mark a point 3″ in from the side seam

Join these two points up creating a curve for the underarm…this will become your actual stitching line/side seam…

Now for the neckline:
A = Mark a point approx 2″down the CB/CF seam from the top (depending on how low you want your neckline to scoop this could be more but wouldn’t advise it being any less. As you can see from my top, 2″ has it sitting just at the base of my throat)
B = Mark a point along the top edge where you want your neck opening to finish. I used my bra strap as a guide as I don’t like to flash them!

Draw in your neckline curve either freehand or using a French Curve. Where the neckline curve hits the CB/CF seam needs to be at a 90 degree angle so as to avoid “peaking” when you come to cut out the pattern piece on the fold. I’d also advise a slightly less acute angle where it hits the top edge/shoulder seam too. I cut mine as shown here and it’s resulted in a very slight pulling at the point where the neckline hits the shoulder seam of my top.

Add a seam alowance to the underarm/ side seam AND the shoulder seam…

Cut out your new pattern piece. Then cut 2 on the fold out of your fashion fabric and with RS together sew together the shoulder seams and then the side seams. Finish seam allowances.  I also put 2″ slits in the side seams for a little extra ease at the hips, finished the neckline with self fabric bias tape,(see posts here and here) and just hemmed the bottom and sleeves with a narrow hem. Voila! Simple top perfect for layering under a cardi for the winter months. Go on! Give it a go! ( I’d love it if you’d let me know if you do!)
Px

Portia
Follow
Sewbox

© Copyright 2026. Portia Lawrie. All Rights Reserved. Managed by WordPress Web Dev Cornwall .