• About
    • Contact
    • Press
    • Sponsor
  • DIY
    • Home & Garden
    • Jewellery & Accessories
    • Yarn Crafts
  • Sewing
    • patternless & self drafted
    • Refashions
    • Commercial Patterns
    • Sewing Tips
    • Overlockers
  • The Refashioners

Portia Lawrie

DIY, finished garments, how to, kimono tee pattern, Pattern Drafting, self drafted, Tutorials

Draft a simple Kimono Tee: An old project revisited….

05/19/14

“Draft your own Simple Top” was one of my first proper tutorials and still one of my most visited and repinned posts. (That and the bias tape trick!) I guess because a simple basic will always have appeal and a place in our wardrobes. I posted it waaaaay back in October 2011, and whilst that tutorial will still yield a cute and wearable top….I’ve learnt a bit more since then and there are a couple of refinements to the drafting and construction process that I wanted to revisit in an updated tutorial. Mainly to eliminate the drag lines I would often get around the neckline….but also some of the design tweaks  that I tend to apply during construction as opposed to during drafting…in a way….kind of self drafted then refashioned!


Start with a rectangle and calculate the length of the sides as follows:
A = Bust or Hip Measurement (whichever is the larger) + 2-3″ (ease) divide by  4 and + 3″
B = Required length of top + desired hemming allowance
Mark which is your side seam and which is your centre back/front line….


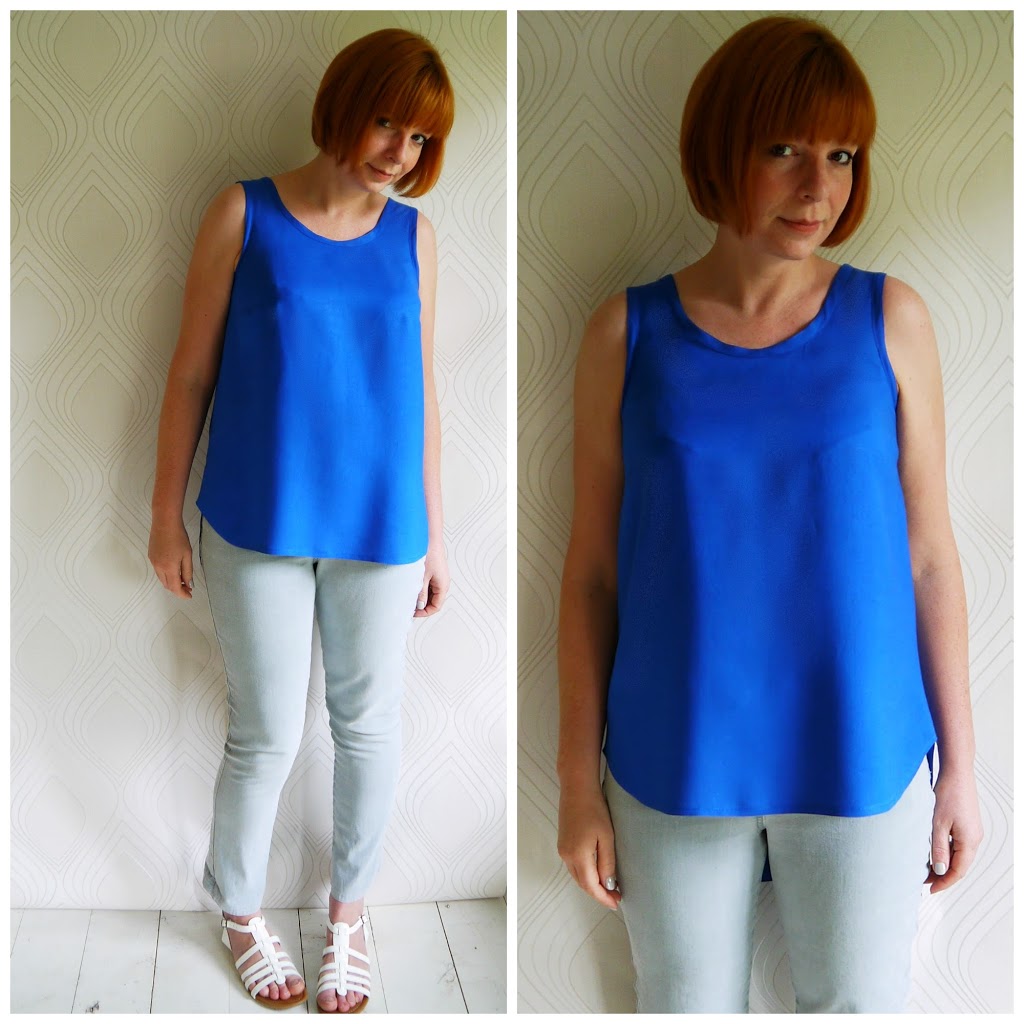
This is what we’re going to end up with….


For the neckline:
C = Mark a point between 2-3″down the CB/CF seam from the top (depending on how low you want your neckline to scoop this could be more but wouldn’t advise it being any less as 2” is just about at the base of your throat)
D = Mark a point along the top edge where you want your neck opening to finish. I used my bra strap as a guide as I don’t like to flash them! This point marks the end of your neck opening and the beginning of your shoulder line.
Draw in your neckline curve either freehand or using a French Curve. Where the neckline curve hits the CB/CF seam needs to be at a 90 degree angle so as to avoid “peaking” when you come to cut out the pattern piece on the fold. 


Now Slope the shoulder (below left):
E = Mark a point 2”down the side seam (The one opposite the centre front/back line) and join to point D. This slopes the shoulder seam to follow the natural slope of your shoulder line and this is the part that avoids pull lines around the neckline….

Draw in the Sleeves (above right):

F = Mark a point approx 8″ down the side seam from what will be the top of your pattern. (This will be your armhole. I made mine 8″. Yours may be slightly more or less depending on how big you want  your armhole opening to be).
G = Square down 3″ from F and and then 3” across (in from the side seam).
Join these two points up creating a curve for the underarm…this will become your actual stitching line/side seam…


Finish the Side Seam:
Join G to your hemline (straight down or slightly angled to create an A line. I prefer the veeeeeery slight A Line to give me a bit more ease at the hips) and you have your basic pattern piece!


Add a seam allowance to the underarm/ side seam AND the shoulder seam…then cut out your pattern piece and mark relevant details like the grainline, fold, size etc. 


Then cut 2 on the fold out of your fashion fabric and with RS together sew together the shoulder seams and then the side seams.
You now have a basic kimono tee! (Or tunic/dress depending on how long you drafted it). Try it on for size. At this point you can choose to take it in or let it out a bit. Or tweak the design elements. For instance, I scooped my front neckline down a little, shortened the sleeves, added a patch pocket and cut a shirt tail hem. You could shorten it, cut a high low hem, add cuffs to the sleeves, cut a scoop back, ruche the sleeves, add a faux button placket, peter pan collar….what ever your imagination allows. At this stage you essentially have a blank canvas on which to create. And once you have that basic pattern piece, you can just keep churning out a basic shape, that you can turn into a different top each and every time by changing up design details….what about making this in a semi sheer bold print cotton lawn, and slicing it right up the centre to make a kimono cover up for cool summer evenings…..or drafting it ankle length to and making in a drapey jersey to make a maxi dress?


I guess that’s why I keep coming back to this shape time and time again. It’s easy, it’s quick, its comfy, and it’s as versatile as your imagination allows it to be !
 
Once you’ve tweaked to your hearts content, finish seam allowances, hems and neckline.  I finished the neckline with self fabric bias tape,(see posts here and here) and just hemmed the bottom and sleeves with a narrow hem. Simple as that. Go on! Give it a go! 


Dressmaking, finished garments, kimono tee pattern, Sewing, Sorbetto

FO: Electric Blue Sorbetto Variation

05/20/13

This is me dressing for the weather I want rather than the weather we have! In fact, as I type this, I’m staring at a grey drizzly morning and wrapped up in a chunky cardi with a warming cup of coffee! (I drink an unhealthy amount of coffee every day!) It’s a variation of the Sorbetto pattern using the same fabric as my Electric Blue Kimono Tee….

Essentially I lengthened the front & back pieces to create a high low scooped hem. It’s a hem treatment I’m growing rather fond of; although this is the most exaggerated incarnation of it so far! (You’ll notice a few examples in this recent inspiration post) The neckline and armholes are finished with self fabric bias using my nifty cheat method…

One problem with this top….despite pre washing the fabric, the kimono tee I made from it has shrunk to unwearable proportions after just 2 washes. So if I want to keep this top wearable, it’s handwash only. Which is a pain in the backside! Ah well! Come on summer! Where the heck are you?!

finished garments, kimono tee pattern, refashioning

FO x 2: Chambray Tee & Refashioned Golf Trousers

05/16/13

Where I live we have quite a well off retired population. The kind that indulge in expensive hobbies like sailing and golf. As a result the charity shops here will often throw up golfing or sailing related wear. These trousers were a case in point. (£1 rail! Score!) I loved the tartan/plaid pattern and subtle colour way; but not the frumpy leg shape. so I tapered and skinnified them and teamed them with yet another kimono tee incarnation. This time with a boxy shell top vibe and the addition of a dinky patch pocket…

More ammo for MMM’13!

finished garments, kimono tee pattern

FO: Electric Blue Kimono Tee

04/30/13

A friend of mine asked me recently if it wasn’t time I made something other than kimono tees. (Cheeky she is that one!) Well, yes it probably is. But then again…when these are so quick and easy to whip up; and I’m mindful of how rapidly MMM’13 is approaching…well…you had to know more of these were going to pop up! I’m really feeling the electric blue thing recently. Not a colour I’ve really worn much before but aside from this make, I’ve recently acquired a couple of jumpers in this colour. Totally subconsciously. Do you ever find that? A colour just starts creeping it’s way into your wardrobe/fabric stash and it takes you a while to notice?

This fabric came from a “craft jumble”. An annual event held at our local village hall in aid of Essex Air Ambulance. It really is a thing to behold. People queuing at the door, trestle tables piled high with fabrics, wools, and all manner of haberdashery and craft items at amazing prices. The fabulous ladies who organise this event spend all year taking in donations and meticulously measuring, bagging, and pricing everything up for the sale, held every March. I went along with a (lovely and hilarious) friend from my dressmaking course and we both came away with metres and metres of fabric. This cotton cost me £1.50 for a little under 3m of fabric. (I have enough left for another make…maybe a maxi skirt…I’m not sure yet). With prices like that, it won’t surprise anyone to hear that it’s a bit of a scrum when you get in there! But hey, for fabric bargains like this a few elbows in the ribs is a small price to pay! (Not me of course…I would never indulge in that kind of behaviour..I’m far too polite 😉

I’ve never come across an event like this before. Sure, jumble sales are ten a penny. But one aimed at stitchers and knitters specifically?  I’d love to hear from you if you have an event like this near you? Surely this can’t be a phenomenon unique to our village hall? Can it?

kimono tee pattern, pattern adjustments, Pattern Drafting, refashioning, Restyles, self drafted

Refashion: Dress to Cuffed Kimono Tee

11/13/12

This past couple of weeks has been manic what with one thing and another. I haven’t been getting much sewing done at all. So this week I eased back into my sewing groove with a quick and simple refashion.

This dress has been in my refashion pile for eons. Like, 2 years! It was made from a beautiful aubergine shade of purple in a drapey brushed cotton. When deciding on items to refashion, I tend to look past the garment itself to the quality and quantity of fabric that there is to work with. This dress had an ankle length gathered skirt with no darts or such like. So once I had removed the skirt from the bodice, and removed the button placket down the centre, I was left with a really good amount of fabric to work with. One large rectangle from the back of the skirt; and 2 smaller rectangles harvested from the front skirt, cut from either side of the button placket. Out came my trusty kimono tee pattern, and a few minor pattern adjustments later, voila…

After lengthening the pattern slightly and reshaping the hem; I cut the front piece in one from the larger rectangle; then the back piece in two parts from the smaller rectangles. I simply added a CB seam allowance to my pattern, so the “new” top has a centre back seam.
The hem of this top is a “high/low” affair. Scooping down at the back and up at the front. The finished tee was a little plain even for my simple tastes! So I used some leftover scraps to add some little cuffs to the sleeves, finished off with buttons harvested from the original dress. Such a simple thing to do it turns out; (and a quick how to on that to follow later this week) but I think it really finishes this tee off nicely!
Pleased as punch with this one. So comfy to wear and I do love a bit of aubergine (eggplant to those of you across the pond!) Actually I can’t stand aubergine to eat. Bleurgh! But the colour officially rocks!

BTW, my photos, until we get some decent natural light, (in the UK in the winter? Fat chance!) are gonna be fuzzy and pretty crap. Just warnin’ ya!

finished garments, kimono tee pattern, Pattern Drafting, self drafted

FO – The Plum Pudding Tunic

10/01/12

Friends, we are skint at the moment! I have no shame in saying this. It is a simple statement of financial fact at the moment, not a reflection on our “value” as individuals! It is, without doubt, a situation that countless families are facing right now. J has yet to secure another job almost 3 months after being made redundant, and while we’re scraping by financially at the moment, there really isn’t room in our budget for me to go fabric shopping right now. Not being one to let a small detail like cash get in the way, I’ve been stash bustin’ instead….
I had this smallish piece of brushed cotton fabric in my stash. A little over a metre long and 45″ wide. I loved the snuggly texture and the plum shades seemed to me, to be perfect for Autumn and Winter. Just one question…what to make with it? The piece was too small to allow room for the placement of multiple pattern pieces. So I opted keep it simple and reached for my trusty self drafted “kimono” sleeve top; with a few variations….

I really squeeeezed this out of the yardage. I managed to cut the 2 main pattern pieces side by side across the width; as opposed to on the fold. I literally had a mm to spare, but I managed it by shortening the sleeves and keeping any ease to a minimum, until everything fit in across the width. I extended my original pattern to more of a tunic length and flared it slightly from the waist to accommodate hips/bum etc.

Construction is obviously really simple. The main change I made here, is that I flipped the facing to the outside to create a little interest around the neckline. I bound the outer edge of the facing before applying it to the neckline in reverse; so that it flipped through to the outside instead; a bit like you would a collar I guess. I then topstitched the facing down through the bias bound edge; so it’s a fixed detail rather than a collar flapping around.

The sleeve hems are bias bound to tie in with the neckline detail; and if you were to look really closely at the sleeve hems, you would see those teeny tiny holes you get along the selvedge. That’s how close a cut this one was peops! Barely enough fabric left from this to make a pincushion!

Dressmaking, finished garments, kimono tee pattern, Pattern Drafting, refashioning, Restyles, Thrifting

FO x 2 – Kimono Tee with Pin Tucked Panel & Refashioned Jeans (again!)

09/13/12

Dropping a dress size and a half, (thankyou peops for all your lovely comments and yes Marie. New hair too!) means that pretty much everything I had in my wardrobe no longer fits me. So I’ve started rebuilding my wardrobe pretty much from scratch. This week I finished up a couple of versatile wardrobe basics….

Refashioned Jeans:  I picked these up at a local charity shop for £1.89! They are brand new M&S jeans in a supersoft khaki denim with a bit of stretch. Guess what…..they’re a size 10! I can’t remember the last time I fit into a size 10. In my teens I think! Granted the stretch element of the denim probably helps, but who cares! Anyhow, M&S jeans always fit me nicely in the waist, bum and hips. But the leg styles can often be a little frumpy so I just narrowed them in my usual way.

Black kimono tee: made from fabric that J’s Nanny Flo gave to me. The length means I can wear it out like this, (without fear of builders bum 😉 or tucked into a waistband without causing too much bulk underneath.  It’s self drafted using this method, and then sliced up to insert a triangular panel with pintuck detailing. (The “slicing up” part to be detailed in a post to follow shortly) The neckline, sleeves and hem are all faced with bias. Using bias as a neckline facing is a new revelation to me. I can’t believe I haven’t done it sooner! It’s sooooo easy and negates the need to draft a neckline facing.

 I first used it on my pleat front tunic as detailed in the original pattern instructions.  I can see this being a particularly useful and time saving technique for future makes. Especially for refashioning; where if I wanted to recut a neckline, I would otherwise have to draft a facing by tracing the curve from the fabric. Something that has always stumped me in the past. Daft really when I think about it. I’ve used bias to bind a neckline before. So I don’t know why it never occurred to me to go one step further to steam it into shape and turn it in as a facing instead! a bit of “doh” forehead slapping moment! I’m probably late to the party for that one. You clever lot all knew about it already I’ll bet!

DIY, kimono tee pattern, Pattern Drafting, Tutorials

Draft your own simple top……A Simple Tutorial

10/21/11

Firstly, forgive the top of my head being lopped off in this photo. I’ve been experimenting with pin curls and hadn’t got round to taking them out when I took this picture. Secondly, yes Karen, you do recognise this fabric! Purchased at the Fabric Fandango, and mindful of Karen’s warning about how much it creases (oooooh how it creases!!) I thought it would be perfect for a simple project like this so as to keep future ironing as easy as possible!
Now, back to the subject in hand….pattern drafting. My toile for the Top Draftalong is FINALLY finished!!!! (More on that to follow) Which means that the design drafting element of the draftalong is imminent, and not a moment too soon in my view. ( Have I mentioned how much I detest fitting…?) Anyway, I thought I’d limber up my drafting muscles with a fun and, yes, easy peasy lemon squeezy, quick and simple “freestyle” drafting project that anyone could do. Seriously. You could draft AND make this top within a couple of hours. Faster if you’re not a slow coach sewer like me. Even if you have never put pencil to paper and drafted anything before in your life. Don’t believe me? Here’s how….

Start with a rectangle and calculate the length of the sides as follows:
A = Bust or Hip Measurement (whichever is the larger) + 2-3″ (ease) divide by  4 and + 3″
B = Required length of top + desired hemming allowance
Mark which is your side seam and which is your centre back/front line….

A = Mark a point approx 8″ down the side seam from what will be the top of your pattern. (This will be your armhole. I made mine 8″. Your’s may be slightly more or less depending on how big you want your armhole opening to be).
B = Along the bottom edge mark a point 3″ in from the side seam

Join these two points up creating a curve for the underarm…this will become your actual stitching line/side seam…

Now for the neckline:
A = Mark a point approx 2″down the CB/CF seam from the top (depending on how low you want your neckline to scoop this could be more but wouldn’t advise it being any less. As you can see from my top, 2″ has it sitting just at the base of my throat)
B = Mark a point along the top edge where you want your neck opening to finish. I used my bra strap as a guide as I don’t like to flash them!

Draw in your neckline curve either freehand or using a French Curve. Where the neckline curve hits the CB/CF seam needs to be at a 90 degree angle so as to avoid “peaking” when you come to cut out the pattern piece on the fold. I’d also advise a slightly less acute angle where it hits the top edge/shoulder seam too. I cut mine as shown here and it’s resulted in a very slight pulling at the point where the neckline hits the shoulder seam of my top.

Add a seam alowance to the underarm/ side seam AND the shoulder seam…

Cut out your new pattern piece. Then cut 2 on the fold out of your fashion fabric and with RS together sew together the shoulder seams and then the side seams. Finish seam allowances.  I also put 2″ slits in the side seams for a little extra ease at the hips, finished the neckline with self fabric bias tape,(see posts here and here) and just hemmed the bottom and sleeves with a narrow hem. Voila! Simple top perfect for layering under a cardi for the winter months. Go on! Give it a go! ( I’d love it if you’d let me know if you do!)
Px

Portia
Follow
Sewbox

© Copyright 2026. Portia Lawrie. All Rights Reserved. Managed by WordPress Web Dev Cornwall .