• About
    • Contact
    • Press
    • Sponsor
  • DIY
    • Home & Garden
    • Jewellery & Accessories
    • Yarn Crafts
  • Sewing
    • patternless & self drafted
    • Refashions
    • Commercial Patterns
    • Sewing Tips
    • Overlockers
  • The Refashioners

Portia Lawrie

crochet, DIY, dyeing, how to, Knitting, Tutorials, yarn crafts

DIY: Turmeric Dyed Ombre Yarn

03/28/15

DIY: Ombre Turmeric Dyed Yarn at www.portialawrie.co.uk

In the past I’ve used tea & Coffee to dye clothes. I’ve been meaning to try turmeric as a dye for aaaages. Then this week when I was “playing” with some yarn for an upcoming project (which btw worked out really well and I think you’re gonna love!!) I figured I might as well use the turmeric on some yarn instead to guage the process and see if I liked it before committing it to a garment. Well, I like it alot! What’s more it’s so easy to do. If you have some plain yarn at home that is in need of a little more zing….this could be just the ticket!


DIY: Ombre Turmeric Dyed Yarn at www.portialawrie.co.uk

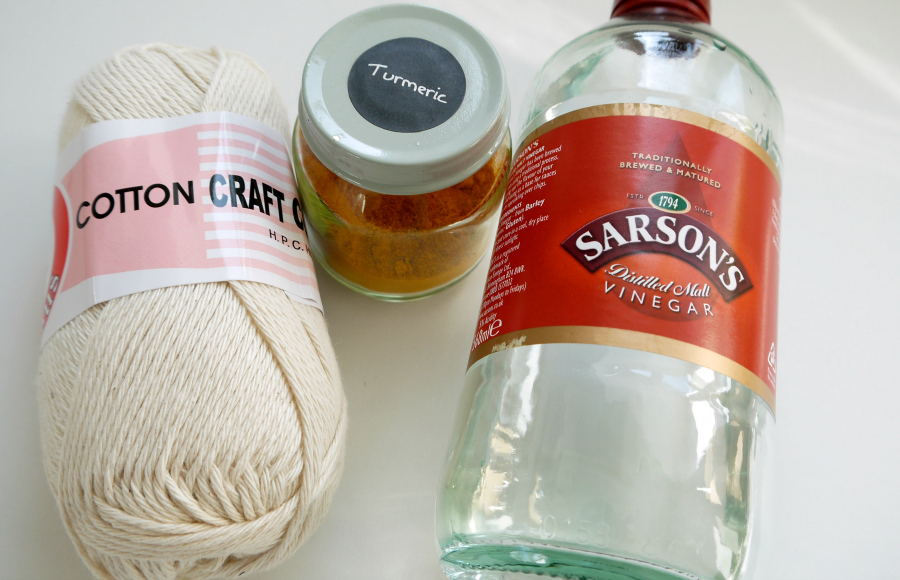
I used Pegasus Cotton Dishcloth Yarn (I love this stuff. Around £2 a ball and widely available on Ebay and Amazon) Ground Turmeric and White Vinegar

DIY: Ombre Turmeric Dyed Yarn at www.portialawrie.co.uk

Start by winding your yarn into a skein. I wound it between two door handles across a hallway. You can use the back of a chair, or wind it in the same way you might a power cord around your elbow and thumb. Now this bit is IMPORTANT. Whatever you do, don’t tie your skein exactly as I have.  I missed one important element and had a nightmare balling the yarn later as a result! See the multiple loops at either end of the skein? You need to tie through both of those to keep them from tangling in the dyeing process and around your loop at intervals.  Like this!

DIY: Ombre Turmeric Dyed Yarn at www.portialawrie.co.uk

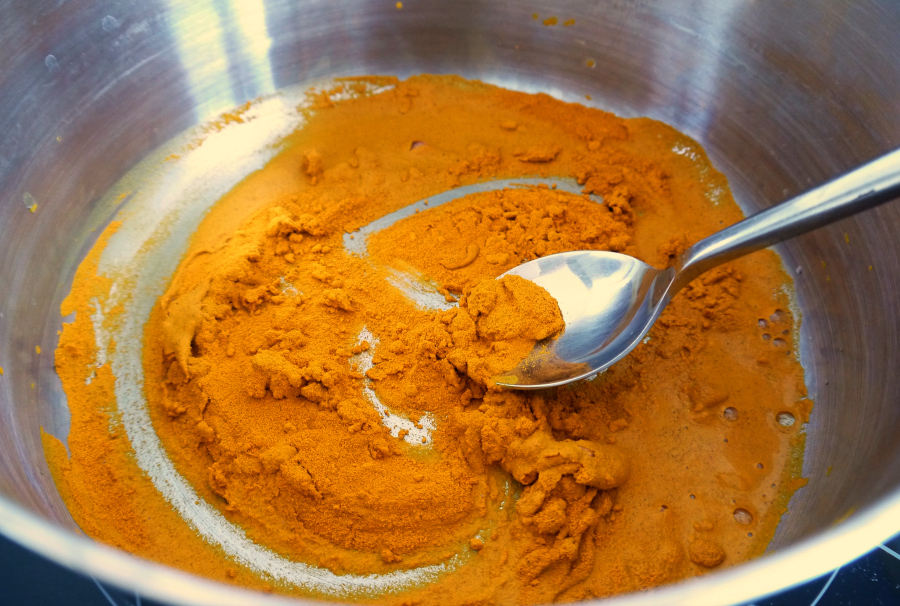
In a stainless steel pan make a paste from 3 Tbsp of Turmeric and 2 Tbsp of White Vinegar….


DIY: Ombre Turmeric Dyed Yarn at www.portialawrie.co.uk

Add 3 pints of water, bring to the boil and then reduce to a simmer for 30 mins to dissolve all the turmeric powder…

DIY: Ombre Turmeric Dyed Yarn at www.portialawrie.co.uk

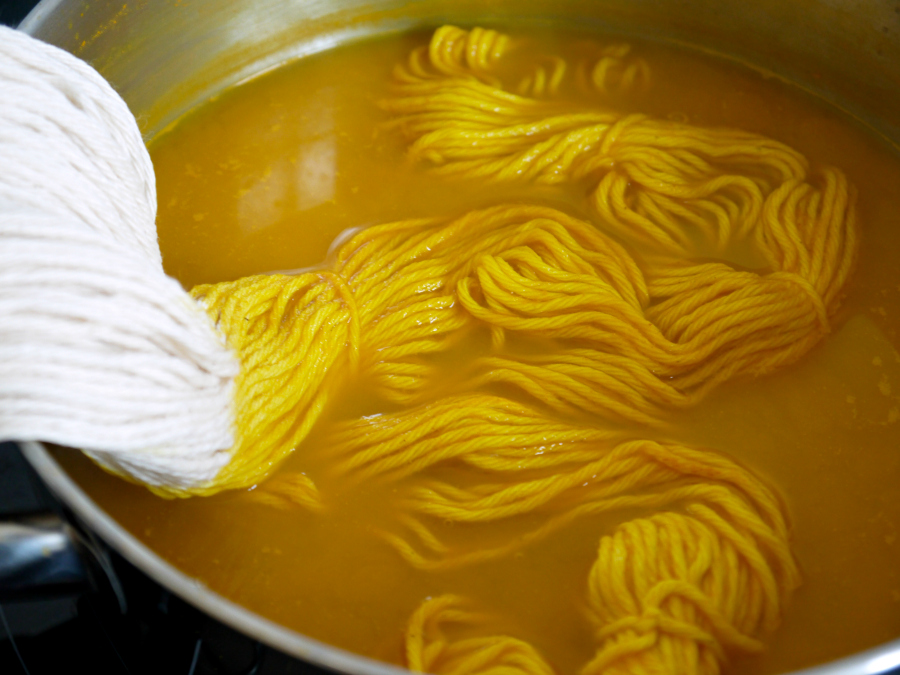
Thoroughly wet your skein and place into the dye liquid. I wanted an ombre effect so only placed one end of my skein in the dye liquid. Place the whole thing in if not. Gently simmer for about 10 minutes then turn off the heat and allow to sit in the cooling dye liquid for approx 30 mins. Agitate gently and periodically during this phase. Worth noting that I am dyeing 100% cotton yarn. The temperatures that cotton can withstand will be higher than wool yarn which can felt if the liquid is too hot and the yarn is agitated too much. If it were wool I would personally skip the simmering stage and minimise the agitation of the yarn whilst wet.


DIY: Ombre Turmeric Dyed Yarn at www.portialawrie.co.uk

After 30 mins remove the skein from the dye liquid rinse in clean water thoroughly until water runs clear, then hang to dry. (There’s another one I dyed using a different process. Details soon!) Mine took a couple of days to dry completely…


DIY: Ombre Turmeric Dyed Yarn at www.portialawrie.co.uk

This is what you’ll end up with. It will dry much lighter. See those currly loops at the ends that I forgot to tie?! I cannot tell you how much of a mare I had untangling those!


DIY: Ombre Turmeric Dyed Yarn at www.portialawrie.co.uk

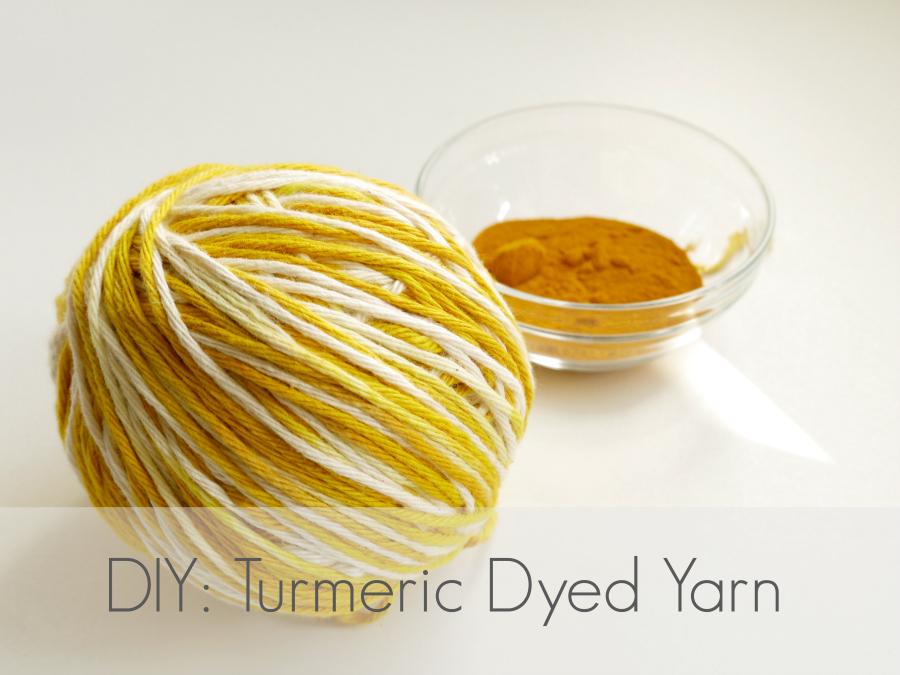
Ball up your skein and admire the rich graduated tones of your new “zingy” yarn!


DIY: Ombre Turmeric Dyed Yarn at www.portialawrie.co.uk

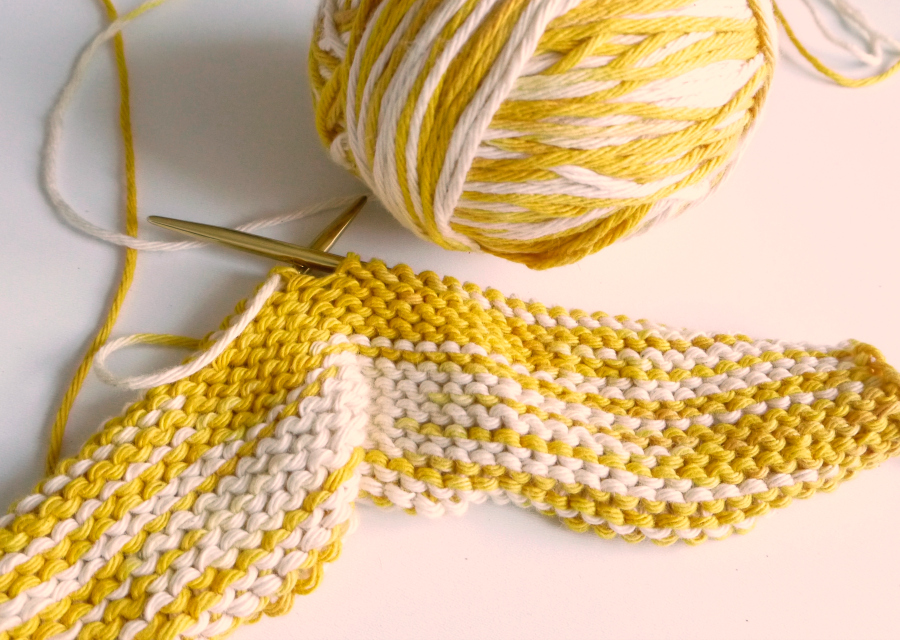
Thought you’d like to see how it knits up…

DIY: Ombre Turmeric Dyed Yarn at www.portialawrie.co.uk

Seriously loving these tones!

DIY, dyeing, how to, refashion, refashioning, repurposing, Restyles, Thrifting, Tips and Tricks, Tutorials

diy: tea dyed floral shirt

02/27/15

Use tea to add a unique vintage twist to a white shirt at www.portialawrie.co.uk

Next time you’re brewing a cuppa, why not brew a little extra and use it to give a subtle vintage twist to a “too bright” shirt. I say too bright, in my case I mean too white. White simply doesn’t suit my skin tone. Bright, is not a feature in my colour palette either. BUT I really loved this top that I thrifted earlier this week. So I bought the cheapest jumbo box of teabags I could find and set to work. Did I mention I actually hate tea? I’m a coffee girl all the way. But it does have it’s uses….


Use tea to add a unique vintage twist to a white shirt at www.portialawrie.co.uk

I used 100 cheap teabags. (Typhoo if you were wondering. On spesh at £2.50 for 200)…


Use tea to add a unique vintage twist to a white shirt at www.portialawrie.co.uk

Brewed my tea solution in about 1.5 litres of hot water for about 10 minutes….


Use tea to add a unique vintage twist to a white shirt at www.portialawrie.co.uk

Strained the teabags (give em a good squeeze) and then topped up my pan with about another 1.5 litres of boiling water (this is a standard casserole pan if that gives you an idea of the size)…


Use tea to add a unique vintage twist to a white shirt at www.portialawrie.co.uk

Wet the garment first, then submerge in the tea….


Use tea to add a unique vintage twist to a white shirt at www.portialawrie.co.uk

Bring to an enthusiastic simmer, then turn off the heat and allow to steep in the solution for at least an hour. Preferably 2. Stir/turn frequently to ensure an even result. Then pour away the solution, rinse until water runs clear in warm, graduating to cool, water. Then chuck in the tumble dryer to help set the colour…


Use tea to add a unique vintage twist to a white shirt at www.portialawrie.co.uk

And check out the difference! It’s actually a vintagey peach colour in the flesh. and definitely more “me” and importantly, more likely to get worn.

Now, lets talk about fabric content. I actually wasn’t expecting great results with this because it’s only really supposed to work on natural fibres. (I’ve used this method to dye silk before here) This top, although it looked and felt like a lightweight cotton, is actually 100% viscose. But, hey, it worked. So far I’ve hand washed it twice with no obvious fade…next time I’ll try it on a delicate wash in the machine and see how it goes. Will keep you posted!

dyeing, rit dye

DIY: Dyeing Buttons experiment…

11/30/14

OK, so I’ll start with a little disclaimer. This was me having a play about because I had a stockpot of dye on the stove whilst working on a larger scale project and I thought…what the heck…I wonder what will happen if I chuck some buttons in a bowl, add some of the dye liquid, and leave it for a while. Well…this happens…

As you can see. Mixed results. Those two dark ones soaked up the dye like thirsty camels! The majority took on a pastel/subtle version of the dye, and a few had no reaction to it at all. Presumably this had a lot to do with the material composition of each button. Some synthetics will take dye…some absolutely won’t. But if you’re not hung up on the results, then this is a kinda fun “see how it turns out” rainy day thing….if you’ve got another dyeing project on the go…why not just syphon off a ladle of the dye liquid and revamp some old buttons at the same time!

OK, so to clarify this is very much a “this is what I did” post as opposed to “this is the right way to do it” post. So this is what I did…

Firstly, the dye bath that I was using (for this “other large scale project” details to follow) was very concentrated. I bottle of liquid Rit and 2 packets of powdered Rit to 10 pints of water, and was being kept at a constant temperature on the hob. I ladled some off and added it to the buttons in a lidded glass bowl with a tbsp of vinegar (recommended when dyeing synthetics). I then covered and left it overnight. About 18 hours in total. During this time I whacked it into the microwave every couple of hours for about 45secs to keep the liquid warm….but overnight I just left it to cool down….

In the morning I simply emptied into a colander and rinsed thoroughly and left to air dry on kitchen towel.

This was just an experiment. The results were much subtler than I expected, but still pleasing. Perhaps having the buttons simmering on the hob (as opposed to simply soaking in the luke warm dye liquid) would have resulted in a stronger colour. Wooden, horn or shell buttons would perhaps dye well being natural fibres? Still…a good way of getting a little extra value for money out of your dye bath and something I thought you may find interesting and a it of fun 🙂

DIY, dyeing, how to, refashion, refashioning, shibori, Tutorials

DIY: Bleach Shibori…

11/17/14

I’ve been wanting to have a dabble with Shibori for a while. I particularly love all the indigo Shibori projects that are popping up all over. But I’m also a fan of using everyday household materials/supplies for creative projects. I guess I just love the idea that if the creative mood strikes, I can just have a rummage in my cupboards and whip something up from what’s there. Rather than having to drive 40mins to my nearest craft store or order supplies online and wait with baited breath for them to arrive. This is one such project. Bleach, string, and a cotton kaftan top I had languishing in my stash, and hey presto….bleach Shibori!

Shibori is a method of dying pattern into cloth (or in these case a kind of reverse dyeing with bleach) through a process of folding, pleating, gathering, and binding. Bleaching works best on natural cellulose fibres as opposed to synthetics, so this cotton kaftan was the perfect subject to experiment with. I started with folding my garment in half, and then pleating it concertina style up from the hem…

….folded the whole thing in half, and then bound tightly with randomly wrapped string….

Place in bleach solution and weight down with bowls or similar to ensure it’s fully submerged. I used a whole 79p bottle of bleach to about half a sink of water. That’s about as technical as I get! I left it in for just under an hour, checking the colour lift intermittently….

…and this is how it came out after I’d removed the string! (That hole on the left? Managed to that when I cut the fabric along with the string! Duh!)

After that I rinsed and rinsed and rinsed again in cold water, hung to dry and pressed.  (I’ve since discovered that it’s recommended to use a solution to neutralise the bleaching process as it continues even after washing apparently. So just a heads up if you’re planning on replicating this. Google neutralising bleach. It seems a product called bleach stop aka Sodium Thiosulphate is quite popular. But also a solution of hydrogen peroxide in a 1:10 ratio with water will apparently do the same job.)

I think this turned out rather cute! I like the way the sleeve edges and hem carry the bulk of the lightening, and the slight “ink blot” effect down the centre that comes from folding the garment in half before bleaching, and I love the effect the string binding has given along the hem in particular, like a forest of sapling trees in silhouette 🙂

I’m already hatching plans for objects to use in more Shibori!

DIY, dyeing

DIY: Coffee Dyeing Silk

01/17/13

Sooooo, following on from yesterday’s post about tea dyeing, I had ANOTHER silk top that was gifted to me by a lovely friend. The pale lilac colour really washed me out though so I’d never worn it. When googling info on tea dyeing it occurred to me that coffee might have similar dyeing/staining properties. After all, I’ve spilled enough coffee down my front to know that it doesn’t always come out in the wash! (I am a clumsy cow!) Sure enough….

I followed exactly the same process and timings as I did for the tea except this time I used a 100g jar of Tesco own brand coffee priced at £1.50. Unfortunately their 47p one wasn’t available in our local Tesco Express, grrr….!

Again, the finish was streak and blotch free and the colour much, much, much more me! Hurrah!
The one thing with both these projects that has yet to be determined is how the colour results stand up to washing. I’m fairly confident about this. For a start, these are silk tops and as such will be handwashed only which will limit the impact on the colour. Plus, everything I’ve researched online prior to trying this, suggests that it doesn’t require a fixative to be permanent; and at the very most it may fade a little, but for all intents and purposes is permanent. I will be sure to let you know how I get on with that!
In the meantime, I have plans afoot to try out some other “grocery” dyes. Turmeric and beetroot are both renowned for staining so it seems logical to me to try them on some silk. Onion skins are another source of natural dye that I fancy trying. Of course, all manner of plant materials and fibres have dyeing properties. Dyeing fabric goes right back to ancient times and would have been wholly achieved by using natural raw materials before the advent of chemical dyeing processes during the industrial revolution. Some of it though is akin to alchemy and beyond my level of patience!There are  more experiments to come though! For now, I’ve run out of silk tops to experiment with. Best get down the charity shop and have a rummage; and you know how I hate that 😉

DIY, dyeing, refashioning, Thrifting, Tutorials

DIY: Tea Dyeing Silk

01/16/13

On the £1 rail outside our local charity shop, I spotted this bright orange silk top with a kind of Swiss dot texture to it. I was smitten with the silk and the style, but a little dubious on the colour. The before photo doesn’t quite capture how bright it was. It was REALLY bright. Since my freshly dyed hair can sometimes be on the bright side of ginger (depending if I’m in a red or ginger mood when I buy my hair dye 😉 I thought a bright orange top could potentially be a bit “clashy”! I prefer more earthy tones anyway so I needed to “mute” the orange. Luckily Marie’s post had reminded me of the ageing properties of tea on lace. (Thanks Marie!) Not too much of a leap then, to wonder what it’s effect would be on silk…..

I’d had a box of loose tea at the back of the cupboard for months. (I’d bought it by mistake instead of teabags.) I quickly whipped up a giant teabag using a J Cloth and let it steep for 10 minutes in 5-6 pints of hot water. Submersing the silk blouse in the tea solution, I let it simmer in a big pan on the hob, on a low heat, for about 40 mins, stirring every few minues. Then rinsed in cold water until the water ran clear and hung to dry….

To say I’m impressed with the result is an understatement. The resulting colour is right up my street. Really Autumnal. But beyond that, the even colour result is immaculate! Not a streak, blotch or tide line in sight. Compared to commercial hand dyes I’ve tried in the past it’s massively superior; and it’s just humble old tea!!
Rit and Dylon hand dyes have always turned out uneven for me no matter how much I stir it and keep it moving. When you consider the price of a commercial hand dye is £4-6, and that a pack of 80 Tesco Everyday Value teabags is 27p, well, nuff said! Plus, it’s non toxic so environmentally friendly AND gentle on the fabric.
Of course tea provides a limited colour palette of varying shades of, erm, tea colour, when using it on white/light coloured cloth. But if the garment has a strong base colour, like mine, it’s a great way of achieving a more muted shade and changing up the look a bit.
This process will work on any natural fibre. Silk, cotton, wool etc. I’d imagine with wool though, you’d have to be careful to let the solution cool a little as too much sudden heat on pure wool can cause it to felt.
Totally in love with tea dyeing now though AND it’s inspired me to experiment with a few more “store cupboard dyes” on some other garments. Coming soon!

Portia
Follow
Sewbox

© Copyright 2026. Portia Lawrie. All Rights Reserved. Managed by WordPress Web Dev Cornwall .