• About
    • Contact
    • Press
    • Sponsor
  • DIY
    • Home & Garden
    • Jewellery & Accessories
    • Yarn Crafts
  • Sewing
    • patternless & self drafted
    • Refashions
    • Commercial Patterns
    • Sewing Tips
    • Overlockers
  • The Refashioners

Portia Lawrie

refashioning, the refashioners, The Refashioners 2016

The Refashioners 2016: Rachel

08/23/16

THE REFASHIONERS 2016 - RACHEL - HOUSE OF PINHEIRO

“They (jeans) have expression, modesty, sex appeal – all I hope for in my clothes.” -Yves Saint-Laurent. {My challenge motto.}

The Refashioners always been a yearly inspirational series for me. I love challenges that get people reinventing something that once-was and making it up-to-date. Anything that inspires people to think out of the box. This year grand-theme of “jeanius” got me whistling ‘Tiny Dancer’ while rummaging every local charity store around. Yes …. some occasional pirouettes were also witnessed by the locals.

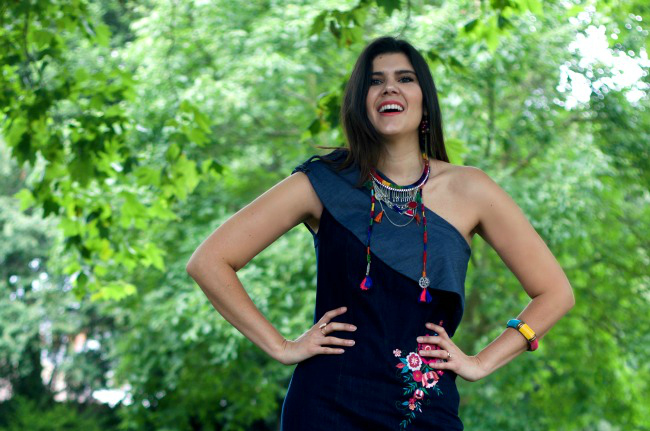
For a long time I been looking for an excuse to draft a Lanvin inspired one-shoulders flounced denim dress.

THE REFASHIONERS 2016 - RACHEL - HOUSE OF PINHEIRO

One of the things that makes having a jeans theme so fascinating for me is that the material- ‘denim’- is consider one of oldest fabrics in the world but is the epitome of youth/cool. Never gets ‘dated’ so rummaging for older pieces felt like a personal treasure hunt.

At first I as looking for the perfect combination of shades of blue. Strangely my biggest challenge was to find the ‘raw materials’ with reasonable prices. Where the second hand shops valuing the jeans using the price of gold? Luckily Portia came to my rescue with a car boot full of used denim. For my body con design to work my denim had some level of stretch.

THE REFASHIONERS 2016 - RACHEL - HOUSE OF PINHEIRO

I came home with 3 pairs with different percentages of lycra content. When working with materials with different characteristics is important that placement is done correctly as the fabrics will behave differently when sewn together. I had to stabilise some of the side seams. I’m glad it all worked perfectly including the side zipper.

My self drafted pattern looked like long strips of rhythmic gymnastics ribbon. A total of 6 pattern pieces using mainly the legs. As each denim pair had a different leg length I had to apply creative problem solving.

THE REFASHIONERS 2016 - RACHEL - HOUSE OF PINHEIRO

The different patches end up being my favourite design feature. The only piece of old the bolt-fabric used was the flounce which was made by cutting a circle. A piece of one of the waistband was used as an epaulette. If you fancy trying this design but don’t want to draft a pattern you can simply unpick each leg forming long strips and drape over a mannequin or yourself.

My plan was just to have a denim dress. Simplicity in itself. But you know when you look at a finished project and feel is missing something? More is more suddenly. Fringe is always a great compliment for denim because the way the fabric is weaved. I imaged someone else would probably do it so I went for contrasting colour fringe trim instead.

THE REFASHIONERS 2016 - RACHEL - HOUSE OF PINHEIRO

After watching Gucci on snapchat (seriously addictive stuff and future subject for long therapy sessions) I felt so inspired by all their embroidery work over Tian prints. If you are into fashion & history of art I highly recommend looking at their latest work. It was inspired by “Bird and Flower’ Chinese 10th century painting.

THE REFASHIONERS 2016 - RACHEL - HOUSE OF PINHEIRO

This thoughtful ‘feeling moment of harmony’ influenced me on choice of design and colour of my embroidery. One of the places I teach, CCB Rochester, has a selection of embroidery machines. I was able to sew the embroidery design with a six needle embroidery machine. You can freehand embroidery on whatever machine you own.

THE REFASHIONERS 2016 - RACHEL - HOUSE OF PINHEIRO THE REFASHIONERS 2016 - RACHEL - HOUSE OF PINHEIRO

That’s all from me. Many thanks to Portia for hosting such a creative and inspiring challenge! Now my pirouettes will look a lot more fun in this dress.

So Rachel returning to that ongoing theme with jeans refashioning….narrowing her pattern pieces so she could squeeze them out of narrow trouser legs. It’s a key way of overcoming the scarcity of fabric, as pretty much all our bloggers have demonstrated. Let’s not forget the perks of stretch denim too! Perfect for form fitting refashions like this. And embellishment! Yay! Embroidery (elaborate like this or simple like sashiko), applique/patches, (floral, modern or like the beautiful japanese boro textiles Marilla and Wendy referenced). Oh and while we’re at it, have a think about bleaching ( a la Rosie!) and dyeing too. Techniques like shibori/tie dye and batik can be used with dye, or in relief with bleach. There are soooooo many ways you can transform the fabric itself before you even sew a stitch!

You can find Rachel here or here. And if you’re inspired to get your refashion on and enter the Community Challenge and be in with a chance of winning some epic prizes…DO IT! Deadline for entries is 30th Sept. Midnight GMT.

The Refashioners 2016 - Huge Prize Package

….I think you’ve got the idea now right? Essentially we want you to refashion some jeans! (You can find the full details/small print of the brief here). BUT, if you want to be in with a chance of winning one of these amazing prize packages you need to SHARE that refashion with us in one of the following ways:

  • On Instagram: Share a pic using the hashtags #therefashioners2016  and #jeanius
  • On Pinterest: There is a community board here where you can pin your makes. (You will need to request an invite to join)
  • On Facebook: There is a community board here where you can post your makes (You will need to request an invite to join)

Only entries shared via the above 3 methods will be entered into the competition. Closing date for entries is 30th September 2016 Midnight GMT. Good luck!!

refashioning, the refashioners, The Refashioners 2016

The Refashioners 2016: Heather

08/22/16

Jeans Refashion_Refashioners 2016_Closet Case Files-10

When Portia first asked if I’d liked to participate in a jeans-centered Refashioners challenge, my answer was clearly “HELLS YES!” Jeans are a bit of an obsession for me. I design jeans sewing patterns, wrote a book about how to sew them, and teach jeans making workshops. A refashioning challenge featuring second hand jeans is pretty much my jam. I also knew immediately what I wanted to make: a perfect, deconstructed pair of Levi 501s.

The Refashioners 2016 - Heather


If you’re a heavy Pinterest user like I am, it would be hard not to notice what a huge comeback 501s have had in the past year or so. Everything 90s is back (whether we like it or not), but there is something perennially classic and eternal about a stonewashed pair of Levis. While I would happily collect dozens of vintage pairs, I happen to have a pair of hips; 501s are drafted for men and therefore are nearly impossible to wear if you have a pear shaped body like mine. While I’ve picked up a number of pairs over the years for research purposes, not one ever managed to fit just right. I could rarely get the buttons done up without crying, and the straight leg never felt very flattering or modern. I’ve also found myself incredibly inspired by all the deconstructed jeans I’ve been seeing lately (many examples of which I’ve collected here), so I decided that it was high time to make myself a pair of frankensteined 501s that actually fit.

I started with three pairs of vintage Levi’s in a gradient of washes. The best fitting pair couldn’t even do up as you can see below, but they did give me the magical 501 butt I’ve been chasing like a dragon for years, so I decided to use those as my base.

Jeans Refashion_Refashioners 2016_before 2 Jeans-Refashion_Refashioners-2016_Closet-Case-Files-before

I started with figuring out how much I’d need to add to the waist, which added up to about 1 1/2 inches on each side. I decided to replicate the method I used in high school when I wanted to make jeans that fit, which involves sewing in inserts of fabric along the side seams. However, unlike the hippyish pairs I made when I was 14, I decided to insert the side seam from one of the other pairs in order to create a subtle colour blocked effect. Since I didn’t want this panel to be too skinny, each side seam panel ended up being about 3″ wide, which meant removing the extra 1 1/2″ of width from the side seams of my base pair. I made sure to include lots of extra waistband from the new panel so I could stagger the waistband seam.

Jeans Refashion_Refashioners 2016_Closet Case Files-4

Once I had everything cut out, I did a quick baste to see what it looked like. While the fit was great through the waist, the legs were way too wide, so using my Morgan Jeans pattern as a base, I narrowed the legs substantially on the base pair. While the new sewn in panel is a consistent width, the main jeans leg was tapered quite a bit to give more of a skinny fit.

The Refashioners 2016 - Heather


At this stage I realized that the difference in wash was almost too subtle, so I decided to add some more dramatic contrast. I made a pattern piece for the back calf and cut it from my lightest jeans, and then replaced the back lower leg of my base pair with this new piece. The top seam was serged and topstitched into place.

Jeans Refashion_Refashioners 2016_Closet Case Files-14

I also added hefty knee patches to break up the darker blue. I hoped to handstitch straight lines using sashiko thread, but after sewing up a sample I realized I didn’t have the time or hand strength to stitch through that much denim, so I resorted to a simple straight topstitch on my machine.

Jeans Refashion_Refashioners 2016_Closet Case Files-18

Once I was sure that the legs fit well, I sewed everything up and serged and pressed open the inner seams. I decided to leave the hem raw for now since I liked how it looked folded up, but I will definitely have to trim off any errant threads after I wash them for the first time.

Jeans Refashion_Refashioners 2016_Closet Case Files-15

Finally, I pieced together a newly expanded waistband. This was probably the trickiest bit of sewing since I had to rip everything open and carefully sew it back together. Luckily the two darker pairs of jeans were similar sizes so it was pretty easy to get the yoke and pocket openings to line up evenly. I love the way the extra belt loop looks too. I used a matching topstitching thread along the waistband once I was sure the fit was spot on.

Jeans Refashion_Refashioners 2016_Closet Case Files-19 Jeans Refashion_Refashioners 2016_Closet Case Files-17

Perhaps my favourite detail is the overlapping coin pockets; I love the different textures of denim all playing off each other.

Jeans Refashion_Refashioners 2016_Closet Case Files-20

In the end, I am over the moon for these jeans. It was a lot more work than I anticipated, but they fit like a total dream and let my hips enjoy the 90s stonewash denim trend. My boyfriend likes them so much he’s now pleading with me to make him a pair too. We’ll be quite the sight walking around in all our patchwork 501 glory.

Jeans Refashion_Refashioners 2016_Closet Case Files-8


A big thank you to Portia for inspiring this refashion! This denim obsessive is really happy to have this deconstructed pair in her collection….
Aaargh! Another pair of jeans I now want! Aside from the fab decorative elements of this refashion there’s a particular technique, that for me, is the big “takeaway” from this make. And that is the “T” shaped panel, harvested from another pair of jeans, and inserted into the base pair to make them fit. So if you have a pair of jeans that are way too small, there’s your solution. RIGHT. THERE. You can use a contrast panel or go for one in a closely matching wash. And hopefully by this stage of the series, you have a few more ideas of what you can do with what’s left of your “donor” jeans afterwards 😉

You can find Heather here or here. And if you’re inspired to get your refashion on and enter the Community Challenge and be in with a chance of winning some epic prizes…DO IT! Deadline for entries is 30th Sept. Midnight GMT.

The Refashioners 2016 - Huge Prize Package

….I think you’ve got the idea now right? Essentially we want you to refashion some jeans! (You can find the full details/small print of the brief here). BUT, if you want to be in with a chance of winning one of these amazing prize packages you need to SHARE that refashion with us in one of the following ways:

  • On Instagram: Share a pic using the hashtags #therefashioners2016  and #jeanius
  • On Pinterest: There is a community board here where you can pin your makes. (You will need to request an invite to join)
  • On Facebook: There is a community board here where you can post your makes (You will need to request an invite to join)

Only entries shared via the above 3 methods will be entered into the competition. Closing date for entries is 30th September 2016 Midnight GMT. Good luck!!

refashioning, the refashioners, The Refashioners 2016, Uncategorized

The Refashioners 2016: Jenna

08/18/16

THE REFASHIONERS 2016 - JENNA BENNETT


Yay! Refashioners time again!  (I can’t wear my refashion, so you’ll have to make do with this pic of me that Portia inserted into this post without telling me instead :))  I was so happy when Portia asked me to take part again this year and extremely excited by the theme.  Jeans are so ubiquitous and so easy to get hold of which is perfect for refashioning.

I had so many ideas to start with (my initial reaction was to make a dungaree dress, which sadly would not have been practical for pregnancy so has been shelved for a while!) but I soon settled on making something I will need soon, and something I know will be used a lot – a travel changing mat.

THE REFASHIONERS 2016 - JENNA BENNETT

I had one of these when my daughter was a baby which was a freebie from a magazine and it didn’t last but it was so useful for carrying a small changing kit around, and meant that any bag could become a changing bag.

THE REFASHIONERS 2016 - JENNA BENNETT THE REFASHIONERS 2016 - JENNA BENNETT THE REFASHIONERS 2016 - JENNA BENNETT

I haven’t actually done a lot of sewing since I found out I was pregnant so this was also the perfect project to get me back into the swing of things, unfortunately my brain wasn’t in gear while I was sewing and I forgot to take any before or during pictures – sorry!

I started with a pair of jeans which I probably bought about 8-10 years ago and which were still a lovely dark indigo colour which was what I was looking for.  They also have some stretch in which isn’t ideal but hasn’t affected the end result.

Before starting, I looked at a tutorial to get a basic idea of construction and also borrowed a friend’s changing mat to get a rough idea of size.  I was obviously constrained by the width of the leg of the jeans but luckily I managed to cut the mat out whilst avoiding the leg shaping in these jeans.  Obviously this would have been easier if I had used a pair of men’s, non-stretch and unshaped jeans but these were sitting unloved in my cupboard!

I cut my jeans up the outside leg seam, leaving the inner seam intact, and lay the fabric out flat. I then made a quilt sandwich of denim, batting and soft furry plush fabric before quilting all three layers together in a diamond pattern, using basting spray and a walking foot to stop the layers shifting around while quilting.

THE REFASHIONERS 2016 - JENNA BENNETT


To make the pockets, I cut two rectangular pieces of denim from the remaining leg and two pieces of flannel fabric half as wide again as the main pocket pieces.  I gathered the bottom of the flannel to fit on the pocket, and sewed a channel for elastic along the top.

THE REFASHIONERS 2016 - JENNA BENNETT THE REFASHIONERS 2016 - JENNA BENNETT

I wanted bigger, roomier pockets than my last version as I am intending to use cloth nappies again which take up more space than disposables, but they will also be useful to put a spare change of clothes in too.

Using a faux leather bias binding I bound the pockets first before attaching them to the mat then bound the whole way around the mat.  The binding was really quite tricky to work with so I kept the walking foot on my machine and took it really slowly.  It isn’t perfect but I am happy with the outcome.  The last thing to do was to stitch the buckle on the front, which has a magnetic closure, and done!

THE REFASHIONERS 2016 - JENNA BENNETT

The only thing I had to buy to make this changing mat was the binding, everything else I had in my cupboard.  The plush and flannel were left over from making new baby gifts, I can’t even remember why I bought the buckle but I am so pleased it has been put to good use and obviously the jeans were taking up space and feeling unloved so I am delighted to have turned them into something which I know will be so useful to me in a few months’ time.  Thank you so much Portia for organising such a brilliant event.  I love seeing everyone’s projects popping up and how other people interpret the theme.  Good luck to all taking part in the community challenge!

I would have loved one of these when Elliott was a baby. So so handy. Love the way it looks like a grown up clutch form the inside and then BAM! Baby style on the inside! I can attest to how soft that plush fabric is on the inside and I suspect Jenna’s impending “mini me” is gonna love that next to his/her skin!  You could adapt this idea to make a pencil, crochet hook or knitting needle roll. Or make a smaller version as a mini sewing kit or needle case. Denim is perfect for all manner of accessories. Bags, pot holders, oven gloves, cushions, quilts, upholstery, purses, zipper pouches….the list is endless. So go change your unloved jeans into something you do love. Like, now!!

You can find Jenna here or here. And if you’re inspired to get your refashion on and enter the Community Challenge and be in with a chance of winning some epic prizes…DO IT! Deadline for entries is 30th Sept. Midnight GMT.

The Refashioners 2016 - Huge Prize Package

….I think you’ve got the idea now right? Essentially we want you to refashion some jeans! (You can find the full details/small print of the brief here). BUT, if you want to be in with a chance of winning one of these amazing prize packages you need to SHARE that refashion with us in one of the following ways:

  • On Instagram: Share a pic using the hashtags #therefashioners2016  and #jeanius
  • On Pinterest: There is a community board here where you can pin your makes. (You will need to request an invite to join)
  • On Facebook: There is a community board here where you can post your makes (You will need to request an invite to join)

Only entries shared via the above 3 methods will be entered into the competition. Closing date for entries is 30th September 2016 Midnight GMT. Good luck!!

DIY, refashioning, the refashioners, The Refashioners 2016, Tutorials, Uncategorized

The Refashioners 2016: Marilla

08/17/16

THE REFASHIONERS 2016 - MARILLA WALKER

First of all I just want to say thank you to Portia for including me in the refashioners 2016. It is a pleasure to take part and reminds me of how much useful cloth we are surrounded by that can be reused and re-purposed. Thanks Portia x

So this year’s challenge is denim! Such a great start! I have probably refashioned more jeans than any other item of clothing and rarely give away good denim. It’s one of those items where the cloth still has a lot to offer in terms of durability and is often superior to equivalent fabrics you can find by the metre. For that reason I am a jeans hoarder.

THE REFASHIONERS 2016 - MARILLA WALKER

I set aside two pairs of jeans for this challenge and  was immediately thinking of the different blue hues and the signs of wear on my garments. I was reminded of traditional Japanese textiles, their use of indigo dye and the boro mending technique. Boro garments and textile items I have seen are rich in colour variation and texture. Below is a better description of traditional and ‘true’ Boro textiles.  Japan’s mended and patched textiles are referred to as boro, or ragged, both in Japan and abroad.

” Boro textiles are usually sewn from nineteenth and early twentieth century rags and patches of indigo dyed cotton.  The diversity of patches on any given piece is a veritable encyclopedia of hand loomed cotton indigo from old Japan. In most cases, the beautiful arrangement of patches and mending stitches is borne of necessity and happenstance, and was not planned by the maker.  Imagine that boro textiles were stitched in the shadows of farmhouses, often at night by the light of one dim candle and on, on the laps of farm women. This unselfconscious creative process has yielded hand-made articles of soulful beauty, each of which calls upon to be recognized and admired as more than the utilitarian cloth they were intended to be.” Source.

THE REFASHIONERS 2016 - MARILLA WALKER

When I was approached about the challenge I had recently acquired a new jacket pattern and immediately knew this was what I wanted to make. I used the fabulous Falda jacket pattern by Pattern Fantastique .

My approach with refashioning jeans always remains the same.  I unpick the inside leg seam and flatten both legs out to get the most amount of flat fabric.

THE REFASHIONERS 2016 - MARILLA WALKER


Inside leg seams are often sewn with a chain stitch, which if you pull the lower thread from the right direction you can just unravel without any tricky unpicking. See this instagram clip I posted here . It ‘s difficult to describe which is the right end, but it’s the base of the chain stitch. Just keep fiddling with both ends until one pulls easily. That’s how I discovered it!

THE REFASHIONERS 2016 - MARILLA WALKER


It did take a while to fit all the pieces on and I did have to use a skirt back left over from another refashion for the jacket back, but with careful planning I got there. I cut the lower sleeve pieces for the jacket thinking I was going to have long sleeves, but if I hadn’t done that then maybe I could of squeezed the whole garment onto just the jeans. After basting the side seams with short sleeves I decided I loved it as it was, so omitted the lower sleeve portions from the final garment.

THE REFASHIONERS 2016 - MARILLA WALKER


So here is the final jacket!

THE REFASHIONERS 2016 - MARILLA WALKER


It is difficult to plan a refashion absolutely and finally, so I let the process be pretty organic. I sewed up the jacket and realised the pocket placement was not working at all, so unpicked them and re-stitched them in a more natural and practical position. I really love the dark, ghost like patches that have been left behind.

The length of the jacket is longer than the pattern states because I just left the hem down. The front facing does not meet the bottom hem, so I just improvised because I really liked the longer length. Well, I liked it after I had a go at shaping the bottom hem. I chopped a load off both sides and didn’t like it, so ended up making Frankenstein style repairs to sew the missing pieces back on! This was actually a brilliant move as it led to all sorts of new additions in an attempt to make good my horrific mistake.

THE REFASHIONERS 2016 - MARILLA WALKER THE REFASHIONERS 2016 - MARILLA WALKER THE REFASHIONERS 2016 - MARILLA WALKER


Once the construction was complete the most fun bit was adding all the finishing details. I topstitched everything fairly neatly for the main body, but then incorporating my disaster into the garment allowed me to play with some finishing ideas. The inside seams are zig zagged with the gold topstitch thread which mimics the original finish of the jeans and then different colour bias tape has been used for mending and finishing the front edges and stabilising the raw edge hems. All the hand stitching is done in white thread for a point of difference and is used to mend and also anchor down parts of the facing.

I refashioned garments from the denim brand most synonymous with jeans and added touches of the original branding here and there.

THE REFASHIONERS 2016 - MARILLA WALKER


Here is the original leather label sewn onto the inside of the jacket back with hand stitches.

THE REFASHIONERS 2016 - MARILLA WALKER


So a combination of different denim washes, stitch techniques/thread colour and recycling of the original elements has produced a very “boro like” garment. I really find denim to be very malleable and a bit of a rough finish here or there only adds to the charm. There are so many nice hidden details to be discovered and the softness of the worn fabric makes this a very tactile item. It is actually more interesting off the body than on in some ways, but is also a completely relevant new item of clothing from old.

THE REFASHIONERS 2016 - MARILLA WALKER


If you hadn’t guessed, I really enjoyed this challenge! I can’t remember if I mentioned this last year, but this really appeals to my textile design background and I love considering all the detail placements.

THE REFASHIONERS 2016 - MARILLA WALKER


I pinned bits on and removed them, stitched bits and unpicked until all was completely how I wanted and achieved a balance I was happy with. This just goes to show that if you don’t instantly love your creation, it may just need some tweaking to become perfect!

THE REFASHIONERS 2016 - MARILLA WALKER THE REFASHIONERS 2016 - MARILLA WALKER THE REFASHIONERS 2016 - MARILLA WALKER


Thanks again Portia and thanks Pattern Fantastique for the great pattern! I have been wearing it all day and am set to wear it all the days!

THE REFASHIONERS 2016 - MARILLA WALKER


So are you tempted to give refashioning a go? One or two old pairs of jeans are definitely the best place to start (in my opinion). Check out some previous denim refashions I have made here  and here.

Not much can go wrong and remember frayed edges are cool, so don’t fret it! 😉

I really love this approach to refashioning. Starting with an idea of the type of garment you’d like to end up with, but not having an overly rigid approach to how you get there or exactly how the finished garment will look. Adapting to the challenges your base garments throw at you as you go and allowing the final garment to evolve. It’s a free flow approach that really allows creativity into the process and can result in some unique details and “happy accidents”. It’s also far less stressful than trying to wrestle a garment to conform to rigid preconceived idea, when it just doesn’t want to be what you want it to be! I always remember my sewing tutor telling me (in relation to fitting a garment) “Watch the fabric. It will tell you what it wants to do”. Same applies to refashioning in my experience.  I tend to think of it as working WITH the garment. Not against it. Or to put it another way,  just roll with it and see what you end up with 🙂

You can find Marilla here or here. And if you’re inspired to get your refashion on and enter the Community Challenge and be in with a chance of winning some epic prizes…DO IT! Deadline for entries is 30th Sept. Midnight GMT.

The Refashioners 2016 - Huge Prize Package

….I think you’ve got the idea now right? Essentially we want you to refashion some jeans! (You can find the full details/small print of the brief here). BUT, if you want to be in with a chance of winning one of these amazing prize packages you need to SHARE that refashion with us in one of the following ways:

  • On Instagram: Share a pic using the hashtags #therefashioners2016  and #jeanius
  • On Pinterest: There is a community board here where you can pin your makes. (You will need to request an invite to join)
  • On Facebook: There is a community board here where you can post your makes (You will need to request an invite to join)

Only entries shared via the above 3 methods will be entered into the competition. Closing date for entries is 30th September 2016 Midnight GMT. Good luck!!

refashioning, the refashioners, The Refashioners 2016, Uncategorized

The Refashioners 2016: Ingrid

08/15/16

THE REFASHIONERS 2016 - INGRID WEIMERS (2)

Here we are, at the halfway point of another spectacular Refashioners series. Thank you Portia for including me again! And thank you for your patience…. I was a really naughty refashioner this year, delivering my post very late. The explanation, as you will be able to see evidence of in my photo’s below, is that my life has been in boxes for a while. The reason being moving countries for the second time in two years, starting a business, holding up two freelance jobs and planning a wedding. Oh, and finishing my masters thesis. And moving in with my mother (temporarily but still…).  All of this has unfortunately meant that my sewing and blogging has been pretty non-existent.

So, carving out time to do this challenge felt SO GOOD. My hands had missed the feeling of fabric, and my ears the buzzing (although perhaps not my boyfriend’s…) of my sewing machine. Although, the denim theme of this year’s challenge had me puzzled for a while. I love jeans. Wear them all the time. It’s so much my go to piece of clothing that I’ve been accused of not being very feminine (I know, people have a lot of deluded ideas about what femininity is). But refashioning denim is a whole other kettle of fish. While there are a huge amount of ingenious upcyling projects with denim, most of them are just too….denimy? If that makes sense. So I thought long and hard (with the help of good old Pinterest) about what to make.

In the end, necessity won out. I needed a pair of dungarees. My sister and I, with whom I’m now running a Bed & Breakfast, thought it would be fun to have dungarees as our ‘uniform’ while working. Practical, fashionable and comfortable – all in one clever package. And I figured that it couldn’t be too hard to make a pair. With refashioners in mind, I decided to give myself the challenge of making some out of one pair of men’s jeans!  I call the result… house moving chic! This is a very picture heavy post as I go through the construction steps.

I started with buying a pair of men’s jeans. Danish charity shops are golden, and I found a good pair of Diesel jeans for about £6!

THE REFASHIONERS 2016 - INGRID WEIMERSTHE REFASHIONERS 2016 - INGRID WEIMERS


They were a pretty large size men’s jeans, but my lovely lady hips meant I had to make them a bit bigger to be able to take them on and off easily. Dungarees obviously don’t have a functioning zipper or button on the waistband… Luckily, these jeans already had these strange inserted side panels as you can see in the below image. I decided to simply take them out and insert ones that were a bit wider in order to create a looser fit that I could pull on easily.

THE REFASHIONERS 2016 - INGRID WEIMERS


Wanting to use as much of the jeans as possibly, I cut off the jeans at a nice short length, and used the cut off bits to create the bib and a few other details.

THE REFASHIONERS 2016 - INGRID WEIMERSTHE REFASHIONERS 2016 - INGRID WEIMERS

I was going to try to also create the waistband and straps out of the same material, but unfortunately I didn’t have enough fabric. I had to cheat with some old denim from my fabric stash.

I looked at a load of photo’s of dungarees on Pinterest and estimated roughly how wide the bib should be, and started cutting. I also cut out a pocket to add to the bib. I finished the edges with a simple overlocked seam, only folding the edges in by about ¾” to save fabric.

THE REFASHIONERS 2016 - INGRID WEIMERSTHE REFASHIONERS 2016 - INGRID WEIMERSTHE REFASHIONERS 2016 - INGRID WEIMERS


The trickiest aspect of the construction was the waistband. Initially, I thought I could just keep the original one, but it would have looked too strange with the button and button hole still there. So, I simply took off the old waistband, and use it as a pattern piece for a new one.

THE REFASHIONERS 2016 - INGRID WEIMERS


I did keep the original belt loops, only ripping the top seam as in the photo’s below. Oh and before I added the new waistband I added the slightly wider side panels I cut out using materials from the jeans. Without having done much measuring, I lucked out and had managed to cut out pieces that were wide enough to create a decent enough fit. I could also have used a contrast fabric as in this image – something to keep in mind for next time.

THE REFASHIONERS 2016 - INGRID WEIMERS THE REFASHIONERS 2016 - INGRID WEIMERS THE REFASHIONERS 2016 - INGRID WEIMERS THE REFASHIONERS 2016 - INGRID WEIMERS


Once the waistband had been added to the bib, I attached it all to the shorts. I topstitched the waistband all the way around and re-attached the belt loops.

THE REFASHIONERS 2016 - INGRID WEIMERS THE REFASHIONERS 2016 - INGRID WEIMERS THE REFASHIONERS 2016 - INGRID WEIMERS THE REFASHIONERS 2016 - INGRID WEIMERS


The final step was cutting out and attaching the straps. I simple measured the length I needed and cut out 4 panels around 3 inches wide and sewed two straps. Rather than using dungaree fasteners (or whatever they are called) or buttons I went for a speedy solution and simply stitched them on.

THE REFASHIONERS 2016 - INGRID WEIMERS THE REFASHIONERS 2016 - INGRID WEIMERS


As you can see the waistband and the straps are a slightly darker shade of denim thanks to using a store bought fabric. I’m thinking about dying the dungarees black to create a more even look. What do you think? Either way, here is the final product!

THE REFASHIONERS 2016 - INGRID WEIMERS THE REFASHIONERS 2016 - INGRID WEIMERS

I have pretty much lived in these since I made them. They have been PERFECT for all the schlepping about we’ve been doing, and they have done several rounds at the B&B too. They aren’t perfect. The bib is a bit loose thanks to a sliiightly dodgy waistband construction and there is quite a gap in the back. And if I would do it again I would have added a small panel at the back, rather than having the straps attached straight on the waistband (something like this). But all in all, a successful refashion! They look great with a slightly baggy vest top underneath, like the jersey Bantam top (from Merchant and Mills Workbook) I’m wearing in the photo’s.

THE REFASHIONERS 2016 - INGRID WEIMERS THE REFASHIONERS 2016 - INGRID WEIMERS

Refashioning is such a brilliant thing to do. I don’t do half as much of it as I should, most likely because I’m too lazy for all the problem solving involved in the process. So thanks Portia for yet again reminding me (and all of you) how much fun it is!

I  love a refashion that solves a problem. And that’s exactly what this has achieved by yielding a really current and wearable wardrobe staple from a pair of jeans that didn’t fit. Total win.  If it had been a larger pair of jeans no doubt Ingrid would have been able to squeeze the straps and waistband out of the original denim; or if she didn’t have the time pressures that a deadline imposes (I know, I’m evil) then she may have been able to source some denim in a similar colour wash to the source garment. But actually, it’s just perfect as it is. What a brilliant way to reconfigure a pair of jeans!

You can find Ingrid here or here. And if you’re inspired to get your refashion on and enter the Community Challenge and be in with a chance of winning some epic prizes…DO IT! Deadline for entries is 30th Sept. Midnight GMT.

The Refashioners 2016 - Huge Prize Package

….I think you’ve got the idea now right? Essentially we want you to refashion some jeans! (You can find the full details/small print of the brief here). BUT, if you want to be in with a chance of winning one of these amazing prize packages you need to SHARE that refashion with us in one of the following ways:

  • On Instagram: Share a pic using the hashtags #therefashioners2016  and #jeanius
  • On Pinterest: There is a community board here where you can pin your makes. (You will need to request an invite to join)
  • On Facebook: There is a community board here where you can post your makes (You will need to request an invite to join)

Only entries shared via the above 3 methods will be entered into the competition. Closing date for entries is 30th September 2016 Midnight GMT. Good luck!!

refashioning, the refashioners, The Refashioners 2016, Uncategorized

The Refashioners 2016: Beth

08/12/16

The Refashioners 2016 - Beth


When Portia first told the group that the challenge was going to be jeans, I was really nervous. The last thing I wanted was to end up with a garment that really looked like it had been cobbled together from old pairs of jeans. I went through the grungy 90s and I was not eager to return.

My first thought was to make a Nita Wrap Skirt, thinking the panels of the wrap skirt would lend itself well to recycled fabric. I did a bunch of research on what’s happening with denim this season and for a while even thought about trying to make overalls (denim jacket cut away for the top and a pair of jeans for the bottom). But it was too hard to find a jacket and pants that perfectly matched.

Somewhere in my research I stumbled upon skirts that had lighter denim in the front and darker in the back. So I found two pairs of jeans and set to work.


The Refashioners 2016 - Beth


Initially  I was going to do a button front pencil skirt but decided that the button placket would use too much fabric so I went for a zip front instead.

I cut apart my jeans and laid my skirt pattern pieces on top. Annnnnnd, they did not fit. So, I took my basic one dart block and adapted it for princess seams, eliminating the darts. More patterns pieces meant I could get one skirt panel out of each pant leg piece (8 skirt panels, 2 jeans=8 pant pieces). And no darts is ideal for a heavier fabric like denim.


The Refashioners 2016 - Beth


I also added some curved front pockets for an extra bit of interest. I did try reusing the pockets from the jeans on the back of the skirt but it didn’t look great so I left it clean.

The Refashioners 2016 - Beth


I ended up taking in the skirt quite a bit to get the fitted look I was going for. By the way, princess seams are quite nice for getting just the right fit. A princess seam shift dress was actually one of my first sewing projects way back in high school. It was so satisfying to be ale to take in all those seams in just the right places to create the perfect fit.

To attach the zipper, I applied interfacing to the seam allowance of the center front and pressed it to the wrong side. Then I basted and stitched the zipper to the center front. I took my time with it and it went in pretty easily. Be aware, that when your denim has stretch, this is a place where the fabric could warp and your zipper can look warped. I think mine probably did warp a bit actually. This zipper is a 24 inch metal separating zipper. So if I want to get undressed really fast, I can just unzip all the way. 😉

The Refashioners 2016 - Beth


The light colored jeans came with a precut, frayed hem that I reused for the front center panel. I had to give it a couple tries to get the frayed edge even but I really like the stair step look.

To finish the waistband, I made a simple facing again to save on fabric. The only fabric I used that did not come from the jeans was a cotton I used for the pocket bags and the waistband facing.

The Refashioners 2016 - Beth


And the final touch, to give it a little extra RTW polish, was to add rivets to the pockets. I’ve only installed rivets one time before when I made a pair of Birkin Flares. I definitely feel like I have not mastered it yet. Hopefully, with a little more practice I’ll be able to attach a rivet without smashing it. You really can’t see the bit of smashing unless you look very closely though.

The Refashioners 2016 - Beth


During the refashioning I thought of a few tips that might be helpful as you start your own jeans refashioning adventures.

Tips for refashioning jeans

  1. If you’re buying, try to buy the biggest size you can, more fabric same amount of money. Also look for straight or wide legs as opposed to boot or skinny cut
  2. Look for jeans with little to no stretch. I’ve had unfortunate experiences, even with premium denim, stretching in unfortunate ways and refusing to go back into shape.
  3. Look for jeans without any fading. As you cut them up and rearrange the denim, the fading could look unnatural in its new incarnation.
  4. Most jeans have at least one seam that is constructed with a chain stitch. If the threads are not too meshed together from years of washing, you can clip the thread and pull to unravel the entire seam. It will only pull going one direction so try both ends of the seam.


The Refashioners 2016 - Beth The Refashioners 2016 - Beth


This was a really fun project and I’m so thrilled that Portia asked me to participate. I really love the design of this skirt and I’m already thinking about playing around with it more.

I’m a lover of simplicity of design combined with little details and, even as a trouserphile non skirt wearer, this is really floating my boat! Love the separating zip. LOVE the stepped and frayed front hem and the contrast of light and dark denim between the front and back. AND the princess seam tip is a great one. Both in terms of fit AND creating multiple narrower pattern pieces that fit onto narrow jeans legs 🙂 Thank you so much Beth!!

You can find Beth here or here. And if you’re inspired to get your refashion on and enter the Community Challenge and be in with a chance of winning some epic prizes…DO IT! Deadline for entries is 30th Sept. Midnight GMT.

The Refashioners 2016 - Huge Prize Package

….I think you’ve got the idea now right? Essentially we want you to refashion some jeans! (You can find the full details/small print of the brief here). BUT, if you want to be in with a chance of winning one of these amazing prize packages you need to SHARE that refashion with us in one of the following ways:

  • On Instagram: Share a pic using the hashtags #therefashioners2016  and #jeanius
  • On Pinterest: There is a community board here where you can pin your makes. (You will need to request an invite to join)
  • On Facebook: There is a community board here where you can post your makes (You will need to request an invite to join)

Only entries shared via the above 3 methods will be entered into the competition. Closing date for entries is 30th September 2016 Midnight GMT. Good luck!!

refashioning, the refashioners, The Refashioners 2016, Uncategorized

The Refashioners 2016 – Zoe

08/11/16

The Refashioniers 2016 - Zoe - Dolores

Hurrah!!! Another edition of The Refashioners challenge is here and I’m beyond excited to see what everyone makes. I’m thrilled that Portia has asked me to take part for another year, and I hope that my contribution will provide some inspiration for sewers who like to make stuff for kids.

After giving my approach some thought, I decided to use this year’s challenge theme to explore different types of denim. I wanted to try a few refashioning projects using jeans that varied in thickness and stretchiness.

The Refashioners 2016 - Zoe Edwards

Matching projects and patterns to the properties of different fabrics is an element of sewing that is often tricky; add to that the extra challenges thrown up by reusing existing garments rather than sewing from a flat piece of new fabric, and you’ve got some sewing fun to be had!

The Refashioners 2016 - Zoe Edwards

Everyone knows, three is the magic number. So I sourced three very different pairs of jeans to hack into. The first pair was a fairly wide legged hipster style (the kind I would have ADORED in the early 2000’s) made from lightweight denim with no stretch that a friend of mine ended up with at a recent clothes swap. The second was a pair of ‘dad jeans’ (thick, sturdy denim but pretty loose and shapeless in style) my husband owned but hated actually wearing. The final pair was the tight, stretchy, skinny variety donated to me by another friend. What is genius about this year’s installment of The Refashioners is that the source material is so easy to come by. If you asked around everyone you know, I think you’d be hard pushed not to find someone with a pair of jeans (or ten) that they no longer want. On to my creations…

The Refashioners 2016 - Zoe Edwards

I couldn’t think of many options for refashioning the skinny, stretchy jeans, particularly with this pair, as they originally belonged to a very petite friend of mine. I decided not to break my brain over it, and to simply make a toddler pair of jeggings from the adult pair. Although my daughter has recently begun to insist on wearing a dress every day, I can often sneak a pair of leggings or trousers on her underneath, which I feel is particularly important for chilly and/or very outside-y days, so I know these will be useful in the future if she doesn’t close that loop-hole!

So the first thing I did was make a fairly sizeable mistake. Just so others would be able to avoid doing so themselves of course! I started out by cutting the jeans up along the outside leg seams so I could preserve the lapped seam and nice topstitching on the inside leg. Sounds like a good idea, no?!The Refashioners 2016 - Zoe Edwards

I opted to use a tried and tested kids skinny trousers/jeggings pattern, the Hosh pants pattern by Lou Bee Clothing , for this project (size 3 but length 4 because I think this pattern comes up a bit short). As you can see in the above image, when I positioned the main pattern piece on the prepared jeans, it is too wide for the amount of denim I was left with. GAH!

I couldn’t figure out a way to rectify to situation, so I took the coward’s route out and found another pair of skinny jeans made from a denim with a similar weight and stretch and started again, this time cutting up the INSIDE legs (see above). This time I could fit the main pattern piece on fine whilst also incorporating the original hem so that was a construction step for my toddler jeggings that I could skip. As you may have noticed, the Hosh pants pattern has no outside leg seam, but to fit that pattern piece on an existing pair of jeans, you have to include the original outside leg seam, which I feel gives a nice little nod to the source material.The Refashoners 2016 - Zoe

The rest of the pattern consists of a pair of front waistband pieces, and a pair of back waistband pieces. I squeezed out one of each from the top of the legs and the final front waistband piece from the centre of what left just under the fly front of the original jeans. The second back waistband piece was cut from a scrap of flamingo print quilting cotton that I had found in a scraps bin a while ago.RefashionersZoeJeggings

The Hosh pants pattern features an adjustable elasticated section at the back, and I think that two layers of denim would have been too stiff to gather sufficiently anyhow.

The Refashoners 2016 - Zoe

I recently made a few of these sun hats in quilting weight cotton, and at the time felt that the pattern could easily cope with being made in a thicker fabric so the hats would keep their shape better. Now was my chance to test that theory. The Dad-jeans were unleashed (well, cut up the outside leg seams and laid out flat). I printed out two copies of the Oliver + S free bucket hat pattern, trimmed one set to the size small pattern pieces and another for a set of size medium.The Refashioners 2016 - Zoe Edwards

The biggest challenge I faced with this project was the faux-and-actual-wearing and distress of the original jeans. Unlike with the pair I used for the jeggings project, here I faced lots of different shades of blue, worn out sections and some holes. It would have been very little hassle to harvest enough denim with similar shading for just one hat. However, I was determined to make a pair of hats so I just had to do my best to avoid the holes and group the pattern pieces so the smaller one would be formed from the darker sections and the larger utilised the more mid-blue parts.

With the tricksome cutting out of the way, the rest of these makes were simple. I chose some red anchor print quilting cotton that had been generously offered and sent to me by IG user @craftandthrift to line the smaller one (which is going to be for the mini-dude currently growing and kicking in my belly). And for my increasingly girly little almost-three-year-old, I picked out some very pink ditsy Liberty-esque cotton lawn for a lining.The Refashioners 2016 - Zoe Edwards

I had both red and dusty pink topstitching thread in my stash, although not as much of the pink, which is why there aren’t so many rows of stitching around the brim on that one!The Refashioners 2016 - Zoe Edwards

I conclude this second experiment by formulating the following equation: one pair of Dad-jeans plus some stash lurkers equals two small peoples’ hats.The Refashioners 2016 - Zoe Edwards

Finally, I used the wide leg pair of jeans, so denim was relatively abundant compared to the other two. It’s still surprising to me how it can be tricky to get a baby’s garment out of something adult sized though! With the current project ratio of 2:1 in favour of Dolores, I thought it only fair to make another garment for the mini-dude.

One of my regular students recently gave me this baby layette sewing pattern, and I thought the dungarees project would be a nice basis for some cute embellishment. I traced out the 6 month sized pattern pieces, but extended to the 9 month length as they looked pretty wide and I thought the hems could be rolled up for a while to get maximum usage from my hard work.The Refashioners 2016 - Zoe Edwards

The wide legged style of the pattern used almost all the lower portions of the original jean’s legs. Thankfully the denim didn’t have lots of fading so there wouldn’t be too many weird patches of shading on the finished garment. With all the pieces cut out without too much of a headache, it was time to embellish them before construction could commence.The Refashioners 2016 - Zoe Edwards

I’ve been collating applique ideas on a Pinterest board  for months now as I’m always amazed by how the simplest addition can transform a simple garment. A basic cloud image is one that has appeared on my board numerous times, and is pleasingly gender neutral. I sketched out a simple cloud shape and cut out a few in different sizes from a scrap of thin grey leather. I appliqued them by first fixing them in place with Copydex, then carefully stitched round the edges using the walking foot and my sewing machine cranked down to slooowwwww. The clouds on the legs are meant to add reinforcement to the knee areas, but I think they will probably have ended up too low to perform that function! Youtube taught me how to make French knots, which I used to hand-embroider the eyes on the main cloud, and I used a running stitch for the mouth in topstitching thread because that’s all I could find.The Refashioners 2016 - Zoe Edwards

With the embellishment complete, it was time to construct the garment. I chose to pleat rather than gather the top of the leg pieces into the yoke as I thought the gathering looked a bit girly. I picked out some plain silver buttons for the closures, and a scrap of sweet juvenile print quilting cotton for the facings…The Refashioners 2016 - Zoe Edwards

Everything for this project came from my stash, except for the press studs that allow the inside legs to open, as I had run out of those after a recent spate of dribble bib making.

The Refashioners 2016 - Zoe Edwards

The Refashioners 2016

It’s impossible to say which will be the most useful reworking of a pair of jeans, as all four items are currently too big or for someone who hasn’t even been born yet! But it’s safe to say that I get an enormous kick from making kid’s clothes from unwanted adult ones. There are soooooooo many unused and unloved garments out there in the world, and there’s few things that make me happier than giving some of them a second chance with the application of some inventive sewing.

The Refashioniers 2016 - Zoe - Dolores

Thanks, as always, to Portia for her truly brilliant organisation of this, the most awesome of challenges! At time of writing I have no idea what the other bloggers have produced, so it’ll be super exciting to check in each day to see what everyone has come up with. Good luck and well done to everyone who is submitting a project to the community competition. Seeing all the denim (re-)creations will no doubt be one of the creative highlights of my year so I thank you all in advance!


Oh Dolores!!! You gorgeous little lady!! I hadn’t learnt to sew “properly” when Elliott was first born. Had I had the skills then that I have now I would have DEFINITELY have been sewing little dude dungarees and hats….and everything else come to think of it!! I would probably be busy refashioning my pre pregnancy jeans in fact! Refashioning is perfect for kids clothes. Not just making adult clothes smaller of course, but adapting clothes so they can continue to be of use as they grow. One of my first memories of sewing was around the age of 7 or 8. When I outgrew a favourite dress (they were all smocky in those days:)) my mum would lop the top of the dress off and then show me how to hand sew an encased elastic waistband, so I could still wear it as a skirt. Which may just have been the seed where all this started, lol! Thank’s again to Zoe, who’s contributed to every single series of The Refashioners since it began!

You can find  Zoe here or here. And if you’re inspired to get your refashion on and enter the Community Challenge and be in with a chance of winning some epic prizes…DO IT! Deadline for entries is 30th Sept. Midnight GMT.

The Refashioners 2016 - Huge Prize Package

….I think you’ve got the idea now right? Essentially we want you to refashion some jeans! (You can find the full details/small print of the brief here). BUT, if you want to be in with a chance of winning one of these amazing prize packages you need to SHARE that refashion with us in one of the following ways:

  • On Instagram: Share a pic using the hashtags #therefashioners2016  and #jeanius
  • On Pinterest: There is a community board here where you can pin your makes. (You will need to request an invite to join)
  • On Facebook: There is a community board here where you can post your makes (You will need to request an invite to join)

Only entries shared via the above 3 methods will be entered into the competition. Closing date for entries is 30th September 2016 Midnight GMT. Good luck!!

refashioning, the refashioners, The Refashioners 2016, Uncategorized

The Refashioners 2016: Lisa

08/10/16

The Refashioners 2016 - Lisa Poblenz

Hey, Refashioners!  Let’s talk jeans refashions!

I want to talk specifically about my creative process for refashioning rather than focusing on details of sewing the specific pattern I used.  I’ll talk about those details more on my blog, but since the goal of these posts is to inspire you to create whatever you want to create, I want to focus on my way of working and thinking about the project, rather than on the specifics of how I followed the pattern directions.

When I first got my brief from Portia outlining the parameters for this year’s Refashioners challenge, I got really excited.  The thing I have loved about participating in this challenge for the past two years is that I think about it differently than I do my everyday sewing.  Refashioning is a problem-solving challenge in the materials department as much as it is a sewing challenge.  When I heard from Portia, I did two things:  start a secret Denim Pinterest board (now public) and head out to my local fabric store to look through the patterns.

The Pinterest board was a place to collect any creative surface designs, fabric manipulation, style lines, and construction that caught my eye.  In searching for a pattern, I looked for garment designs made up of multiple smaller pieces (especially vertical ones) since I would be cutting the pieces out of the legs of jeans.

And after that?  It was off to the thrift store!  I had already gone through any jeans that weren’t being worn in my personal stash, so I went to the thrift store with the hope of finding some colorful denim that was different than the traditional indigo I already had.The Refashioners 2016 - Lisa Poblenz

I struck gold in the men’s department with two large pairs of jeans, one ivory and one yellow.  I also found a pair with a cute heart design in the kids’ section that I planned to use initially, but changed my mind on in the end.

In creating a project like this, there is often as much time spent in the thinking and planning phase as there is in actual construction.  After all the mental preparation and ruminating, this is what I finally came up with:  I would create a skirt using Vogue 8750, View A.  This skirt has numerous panels for color-blocking, so it seemed like a good choice.

Before I even got started, I washed my jeans in hot water and then dried them on hot so that any shrinkage and dye bleeding would happen before I made my garment.  I used dye magnet sheets to see how much bleeding was happening.  It wasn’t much of a problem with the jeans from my stash or the kids’ jeans since they were older and had been washed often.  Obviously the ivory wasn’t going to bleed.  Where I did run into potential problems was with the yellow jeans.  I think they may have been brand new, and I had to wash them several times to get all the excess dye out.  My last step before declaring them ready to go was to do one wash with all the jeans together on hot, so that if there was any chance they might bleed on one another, it would happen before I started and I could regroup and come up with a new plan.  Luckily, it didn’t happen.  What a relief!

Another thing I did after getting my pattern and my jeans was to scan the line drawing from the back of the pattern envelope and then, using a program called Picasa (free from Google), I repeated the image on a sheet of paper and printed it out.  Then I used colored pencils to do little mock-ups of my thoughts so I could get an idea of what I liked.  This was a technique I used to plan my project last year, and it was immensely helpful.The Refashioners 2016 - Lisa Poblenz

When I was finally ready with all my planning, I made two test versions of my skirt using scrap fabric, some of which stretched (like my indigo denim) and some of which didn’t (like my ivory and yellow denim).  The combination of stretch and non-stretch fabric turned out to be a great choice as it really adds to the comfort level of the skirt.

One thing I learned during my final version was that I should have considered how I was going to finish my seams at the beginning.  Of course this isn’t something I did on my muslins, but I really wanted to make everything nice on the inside for the final skirt.  You can see that some of my bias tape finishing stops short of the intersecting seam.  This is because I didn’t think through my finishing beforehand.  I learned my lesson, though, and finished all my other seams as I went along.  I LOVE how it looks.  If you have wide seam allowances, this is a great finishing option, and you can learn from my mistake!The Refashioners 2016 - Lisa Poblenz

Another small detail that had a big impact on my finished garment was choosing to topstitch many of the seams with red topstitching thread.  It helped to make everything look crisp and it gave the skirt a nice detail.  Small details can go a long way with this project.The Refashioners 2016 - Lisa Poblenz

I was really happy with the finished look of my skirt.  Now I have a jean skirt as part of my wardrobe, but not just any jean skirt—one that is completely unique and made from formerly unloved jeans!The Refashioners 2016 - Lisa Poblenz

I can’t wait to see what everyone else makes and how each person puts their own unique stamp on their project. The Refashioners 2016 - Lisa Poblenz

Thanks for the opportunity to be a part of this challenge, Portia!

Love that idea of scanning in the line drawing and using it to plan your colour blocking! Such alot of thought, planning and preparation gone into this. And it shows in the finished garment! Lisa to me, has a very distinct and precise approach to refashioning evidenced again in this post which very nearly won her the challenge last year and prompted me to create a second prize this year! To my mind there are two quite distinct approaches to refashioning. This one where you view the base garment(s ) as a source of fabric from which to cut your pattern; and the other….a free wheeling approach…where you tweak, reconfigure, and reshape an existing garment and let it evolve. (And of course there are a million shades of  grey inbetween!) Both, IMHO, are equally valid in the context of refashioning. Both can yield amazing results. To refashion something is to “give new form to something”. How you get there,  is a matter of personal choice and preference and what suits your creative style  😉  

You can find Lisa here. And if you’re inspired to get your refashion on and enter the Community Challenge and be in with a chance of winning some epic prizes…DO IT! Deadline for entries is 30th Sept. Midnight GMT.

The Refashioners 2016 - Huge Prize Package

….I think you’ve got the idea now right? Essentially we want you to refashion some jeans! (You can find the full details/small print of the brief here). BUT, if you want to be in with a chance of winning one of these amazing prize packages you need to SHARE that refashion with us in one of the following ways:

  • On Instagram: Share a pic using the hashtags #therefashioners2016  and #jeanius
  • On Pinterest: There is a community board here where you can pin your makes. (You will need to request an invite to join)
  • On Facebook: There is a community board here where you can post your makes (You will need to request an invite to join)

Only entries shared via the above 3 methods will be entered into the competition. Closing date for entries is 30th September 2016 Midnight GMT. Good luck!!

refashioning, the refashioners, The Refashioners 2016, Uncategorized

The Refashioners 2016 – Kate (The Fold Line)

08/09/16

The Refashioners 2016 - Kate - The Fold Line

We’re really excited to be part of the refashioners this year, after squabbling over who got to take on this challenge with Rachel (rock, paper, scissors sorts out everything!) I won. I’ve been wanting to make a cropped denim jacket for ages to wear with dresses and I felt like this was the perfect project to make this happen. I started off with one pair of my old jeans and one pair from my other half.The Refashioners 2016 - Kate - The Fold Line

I didn’t have a pattern that I wanted to use so I decided to use the bodice part of a Vogue jumpsuit pattern (V9075) that I love and have already spent a long time making sure fit. I used the back panels and then modified the front so that it was one piece. I then started hunting through the tissue paper looking for the sleeve pattern piece only to discover that I had lost it! After a few choice words not to be repeated I had to draft my own.

Once I had all the pattern pieces it was time to cut out. What I really enjoyed about this part is that I took the sewing rule book and promptly threw it out of the window. Because of the limitations on the size of fabric and the look I wanted to get I had to ignore the grainline (I know gasp!) I wanted to make a feature of the flat felled double stitch line on the inside leg of both pairs, I unpicked the outside hem and started to lay out my pattern pieces.The Refashioners 2016 - Kate - The Fold Line

I used my jeans for the arms because they had some stretch and I thought it they’d be best suited for that and the rest of the came out of other pair. Here are all my pieces ready to be overlocked.The Refashioners 2016 - Kate - The Fold Line

Sewing together this jacket was an absolute breeze, the denim was lovely to work with and I started by sewing together the bodice section of the jacket.The Refashioners 2016 - Kate - The Fold Line

Once this was done and pressed I need to to attach the facing, I had made one continuous piece that went up the front of the jacket and around the neckline. I pinned it onto the bodice, lining everything up at the seams. Once I had sewn this I turned it out and gave it a really good press. I then sewed the facing to the jacket bodice at the shoulder seams to hold it all in place.

I then added the sleeves and tried it on. I was really pleased with the fit and decided on a turn up cuff. I started to pin the pocket pieces onto the jacket (I’d taken them off one of the pairs of jeans) I had wanted to have them on the outside of the jacket, but because its so cropped they looked  really weird and decided on a sneaky inside pocket instead.The Refashioners 2016 - Kate - The Fold Line

I topstitched the whole of the outside of the jacket in a navy blue, I had planned on using some orange but in the end I thought it made more of a feature of the jeans original stitching. The Refashioners 2016 - Kate - The Fold LineThe Refashioners 2016 - Kate - The Fold LineThe Refashioners 2016 - Kate - The Fold Line

Not bad for an afternoon’s work I have to say!

The Refashioners 2016 - Kate - The Fold Line


I have to say, this cute and simple little jacket is right up my alley. You’ll probably have noticed a common theme developing in how our bloggers are overcoming the limitations of jeans. And that is, if you’re using a pattern, reducing the size of your pattern pieces so you can piece them from your jeans like a jigsaw AND  incorporating  original seams (or hems) as part of your design to open up your pattern placement options a bit! And like Kate says, you may have to throw out the sewing rule book (Grainline! What grainline?!)  from time to time with refashioning. That’s just part of the fun though!!

You can find Kate & Rachel  here or here. And if you’re inspired to get your refashion on and enter the Community Challenge and be in with a chance of winning some epic prizes…DO IT! Deadline for entries is 30th Sept. Midnight GMT.

The Refashioners 2016 - Huge Prize Package

….I think you’ve got the idea now right? Essentially we want you to refashion some jeans! (You can find the full details/small print of the brief here). BUT, if you want to be in with a chance of winning one of these amazing prize packages you need to SHARE that refashion with us in one of the following ways:

  • On Instagram: Share a pic using the hashtags #therefashioners2016  and #jeanius
  • On Pinterest: There is a community board here where you can pin your makes. (You will need to request an invite to join)
  • On Facebook: There is a community board here where you can post your makes (You will need to request an invite to join)

Only entries shared via the above 3 methods will be entered into the competition. Closing date for entries is 30th September 2016 Midnight GMT. Good luck!!

refashioning, the refashioners, The Refashioners 2016, Uncategorized

The Refashioners 2016 – The Colette Team

08/08/16

The Refashioners 2016 - Colette Patterns

One of the best parts of working at Colette HQ is being around people who are just as obsessed with sewing as you are. It can be a solitary activity sometimes, so having friends you can talk to every day about what you’re making, how you’re making it, and what you’re learning is a complete joy.

That’s why some of us decided to join The Refashioners project together. Because the only thing more inspiring that a good creative challenge is watching how other people tackle the same problem.

Four of us participated this year: me (I’m Sarai, the founder), Delaney (our pattern manager), Anna (our designer), and Meg (our communications manager).

Here’s what each of us made, and how. You can read more about each of our projects on the colette blog, where we’re each sharing more photos and details this week. – Sarai

sarai

http://blog.colettehq.com

Anyone who knows me (or even follows me on Instagram knows that I’m kind of obsessed with roses. I’m even a member of the Portland English Rose Society, an unofficial rose-growing club that mostly involves a bunch of ladies getting together to sip champagne, eat rose-flavored treats, and pore over garden catalogs. So when I saw these 90s floral jeans, I knew they were meant for me.http://www.instagram.com/saraimitnick

I modelled my dress off something very similar by Stella McCartney. I’ve wanted a little denim cut-out sort of dress since last summer, and I loved the interesting construction details. Of course, mine ended up quite a big shorter because I used every bit of fabric I had! I drafted the pattern using a combination of draping and flat pattern making, made a muslin, and got to work! Some pieces needed to be cut on the cross grain to get things to fit, but somehow I ended up with just the right amount of fabric. The most time consuming part was definitely taking the original garment apart.http://www.instagram.com/saraimitnick

Though in retrospect, the fun seamlines on this dress probably would have been a lot more visible in a solid denim, I can’t deny that all these big red 90s flowers make me very happy.

Read more about each of our projects on the colette blog this week .

Delaney

http://blog.colettehq.com

I had no clue of what I was going to make before I went to Goodwill. I snaked through the aisles, collecting possible combinations, creating garments in my mind and subsequently rejecting them all. I finally settled upon a pair of mens size 50 black jeans, two pairs of  the same purple stretch denim, and a fabulous pair of black floral stretch denim.

The next step was to find out what I would make with them. Many years ago, I purchased a Bellville Sassoon pattern from vogue to make my junior prom dress, yet sadly, I wasn’t asked to go. I felt obligated to work this pattern into my design, and I loved the gored skirt (without the mermaid flare of course). I paired the skirt with the Madonna bodice pattern from the book Famous Frocks by Sara Alm and Hannah McDevitt, and my refashioned design was ready to be patterned.The Refashioners 2016 - Colette Patterns

I had to alter both patterns to make the gores from the skirt and bodice line up and blend smoothly. The Bellville Sassoon pattern didn’t have a waist seam, so I laid a different skirt pattern on top of the traced skirt pattern and marked a waistline on each gore. I then aligned the stitch line of the bodice pieces with my new waistline on the skirt and trued my seams. The process was easy, and required little alteration.

Apparently purple stretch denim isn’t popular here in the northwest, so I was lucky to find two pairs! Before I cut into my jeans, I laid the pattern pieces to make sure there was enough, and there was plenty. The construction process was fairly simple and the dress came together quickly. I struggled with the fit on the skirt, and was ready to just make the bodice into a top. After throwing the dress the corner of my sewing room, I went to bed frustrated and defeated. I woke up the next morning determined to make the skirt fit, and I’m glad I did.The Refashioners 2016 - Colette Patterns

I thoroughly enjoyed this project. It reminded me of my early sewing days when I would buy thrift store garments and hack them apart to make a pattern. I used to go into projects without any fear or hesitation of whether or not the end result was perfect. This project allowed me to let go of the rules of sewing and just have fun.

Read more about each of our projects on the Colette blog this week 

Anna

The Refashioners 2016 - Colette Patterns

For my refashioners project I decided to copy a favorite denim jacket that I own, as far as shape and silhouette. I love wearing and sewing with denim, so when Sarai asked the office to participate in the refashioners 2016 project I very enthusiastically accepted the challenge! For my project I used 2 1/2 pairs of men’s XXL wrangler jeans from Goodwill. When at the store I was excited that I had found a few pairs of pants in the same denim wash, which can be difficult, especially as I was wanting a light blue wash denim jacket. However, when I began cutting out my pattern pieces and positioning them next to each other, I realized the denim had faded in different areas and the jacket was beginning to look a little to patchwork for my liking.The Refashioners 2016 - Colette Patterns

Distracting  from the varying blue colors, I decided to add some actual patches to the jacket, and lots of hardware. I have been embroidering a lot lately, and had a few patches already made up.

My favorite artist and designer is Nudie Cohn, famous for his Nudie Suits, and clothing big country acts like Gram Parsons, The Flying Burrito Brothers, Elvis, Hank Williams, and many more. The way he utilizes embroidery and hardware to decorate a garment, or full suit, is very inspiring to me and I wanted to do something similar for this jacket. Another artist I am very inspired by is Ft. Lonesome. The company is based out of Austin, Texas and is known primarily for making chain stitch embroideries and then adding them to various custom garments.The Refashioners 2016 - Colette Patterns

Although my embroideries do not even come close to comparison with these two artists work, I did my best to make a garment reminiscent of their work. The project was very fun to accomplish, and I am happy to now have a handmade, recycled denim jacket that fits just as well as my original favorite denim jacket.The Refashioners 2016 - Colette Patterns

Read more about each of our projects on the Colette blog this week 

Meg

The Refashioners 2016 - Colette Patterns

I wear way too much denim. I really didn’t need another denim garment in my wardrobe, but I did need a new backpack for summer camping trips! So I made the Cooper bag.

I’m stoked that 100% of this bag is refashioned. I used jeans for the flap, bottom, pockets, and straps, and old denim curtains from IKEA for the contrasting fabric.The Refashioners 2016 - Colette Patterns

The lining is thrifted cotton from my stash. All hardware came from an old bag I had in a donate pile at home, and the snaps came from an old sweater. The patch is from my old Girl Scout sash!

I ripped the jeans apart at the sides and crotch, but I kept the legs intact at the inseam, which is why the flap and bottom have a center seam. After that, I didn’t have much jeans left, so I got creative with the rest. I used the actual back pockets from the jeans for the pockets on the outside and inside of the bag, and the waistbands from the jeans for the backpack straps. The waistbands came off the jeans nicely, and it meant I didn’t need to assemble straps. I even kept the button from the fly as a fun little detail for each strap.The Refashioners 2016 - Colette Patterns

From the outside, you can’t tell that it’s made from jeans, but take a peek inside, and the Levi’s pocket gives it away.The Refashioners 2016 - Colette Patterns

Read more about each of our projects on the Colette blog this week 

The Refashioners 2016 - Colette Patterns


I don’t think you’ll find a better example in one post, of the massive scope of potential in refashioning unloved jeans! So interesting to see how completely different everyone’s take is on the challenge in terms of aesthetic and approach.  And Delaney’s comment particularly resonates with me….and one of the reasons I LOVE refashioning so much: “I used to go into projects without any fear or hesitation of whether or not the end result was perfect. This project allowed me to let go of the rules of sewing and just have fun.”

Thank you so much to Sarai, Delaney, Anna & Meg. Awesome job!!!

You can find  the team here or here. And if you’re inspired to get your refashion on and enter the Community Challenge and be in with a chance of winning some epic prizes…DO IT! Deadline for entries is 30th Sept. Midnight GMT.

The Refashioners 2016 - Huge Prize Package

….I think you’ve got the idea now right? Essentially we want you to refashion some jeans! (You can find the full details/small print of the brief here). BUT, if you want to be in with a chance of winning one of these amazing prize packages you need to SHARE that refashion with us in one of the following ways:

  • On Instagram: Share a pic using the hashtags #therefashioners2016  and #jeanius
  • On Pinterest: There is a community board here where you can pin your makes. (You will need to request an invite to join)
  • On Facebook: There is a community board here where you can post your makes (You will need to request an invite to join)

Only entries shared via the above 3 methods will be entered into the competition. Closing date for entries is 30th September 2016 Midnight GMT. Good luck!!

Newer Posts
Older Posts
Portia
Follow
Sewbox

© Copyright 2026. Portia Lawrie. All Rights Reserved. Managed by WordPress Web Dev Cornwall .